In winter, there is a need to clear snow from yards, walkways, driveways and other areas intended for the movement of people and vehicles.
Removing snow by hand is quite difficult, but you can make cleaning as easy as possible by building a convenient and practical cleaning tool.
How to make a snow scraper with your own hands, read the article.
Types of homemade snow scrapers
All scrapers have the same device. The equipment consists of a handle and a working blade, which is used to directly clean the snow. However, the shape and size of these elements can be different, depending on the purpose of the tool. For example, roof snow scrapers have a long handle. It can be solid or telescopic. The working blade is fixed perpendicular to the handle. The scraper is more like a rake.
To clear snow from paths and areas, scrapers are made wide. The simplest option is a rectangular sheet of tin or plywood with a handle. The stalk can be one or two, as well as straight or curved. A U-shaped handle is made on wide scrapers.
If we talk about assembling a scraper for snow removal with your own hands, then a scraper of this type sometimes has a working blade with side sides. The bucket allows you to capture a large volume of snow mass and transport it to a designated location.
Important! To make work easier when manually cleaning large areas, craftsmen came up with a type of scraper mounted on skis.
There are many configurations of snow removal equipment. However, all homemade snow scrapers have a main difference in the material they are made of. They create a tool from metal, plastic and wood:
- Plastic equipment is most often purchased in stores. However, you can make such a scraper yourself from a used plastic barrel, tray or other household item. The plastic is lightweight and snow does not stick to it. Due to these advantages, the work with the scraper is simplified. The edge of the working blade is usually protected by a frame made of a metal strip, which protects the plastic from abrasion. Store-bought products have stiffening ribs. They give strength to the working surface. Plastic scrapers are lightweight, convenient, and do not stick to snow
- The most popular tool for DIY assembly is a shovel-scraper for snow removal, where the material used is plywood and a wooden handle. It is not difficult to find a blank for such a tool in almost every home. Wood is easy to process, but has one drawback. Plywood strongly absorbs moisture. Over time, it begins to delaminate. A tool swollen with water becomes heavy, and wet snow sticks to the working surface. Wooden equipment is usually made from plywood
- In terms of strength, metal scrapers come first. However, not all equipment is created equal. Metal is a flexible concept. If you use ordinary tin and a pipe for the handle, then such equipment will quickly rust. It's heavy. Snow is frozen to the working surface. Inventory made of galvanized sheet steel is considered optimal in terms of price and quality. The protective coating prevents the rapid development of corrosion. However, the scraper is still a bit heavy. Over time, the galvanized layer wears off and rusty spots appear. Aluminum scrapers are considered the best. The tool is lightweight, rarely freezes with snow, and does not rust. You can also consider stainless steel, but the metal is expensive. Metal scrapers are durable, resistant to moisture and mechanical stress
Despite many disadvantages, wood still remains one of the most popular materials.
Where is this technique used?
A universal snow blower is designed to clear large areas of snow. The basic principle of throwing the snow cover to the side is similar to human labor, only more economical. There are no complex components in their design, which increases operability and maintainability.
Roads and road transport structures of any complexity. Special design workshop “Spetsroad”: TDR – traffic management project. Design since 2010, significant experience in passing and approving state and commercial examinations.
In addition, anyone can handle their operation. With a large area, it is simply impossible to do without such a device.
How to make a snow scraper with your own hands
Before you start making a scraper, you need to think about its configuration and size. See what material is available. First of all, the equipment should be convenient for work. The cutting is made according to the height of the person. If the working surface is wide, it is optimal to provide a U-shaped handle.
For a wide scraper, a double U-shaped handle is provided
It is optimal to choose metal from the materials for the working surface. However, such a tool can scratch paving slabs. If the yard has such a decorative covering, then it is better to choose plywood or OSB sheet. You can make an excellent plastic scraper for snow from a barrel with your own hands if you cut out a fragment of the side wall. It is important that the plastic is not fragile and at least 5 mm thick.
The material for the handle is a wooden handle or an aluminum tube. It is not advisable to use a regular steel pipe. Such a handle will be heavy, cold, and uncomfortable in the hands.
The tools you will need are a saw, a jigsaw, a grinder, a hammer, a screwdriver, and an electric drill. The exact list depends on what material will be used for the work.
Advice! If you plan to transport the scraper in a car, you need to consider a collapsible or folding handle.
Video of DIY snow scrapers:
Main stages of work
Next, you will need to make the side walls of the scraper, which will be attached to the plywood. And for this, the master cuts two blanks from the board. If you have an edged board available, the work will not take much time.
At the next stage, you will need to screw the plywood to the side walls with self-tapping screws. For reliability, it is better to glue the boards and plywood together. PVA is not suitable for this purpose - it is afraid of moisture, but you can use polyurethane foam.
Then all that remains is to strengthen the lower part of the bucket with a galvanized strip and attach the handles, which the master made from wooden slats. To protect it from moisture, it is better to coat the scraper with a layer of varnish.
You can watch the detailed process of making a homemade snow scraper from plywood and boards in the video on our website.
DIY snow scraper made of metal
If desired, you can make two versions of metal equipment: with and without sides on the working surface. The easiest option is the second one. For a working blade, a rectangular blank is cut out of sheet metal using a grinder. The height of the scraper is about 50 cm. The width depends on how many people the tool is designed for. If one operator will operate, the parameter is limited to 60-70 cm. For two people, the width of the working surface is increased to 1 m.
The handle is a wooden handle. It is installed alone on a narrow canvas. A wide scraper is equipped with two cuttings, and at the end they are connected by a jumper. The handle is shaped like the letter “P”.
The presence of sides allows you to capture more snow
Using the scraper principle, you can construct a homemade snow scraper with your own hands if you equip it with sides. Here too there are two options. In the first case, the rear and two side sides are bent from metal. If you make them high, the bucket will be convenient not only to scrape off, but also to remove snow from the site.
In the second option, the metal ones bend only the side sides. The back shelf is made from boards. It additionally serves as a solid basis for fixing the cutting.
Tools and materials
You can install a snow blade on the frame of any motorized cultivator that has a power of more than 4 hp. and weight not less than 50 kg. The heavier the unit, the better it will cope with the consequences of a snow storm. It is best to equip the domestic Neva walk-behind tractor with a shovel. This equipment has high performance characteristics and is adapted to work in the most severe weather conditions with maximum load.
A shovel for a walk-behind tractor is made with your own hands using the following devices:
- roulette;
- welding machine;
- grinder with discs for cutting and grinding metal;
- electric drill;
- set of wrenches;
- screwdriver;
- paint, paint brush.
After preparing the tool for work, it is necessary to decide on the material from which the shovel blade for the Neva walk-behind tractor will be made. You can make a shovel from various metal products that have a sufficient margin of safety.
The blade for the Neva walk-behind tractor can be assembled from the following materials:
- An old gas cylinder. The thick walls of the cylinder are resistant to high mechanical loads. Having received such a blade, the walk-behind tractor will be able to cope with compacted snow, level roads, and move sand and crushed stone.
- Barrels with a volume of 200 l. It should be taken into account that the walls of the barrel are made of thin steel. This shovel for the Neva walk-behind tractor can only be used for removing fresh snow that has not yet compacted and become covered with crust.
- Metal strips. Bumpers from trucks or corrugated steel, which covers the floors of hangars and warehouses, are well suited for making a blade for a walk-behind tractor.
In order to make a rotating mechanism, you will need steel with a thickness of at least 10 mm. You can find such material at scrap metal collection points. The manufacture of fastenings involves the use of profile steel pipes 20x40 mm.
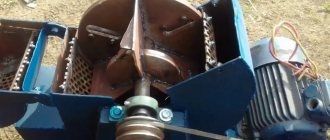
When working on loose and deep snow, homemade snow removal equipment can get stuck. This problem can be solved with the help of tracks installed on the axle shaft of the unit. A homemade tracked snow blower can work in any conditions, being as productive as special equipment.
How to make a snow scraper for skis with your own hands
The disadvantage of all inventory is the complexity of management. While pushing, the scraper collects snow well only on a flat surface, but no matter how smooth it is, the working surface still hits pieces of ice, ground and other obstacles. Each blow is reflected by the load on the back. A cleaning device installed on the skis helps solve the problem.
The working blade mounted on skis does not rest against the ground when raking snow.
To make your own snow scraper, use a grinder to cut off two corners, pipes or tires 1 m long. The ends are bent, otherwise the skids will hit the ground while moving. A U-shaped handle is bent from a tube with a diameter of 15 mm. It is welded to the runners at an angle. Bend towards yourself. The angle is determined individually so that it is convenient to control. A rectangular metal sheet is bolted to the posts of the U-shaped handle. The lower edge of the working blade should be on skis so that it does not rest on the ground.
Snow removal design for walk-behind tractor
If we are talking only about a walk-behind tractor as a power unit, then the snow removal “gadget” for it will also have its own characteristics.
First, it should be noted that the structure will consist of the following parts:
- vertical blade;
- 4 racks to provide the structure with great rigidity;
- horizontal dump;
- ladle knife;
- rubber gasket;
- tires for fastening rods.
A walk-behind tractor with a snow blade is very often used in private households. To install the same equipment on a walk-behind tractor, you will need the following tools:
- steel sheet 800x650x3 millimeters;
- steel plates (440x220x4 millimeters, 4 pieces);
- iron strips (800x100x4 millimeters);
- springs for attaching rods (2 jokes);
- profiled square pipe 40x40 millimeters, 1 meter;
- a set of washers, nuts and bolts;
- rods (520 millimeters in length, 2 pieces);
- metal drills;
- a set of keys;
- pliers;
- thick rubber sheet;
- grinder and a set of cutting discs for it;
- welding;
- drill.
To install the blade, you need brackets that are used on the walk-behind tractor frame. Also, the structure is attached to the walk-behind tractor using two non-working rods, with the help of which the walk-behind tractor brackets will be unloaded. The snow blade is attached to the blade using steel bolts on the lower edge of the bucket.
Once the blade is ready, you can attach it to the walk-behind tractor and begin clearing the area of snow, debris, leveling the ground and other necessary actions, which with the help of a snow blower will be performed faster and with minimal labor costs. Such a device can rightfully be considered universal, since it can perform a variety of tasks. And self-assembly allows you to create equipment specifically for the needs of a specific owner. In addition, its price will be several times lower than the factory models.
For long-term operation of the structure, it is recommended to treat it with a special primer to avoid the formation of corrosion. Before this, all welding points must be carefully processed with a grinder. After priming the structure can be painted
It is also important that the rubber protection strip should extend beyond the edge to avoid damage to the surface of the area
As it turns out, anyone can independently assemble a snow blower for a walk-behind tractor and other equipment. You just need to have minimal experience working with welding machines and a desire to work. This process is not complicated, there are many plans online for creating a snow blower, and the materials and tools can be found at any hardware store if you don't have them. In addition, this will significantly save money.
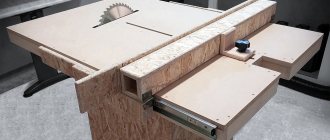
How to make a snow scraper from plywood
For snow removal equipment you will need a plywood sheet 6 mm thick. The workpiece is sawed off to a length of 0.8-1 m and a width of 50 cm. The plywood is bolted to a U-shaped handle curved from a metal pipe or assembled from wooden cuttings. The scraper is almost ready, but it’s too early to clean the snow with it. In this form, the ends of the working cloth quickly wear out. The plywood begins to delaminate and break off in splinters.
It is optimal to frame the plywood with a steel strip
To improve the design, the lower end of the working blade is framed with a steel strip. It is fastened with rivets through through drilled holes.
Advice! A good handle for a scraper can be made from the frame of an old clamshell. The aluminum tube is durable, lightweight, and comfortable to hold with your hands.
Attaching the blade to the tractor
Most walk-behind tractors are equipped with a standard bracket for attaching attachments. It can be used to attach the front shovel of a tractor. If necessary, you can make an adapter to ensure that the blade turns to the left or to the right. When installing the bucket at the rear of the machine, skimmer mounting technology can be used.
Making the front bucket mount:
- Weld a profile pipe onto the back of the bucket. For reinforcement, it can be bolted after welding.
- Make a semicircle with a radius of 10 - 12 cm from a metal sheet 1 cm thick. The workpiece must be welded to the profile pipe. Holes are drilled in a circle to make it possible to set the angle of rotation of the blade.
- When making a shovel, the holder is also made. To do this, you need to make a “g”-shaped profile from a square pipe. The short side of the holder is attached to the rotary sector, and the other edge is rigidly fixed to the tractor bracket. The height will be adjusted using bolts screwed into the adapter.
There is a simpler method of fastening; for this, eyes and locks made of durable steel sheet are used.
Do-it-yourself scraper for removing snow from the roof
Snow covers not only paths, but also roofs. On the one hand, he doesn’t interfere there. However, it needs to be removed. Large accumulations of snow can cause the roof to collapse, and when an avalanche falls from the roof, there is a risk of injury to a person. A regular scraper won't do the job here. A long-handled device will be required. There are many options, but one of the simplest designs is considered to be a rake scraper.
They begin to assemble a homemade scraper with their own hands for removing snow from sawing off boards. The workpiece is taken up to 800 mm long and up to 200 mm wide. In any case, the board must cover the rake teeth, otherwise they will damage the roofing.
The board is fixed to the rake with a steel tire and self-tapping screws
The board is laid on the ground. A rake is placed perpendicularly on top. In this position, the teeth are parallel to the plane of the board. Now the elements need to be securely fastened. To do this, take a tire. Its length should exceed the width of the rake. Holes are drilled in the tire, placed on the teeth, and screwed to the board with self-tapping screws.
Snow is cleared from the roof by moving it towards you with a rake.
The only drawback of the design is the short handle of the rake. It is extended with an aluminum tube or a long wooden strip is used.
Lever Application
However, the design discussed above has one, but very significant, drawback - it is impossible for them to throw snow. This problem can be solved by equipping the handle itself with wheels . The advantage of this device is that you can use large diameter wheels - this will make movement easier. Some models consist of one wheel, but for greater convenience and stability, you can use three or four.
In this case, the handle is a lever, which allows you not only to transport snow, but also to throw it away. The easiest way is to use two wheels on an axle. The handle is attached to the rod with clamps. Before attaching, a bearing is put on it. This makes it possible to rotate the scraper. Since the work will be done in winter, the bearing must be lubricated with winter grease, otherwise it will not work. If the handle is T-shaped, this will also make the design more convenient.
How to make a snow scraper from 0SB
When you urgently need to remove snow, and you only have a piece of OSB board at hand, you can make a scraper using simple manipulations with a jigsaw. To assemble a scraper with your own hands for clearing snow, you don’t need drawings, but you need to build a pattern.
On the OSB board, draw the shape of the future scraper with a pencil. Towards the bottom, the drag scraper is expanded to 1 m. The corners are slightly rounded. Toward the top, the plate is narrowed approximately 30 cm from each edge. Two oblong holes for handles are drawn on the pattern. Now all that remains is to cut off the excess parts of the OSB board using a jigsaw according to the markings. The area near the handles is carefully sanded with sandpaper. For convenience, they can be wrapped with electrical tape.
Shovel for motor cultivator
Moldboard shovels for motor cultivators can be equipped with a knife attachment, which is convenient for leveling the soil, as well as rubber attachments designed to eliminate the consequences of snowfalls. The choice of snow plow models is extensive; when selecting such a mounted mechanism, you must make sure that the structure can be mounted on an existing motor cultivator.
Manufacturers do not equip these devices for walk-behind tractors with a device for damping (damping) or preventing vibrations (spring dampers), since due to the low speed of movement, special protection against contact with uneven soil topography is not needed. When equipping your motor-cultivator with additional equipment for snow removal, purchase specialized steel lugs.
DIY snow scraper with brush
The store-bought version of a scraper with a brush resembles a double-sided rake, only instead of teeth there are bristles on one side, and a rigid base is fixed on the other side. When cleaning, first scrape off the bulk of the snow, and then sweep away the remains with a brush.
A shop scraper with a brush is usually equipped with an aluminum telescopic handle, which allows you to remove snow from a height, such as a roof.
In the DIY version, you assemble a snow scraper with your own hands from plywood, securing a long handle perpendicular to the rectangular blank. One side is framed with a tin strip. Bristles from a plastic broom or brush are applied to the other side of the workpiece, pressed with a metal tire and secured with self-tapping screws through the drilled holes.
Achievements of progress - to the masses
A few decades ago, a shovel with a motor was found only in jokes. But today the most amazing and strange things have firmly entered our lives. Therefore, every person should know about such a cunning tool as an electric shovel.
Of course, this device doesn’t look too much like a shovel. Rather, it has something in common with a regular lawn mower. You need to hold the shovel by the handle, pressing lightly from above, so that the screw rake in as much snow as possible. The captured snow is thrown far to the side, where it will not cause unnecessary trouble.
Before purchasing, you should seriously consider whether you really need this tool. After all, its cost usually starts from 5 thousand rubles and can be much higher, depending on the manufacturer and power. Therefore, it is worth making such a purchase in cases where it is necessary to regularly clear snow from an area of tens of square meters. Then an electric shovel will help you save a lot of time and effort. A serious advantage is the minimal energy consumption: you just walk around the area, lightly pressing on the shovel, and it does all the work for you.
Light weight - from 6 kilograms - makes it easy to work with an electric shovel for both men and women, adults and teenagers
Of course, when working, you should exercise some caution so as not to get injured by the powerful screw of the device.