It has been raining heavily in Central Russia since the very beginning of May. There was a day when half the monthly rainfall fell in two hours. In some areas, rescuers evacuated local residents by boat. Plantings and buildings were damaged, and there are too many flooded basements to count!
This situation made people think that if you don’t want to have a spontaneous pool in the basement, then you definitely need internal waterproofing. But waterproofing the basement from the inside against groundwater does not guarantee that these waters “will not find a hole”: a small hole is enough, and that’s it; something urgently needs to be done to prevent the destruction of structures. We will understand in what cases expensive multi-layer waterproofing is needed, when you can get by with little damage, how much ventilation is necessary and what materials and technologies will rid the basement of moisture, dampness and mold.
What kind of water prevents us from living and why Types of waterproofing How to make internal anti-pressure waterproofing How to close the pores and capillaries of moisture Ditch, seal, waterproof How to make the basement dry
What is a basement
Basements can be used for a variety of purposes.
When equipping a room with heating devices, here you can:
However, potatoes, root vegetables and fruits cannot be stored in dry and heated basements. For these purposes, rooms with an earthen floor and natural humidity that corresponds to the humidity of the earth are better suited.
Advice: A basement can be used as housing only if it is possible to keep its walls and floors dry. Otherwise, a damp room may cause deterioration in the health of the people living here.
When walls are made of concrete, their high thermal conductivity does not allow creating the desired microclimate, which requires insulation. Creating a ventilated structure for insulation helps improve the situation.
The ceiling can become a cold bridge, which is undesirable and will cause heat loss in the room. To do this, it needs thermal insulation.
Power circuits of these areas
Any building project includes not only sketches of all structural elements, but also additional aspects up to the lighting of the basement. Let's look at what the power diagram of the structure actually looks like:
- The perimeter of the entire structure is indicated, which represents the foundations of the future building.
- There is a diagram of auxiliary load-bearing structures, which are located on the ground floor.
- A section of the structure is highlighted in detail, which shows the thickness of the walls, as well as materials for manufacturing.
- The entrances, as well as the ventilation system and other ventilation devices, are designated separately.
- In addition, the project diagram contains exact parameters for the depth of the basement floor in relation to the ground level.
To complete such buildings with your own hands, step by step, you need to create a detailed diagram, with the help of which it will be easier to transfer the project to the ground during construction work.
Important. On paper, the project is carried out in several variations at once, which allows you to better perceive the information present on it.
What insulation is suitable for basement walls?
Basement walls must be insulated from the inside and outside. The correct choice of insulation is half the success when finishing the walls of such a room.
When purchasing material, it is necessary that it meets certain requirements:
These requirements are met:
Disadvantage: it burns easily, and when heated, it emits an unpleasant odor.
A serious drawback of the material is its high cost. And to apply it you will need special equipment and a master who performs such operations efficiently.
Advice: When working with glass wool, special attention should be paid to protecting the respiratory tract and eyes from small glass fibers getting into them. You should not use the material for external basement insulation.
After purchasing the material, it is necessary to prepare for the thermal insulation of the walls. For this:
How to insulate basement walls from the inside
Insulating the basement from the inside makes it possible to increase the thermal insulation of the entire house. But this technology is not very common due to the presence of dampness in the room, which, if there is thermal insulation inside the basement, can lead to condensation and additional exposure to fumes from it on the material.
The insulation may lose its positive properties and become deformed.
The process of internal basement insulation consists of two stages:
The most popular methods for carrying out the process:
Tip: To prevent the formation of condensation and excess moisture, ventilation holes should be provided in the base with a pitch of approximately five millimeters, which will ensure the circulation of air masses and at the same time remove fumes to the street.
The simplest and most common way to insulate a basement from the inside is to use polystyrene foam.
How to insulate the outside of basement walls
External basement insulation may be more important than internal insulation. In this case, the walls are protected from the direct influence of negative atmospheric phenomena, which does not allow cold from the street into the room.
When insulating a basement externally with polystyrene foam, the procedure for carrying out the work is as follows:
Advice: Insulation of the basement walls from the outside should be carried out at the construction stage, which will be much more convenient.
When externally insulating a building with rolled materials, such as: glass insulation; bitumen roofing felt required:
Subtleties when insulating basement walls
High-quality finishing of the basement walls creates favorable conditions for its operation.
Victor Martovich
Source
Entrance from the street - main features
This option is great in cases where the basement is used very rarely. In addition, sometimes there is simply nowhere to make an entrance in the house, and as an option, an entrance device to the basement from the street is used. If you need to enter the lower level frequently, the structure is located next to the entrance to the house, sometimes even on the same platform.
The main thing to consider in this case:
- The location of the structure is much more important than it seems at first glance. Design flaws can result in a situation similar to the one shown in the photo - the window is too close, and the canopy over the basement entrance must be made either with too small a slope or with a partial covering of the window opening, which does not look very attractive.
This is what shortcomings in the layout lead to - you have to decide what is more important - the window or the canopy
- The configuration of the stairs must be chosen in advance. This can be either a marching type, gentle and comfortable, or steeper options.
- A system that protects the stairs from precipitation and moisture; it can be either a cover or a canopy. Below we will look at this aspect in more detail.
Key points in finishing the basement of a private house
An underground room, on the one hand, is easier to insulate, since the soil temperature varies within much smaller limits than the air temperature. On the other hand, it is more difficult to arrange ventilation here. If the basement is turned into a living room, the air exchange must be very intense; this can only be done by installing forced ventilation.
There are other important points that need to be taken into account when decorating the exterior and interior.
Processing the outside of the cellar walls
The basement under a private house is large. If you intend to use it not only as a warehouse, it is better to take this point into account during construction.
Another important point is the nature of the soil. The cellar can only be built on solid soils. On heaving mobile soils, the cottage is placed on piles, which in principle eliminates the need for an underground floor. In the worst case, a monolithic foundation is built, which again excludes the ground floor.
Prohibited activities
For some types of activities, a basement is not suitable:
- Since loud music and noise are unacceptable, a nightclub or other similar establishment cannot be opened in a residential building.
- It is prohibited to set up production that could become a source of noise, dirt and unpleasant odors.
- For the same reasons, it will not be possible to open a dry cleaner or laundry.
- It is not permitted to place a medical facility or make a swimming pool or sauna in the basement.
- You cannot open a funeral home and provide funeral services.
- Wholesale and small wholesale warehouses cannot be located in the basement.
Activities on the rented area must not violate sanitary and hygienic standards and fire safety rules. Besides:
- for business it is prohibited to use other collective premises that border the basement: entrance, staircase, corridors, elevator;
- the store or office must have a separate equipped exit to the street;
- It is important that the utilities and equipment of the house remain accessible.
A technical premises that is not used by residents, by decision of the municipality or the association of owners, can be transferred to non-residential status. After this, the potential tenant can begin the registration procedure.
Room decoration
Internal basement waterproofing
The interior decoration of the cellar includes a practical part and a design part.
Waterproofing and insulation
It is not always possible to achieve good waterproofing by installing only external waterproofing and a drainage system. But in order not to reduce the internal area of the basement, it is preferable to use coating and roll materials.
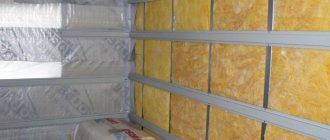
Insulation is carried out from the inside if it is not possible to perform thermal insulation from the outside. The scheme is traditional: they construct a sheathing, lay insulation in the cavity, cover it with a waterproofing material, preferably with a foil-coated outside, and finish it off.
The floor and ceiling must be insulated regardless of the nature of the external work. To insulate the floor, you can use bulk materials, such as expanded clay or plastic chips - this reduces the cost of construction. The ceiling is insulated using sheet materials: penoplex, polystyrene foam.
If a sauna or bathhouse is installed in the basement, the insulation and waterproofing work is much more complex and extensive.
Decorative finishing
PVC panels are easy to install
You can decorate the walls in a country cellar using a variety of materials. The choice determines the purpose, interior style, and financial capabilities.
Wall cladding must be combined with ceiling and floor finishing.
Color design of the room
It is preferable to paint the walls in light colors
The design of a basement or semi-basement in a private house is determined by the style and color scheme. The latter must be selected not only taking into account the stylistic requirements, but also the characteristics of the underground room.
The ground floor is precisely those rooms in the design of which preference is given to natural shades of stone, brick, and wood. This is due to the lack of natural light.
Lighting
The best option is white daylight
The level of illumination in the basement depends on the purpose. For storage rooms, 8 W per 1 m² will be sufficient. In a gym or spa, 10–15 is enough. But for a living room or playroom, at least 20 W per m² is required. However, these recommended values must be immediately multiplied by a correction factor.
The absence of windows creates an extremely depressing impression. To compensate, it is necessary to increase the lighting level and select the right light sources:
When decorating, you can also use lighting. However, it only plays a decorative role.
Source
What kind of water prevents us from living and why?
All water that can harm a house from the outside is conventionally divided into surface and underground.
Superficial ones appear on the site during floods, spring melting of snow and precipitation. They fall into the soil and sink through the pores into its deeper layers. Storm sewers successfully combat these waters.
And of all types of groundwater, residents of country houses need to focus on the following:
- Capillary waters. Formed in the area above groundwater. Capillary rise can break the crushed stone layer, and to prevent the crushed stone from mixing with the soil, geotextiles are used.
- Groundwater The layer of water that is located closest to the surface on a waterproof layer of rock. To combat them, different types of drainage are used (ring, etc.), some of which can only be done with the involvement of hydraulic engineers and other specialists.
- Verkhovodka. A type of groundwater that seasonally accumulates in the upper water-saturated layer of soil above clay or loamy rocks. If the soil on the site is clay or dense loam, but water appears in the basement after a couple of years of operation, this is perched water. You can deal with high water using wall drainage and preventive measures: organizing the relief, installing blind areas and storm drains, and compacting backfills.
Waterproofing can have "operational and economic advantages" over the measures described in the table, and successfully protect basements from corrosion and water intrusion. It would be more correct not to get by with waterproofing the basement alone, but to completely close off the possibility of water getting to the house by making a storm drain, a gravel area with a drainage system, and a sand cushion under the foundation. But if mistakes have already been made during construction, and even in dry weather there is water in the basement, and in heavy rain you can swim there, internal waterproofing can be a real salvation.
We finish the cellar inside - protection from water and mold
Poor-quality cellar finishing can ruin even a spacious underground room and turn it into a cold and damp place with an unpleasant odor. Vegetables in such cellars are poorly stored due to high humidity; in winter, the crop can freeze and in spring suffer from groundwater rising on the floor. However, this situation can be corrected if the issue of finishing the cellar inside is approached with due attention. To do this, you need to be patient and have some free time. If you wish, you can even make a special design for the room.
Ladder and manhole cover
The simplest solution to the question of how to easily build a staircase in a cellar is to use boards and bars of wood. If desired, you can use concrete or even metal. It all depends on personal preferences and capabilities.
It should be noted that wood will require impregnation with special compounds (to prevent rotting), and metal will require painting with a primer.
There are many types of stairs, for example:
- stationary wooden;
- complex concrete staircase;
- retractable.
Don't forget about the hatch
The hatch cover can be made hinged (hinged) or completely removable, it depends on how large the hole is inside and where it is located.
Preparatory work
Like the rest of the house, the cellar requires care and attention from the owners. The first thing you need to take care of is protecting the room from moisture. To do this you will have to resort to waterproofing. This way you will get rid of excess water inside the cellar and forget about mold forever.
A quick guide to waterproofing:
At the final stage, finishing is carried out (which we will talk about later) or, if necessary, insulation.
When finishing the cellar, use moisture-resistant materials. This will provide additional protection and a comfortable indoor microclimate.
How to decorate the walls of a dacha inside inexpensively. Interior decoration of a country house: the best options
Where to begin?
Most owners of country houses try to make them as comfortable, cozy and hospitable as possible. The atmosphere in the home should be calm and pleasant. The listed factors largely depend on the choice of suitable finishing materials. More recently, in houses, the walls were first plastered, then painted or wallpapered. Today, the market for construction and finishing materials offers many more products that can radically change the appearance of the environment, making it more harmonious and attractive.
Before you start covering the wall bases, you need to figure out what type they are and what they are made of. Only knowing these parameters can you choose the optimal finish.
When designing different foundations in a country house, a number of other features should be taken into account.
We take care of thermal insulation
Having ensured high-quality waterproofing of the cellar, we move on to thermal insulation. What is it for? Thermal insulation allows you to maintain the desired temperature in the cellar, regardless of the weather conditions outside. This is important when storing and preserving vegetables, since high temperatures will promote crop germination, and too low temperatures will promote freezing.
To insulate the floor, you can use expanded clay or foam chips.
So, a plastic film is laid on the floor, and wooden or metal logs are installed. Thermal insulation material is tightly placed into the resulting cells.
Insulation of the cellar floor using expanded clay.
When laying thermal insulation material, it is unacceptable to leave voids. The entire space should be evenly filled with material. Then the surface is leveled and filled with concrete mixture. To increase the reliability of the floor, additional reinforcement is carried out. To do this, use a metal or fiberglass mesh.
After the concrete mixture has hardened, we begin finishing the floor. For this you can use various coatings and materials. It is not only the insulation of the floor that needs to be taken care of. The walls of the room also require attention.
For walls, heat insulators in the form of slabs or mineral wool are used. Installing insulating material is easy. The same insulation technology is applied to any material. The slabs are laid on the prepared walls and secured with special fasteners.
Don't forget, insulation is important (especially for food cellars).
How to decorate the walls in the toilet besides tiles and plastic. Tile
This finishing method can be considered classic. Ceramic tiles have a number of advantages: moisture resistance, ease of cleaning, long service life, durability, reliability, aesthetics, hygiene, and the ability to choose various combinations in wall design. The disadvantages of such a coating include a rather labor-intensive installation process, higher costs for materials and the need for smooth walls.
If you need to first level the walls, then the order of laying the tiles is as follows:
Finishing a toilet with mosaics is also quite labor-intensive, but it allows you to achieve very different effects - in combination with regular-sized tiles, or on their own. Mosaics can be used to create entire artistic canvases, which will give the toilet uniqueness and exclusivity. It is sold in rolls and comes in different shapes - square, round, triangular. Before working with mosaics, you also need to prepare the walls accordingly.
Decorating the toilet with mosaics
Now the so-called 3D tiles have come into fashion - a special combination of tiles and carbon film, on which a three-dimensional image effect is obtained. This solution helps to visually expand the space, although it is not a budget solution.
Tiling involves using its elements strictly for their intended purpose. You cannot use floor tiles for wall decoration - they are too heavy and may fall off at the most inopportune moment. It is also not recommended to lay wall tiles on the floor - they are thin and fragile for such a purpose, and also slippery, which can be fraught with falls and injuries at the slightest increase in humidity.
You can choose tiles with standard strength, since at home they are not subject to such heavy loads as in public places.
Paint or lime?
The choice of paint depends on the wall and floor covering. If you used concrete, apply a moisture-resistant base before painting. Without it, the paint will not last long, as moisture will cause it to peel off. In addition, there are materials with a water-resistant structure, for example, various emulsions. They have a wide range of colors and are quite durable. After applying the emulsion, you can choose the paint of the required color, depending on the design of the cellar, and treat the walls again.
Painting concrete with water-based paint.
When choosing paint, pay attention to its expiration date. Regular paint will last no more than one year. Due to the special microclimate in the cellar, enamel paint can “slide” off concrete surfaces after a couple of weeks. This is due to increased humidity in the room. Paints with a service life of more than five years are suitable for wet concrete; such paints belong to the group of silicate paints. They do not emit toxic substances and do not absorb moisture (water simply drains from them).
Whitewashing the ceiling with slaked lime.
Slaked lime is often used to finish the cellar. It is suitable for whitewashing in rooms with low humidity and good ventilation. Lime has antifungal properties, so if you're concerned about mold, it's a great solution for giving your cellar a makeover. Lime has long been known as an excellent means of combating pathogens. Another advantage of lime whitewash is its low cost. The same cannot be said about expensive paints, which are capable of releasing moisture from concrete, but do not allow it to penetrate into it. Such paints are made on the basis of liquid glass.
Paints based on liquid glass are mainly used in industrial enterprises and have a long service life. This coating is not afraid of strong moisture and temperature changes, so if you can afford such paint, you will forget about finishing the cellar for more than 15 years.
Also, an excellent competitor to lime whitewash is acrylic paint. It can be used to treat any surface. This type of finishing is also not cheap. However, the effectiveness of this method justifies the expense. With this paint you can update the design of the cellar and give it a more noble look. A wide range of colors will allow you to turn the most unusual ideas into reality.
Top business ideas for mini-productions at home
Food
The trend of creating various food products at home began long before the pandemic. Economic sanctions, a government program to support small and medium-sized agricultural businesses, and demand for healthy food - everything contributes to the rapid development of such business ideas. Many of them are easy to implement in your own kitchen, in the basement of a private house. Such productions at the initial stage take up relatively little space and pay off well.
Home food production can often be defined by the term “craft” (that is, made by hand, in an artisanal way). Craft is valued for the bright individual features of the product, for the effect of something homey, traditional, associated with childhood, with the “warm and lamp” world before the industrial boom. Buyers believe that goods produced by hand in small batches are of better quality and taste than those that came off the production line. And for a gift, choosing not a “stamped” product, but a craft product in a nice package (most likely also craft), seems like something taken for granted today.
Cheese making
Market request number one. Homemade cheeses are one of the most popular products on the market; this niche is not even 40% filled. The hard varieties sell best. The equipment is compact; such production (if you limit yourself to small batches) can be done even in a city apartment. To prepare up to 100 kg of cheese, a room of 40 square meters is enough. meters. Demand is high, there is no seasonality, there are enough sales points. It is important to follow technology and take into account that cheese is a product with a limited shelf life and sale.
Dried fruits, dried mushrooms
These are products for which there is always demand. Russians willingly buy ready-made sets of dried fruits or dry milk mushrooms and boletus mushrooms. This production does not require large spaces. The costs of starting such a business are low; you can start from scratch, with minimal investment: you can literally place a drying machine in your own kitchen. You can vary the range in accordance with changes in demand. It must be taken into account that the quality of the finished product depends on the quality of the raw materials. For such a business idea, there is seasonality for production, but sales can be carried out all year round.
Detox juices
A new trend for home production. Crafted natural detox juices are still outperforming similar products from mass producers. Such drinks are used not only for weight loss, but also in all healthy lifestyle programs; they are bought for children and teenagers. The demand is great, this production is almost not affected by seasonality, you can even install the equipment at home, but this business idea will require the highest quality raw materials. It is also important that there is a low level of competition in this market segment in your locality.
Gluten free bread
Russians are seriously passionate about a healthy lifestyle; this trend has provoked the popularity of gluten-free bread. Over the past year, demand for it has increased by 7-12% in different regions. Starting a business for baking gluten-free bread will cost from 16 to 30 thousand rubles, depending on the equipment chosen. The total costs of such a mini-production are small, and bread can be sold through local grocery stores in the “near-home” format, and through websites of healthy lifestyle products, and at farmers’ markets.
Homemade marshmallows and bouquets of them
The demand for healthy and homemade sweets is constantly growing. People willingly buy handmade marshmallows not only as a gift, but also for their everyday table. Options for implementing such business ideas are flourishing on Instagram, but, according to experts, the market is still far from saturation. Production is simple, equipment costs start from almost nothing and increase depending on the complexity and uniqueness of the recipe. Sales are going equally well online and in regular shops and sweet shops.
Jelly Bean
Initially, this familiar delicacy was made by hand, in home production. Returning to the roots has borne fruit, and now chewing candies made from natural sapodilla juice, agave syrup and extracts of mint, wild berries, and cinnamon are extremely popular. Production can easily fit in a garage or kitchen, and the success of a business idea depends on the originality of packaging and competent promotion.
Dumplings and dumplings
From multi-colored dough made from vegetable juice or cuttlefish ink, from different varieties of meat, poultry, fish, vegetables, fruits, berries, cottage cheese, national, cooked to order - variants of this business idea are multiplying before our eyes and are being successfully implemented on the Internet and in stores craft products. The production is clear, the ingredients are easy to purchase. The only difficulty: refrigeration equipment for freezing semi-finished products is quite expensive. However, even despite this, the business quickly pays for itself, and refrigeration units can also be leased, which will reduce the one-time burden on the entrepreneur’s wallet.
Craft beer
This area is showing rapid and stable growth. The popularity of craft beer is growing every year. Small breweries are easy to place at home, in the garage or basement of your own home. This can be a great start to a successful small business. If necessary, production can be expanded using rented space. As in any grocery business, it is important to find suppliers of quality raw materials in advance and decide on distribution channels.
Marmalade toys
A new-fangled replacement for Kinder surprises are small craft toys with a marmalade base. Options for business ideas in this area are represented by dozens of successful franchises that supply entrepreneurs with equipment and connect them with suppliers of raw materials. The growing popularity no longer seems like a random whim of the market; betting on this production, which you can open at home, can be very successful.
Crafts
People locked in their homes during the lockdown have re-evaluated the importance of their home decor. Now household items, furniture and design are of great importance: Russians are looking for individual, special things made in small factories. Small businesses with their ideas in this industry have room to expand.
Restoration work on wood
Buyers are happy to look for old chairs, armchairs and tables at flea markets, at grandfather’s dachas, in online and offline consignment stores. As a rule, antique and vintage items require restoration. Thanks to the popularity of the trend for furniture with history, small carpentry workshops located in garages or in private homes are benefiting greatly. An entrepreneur in this segment requires skill and desire to work with wood. It is important to remember that the outcome of restoration work depends on the quality of carpentry equipment, and its cost increases. Despite this, the business idea is profitable: the restoration of one large piece of furniture (wardrobe, chest of drawers, chest) is estimated at several tens of thousands of rubles.
Wooden utensils
Fashion for it returned at the beginning of the last decade. Started as a souvenir trend, the industry is gradually conquering the market. This business idea allows those entrepreneurs who dream of creating and creating from wood to show their imagination. The production of wooden utensils is perfectly located at home, the costs are not so high, and profits depend on the competent implementation of the business idea.
National toys and handmade toys
Millennials have proven to be very thoughtful, caring parents. The quality and originality of the fun they buy for their child are important to them. In recent years, Russian manufacturers have confidently taken prizes at international competitions for children's games and toys. Such business ideas are well packaged into franchises, but if an entrepreneur wants to open his own business, then the widest scope for creativity opens up before him. Inspiration can be drawn from toys from the era when grandma played with dolls, or even earlier (the handmade toy tradition runs the gamut from rag dolls to wooden rocking horses). The costs of such production depend on the chosen toy manufacturing technology.
Furniture for animals
Another global and Russian trend is a high level of care for pets. A variety of scratching posts, beds, and houses can easily be made at home; the cost of such production often does not exceed 50-100 thousand rubles, and finished goods can be sold both online and offline. However, you need to remember that there is high competition in this market segment.
Jewelry and souvenirs made of clay
This low-cost mini-production can easily be located even in a city apartment. We are not just talking about pendants and keychains; small souvenirs and interior items (ceramic figurines, candle stands, whistles, fruit dishes and deliberately irregularly shaped key holders) are also popular. In this area of handicraft, competition remains high, in order to succeed, it is necessary to offer customers an unusual idea.
Sewing
This is a broad area that includes work of varying complexity and volume, from the production of a large batch of fabric protective masks to the creation of clothing according to individual sketches. Production at the initial stage does not require a large premises, can be easily located at home and does not require significant investments. However, we must remember that the complexity of the task and the final quality of the product are directly related to the quality of raw materials and the manufacturability of the equipment.
Anti-stress pillows
An extremely fashionable niche, production is simple and low-cost, and demand is high. The disadvantages include the high level of competition. Sales and promotion are confidently shifting to the Internet, but resources remain for offline sales: regional festivals and fairs.
Aprons and capes for home hairdressing salons
The niche arose several years ago and was well established during the lockdown, when hairdressers and barbers switched to home service for clients, and many people began to cut their loved ones’ hair themselves. An easy-to-produce, low-cost business idea is well promoted on the Internet. You need to understand that you cannot sell many aprons to the same people; it is better to find a channel for wide sales in advance (for example, through an online dropshipping store that sends its goods throughout the country).
Printing
T-shirts with funny designs and slogans, canvas bags with logos, corporate T-shirts, scarves, baseball caps - clothing and other things with prints are still in demand by both private buyers and businesses. Printers for high-quality printing on textiles are relatively inexpensive; it is enough to allocate a corner in your house or garage for them. It’s more difficult with design and methods of promotion: there is serious competition in this area, and a lot depends on the quality of equipment and fabrics. The demands of the modern consumer are quite high; the success of such a mini-production largely depends on a competent analysis of the local market and the elaboration of one’s business idea.
Production of frameless furniture
Today, pear chairs and poufs are happily purchased for children's rooms, living rooms, shopping centers, cafes and other public spaces. The entrepreneur’s costs for such a mini-production at the initial stage amount to up to 300,000 rubles. You can locate the workshop in a garage or basement. The quality of products will depend on the purchased raw materials and adherence to technology.
Conclusion
Not all options for business ideas and even industries for small and medium-sized businesses, organized as a mini-production in your own garage or right at home, are listed here. Remember that the state is interested in socially significant mini-productions, and you can often count on financial support. Subsidies for the production of certain goods (the list can be found on the websites of local municipal authorities) are part of the program to support small and medium-sized businesses in Russia.
The main advantage of mini-productions is that they can be either an excellent start in business, the first thing opened from scratch, or a source of constant income for years. You can open a mini-production, saving on rent, directly in your home or garage; it rarely requires significant funds for equipment and raw materials, and most importantly, it can be easily modernized and repurposed under the influence of new socio-economic phenomena and market trends.
Plastering walls
In a cellar with brick, stone or concrete walls, plaster is used for finishing. A wall plastered with skillful hands provides additional fire protection and does not allow moisture to pass through. This is a method of finishing a cellar that is accessible to many and does not require complex skills or time.
Plastering the walls plays the role of additional waterproofing.
Plastering walls begins with cleaning them. Clean the walls from dust and spray liquid cement mortar. This will improve the adhesion of the plaster to the walls. You don’t have to do this for brick walls, since they already have good adhesion to the material.
For foundation blocks, you will have to additionally use a metal mesh, which is secured with parachute dowels. Due to the increased humidity in the room, the plaster will not hold up without additional strengthening.
Plaster on metal mesh.
After the first layer of plaster has been applied, let it dry and proceed to the second stage of work.
It is not recommended to dry the plaster using heating devices (this will lead to cracking). At the second stage of work, apply another layer of plaster and leave to dry.
Gypsum, cement or lime mortars can be used to plaster walls.
How to make internal anti-pressure waterproofing
Waterproofing the outside of the basement is done during the construction of the house. Since the water pressure presses the waterproofing to the base, it is made from roll coatings, bitumen mastics or cement materials.
And for internal waterproofing, it is important that the waterproofing material has excellent adhesion to the brick or concrete of the supporting structure.
Anti-pressure waterproofing from the inside of the basement is installed in already constructed buildings when water has treacherously filled the premises being used. Usually in such areas there is a high pressure of groundwater, there is no drainage system, and a solid and durable barrier is needed that will not allow water to enter the basement.
It is preferable to make a new one or restore the destroyed external anti-pressure waterproofing, but if this is not possible, do the internal one.
This method of waterproofing the inside of basements in private houses began to be used when new generation plaster solutions appeared, which quickly set and firmly adhere to the surface. The structure of such a water barrier consists of several layers - they are shown in diagrams published in 1996 by the Central Research Institute of Industrial Buildings in a document entitled “Recommendations for the design of waterproofing of underground parts of buildings and structures.”
Here's how this kind of waterproofing is done: a layer of hydrophobic cement solution is laid on a primed concrete wall. When it dries, it is primed again and three layers of cold bitumen mastic are applied, and a cement-sand mixture of grade M-75 is applied to it.
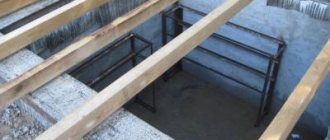
The next step is to install the reinforced floor screed, lay the reinforcing mesh and make formwork for the concrete slab.
In areas where the groundwater level fluctuates at around 15-50 cm, waterproofing is done according to a simpler scheme, without erecting reinforced concrete walls, with a slight slope to the pit.
1 - wall, 2 - crushed stone cushion with a thickness of at least 10 cm, 3 - concrete grade M-100, 4 - hydrophobic cement mortar grade M-150, 5 - bitumen mastic, 6 - TsPS grade M-75, 7 - TsPS M -100, 8 - thickening of cement-sand mortar, 9 - duplicating layer of bitumen mastic 3 mm thick, 10 - concrete of the original structure, 11 - foundation slab, 12 - formwork for pouring a concrete slab, 13 steel pins of round section, 14 - height UGV.
An automatic pump is installed in the pit, which pumps water into the drainage system or sewer system.
It is quite difficult to make the correct anti-pressure waterproofing in the basement with your own hands. You can master this technology, but you need to be prepared for its high cost: that a square meter of a basement will be more expensive than a square meter of living space. As the moderator of our portal with the nickname al185 says, success is only possible if
- The right project.
- Proper supervision that understands where to look.
Here's how and with what he recommends doing it:
al185MODERATOR FORUMHOUSE
- Footing - a layer of low-quality concrete 5-10 cm without reinforcement.
- Level the walls for pasting with grout or plaster.
- Pasting bitumen GI in two layers inextricably on the concrete base and on the walls.
- Floor screed 5-10cm M150-200, reinforcement #4x100-150mm on stands 20-30mm.
- Pressing masonry to the walls, half a brick.
- If insulation is necessary, use 10 cm PSBS-35 under the brick/screed, protect from bitumen GI with polyethylene film.
What else can you turn your basement into?
If the size allows, the underground room can be used not only as a storage of vegetables or equipment, but as a place for relaxation or entertainment.
As you can see, decorating and designing a cellar is a very multifaceted and creative task.
Site consultant, builder-installer with 8 years of experience. He started his career as an installer-finisher, and currently works as a foreman in a company engaged in suburban construction.
Source
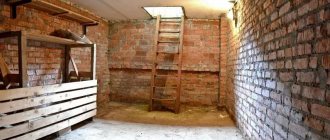
In the photo: the cellar is a very useful room in which you can store vegetables, fruits and winter preparations
Interior decoration of the cellar is not a difficult job, but it is important, since this type of premises is very different from ordinary living rooms. In this review, we will figure out how to finish concrete and brick walls and floors in the cellar. The process has its own characteristics, so you need to choose and, following the recommendations, carry out the work correctly.
Using a cellar without finishing is not the best solution, especially since the work is simple and will not take much time
If you think that the decoration inside the cellar has exclusively decorative value, then you are mistaken. If everything is done correctly, the room will have an optimal microclimate for storing supplies, and the resistance of surfaces to moisture penetration will also increase .
Finished walls not only look better, but also protect the cellar from moisture
How to decorate the walls in the bathroom other than tiles. Bathtub wall paint
Paints intended for wet rooms have special formulas in their composition that protect the painted surface from moisture penetration and the development of various types of mold and fungi. Most often these are silver ions. They are available in a very wide range of colors, so you can perfectly match the color to your interior or furniture. Suitable properties, low price and ease of application to the wall make the paint a unique solution.
Paint the bathroom instead of tile? A smart decision, since bathroom paint protects the walls of the room from moisture and provides long-lasting colors. A bathroom without tiles is an increasingly popular solution. You can decorate surfaces with stickers, wall murals or even panels.
Tips and tricks
Current bathroom trends recommend minimal use of tiles, that is, only in the wet area. Is a bathroom without tiles practical? How to decorate the walls in the bathroom? You can paint the room, but be sure to choose special substances that are resistant to moisture. It’s worth making this decision when we don’t have a shower, when you want to create a special room design, for example, a Provençal, romantic bathroom in a rustic style, or you simply don’t want to invest heavily in plumbing.
How to protect bathroom walls from moisture when painting?
To paint the bathroom, use special paints that do not let moisture in and allow the wall to breathe. If the room is large, move the bathtub away from the wall as this will protect the plaster from splashing. If the plumbing fixtures must be next to a wall, you can use a large format wall mural or attach a mirror surface to the tile. This decoration of bathroom walls gives the interior style and a pleasant warmth that is always liked. A bathroom without tiles will have an interesting and cozy character, and the color of the walls in the room will undoubtedly be easier to change next season than investing in new tiles.
Workflow Description
In order for supplies to be stored in the best possible way, you need to create an optimal microclimate in the room
The title of the review is no coincidence, because we will analyze finishing and waterproofing together. That is, after finishing the work, your cellar will be both beautiful and reliable. I will divide the work into two stages:
It's simple, you will need free time and a small set of materials, which can be purchased at any hardware store.
Even before starting to describe the work process, I want to draw your attention to this aspect: no amount of finishing or waterproofing will help if you have not equipped the room with a ventilation system. The dampness needs to go somewhere, and if you don’t have an exhaust pipe installed, then it’s better not to start work at all.
Without ventilation it is impossible to deal with dampness in the cellar
Stage 1 – water protection
I begin reviewing the work process from the moment you have a finished room with a screed poured on the floor. First, we need to ensure the waterproofing of the room.
If your groundwater level is very high, then you should first create a drainage system, otherwise no treatment will provide long-term protection. You need to lay drainage pipes and lead them to the collector; this is the easiest and most reliable way.
As for pre-treatment of surfaces, we will need the following materials:
Glass insulation is necessary to create additional protection on the floor
Tiprom compositions have proven themselves well among specialists
We need the following tools:
Nowadays there are small canister burners; such equipment is enough for a basement.
Let's look at the workflow, the instructions for doing it look like this:
The water repellent can also be applied by spray
Waterproofing the floor will help create an additional barrier to moisture
You can finish the work here, but I usually pour another screed 2-3 cm thick, it protects the insulating material from damage and makes the surface stronger.
Stage 2 – finishing
Now you can start finishing the walls. If your surfaces are immediately ready for painting, then you can skip this part of the work, and if the walls are uneven, then it is better to level them.
The question of how to decorate the walls of the cellar from the inside does not arise, since the best and cheapest solution is cement-based compositions. Let's figure out what materials you will need for the job.
An excellent option for working in cellars and basements
| Material | Description |
| Cement plaster | Gone are the days when you had to buy cement, sand, lime separately and prepare a plaster solution. You can buy a ready-made composition, I recommend using Osnovit Startwell, it is intended for facades, so it will work perfectly in the cellar. |
The advantage is the affordable price - a bag weighing 25 kg will cost you only 220 rubles
Mesh reinforces finish
If the walls are smooth and strong, then you can do without a mesh, but I still recommend using it just in case, since operating conditions in the cellar are difficult.
The process of doing the work yourself consists of several stages:
The workflow diagram is very simple
The mesh should not stick out, it should be evenly pressed over the entire surface
The solution must be mixed thoroughly
Finishing the walls in the cellar is a simple process
After finishing the work, you need to leave the plaster until it dries completely, this takes from a day to a week, depending on the temperature and humidity in the room. To speed up the process, I put on a heater to artificially raise the temperature and make the drying process faster.
Stage 3 – painting
We've figured out how to decorate the inside of the cellar, now let's look at what can be applied to the walls. There are two options, I will talk about them in order.
The first solution is whitewashing the surface . To work, we need lime; it has moisture-proof and antiseptic properties, which is very important for the cellar. Another important advantage is its low cost; buy fluff lime, it is ready for use.
Lime - a simple but reliable solution
The workflow is simple:
The whitewash needs to be mixed well
Whitewashing is best applied with a roller
For all its advantages, whitewash has one drawback: it needs to be updated annually, so many choose a more modern solution.
As an option, you can use moisture-resistant acrylic-based paint; it has good reliability and works well in basements and cellars. In this case, the workflow would look like this:
The paint must contain antiseptic additives
The soil strengthens the plaster
Painting is much more reliable than whitewashing
Using the basement as a storage room
The basement space is quite suitable for storing household items, food, work and seasonal clothing, tools, sports equipment (skis, sleds), strollers, bicycles and much more. etc.
Using the basement as a storage room
Such a pantry noticeably frees the house from bulky things; There is less street dirt and dust in the rooms. You should think in advance about the placement of utility cabinets in it. Cabinets can be built-in, with natural ventilation. It is connected to the kitchen or stove smoke ventilation duct. The lower part of the door of a ventilated cabinet is equipped with holes for air flow. Typically, such holes are drilled on site or the door leaf is not brought to the bottom by about 10-15 cm.
Ventilation at the bottom of the door
If you want to store various food products in the basement, then it is better to place them in special utility cabinets located near the outer wall and equipped with natural ventilation. Here you can store potatoes, vegetables, fruits, pickles, marinades and other supplies all winter. Typically, such cold storage rooms are located on the north side of the house . To enhance thermal insulation, the perimeter walls are covered with sawdust or covered with tiled insulation, which is covered with board cladding. Keep the pantry temperature low with ice. On the side of the house, a cold, unheated room should be adjacent to the wall (figure below).
Arrangement of a cold storage room in the house: 1 - ice chamber; 2 - metal sheet of the wall; 3 — cabinet for food; 4 — shelves; 5 - racks; 6 - supply of firewood (for stove or fireplace heating)
To provide the pantry with fresh air, various simple adjustment devices are used. Thanks to them, you can get an additional refrigerator of impressive size inside the house. Ventilation is provided by an additional attached duct or pipe. You can install two additional ventilation ducts (supply and exhaust) in the main internal wall and lead them to the roof or attic. Channels made in a brick wall, as a rule, have a cross-section of 140 x 140 mm.
Shelving in pantries is made of wood and its derivatives; plywood, chipboard and fiberboard. The simplest rack (figure below) is a structure consisting of metal or wooden racks, to which wooden or thick plywood shelves are attached. If desired, the side surfaces of the rack are limited by sides. You can make the sides through.
Rack for storing products and equipment: a - welding unit; b, c connection nodes; 1 - wooden stand with a section of 20 X 50 mm, height 1600-2700 mm; 2 - stand made of pipes or round fittings with a height of 1500-2500 mm; 3 - wooden shelf measuring 20 X 200 mm, length 800-1200 mm; 4 - side made of plywood 4 mm thick
If the racks are made of metal, then they need to be welded; wooden ones are easy to make yourself. The racks are attached to the wall using plugs pre-hammered into the wall. Installation of shelves with racks is carried out using metal hooks. Before installation, metal and wooden parts are sanded and coated with nitro enamel.
The indicated dimensions are, as it were, basic, basic. If desired, the dimensions of the rack can be changed both smaller and larger. It can occupy the entire wall, running along the entire room, or stand in the corner.
Storing food in the basement
Before placing vegetables and fruits in the basement, you should ensure that they sit for about a week in a well-ventilated area. This measure will allow you to prepare the products for long-term storage, while possible cuts and damage to the surfaces of vegetables and fruits will be covered with a crust.
After a week of aging, the harvest (or purchased supplies) is carefully placed indoors.
Storing food in the basement
There is a certain loading rule that should be followed whenever possible: vegetables are placed along the air flow - from inflow to air removal. First, large products are laid out : cabbage, watermelons, pumpkins, large zucchini, etc. Then something smaller is placed - apples, pears, eggplants, etc. Potatoes and onions are added at the very end.
Conclusion
Finishing cellars is a simple process; the main thing is to properly protect the surfaces from moisture penetration, after which you can apply plaster or even immediately paint the walls and ceilings. The video in this article will clearly show some important aspects of the workflow and will help you understand it even better, and if you have questions on the topic, write them in the comments under the review.
Source
| Reinforcing mesh | To prevent cracking of our finish, we must first secure a steel mesh to the surface for rough plaster. It is inexpensive, but it allows you to make the surface tens of times stronger, you can use the option that you have at hand, I usually take material with a cell of 3x3 cm |
| Dowels | To attach the mesh to the surface, it is best to use special dowels with wide heads. You can use regular fasteners with wide washers and other available options, the main thing is that you can securely fix the mesh to the wall |
Waterproofing the cellar from the inside
For internal waterproofing of walls in the basement, roll materials (such as roofing felt) or coating materials (bitumen mastic) are used. It’s even better to combine both materials, it’s much more reliable.
You need to know this: how to waterproof a basement from the inside.
First, layers of mastic are applied (with a brush or roller), and after that the walls are covered with sheets of roofing felt in 2-3 layers. In some cases, it is advisable to lay a brick wall in one layer, this will significantly strengthen it.
Installing a plinth on different types of foundations
The use of different foundations leads to the creation of basement floors that differ in their properties from each other. To create a strip foundation, builders use monolithic concrete, brickwork or concrete blocks. It is characterized by high reliability and durability.
Slab foundation
If the base is built on a slab foundation, then brickwork is often used. It is possible to use a reinforced concrete slab as the base of the building. When building a slab foundation, it is necessary to take into account that the slab must rise above the blind area by no less than half a meter.
But in practice, the use of this method occurs when there is no basement. This reduces the cost of materials and construction time, since the installation of walls begins after the foundation tiles have hardened.
Columnar foundation
A columnar foundation can be classified as the most labor-intensive and costly way to install a foundation. It is made of monolithic concrete or reinforced concrete products. You can call this a grillage.
To pour cement mortar, formwork made of wood or metal is used. When the material hardens, a reinforced concrete belt is obtained, distributing the entire load over the area.
Arrangement
The final stage of construction of the basement floor is its arrangement. In this case, it includes the following stages of work:
- Complete completion of all construction work.
- Preparation of appropriate material for repair.
- Preparation of the necessary tools.
- Step-by-step cladding of structures from the inside, taking into account the purpose of each room separately.
All facing work is carried out in stages. Here you need to start from the ceiling, gradually moving to the floor.
Important. To create an ennobled basement floor in your private home, you need to have some knowledge and experience in the construction industry, otherwise it is better to entrust all the work to specialists.