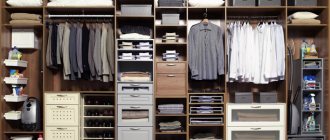
The functionality of sliding wardrobes and their spaciousness allows you to free up space in other rooms for storing the bulk of the owners’ clothes. Both in the spacious hallways of new buildings and in ordinary Soviet Khrushchev-era buildings, such a cabinet can fit thanks to an individually selected model. The dimensions of sliding wardrobes may differ within certain standards, but a suitable model in terms of dimensions and internal content can be selected based on the characteristics of the room.
Based on the standards and needs of the customer, furniture makers will help their clients select and manufacture a wardrobe of a suitable size, shape and taking into account additional elements of internal content. Some craftsmen may risk assembling a wardrobe themselves. But in order for the work to be successfully completed, you should seek help from an experienced specialist and learn about the rules and design options for sliding wardrobes.
Doors for sliding wardrobes: recommended sizes
If we talk about strict restrictions on the size of doors for a wardrobe, then there are none. You can make any length and width. But there are recommended parameters determined based on operating experience:
- The minimum width is 50 cm. Nothing prevents you from making the canvas narrower, but when moving it will warp, as a result it may even jump out of the guides.
- The maximum width of the sash is 110 cm. In this case, considerable effort has to be made in order to move it.
- The optimal width is 60-90 cm.
- The profiles come from the factory with a height of 5.5 m, and in stores they are usually cut in half. So there is a real opportunity to make doors for a sliding wardrobe of the required height. At high heights, you just need to pay attention to the rigidity of the handle profile.
- The number of compartment door leaves is selected based on the optimal width. Choose them so that they do not block access to the cabinet contents.
Almost no size restrictions
Constructors for PC
Most desktop programs for furniture modeling are paid. But many developers provide access to trial versions of the software with a limited trial period. Trial versions of programs often have reduced functionality, but even they are enough to calculate the size of cabinets.
Furniture designers come in two-dimensional and three-dimensional forms. 2D programs create drawings and carry out calculations. They are used in workshops to produce parts for furniture sets. Three-dimensional programs allow you to create three-dimensional models. The user will be able to imagine what a cabinet or set will look like in the living room or kitchen.
Furniture designers belong to specialized programs. They can only be used for modeling kitchen units and cabinets. But there are also more complex programs like 3ds Max, LightWave 3D, etc. Such software can be used to create any three-dimensional objects, including furniture.
Basis-Furniture Maker
K3-Furniture
The program is designed for designing cabinet furniture. Popular among workshops making custom kitchens.
bCAD Furniture
T-FLEX Furniture
This software package is designed for the development of various types of cabinet furniture. Presented in 4 editions: salon, designer, expert, server. Modules can be downloaded to your computer individually or paid for all at once. The program is quite demanding on computer performance.
PRO100
Software advantages:
Sawyer
A program for creating material cutting maps. Also used for designing cabinet furniture. Currently, the project is closed, development and support of the program has been discontinued. The application calculates the percentage of leftovers after cutting and is more suitable for furniture manufacturing companies.
WOODY
Software Features:
Astra Furniture Designer
Advantages of the software:
KitchenDraw
A program designed specifically for kitchen design. There is a free trial version. The user works with two-dimensional drawings, but if necessary, can switch to three-dimensional visualization mode. This designer is aimed primarily at experienced designers.
Solidworks
This program is designed for engineering design and three-dimensional modeling. It is most often used in industrial production conditions. It will be quite difficult for beginners to understand this program. The program is paid, but if necessary, you can download a trial version.
Features supported by the program:
Source
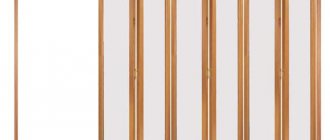
Sash design
The wardrobe door leaf consists of profiles:
- lower;
The lower profile has deeper sidewalls - upper;
Upper profile for sliding door leaf - handle profile;
The handle can stand on both sides - intermediate.
These profiles are placed between parts of the door leaf, but you can do without them - if the door is solid and not composite
All this together looks like in the photo. The door material you choose is inserted into this frame, into the grooves. It can be glass, mirror, chipboard and other materials.
Sash design without filling
Separating profiles are optional. They are needed if you assemble the sashes from different materials or you simply like them this way better. The maximum thickness of the filling material is 10 mm, the minimum is 4 mm. Thinner ones - glass, plastic, mirror - are inserted through a sealing gasket.
In order for the sash to be able to move, rollers are installed on it - at the top and bottom. The lower rollers bear the entire weight of the door, and the upper rollers stabilize the vertical position of the leaf, preventing it from deviating.
Rollers for wardrobe doors
The rollers are attached to the side profiles using special fasteners.
Mirror, plinth and lighting
Mirror The most popular way to place a mirror in a closet is to make the doors mirrored. You can cover the closet with mirrors completely or partially. It is ergonomic: the mirror does not take up additional space, and reflective surfaces add shine, light and volume to the interior. If you are not a fan of large mirror surfaces in the interior, mirror the inner surfaces of the doors. True, this method is only suitable for swing structures. Two open doors with mirrors inside will provide the effect of a dressing table: you can see yourself both in front and behind.
Base This element of a built-in wardrobe is useful if you have an uneven floor, which means there may be problems with doors mounted to the very bottom. Coupe doors will slide downhill, and you won’t be able to install a guide on bumps. Swinging doors can also warp, in addition, there will be unsightly gaps between the door and the floor. The plinth allows you to level the lower level of the cabinet, eliminating these problems.
Lighting Additional lighting of the closet is effective, practical, but not at all necessary. Using lighting, you can make open shelves more interesting and the space behind glass doors more mysterious. After all, illuminated shelves make it easier to find what you need. Mounting lighting inside sections makes sense if you have open shelves and want a beautiful decorative effect. Lighting hidden inside one shelf will not reach another compartment. If you want to illuminate the contents of the closet so as not to rummage through things in the dark, install lamps in the canopy. Don't forget to leave a gap between the canopy and the top border of the swing doors so they don't get caught. The transformer for built-in lamps is usually installed on the roof of the cabinet.
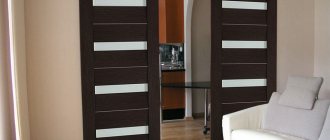
Guides for sliding doors
As you understand, the sash is not everything. Guides are needed along which these very doors will move. There are two of them - upper and lower. In appearance they differ significantly.
The top guide for the wardrobe door The bottom guide is made of metal
When installing the door, first insert it tightly into the upper guide, lift the sash all the way and place the lower rollers in the corresponding slot. The entire structure is shown in the following photo.
Assembly diagram
Size calculation
When assembling a sliding wardrobe door yourself, there are two options. The first is to measure the opening, think about how many doors you want to have and contact a door manufacturing company with this information. Just make sure they sell the parts without paying for assembly. The manager himself will count all the necessary materials for you, give you the dimensions and announce the amount. It's simple. But you will have to purchase everything from this office, i.e. choose from what is available.
The second way is to calculate everything yourself and look for the necessary components from different companies. It’s more complicated and more expensive, but there’s a wider choice. For those who do not like simple paths, we will describe the calculation of the components.
Doors
Calculate the width of the doors so that when closed, only one handle is visible, but it should not cover the door leaf itself. For a sliding door with two leaves, you calculate it like this: measure the width of the opening, add the width of the profile and divide in half. This will be the width of the sash.
For example, the opening is 1600 mm, the width of the handle profile is 26 mm. We get 1600 mm + 23 mm / 2 = 811.5 mm. Please note that the width of the handle profile is taken arbitrarily. It can be different in shape and, naturally, in width. When making calculations, substitute the width of your chosen structure.
Profiles may be different, so they must be measured individually
To calculate a tricuspid one, you will need to add twice the profile width and divide by 3.
Example: opening 2100 mm, handle width is the same - 26 mm. We count: 2100 mm + 2*26 mm / 3 = 717 mm.
Everything is easier with height. Subtract 40-45 mm from the height of the cabinet and obtain the required height of the sash, as well as the length of the side profiles. That's all about the dimensions of the sashes.
Filling
Since the filling is in a frame of profiles, we subtract twice the profile width from the total width of the sash. We do the same with the height - subtract the height of the lower and upper profile.
Measuring the width of profiles
So, the width of our sash is 811.5 mm. The measured width of the handle profile is 18 mm. Since the handles are placed on both sides, we double this figure. We get 36 mm. Total filling width 811.5 mm - 36 mm = 775.5 mm.
We also calculate the height: let the initial one be 2350 mm, the width of the upper profile 12 mm, the lower one 48 mm. Total filling height 2350 mm - 12 mm - 48 mm = 2290 mm. This is if the filling is solid and it is laminated chipboard, which does not require a silicone seal. If the sash is a solid mirror or glass, the thickness of the sealing rubber must be subtracted from the found height. It is 1 mm, but since it is put on around the perimeter, it takes up 2 mm in general - above and below. In this case, the filling height is 2290 mm - 2 mm = 2288 mm.
If the sash filling consists of fragments, the thickness of the connecting profile is also subtracted. It is also approximately 1 mm.
Profiles
The height of the vertical profiles of the frames is equal to the total height of the sash. The width of all horizontal ones is calculated depending on the width of the handle: from the width of the sash we subtract twice the width of the handle (there are two of them).
How to measure handle width
Let the handle width be 26 mm. We get the width of the vertical profiles: 811.5 mm - 26 mm*2 = 759.2 mm.
Programs
Programs are used for detailed calculations. They will need to be downloaded and installed before you can use them.
BT cabinet
The BT-cabinet program creates straight, corner and diagonal cabinets, where the model is built based on the entered dimensions.
First, the type of cabinet is selected, then the general dimensions are entered. Next, the space is divided into sections and the filling for them is selected - shoe racks, rods, shelves, drawers. The next stage is the selection and calculation of compartment doors. Their number is set, the design and appearance are selected - material and divisions, if necessary.
Dimensions can be easily changed directly on the model; to do this, you need to pull the desired partition or part. The filling moves together in sections and increases in length if the walls of the section move.
At the end, you can print calculations, drawings and a table with all the elements and parts with the number of pieces.
eXponent Furniture Designer
Another design program.
Its interface is entirely in Russian. As you enter the cabinet parameters, a 3D model is created. A large database of component elements (shelves, drawers, rods, holders and fastenings) is provided.
After completion, the drawing is saved in a separate file, and it is also possible to print directly from the program.
In addition, here you can create any piece of furniture and design your own room.
The official website no longer works, you can download it from Yandex Disk.
PRO 100
This is a program for creating both interiors and individual pieces of furniture. Completely in Russian, modeling by clicking the mouse and entering parameters. Lots of ready-made elements to choose from.
At any stage, you can change the parameters of sections, overall dimensions and filling. This will immediately be reflected in the price - the cost is easily tracked.
As a result, you can see drawings of models and individual parts in any projection with dimensions and method of fastening.
Basic cabinet
Another common program for designing cabinet furniture is Basis-cabinet.
When building a cabinet model, the program automatically calculates the dimensions of the internal filling elements and adjusts them if the general parameters change.
Simple and complex shapes and designs are available for modeling.
Libraries of fastening systems and elements in accordance with the products of popular manufacturers.
Photo report on the assembly
First, all profiles are cut exactly to the calculated dimensions. The accuracy must be perfect. The cut is strictly perpendicular, at 90°. Holes are drilled in the handle profiles for installing rollers and fasteners.
The holes are made through two diameters. The exact size depends on the dimensions of the purchased fastener, but basically there are two sizes: 4 mm and 6 mm, as well as 6 mm and 10 mm.
How to drill holes
One such hole is made at the top, the center of which is located at a distance of 7 mm from the edge of the profile, at the bottom there are two holes - the first at a distance of 7 mm from the edge, the second at a distance of 42 mm from the profile cut.
Holes at the bottom of the side profiles
During assembly, all parts of the filling are assembled first. First, if there is glass or a mirror, sealing rubber is installed around the perimeter. It is simply put on the end of the part by pressing a finger. The seal is cut off along the edges and placed end to end, but without overlapping on the next side.
Seal on the mirror
A protective film is glued to the back of the mirrors. You can use regular self-adhesive. This film will prevent fragments from scattering if the mirror breaks.
If the sash is composite, we assemble it using connecting profiles. The filling parts are simply inserted with force into the profile. Sometimes considerable effort may be required. You can tap the end with the back of your hand or use a rubber mallet for this.
Simply insert the filling parts into the grooves of the profile and tap on the end
When the sash is assembled, the corresponding profiles are installed at the top and bottom using the same principle.
Top profile installed
Then it’s time to install the side handle profiles. Everything is the same: push the filling into the groove, make sure that it fits all the way along the entire length without distortion. When the frame is assembled, it is necessary to tighten it with fasteners. Let's start from the top. Take the fasteners and insert them into the previously drilled hole. If the distance was measured accurately, the screw fits into the groove of the upper cross member.
If drilled correctly
Tighten the connection using a hex wrench. Slightly not tightening it all the way, insert the upper rollers between the screw head and the profile jumper, then tighten the screw.
Insert the upper rollers
We repeat the same operation on the other side. Then we move down. Here the fasteners are installed in the upper hole. Just tighten it all the way. We repeat similarly on the other side.
Install the fasteners from below
Next, install the lower rollers. We insert the thrust plate into the groove and press it.
Installing the lower roller - insert the plate into the profile
We press the spring, tucking the roller body inside. We insert a screw into the hole, trying to get into the socket, and tighten it with a hexagon. You may need it in a different size - slightly smaller than the others - since this screw is usually thinner and longer.
Press the roller, insert the screw
There is no need to tighten it all the way. So that it goes into the plate half a centimeter or so. Then, when installing the door and adjusting its travel, this screw adjusts the position of the sash - the angle is raised or lowered.
Tighten the screw that fixes the roller
If you press the roller wheel, it will go into the housing, then return due to the elasticity of the spring. This simple mechanism ensures smooth movement of the sliding wardrobe door.
Having assembled all the sashes, we proceed to installing the guides. They must be located strictly one below the other, even without deviations of a millimeter. Use a plumb line or a laser level (read how to use a laser level here).
First screw on the top guide. It is attached either to the ceiling or to the top of the cabinet. The distance from the shelves is at least 100 mm, otherwise the doors will touch shelves, things, and hangers.
Screw on the top guide
We insert bumper springs into the grooves in the lower guide from the sides. They will limit the movement of the door. The number of springs is equal to the number of leaves; they are installed at both ends.
Door stoppers
Insert travel limiter springs
If you don’t have a laser level, so you don’t have to worry about plumb lines, you can start by simply laying the bottom guide without fixing it yet. Then install one blade, placing its upper rollers at the top and installing the lower ones in the desired groove. This way the doors will connect the upper and lower guides.
Having aligned the sash vertically, automatically align the bottom guide
By aligning the canvas strictly vertically, you will automatically align the lower guide. All that remains is to screw it on. Just be careful that the doors do not move.
The last thing left to do is to glue the Schlegel on the sides. This is a fleecy self-adhesive strip that softens the impact of the sash on the walls of the cabinet (or simply on the walls, if the cabinet is frameless).
The final touch is the Schlegel sticker
Here the wardrobe doors are installed and ready to go. You can watch the process again in the video.
Free online designer for wardrobes and wardrobe systems “Wardrobe.online”
Cabinets for every taste and individual tasks at the best price options!
We will design your dream wardrobe professionally and free of charge.
You are on the page of a free online designer of wardrobes and wardrobe systems. We are happy to greet you! Our developers have tried to make using the designer simple and clear - you don’t have to spend a lot of time.
Wardrobe.online wardrobes and wardrobe systems are easy to use and flexibly adapt to each specific room; you choose the configuration, purpose and design. We provide ready-made free cabinet modules so that you can create a unique product that is 100% suitable for your needs and preferences.
We recommend that you first study the step-by-step instructions for working with the designer - then you will be able to take advantage of all its capabilities. It only takes 4 steps to design the perfect closet for you. Instructions can be found on this page below.