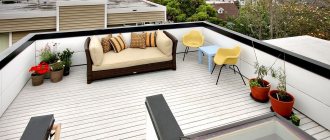
If previously in Russia most private houses were built one-story, now you can often find cottages with two floors and an attic. Moreover, the option with a residential attic is being chosen more and more often due to its cost-effectiveness and ease of construction. The main nuance of such buildings is the attic windows, which provide the rooms under the roof with the necessary insolation and effective ventilation. Fortunately, they can be made to any size; there are a lot of structural materials for making such window blocks.
What are roof windows
François Mansart was the first architect to convert an attic space into living space. This happened in 1630. Therefore, the attic began to be called “attic”, and the windows “dormer”.
Their main difference from façade ones is that the former are mounted in an inclined plane, the latter in a vertical plane. Hence the increased requirements; they will have to withstand strong gusts of wind, rain, snow, and hail. They must be installed carefully so as not to be bent and they do not leak. But if you look at the photo, it immediately becomes clear that even self-made ones make the house stand out from other buildings.
Standard sizes of roof windows
dormer windows photo
Installation should be carried out on roofs with a slope of 150 to 900. Manufacturers offer from 6 to 14 standard sizes. The rest of the differences concern:
- material of manufacture;
- option for opening the doors;
- complete set of fittings;
- type of glass unit.
Custom orders are limited to the minimum and maximum design sizes available from the manufacturer.
The rating of manufacturers in our market consists of 3 companies:
- Velux (Denmark). In the industry since 1941.
- Fakro (Poland). The company has been operating since 1986 and has been able to develop from an ordinary carpentry workshop into a leading manufacturer.
- ROTO (Germany). The company has satisfied the needs of 500 million people and has been in the industry for over 80 years.
The standard minimum size is 55X78 cm, maximum 114X140 cm. Each manufacturer has its own line:
| width, cm | height, cm | approximate effective lighting area, m2 | Velux | FAKRO | ROTO |
| 114 | 140 | 1,16 | + | + | + |
| 134 | 98 | 0,92 | + | ||
| 114 | 118 | 0,95 | + | + | + |
| 94 | 140 | 0,92 | + | + | + |
| 94 | 118 | 0,75 | + | + | |
| 78 | 160 | 0,85 | + | + | |
| 78 | 140 | 0,73 | + | + | |
| 78 | 118 | 0,59 | + | + | |
| 78 | 98 | 0,47 | + | + | |
| 74 | 160 | 0,83 | + | ||
| 74 | 140 | 0,70 | + | ||
| 74 | 118 | 0,50 | + | ||
| 74 | 98 | 0,40 | + | ||
| 66 | 118 | 0,47 | + | + | |
| 66 | 98 | 0,38 | + | ||
| 65 | 140 | 0,39 | + | ||
| 65 | 118 | 0,38 | + | ||
| 55 | 98 | 0,29 | + | ||
| 55 | 78 | 0,22 | + | + | |
| 54 | 98 | 0,21 | + | ||
| 54 | 78 | 0,20 | + |
Kinds
Based on the type of material used, the following are distinguished:
- Wooden , with doors and a frame made of laminated veneer lumber.
- With polyurethane coating . This is a wooden structure, with a coating that protects the color and protects against yellowing.
- With PVC profile . Recommended for installation in bathrooms and kitchens.
- Armored.
The latter type is mounted only on roofs made of concrete monolithic structures, as they have significant weight. Wooden frames are an expensive pleasure.
Wooden roof windows
Depending on the opening method, there are:
- with a central axis of rotation of the sash;
- with a raised steering axis;
- with a side pivot axis or roof hatches;
- with a lower rotating axis, that is, the frame opens forward;
- combined, opening outwards up to 450 and rotating.
The latest development is designs that can be opened by remote control or “smart windows”. This is a good solution for rooms where the glazing is very large. There are models that close and open depending on rain or smoke. They can be set to open at a certain period of time.
Smart windows
Classification by design features:
- Standard. They are made in the form of a square or rectangle. They have the simplest design: a sash and a frame, and can be blind.
- Extensions. They can have a rectangular or semicircular shape. More often used as an additional decorative top element.
- Balcony models. They allow a person to go outside, that is, they form a kind of balcony. The second option is that in the closed position it follows the shape of the roof, and after opening, the sash rises up and out.
- Light tunnel. A structure that does not have direct contact with the room and is intended to illuminate a space where artificial lighting is not possible.
- Additional window element. It must be mounted in the same plane as the roof window. These models are installed in cases where the existing glazing is not enough to illuminate the room, and 2 standard structures cannot be installed due to the small height of the roof.
- Arc, that is, the structure has curved shapes, depending on the radius of the roof.
- Cornice. Designed for roofs with a high wall underneath the wall.
- Anti-aircraft or intended for flat roofs.
Combined structures are placed in a separate category. Up to 6 double-glazed windows of different sizes and shapes can be installed on one slope. Manufacturers also offer models for ridges and sloping roofs. It is possible to combine translucent façade structures with existing ones.
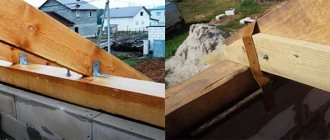
Rafter system
When independently building private houses with an attic, they usually choose a broken roof. It allows you to get a room of significant area. Compared to a gable.
With the same width of the base (of the house), the attic space under a sloping roof is larger than under a regular gable roof. The rafter system is becoming more complex, but a gable roof with an attic under a sloping roof is still more popular
The design of the sloping mansard roof is such that the overhangs can be lowered quite low, giving the house an interesting look. But the long overhang of the roof serves not only a decorative role. They also cover the upper part of the wall from precipitation and divert the bulk of the water away from the foundation. Although when planning you need to keep in mind that in strong winds they increase windage. Because of this, it is necessary to use more powerful boards and beams. Therefore, the size of the roof overhang is chosen based on several considerations, the main one of which is weather conditions.
Tilt angle
The choice of roof slope depends on the roofing material. But you can change your mind about the material. What cannot be changed are regions and weather conditions. So they are decisive in choosing the angle of inclination of the attic roof.
The classic version is shown in the figure. The lower slopes in relation to the plane of the attic floor are inclined by 60°, the upper slopes by 30°. Based on these data and the parameters of your building, you can calculate all lengths. Just take into account that according to SNiP, the ceiling height in the attic cannot be less than 2 m. Then, by definition, this is an attic. A person will feel comfortable if the ceiling is raised to a height of at least 2.5 m. Based on this, according to the rules of geometry, calculate the required lengths.
Tilt angles in the classic version
In the classic version, the load from precipitation on the side surfaces may not be taken into account. Precipitation can only be retained on the upper part, the angle of inclination of which is less than 45°.
In general, the inclination of the side surfaces usually varies between 45° and up to 80°. The steeper the slope, the more windage it has. This must be taken into account. And in regions with strong winds, it is better to make flatter roofs. Then wind loads will be perceived much better.
Types of rafter systems for sloping roofs
To make the frame of a sloping roof with your own hands, pine lumber is most often used, grade no lower than 2. The choice of cross-section of timber and boards depends on the size of the roof, the selected roofing covering (its weight), wind and snow loads in the region, and the pitch of rafter installation. All these parameters are taken into account in the calculation. The methodology is prescribed in SNiP 2.08.01-89 and TKP 45-5.05-146-2009.
The design of a sloping mansard roof is one of the options for the rafter system (the most common)
With layered rafters
The figure below shows a drawing of a frame with hanging rafters. It can only be implemented if the base of the upper triangle is no more than 4.5 meters (in this case, this is the width of the attic room). If more, you will have to make layered rafters, which should rest on the load-bearing wall in the middle (the attic will be divided into two parts by a row of beams).
One of the options for constructing a frame with hanging rafters
Another version of the upper part is shown in the photo below (the picture is clickable). In this case, the side rafters are reinforced with struts. They significantly increase the rigidity of the system.
There is a second way to achieve a similar effect - to establish contractions - in the figure they are only outlined with barely visible lines. The length of the side rafter leg is divided by three, and contractions are established in these places. They will be needed if the roof covering will have a significant weight.
Option for installing a sloping roof truss system - with struts that increase the rigidity of the system
For a small building, the roof frame can be generally simple: at the top there are two hanging rafters, a tie rod, floor beams, posts and side rafters (pictured below).
Construction of a rafter system for a broken mansard roof for a small house
Rafter installation step
The attic sloping roof of a small house (no more than 6-7 meters wide) has been built so many times that, based on experience, we can say what materials should be used. Many parameters are dependent on other materials. For example, the installation step of the rafters is tied to the parameters of the insulation.
The attic will need to be insulated, so they try to adjust the pitch of the rafters to the width of the insulation
To ensure that there is as little waste as possible during insulation and installation is simpler, it is necessary that the distance from one rack to another be slightly less than the width of the insulation (20-30 mm). So, if you are going to use mineral wool, its width is 60 cm. Then the racks need to be installed so that the gap between two adjacent ones is 57-58 cm and no more.
Dimensions of boards for the rafter system
The width of the board for the rafter leg is again determined based on the insulation. For the central zone of Russia, the required thickness of basalt wool is 200-250 mm. That's not all. In order for the thermal insulation to dry, a ventilation gap of 20-30 mm is required (without it, condensation will gradually rot the wood and render the mineral wool unusable). In total, it turns out that the minimum width of the rafter leg should be 230 mm. The thickness of the board is at least 50 mm. This is in regions with light winds and not very heavy snowfalls. To summarize, for all rafters - ridge and side - a board of 230 * 50 mm is required.
You can do double-layer insulation. It will even be warmer - all the cold bridges will be blocked
If lumber with such characteristics turns out to be too expensive, it will be possible to do the insulation in two directions: partly along the rafters, partly, filling the sheathing, across. You can lay a minimum of 100 mm of basalt wool, therefore you can take a standard board 50 * 150 mm and leave a 50 mm ventilation gap, or order a non-standard 130 * 50 mm. It's up to you to see which is more profitable for the money.
For racks and beams, it is better to take a beam of at least 80 * 80 mm, better - 100 * 100 mm. Especially in areas with difficult weather conditions - heavy snowfalls or strong winds.
Order a more accurate calculation from specialists. This is a long process consisting of collecting loads from the roofing material, the structural elements themselves, wind and snow loads. After which, according to a certain formula, elements are selected.
Features of insulation of mansard-type roofs are described here.
How to choose a roof window
Before purchasing you need to decide:
- with dimensions;
- quantity;
- opening method;
- material of manufacture.
Depending on the purpose of the room, it is recommended to give preference to wooden structures for bedrooms, children's rooms and living rooms. Wood is an environmentally friendly material; winter-harvested pine performed best in this class. It is labeled as class 1A.
Most often, installation is carried out between the rafters. The distance between them should be 4-6 cm greater than the width of the frame itself. It is very simple to calculate, with a distance between the rafters of 84 cm, you will need a double-glazed window 78 cm wide, that is, there is a margin of 3 cm on each side.
The height (length) is selected depending on the roof slope. If the slope varies from 150 to 300, then the height should be 160 cm. It will provide a good overview, and there will be excellent lighting inside.
When calculating the quantity, use the ratio 1:10. This means that for 10 sq.m. you will need 1 sq.m. glazing. If you want to make the room as illuminated as possible, it is recommended to use a ratio of 1:6. It should also be taken into account that glazing on different sides will give much more light than one large one on one wall.
When choosing an opening method, you must be guided by the convenience and configuration of the roof. The most popular model is mid-rotation. The structure can be in an inclined position or rotated around its axis by 1800.
There are many options for opening, the main thing is to choose only those functions that are really needed in a particular situation, so as not to overpay for features that will not be required during operation. Particular attention should be paid to service windows if you have to go onto the roof in the future, for example, to remove snow or carry out repair work. They can act as an emergency exit. But, if you want to get maximum comfort, buy “smart” ones.
At the next stage, you need to choose between wooden and plastic structures. The thermal conductivity of both is the same, so this property is not decisive when choosing.
The resistance to environmental influences of plastic is an order of magnitude higher than that of wood. However, wooden structures covered with PVC also tolerate precipitation well.
In terms of strength, wooden structures are not inferior to PVC models, reinforced with aluminum load-bearing profiles.
Wooden models will be more expensive, but plastic ones are easier to install, make repairs and do not require additional maintenance. They do not fade, manufacturers offer a wide range of colors. However, wooden structures look natural and beautiful, and are environmentally friendly.
A few more tips:
- in rooms where you plan to dry clothes, do laundry, or have a bathroom or toilet room, it is better to choose a moisture-resistant design;
- Regardless of the chosen design, the outer glass must be tempered;
- ideal window ventilation should look like a labyrinth, with an adjustment function, this will keep the room warm and ensure the passage of a sufficient amount of air;
- it is necessary to check all wooden parts of the windows; they must be varnished to protect the wood from moisture and extend their service life;
- You cannot buy wooden models with knots and defects; all parts must have the same color and structure.
Particular attention must be paid to slopes. The lower ones are made perpendicular to the floor, and the upper ones - parallel. This will make it possible to avoid condensation on the glass during operation.
Under no circumstances should you be embarrassed to ask about the price. The cost depends not only on the type and size of the structure, but also on the popularity of the brand and accessories. Be sure to make sure that the manufacturer provides a warranty; it should not be less than 5 years.
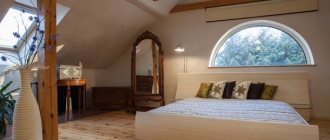
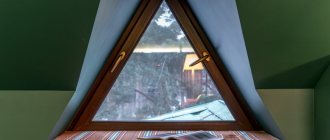
Dormer windows in the interior are an opportunity to realize the most daring ideas in interior design. Once again you can be convinced of this if you look at photos of attics with and without windows.
Type of glass
Dormer windows are installed in the plane of the slopes - that is, at an angle, and not vertically. They bear more loads than conventional façade windows. For this reason, high-strength glass - tempered or triplex - is used for roof windows. Let's talk about each of them.
Strained glass
Tempered glass is suitable for all rooms except children's rooms. It is impact-resistant and adapted to mechanical loads. To break it, you have to try. He is not afraid of accidental blows. If you rearrange furniture and touch the window with a corner, the glass will not crack.
This glass is considered safe. If it breaks, the pieces will be small and the edges will not be sharp. You won't cut yourself.
Tempered glass is also heat-resistant. It will not crack due to sudden temperature changes or heating - even if the outside of the glass is covered with ice or there is a heater in the room under the window.
Another advantage of tempered glass is price. It is cheaper than triplex.
Triplex
If you are installing skylights in a child's room, choose triplex glass.
Triplex consists of two or more tempered glasses connected by a polymer film. This is laminated glass of increased strength. It can withstand mechanical loads very well. If children hit the window with a ball, the glass will not break - the polymer film absorbs the impact.
Triplex glass tolerates temperature changes well. It will not crack when the window is covered with a crust of ice or covered with snow. When heated, triplex also retains its working properties - you can install a radiator or heater under the window, and the glass will not be harmed.
A roof window with triplex glass is more expensive than with regular tempered glass, but it is safer. If you break it, the glass will become covered with a “web” of cracks. The fragments will hang on the film and will not fall down, you will not get hurt by them.
Dormer windows pros and cons
windows on the roof of the attic photo
The main advantage is the ability to create interesting lighting in the attic. Other advantages include:
- the number of double-glazed windows and their shape can only be limited by the buyer’s imagination;
- there is much more light from attic glass structures than from façade ones;
- modern materials make it possible to produce roof windows that can withstand any load;
- a huge range: anti-vandal designs, with a mirror effect and even absorbing light.
But attic structures are not the only advantages. The main disadvantage is that they get dirty very quickly. This must be taken into account when choosing an opening method to make it convenient to wash the glass. The second disadvantage is the high price for the structures themselves and their installation. But if you have certain skills, you can install and do them yourself.
Eventually
Dormer windows not only provide a comfortable level of natural light in living spaces, but also make the house more attractive. To ensure that no problems arise during operation, and that the structures reach their long-term service life, it is necessary:
- When choosing, take into account the characteristics of the roof and the technical nuances of windows of various models.
- Strictly following the technology for preparing the opening and installation, proper waterproofing, is the key to reliability and durability.
- Don’t be lazy about removing snow, if the need arises, if the slopes are flat and the roof is metal, it’s worth taking into account the advice of experts and proactively installing snow guards.
In previous materials, in as much detail as possible - about the installation of roof windows, as well as design and selection. The video contains complete instructions for installation in a finished opening.
Subscribe to our Telegram channelExclusive posts every week
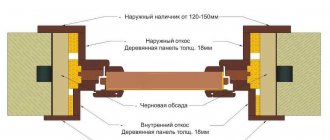
Finishing the attic window from the inside
Dormer windows require a high degree of watertightness around the entire perimeter of the roof. For this purpose, special salaries are established. They protect against freezing and liquid accumulation.
The next important point is the insulation of the glazing installation area and slopes. For these purposes, soft thermal insulation materials are used, for example, mineral wool. You cannot foam with polyurethane foam, as it will begin to crumble over time.
finishing of the attic window photo
The lower slope must be made perpendicular, and the upper slope parallel to the floor. Otherwise, condensation will collect, and fungus and mold may appear around. To finish slopes you can use:
- drywall;
- lining;
- plastic panels;
- plaster, although it does not retain heat well;
- OSB boards.
In rooms where high humidity is expected, it is better to use materials that are resistant to moisture, for example, moisture-resistant plasterboard. The slabs are fastened to a special frame using self-tapping screws. It would not be superfluous to lay a hydro- and/or vapor barrier layer.
Functions
Installation of window structures in the attic is designed to solve the following problems:
- ensuring an influx of sunlight;
- increasing decorative appeal;
- smoke elimination;
- heat preservation;
- ventilation;
- reduction of heat loss.
Also, the presence of a window opening in the roof visually increases the space and increases the operating comfort of the room.
Decoration of dormer windows
The easiest way to decorate is with the help of a lower and upper cornice. For decoration, it is better to choose the lightest tulle or curtain that will not sag. If they are located almost at the intersection of the fold of the roof, and the curtains are too low, then it is better to fix the cornice higher, even on the ceiling. Decorating with cafe cornices will look impressive, as they do not distract attention from the beauty of the entire structure and curtains, for example, pleated curtains.
design of dormer windows photo
If there is a very large bevel or windows with a large slope, then roller blinds or Roman blinds are suitable. They are convenient because they are easy to open and close, even if the glass unit is tilted, and they do not require careful maintenance. Austrian roller blinds will look beautiful.
If you like an ascetic interior, then you can completely abandon any textiles. On the attic floor, such a solution will look as natural as possible.
Oblique-shaped structures in the attic can be decorated with bending models of cornices made of polymer materials or corner ones with rotating elements.
dormer windows photo design
Condensation on roof windows
The appearance of condensation on roof windows in winter is a natural phenomenon. This is due to the large temperature difference between inside and outside. But condensation can also appear for other reasons:
- improper installation of slopes;
- violation or absence of hydro- and thermal insulation of the layer;
- poor insulation or incorrectly selected material for this;
- violation of installation technology.
Poor installation leads to the appearance of cold bridges, after which condensation appears in winter.
The last factor that provokes the appearance of condensation is the defective glass unit itself, which is also characterized by the appearance of liquid between the glasses. The design is subject to free replacement under the manufacturer's warranty.
There are completely harmless reasons that are very easy to eliminate. Condensation may appear if the room is not ventilated. If drops of moisture appear while taking a shower, then this is a natural process. This also applies to rooms where food is prepared. The main thing is that after cooking or taking a shower, condensation does not appear again.
Condensation on roof windows
If condensation appears during and immediately after construction and repair work, this is normal. When building materials dry, a lot of moisture is released. The same situation arises if there are a lot of living plants in a room under the roof. Some of them are prone to releasing excess moisture.
What to do if it's blowing from the attic window
Blowing is often associated with:
- cheap accessories;
- poor fit of all parts, that is, poor quality manufacturing of the structure;
- poor quality installation.
Problems arise due to insufficient pressure on the sash. If a draft is felt throughout the entire perimeter, then this is the reason. To correct the situation, it must be switched to winter mode.
If you start blowing from under the seal, most likely it has dried out or lost its elasticity. The problem is solved by replacing the seal.
If it blows from the side of the hinges, they need to be tightened. It is necessary to check the structure for the presence of through and oblique holes. They could be made for installing roller shutters or curtains. To prevent blowing from the holes, it is necessary to seal them with sealant.
How to make a roof window with your own hands
The simplest design consists of:
- base plate;
- frames with glass;
- coaming or continuous fencing for the opening.
The support plate is made of sheet steel, its thickness should be from 1 mm to 1.5 mm. It is secured to the supporting structure with nails. It is better to use pine or PVC as a frame. It is better to take tempered glass, in extreme cases, only the top glass, since attic structures are subject to a large load from snow and rain.
Coamings are made from boards with a thickness of 40 mm to 50 mm. To achieve maximum joining in the corners, use waterproof glue. The support plate is attached to the coaming with screws.
The frame must have overlaps on the coaming; if this is not done, rainwater will penetrate into the room. It is necessary to attach sealing tape around the perimeter of the frame and coaming. Glass installation is carried out using putty, with additional fixation with glazing beads.
Before installation work, all wood parts must be impregnated with scrap wood or hot drying oil. Only after the drying oil has completely dried can oil paint be applied.
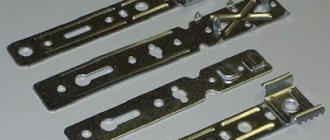
It’s unlikely that you can make the fittings (self-locking hinges and handles) yourself, so it’s easier to purchase them. The fastening mechanism that is installed on industrial windows can be replaced with a toothed rack.
If you have carpentry skills, you won’t have any problems creating a roof window with your own hands. You can always watch a video that describes the whole process in detail, download photos with drawings. You can also buy a new one, but if you install it yourself, the manufacturer’s warranty will not be provided.
Insulation work
All the difficulties in installing a roof window lie in achieving the required level of waterproofing. Additional materials used at this stage are secured with a construction stapler.
A drainage gutter is created to remove excess moisture. It is placed in the upper part of the frame at a slight angle to the slope.
The trimmed material, which was left at the preparation stage, is carefully placed into the formed seam. From the outside, the roofing material is placed under the frame, the fasteners are screwed in completely.
How to insulate roof windows
Before installation, the external flashing is installed from the outside. Thermal insulation material is laid out over the entire area of the slopes inside, without gaps.
The following are used as thermal insulation materials:
- glass wool, which is very soft and elastic, inexpensive and lightweight;
- basalt wool, which is universal, but quite hard;
- expanded polystyrene: durable and inexpensive material, with low thermal conductivity.
After laying the insulation, the installation work is completed by laying the waterproofing.
You cannot use metal elements to install insulation; they will conduct cold air.
Preparatory work
Before installation, markings are carried out on the inside. After determining the space that the frame will occupy, the space is cleared of beams and other materials.
When cutting the waterproofing layer, leave a 20 cm margin. It will be needed to increase the insulation of the frame. You need to work with roofing material carefully, as it will be reused.