Today it is difficult to imagine a country house without floor heating. Before you start installing the heating, you need to calculate the length of the pipe (calculator) that is used for the heated floor. Almost every country house has its own heating system; the owners of such houses independently install a water floor - if this is provided for by the layout of the premises. Of course, it is possible to install such warm floors in apartments, but such a process can bring a lot of trouble to both apartment owners and employees. This is due to the fact that it is impossible to connect the heated floor to the heating system, and installing an additional boiler is problematic.
The size and shape of the pipe for a heated floor can be different, therefore, in order to understand how to calculate a heated floor, you need to understand in more detail the system and structure of such a system.
How can I install a heated floor?
There are several ways to install heated floors. For example, we can consider 2 methods.
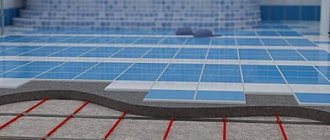
Grazing. This floor has a flooring made of various materials, such as polystyrene or wood. It is worth noting that such a floor is faster to install and put into operation, since it does not require additional time for pouring the screed and drying it.
Concrete. This type of floor has a screed, which will take more time to apply, so if you want to make a warm floor as quickly as possible, then this option will not suit you.
In any case, installing a heated floor is a difficult task, so it is not recommended to carry out this process yourself. If there are no additional funds for workers, then you can install the floor yourself, but strictly following the installation instructions.
Temperature
The maximum recommended temperature in pipes should not exceed 60 degrees. In addition, it is knocked down by various flooring options, for example, laminate or linoleum, so in fact it turns out to be about 35 degrees.
Be that as it may, it is worth installing sensors to monitor the temperature. One of them must be placed immediately at the entrance to the system, after the pump. The second sensor is installed in front of the pump, respectively, at the outlet of the system.
The temperature difference between the readings of the first and second sensors should not exceed 5 degrees, since otherwise this is a signal of extremely large heat losses. Thus, it will be necessary to eliminate the cause of these problems.
In addition, there are certain parameters for each type of premises:
- In living rooms, the floor temperature should be about 29 degrees.
- Passage-type premises should have a temperature setting of 35 degrees.
- Workspaces should be slightly colder than walk-through areas - 33 degrees.
Concrete installation of heated floors
Despite the fact that it takes longer to lay heated floors this way, it is more popular. The pipe for underfloor heating is selected depending on the materials. It is worth noting that the price of the pipe will also depend on the material from which it is made. With this method, the pipe is laid along the contour. After laying the pipe, it is filled with concrete screed without additional thermal insulation materials.
Calculation by computer program
A special program that facilitates calculations
To calculate you will need:
- enter data describing the room in which the floor is supposed to be installed;
- determine the initial data for the calculation. Basic data includes:
- the region where the room is located, which determines the average air temperature and the required floor temperature;
- indoor humidity;
- floor covering area;
- the number of windows, entrance doors and walls facing the street;
- calculate heat losses;
- determine the location of equipment and pipe laying. Design is carried out according to the given parameters, that is, the program will reflect the entered information schematically;
Layout of floor pipes, compiled according to specified parameters
- calculate the amount of materials for the floor. The program will automatically calculate the pipe footage for a heated floor and other parameters that need to be taken into account when installing an additional heating source;
- Using the program you can also calculate:
- hydraulic resistance parameters;
- the required power of the heating boiler and other equipment required for arranging the floor: expansion tank, pump supplying water to the system, and so on.
A detailed description and example of using the VALTEC program is presented in the video.
Correct calculation is the key to installing the optimal floor structure. It is advisable that the calculation be carried out by qualified specialists who, having determined all the conditions, will be able to calculate the optimal parameters. If you are laying the floor yourself, then it is recommended to use computer programs for calculations.
Calculation and installation of heated floors
Before you begin installing the floor, you need to calculate the required number of pipes and other materials. The first step is to divide the room into several identical squares. The number of parts in a room depends on the area of the room and its geometry.
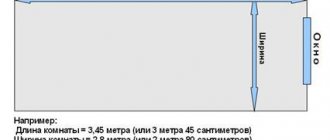
Calculator - the simplest calculation of pipe length:
Calculation of the required amount of pipe
The maximum circuit length required for a warm water floor should not exceed 120 meters. It is worth noting that these dimensions are indicated for several reasons.
Due to the fact that water in the pipes can affect the integrity of the screed, if it is installed incorrectly, the floor can be damaged. An increase or decrease in temperature negatively affects the quality of a wooden floor or linoleum. By choosing the optimal square sizes, you distribute energy and water through the pipes more efficiently.
Once the room has been divided into parts, you can begin planning the shape of the pipe.
Methods for laying pipes for heated floors
There are 4 ways to lay the pipe:
- Snake;
- Double snake (fits into 2 pipes);
- Snail. The pipe is laid in 2 times (bends) coming from one source, gradually rounding towards the middle;
- Corner snake. Two pipes come out from one corner: the first pipe starts the snake, the second ends it.
Depending on which pipe laying method you choose, you need to calculate the number of pipes. It is worth noting that pipes can be laid in several ways.
Which installation method should you choose?
In large rooms that have a flat square or rectangular shape, it is recommended to use the “snail” installation method, so the large room will always be warm and cozy.
If the room is long or small, then it is recommended to use a “snake”.
Laying step
In order for a person’s feet not to feel the difference between sections of the floor, it is necessary to adhere to a certain length between the pipes, at the edge this length should be approximately 10 cm, then with a difference of 5 cm, for example, 15 cm, 20 cm, 25 cm .
The distance between the pipes should not exceed 30 cm, otherwise walking on such a floor will be simply unpleasant.
What is needed for the calculation
In order for the house to be warm, the heating system must compensate for all heat losses through the building envelope, windows and doors, and the ventilation system. Therefore, the main parameters that will be required for calculations are:
- house dimensions;
- wall and ceiling materials;
- sizes, number and designs of windows and doors;
- ventilation power (volume of air exchange), etc.
You also need to take into account the climate in the region (minimum winter temperature) and the desired air temperature in each room.
These data will allow you to calculate the required thermal power of the system, which is the main parameter for determining the pump power, coolant temperature, length and cross-section of pipes, etc.
A calculator located on the websites of many construction companies that provide installation services will help you perform a thermal calculation of a pipe for a heated floor.
Screenshot from the calculator program page Source www.apostroy.ru
Note! If a water heated floor is used as an additional, rather than the main source of heat, the resulting power values are reduced to a certain proportion.
Calculation of pipes for heated floors
On average, 5 linear meters of pipe are needed per 1 m2. This method is easier to determine how many pipes per m2 are needed to install a heated floor. With this calculation, the step length is 20 cm. The required amount of pipe can be determined using the formula: L = S / N * 1.1, where:
- S – area of the room.
- N – Laying step.
- 1.1 – pipe reserve for turns.
When calculating, it is also necessary to add the number of meters from the floor to the collector and back. Example:
- Floor area (usable area): 15 m2;
- Distance from floor to collector: 4 m;
- Step for laying heated floors: 15 cm (0.15 m);
- Calculations: 15 / 0.15 * 1.1 + (4 * 2) = 118 m.
Calculation for wrong rooms
It happens that rooms have complex geometry. To calculate the total area, you need to divide such a room into several zones. After this, calculate their area and sum them up (see figure).
Two options for calculating the area of an irregularly shaped room. The total area of the room is equal to the area of zones A + B + C.
After the area of each part of the room has been calculated, we sum them up. After this, we substitute the resulting value into the same formula:
S/H x 1.1 + D x 2 = L
Sometimes in one part of the room the heated floor is laid with a pipe pitch different from the other. In this case, it is necessary to calculate the pipe lengths for each part of the room separately. And the results are summed up.
What should be the length of the water heated floor circuit?
These parameters must be calculated based on the diameter and material from which the pipes are made. So, for example, for metal-plastic pipes with a diameter of 16 inches, the length of the water-heated floor contour should not exceed 100 meters. The optimal length for such a pipe is 75-80 meters.
For pipes made of cross-linked polyethylene with a diameter of 18 mm, the length of the contour on the surface for a warm floor should not exceed 120 meters. In practice, this length is 90-100 meters.
For a metal-plastic pipe with a diameter of 20 mm, the maximum length of the heated floor should be approximately 100-120 meters, depending on the manufacturer.
It is recommended to select pipes for laying on the floor based on the area of the room. It is worth noting that their durability and quality of work depend on what material the pipes are made of and how they are laid on the surface. The best option would be metal-plastic pipes.
Assessment of technical properties when choosing pipes
Due to non-standard operating conditions, high demands are placed on the material and size of the water floor coil:
- chemical inertness , resistance to corrosive processes;
- the presence of an absolutely smooth internal coating , not prone to the formation of limescale build-ups;
- strength - the walls are constantly exposed to the coolant from the inside, and the screed from the outside; the pipe must withstand a pressure of up to 10 bar.
It is desirable that the heating branch have a small specific gravity. The water floor pie already places a significant load on the ceiling, and a heavy pipeline will only aggravate the situation.
According to SNiP, the use of welded pipes in closed heating systems is prohibited, regardless of the type of seam: spiral or straight
Three categories of rolled pipes meet the listed requirements to one degree or another: cross-linked polyethylene, metal-plastic, and copper.
Option #1 - cross-linked polyethylene (PEX)
The material has a mesh wide-cell structure of molecular bonds. Modified polyethylene differs from conventional polyethylene in the presence of both longitudinal and transverse ligaments. This structure increases specific gravity, mechanical strength and chemical resistance.
A water circuit made of PEX pipes has a number of advantages:
- high elasticity , allowing the coil to be laid with a small bend radius;
- safety – when heated, the material does not emit harmful components;
- heat resistance : softening – from 150 °C, melting – 200 °C, combustion – 400 °C;
- maintains structure during temperature fluctuations;
- resistance to damage - biological destroyers and chemical reagents.
The pipeline retains its original throughput - no sediment is deposited on the walls. The estimated service life of a PEX circuit is 50 years.
The disadvantages of cross-linked polyethylene include: fear of sunlight, the negative effects of oxygen when it penetrates inside the structure, the need for rigid fixation of the coil during installation
There are four product groups:
- PEX-a – peroxide cross-linking . The most durable and uniform structure with a bond density of up to 75% is achieved.
- PEX-b – silane cross-linking . The technology uses silanides - toxic substances that are unacceptable for household use. Manufacturers of plumbing products replace it with a safe reagent. Pipes with a hygienic certificate are acceptable for installation. Crosslink density – 65-70%.
- PEX-c – radiation method . Polyethylene is irradiated with a stream of gamma rays or an electron. As a result, the bonds are compacted up to 60%. Disadvantages of PEX-c: unsafe use, uneven cross-linking.
- PEX-d – nitriding . The reaction to create a network occurs due to nitrogen radicals. The output is a material with a crosslink density of about 60-70%.
The strength characteristics of PEX pipes depend on the method of cross-linking polyethylene.
If you choose pipes made from cross-linked polyethylene, we recommend that you familiarize yourself with the rules for installing a heated floor system made from them.
Option #2 - metal-plastic
The leader in rolled pipes for installing heated floors is metal-plastic. Structurally, the material includes five layers.
The inner coating and outer shell are high-density polyethylene, which gives the pipe the necessary smoothness and heat resistance. Intermediate layer – aluminum spacer
The metal increases the strength of the line, reduces the rate of thermal expansion and acts as an anti-diffusion barrier - it blocks the flow of oxygen to the coolant.
Features of metal-plastic pipes:
- good thermal conductivity;
- ability to maintain a given configuration;
- operating temperature with preservation of properties – 110 °C;
- low specific gravity;
- noiseless movement of the coolant;
- safety of use;
- corrosion resistance;
- service life – up to 50 years.
The disadvantage of composite pipes is the inadmissibility of bending about the axis. Repeated twisting risks damaging the aluminum layer. We recommend that you familiarize yourself with the correct technology for installing metal-plastic pipes, which will help avoid damage.
Option #3 - copper pipes
In terms of technical and operational characteristics, yellow metal will be the best choice. However, its demand is limited by its high cost.
Compared to synthetic pipelines, the copper circuit wins on several points: thermal conductivity, thermal and physical strength, unlimited bending variability, absolute impermeability to gases
In addition to being expensive, copper piping has an additional disadvantage - the complexity of installation. To bend the contour you will need a press machine or pipe bender.
Option #4 - polypropylene and stainless steel
Sometimes a heating branch is created from polypropylene or stainless steel corrugated pipes. The first option is affordable, but quite rigid in bending - the minimum radius is eight times the diameter of the product.
This means that pipes with a standard size of 23 mm will have to be placed at a distance of 368 mm from each other - an increased laying step will not ensure uniform heating.
Stainless steel pipes have high thermal conductivity and good flexibility. Disadvantages: fragility of sealing rubber bands, creation of strong hydraulic resistance by corrugation
Floor installation steps
After you have chosen high-quality and reliable pipes, it is recommended to begin installing the heated floor. This needs to be done in several stages.
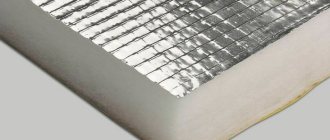
Installation of thermal insulation
At this stage, preparatory work is carried out, the floor is cleared and a layer of thermal insulation is laid. Polystyrene foam can act as thermal insulation. Layers of foam plastic are laid on the subfloor. The thickness of the foam should not exceed 15 cm. It is recommended to calculate the thickness depending on the size of the room, its location in the apartment, as well as the individual preferences of the person.
Installation of waterproofing
After the foam has been laid, it is necessary to lay a layer of waterproofing. Polyethylene film is suitable as waterproofing. Polyethylene film is fixed to the walls (near the baseboard), and the floor is reinforced with mesh on top.
Laying and securing pipes
Next, you can lay the pipes for the heated floor. Once you have calculated and chosen a pipe laying scheme, this process will not take you much time. When laying pipes, they must be secured to the reinforcing mesh with special braces or clamps.
Crimping
Pressure testing is practically the last stage of installing a heated floor. Pressure testing must be carried out within 24 hours at operating pressure. Thanks to this stage, mechanical damage to pipes can be identified and eliminated.
Pouring concrete mortar
All floor pouring work is carried out under pressure. It is worth noting that the thickness of the concrete layer should not exceed 7 cm.
After the concrete has dried, you can lay the floor. It is recommended to use tiles or linoleum as flooring. If you choose parquet or any other natural surface, due to possible temperature changes, such a surface may become unusable.
How to determine the optimal room temperature
In this case, no special difficulties arise. For orientation, you can use the recommended values, or come up with your own. Moreover, the floor covering must be taken into account.
The living room floor should be heated to 29 degrees. At a distance of more than half a meter from the external walls, the floor temperature should reach 35 degrees. If there is constantly high humidity in the room, you will need to heat the floor surface to 33 degrees.
If the house has wooden parquet, the floor should not be heated above 27 degrees, as the parquet may deteriorate.
Carpet is capable of retaining heat; it makes it possible to increase the temperature by about 4–5 degrees.
Manifold cabinet and its installation
Before calculating the pipe flow required for installation on the surface and underfloor heating, you need to prepare a place for the collector.
A manifold is a device that maintains pressure in pipes and heats used water. This device also allows you to maintain the required temperature in the room. It is worth noting that you need to buy a collector depending on the size of the room.
It is recommended to install and connect the collector with the help of professionals. If the manifold is not installed correctly, it may not work or may not function properly.
How and where should the manifold cabinet be installed?
There are no restrictions for installing a manifold cabinet; at the same time, there are several recommendations.
It is not recommended to install the cabinet too close to the floor. Calculate how many centimeters will be spent on screed, heat and waterproofing, as well as pipes, and only then plan the installation of the cabinet.
It is also not recommended to install the manifold cabinet too high, since ultimately the water circulation may occur unevenly. The optimal height for installing a cabinet is 20-30 cm above the bare floor.
What room requirements must be met when installing the system?
During installation work, the most correct decision would be when the pipeline is installed at the initial stage of construction of the floors. This method is 30–40% more economical than the radiator method. It is also possible to install a water heating structure in a ready-made room, but to save the family budget, you should pay attention to the following requirements:
- The height of the ceilings should allow the installation of heated floors with a thickness of 8 to 20 centimeters.
- The height of doorways should not be less than 210 centimeters.
- To install a cement-sand screed, the floor must be more durable.
- To avoid airiness of the contours and high hydraulic resistance, the surface for the base of the structure must be flat and clean. The permissible level of unevenness is no more than 5 millimeters.
And also in the building itself or in individual rooms where the heating system will be installed, plastering work must be done and all windows must be installed.
Calculation of the number of circuits
If you take into account all the rules, it becomes clear that one heated floor circuit is enough for small rooms. When the area of the room is much larger, you need to divide it into sections in a ratio of 1: 2. In other words, the width of the section will be less than its length, exactly half. To determine the number of sections, you need to know the following parameters:
- Step 15 cm - plot area 12 square meters. meters;
- 20 cm – 16 sq. meters;
- 25 cm - 20 sq. meters;
- 30 cm – 24 sq. meters.
Sometimes the supply section is made longer than 15 meters. Experts advise increasing the indicated values by another 2 square meters. meters.
Are two identical ones necessary and possible?
Naturally, the ideal situation would be when the loops are the same length. In this case, no adjustments or searches for balance will be needed. But this is mostly in theory. If you look at practice, it turns out that it is not even advisable to achieve such an equilibrium in a warm water floor.
The fact is that it is often necessary to lay heated floors in a facility consisting of several rooms. One of them is emphatically small, for example, a bathroom. Its area is 4-5 m2. In this case, a reasonable question arises: is it worth adjusting the entire area for a bathroom, dividing it into tiny sections?
Since this is not advisable, we approach another question: how not to lose pressure. And for this purpose, elements such as balancing valves have been created, the use of which consists in equalizing pressure losses along the circuits.
Again, you can use calculations. But they are complex. From the practice of carrying out work on installing a warm water floor, we can safely say that the variation in the size of the contours is possible within 30-40%. In this case, we have every chance to get the maximum effect from using a warm water floor.
Despite the considerable amount of materials on how to make a water floor yourself, it is better to turn to specialists. Only craftsmen can evaluate the working area and, if necessary, “manipulate” the diameter of the pipe, “cut” the area and combine the laying step when it comes to large areas.
Collector Features
This element of the heating system is very important, because it serves as the beginning and end of the circuit. That is why it is necessary to strictly observe the conditions for its installation. In order to determine the price of a collector, you will need to take into account a number of parameters, namely the size and type of the collector cabinet. However, here each system will be individual, but you can consider several cabinets available on the market: Internal models, recessed into the floor (length*depth*height, cm): 67*12.5*49.4 67*12.5*59, 4 67*12.5*74.4
External cabinets have slightly different parameters: 65.1*12*45.3 65.1*12*55.3 65.1*12*70.3 However, these indicators are not any kind of ideal. Each cabinet has the size set by the manufacturer. In addition, all of the above cabinet models are suitable for a double-circuit heating system, so they can be safely used in rooms measuring 40 m2. In order to understand what kind of cabinet is needed, you should start from its length, coupled with the following parameters:
- The installation of the cabinet must be done before pouring the screed for the heated water floor and installing its covering, so it is worth knowing in advance what height the structure of the heated water floor will take.
- The cabinet requires frequent access, so you need to take care of its availability.
The wardrobe is unlikely to be a desirable piece of decor, so many will want to hide it out of sight. In this case, you can leave about 20 cm above the floor surface, which will ensure its invisibility, but also ease of access. How to calculate a warm water floor, watch the video:
If the room is very large, is it necessary to create several circuits?
Of course, it is better to divide the heated floor in such rooms into parts and install several circuits.
This need is due to various reasons:
- The short length of the pipe will prevent the appearance of a “locked loop” when circulation of the coolant becomes impossible;
- The area of the concrete site should be less than 30 square meters. meters. The length of its sides should be in proportion 1:2. One of the ends of the slab must be less than 8 meters long.
How to calculate heat loss
The correctness of this calculation determines the amount of heat that needs to be supplied to the room so that it always has a comfortable temperature. The calculations performed will help determine the power of the heated floor, and will also help make the right choice of boiler and pump.
It is very difficult to perform such a calculation. We have to take into account quite a lot of different criteria:
- Season;
- Outside air temperature;
- Room type;
- Number and dimensions of the window;
- Floor covering.
- Insulation of walls;
- Where is the room located, below or on the upper floors;
- Alternative heat sources;
- Office equipment;
- Lighting.
To make this calculation more convenient, average values are taken. If a double-glazed window is installed in the house and good insulation is done, this parameter will be approximately equal to 40 W/m2.
Warm buildings with little thermal insulation constantly lose about 70–80 W/m2.
If you take an old house, heat loss increases sharply and approaches 100 W/m2.
In new cottages where the walls are not insulated and where panoramic windows are installed, losses can be about 300 W/m2.
Having chosen an approximate value for your room, you can begin calculating the replenishment of heat losses.