tree house
There are things that all children dream of. And this is not only a bicycle or a game console, the child also wants to have a place where he will feel like a complete master. Children are always looking for a building for themselves, so make the task easier for them, build a tree house and the child’s joy will know no bounds.
Of course, this is easier said than done, but the time and effort will definitely not be wasted. You need to try a little, think through everything carefully so that the design is reliable and safe.
Houses may differ in platform mounting, number of trees, structure, design, and so on.
Takashi Kobayashi House, Japan
0
Source:
Architect Takashi Kobayashi has big plans: he wants to build a Treehouse People community, where all people will exist side by side with living trees. His company's goal is to promote architecture that enriches Japan and the world, both environmentally and aesthetically. This particular house from the photograph can be found in the Japanese village of Nasu.
House construction plan
Step-by-step instructions on how to make a house with windows and doors to place on a tree:
- Cut out all the necessary parts.
- It is very good to sand every element of the future house.
- Treat each element with an antiseptic or special impregnation.
- On the selected tree, remove all unnecessary branches and mark the height of the platform.
- In two boards for support, drill oblong holes and respectively attach them to the trees with bolts.
- Measure the size of the jumpers between the boards.
- Mount the jumpers between the boards to provide stronger support.
- Assemble the platform frame using self-tapping screws, then attach it to the support boards using bolts.
- Additionally, strengthen the structure with 4 diagonal supports, which should be fixed to the trees.
- Secure the entire structure with metal plates or corners.
- Tighten all the bolts very tightly and check again all joints and structural elements for strength.
- If desired, you can add stiffeners.
- Cover the entire platform with plywood and lay it on the frame. This platform acts as the floor of the house.
- Carefully cover the veranda with a thin board.
- Build a wall frame taking into account window and door openings.
- Assemble all the walls into one structure.
- Reinforce window and door openings with additional bars so that windows and doors open easily and do not warp over time.
- Assemble the roof frame and fit it to the wall structure, cut out the necessary recesses for fastening.
- Installation of roof and walls.
- Adjust the walls and, if necessary, further strengthen the roof.
- Cover the outside walls with plywood and then with panels. Do not touch all window and door openings.
- Use a thin board to mount all window openings.
- Make window shutters, they will be safer for children.
- Attach them with loops to the openings.
- Make doors and also attach them with hinges.
- Attach the outer and inner handles to the door.
- Paint all the parts of the house, let dry and carefully disassemble into parts for fixing on the trees.
- Move the walls onto the platform and secure them with bars.
- Raise the roof over the walls and secure it.
- Secure the roof roof with self-tapping screws and washers.
- Design door and window openings.
Construction stages
First of all, you need to purchase all the necessary materials. You need to prepare sheets of plywood, beams, boards, roofing material, corners for fastening parts, screws, varnish, paint and brushes.
Stage 1. Marking the place
It is worth choosing a place to install the house that can be easily monitored.
When building a house and wooden supports, it is necessary to fence off the area that the house will occupy with pegs. The supports are installed at a distance of about 20 cm.
In order for the house to be level, it must be leveled using a level. Next, boards are attached to the supports, on which the floors will later be laid.
Stage 2. Wall installation
First of all, you need to prepare the blanks. To do this, pointed beams are attached to the chipboard sheets along the edges.
One wall is made from one sheet of plywood. Cut holes for doors and windows in the right places. The prepared walls are fixed to the finished flooring. Angles and screws will help secure them.
Stage 3. Roof installation
Having decided on the shape, they proceed to installing the roof. A special frame is made for a sloping roof. Roofing material is laid on top of it. Very often, to facilitate the process, the roof is made flat.
To increase the strength of the structure, metal corners are used.
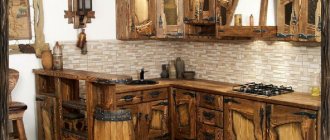
Stage 4. Tree house decor
The house can be decorated with wood carvings or beautiful carved windows.
You can give children paints so that they can decorate the walls and doors themselves. This activity is usually very exciting for children of any age.
Don't forget to think about the stairs and other options for getting into the tree house.
Walls, floors, roof and roofing
For external cladding we use 12 mm tongue and groove boards. We cover the corners with vertical wooden overlays.
The outside of the house is covered with tongue and groove boards
After the sheathing is ready, we lay a layer of insulation between the beams. Such a house will be warm.
Do not use polystyrene foam; it is highly flammable. Elastic polyester fiber wool is good, but a little expensive. However, a semi-rigid mine will do just fine. the slab, the only thing is that we will lay waterproofing under it and cover it with a film - a vapor barrier.
We sew up the inside walls of the house with tongue-and-groove wooden lining.
For the roof we use OSB-3, 10-12 mm thick, covered with bitumen tiles. If a tree trunk passes through the roof, cover the junction with an apron made of roofing steel.
We make floors using joists. First we lay a layer of waterproofing film, then insulation made of expanded vermiculite. It is environmentally friendly, lightweight, absolutely non-flammable, does not cake and does not deteriorate from moisture.
We do the painting at the stage of preparing and cutting the parts, and apply the final polish to the place.
The house is roughly finished. All that remains is to install the door block, window frames, and glazing. Use SIP type wires to supply electricity, install a heating convector and lamps.
Types of bases for a tree house
The house is installed on a base attached to several trees at once. Photo from psyhosting.info
Mighty century-old trees are very rare in summer cottages. However, even without a suitable tree at your disposal, you can bring your idea to life. In this case, you can go three ways. Option one is to use several smaller trees to arrange the platform.
Option two is to install the platform so that one part of it is attached to one or more trees, and the second part is attached to piles.
The third option does not involve using the trunk as a support for the base of the house. The platform is installed on piles so that the tree trunk passes through the floor and roof of the structure.
contentgrid.homedepot-static.com
However, you don’t have to limit yourself to just these options. Depending on the intended load or decorative features, you can develop a combined fastening system.
Where to place the house
The choice of frame tree is a determining factor. This determines how durable and strong the structure will be.
The best options are oak, maple or fir. It is important that the tree is not too old or, on the contrary, not strong enough. Serious damage to the bark, cracks, pests and dry branches should be absent. The presence of thick horizontal branches will help securely secure the house.
It is not recommended to place the structure on poplar or willow (they have weak roots), as well as on linden, which has viscous wood, which will prevent strong fixation.
Playhouse for a summer cottage with a sandbox below
We bring the brought timber 100*100 mm until smooth. You can use a plane, or you can use a drill with sandpaper attached. First with large grains, then with small ones. Afterwards we treat it with a protective compound against rotting and paint it. While the pillars are drying, we drill holes (our diameter is 23 cm, depth 60 cm). We fill them with crushed stone at the bottom near a shovel. We put up the pillars, set them vertically, fill them with crushed stone, compact them, and concrete them.
We prepare the pillars, impregnate them, install them and concrete them
We cut the exposed pillars all to the same level. We fix the same 100*100 mm beam on top. It is also carefully processed so that there are no splinters. We connect it into half a tree: at the ends we cut out recesses half the thickness of the timber. For a 100*100 mm beam, cutouts are 50 mm deep and 100-100 mm in area: so that the same sawn edge of the other beam lies flat.
We fix the top beam. Three have been collected, the fourth is still lying around.
We fasten it securely: 2 long nails (200 mm) on top, corners on the sides with self-tapping screws.
Corners on both sides
We attach an additional beam along the long side. Under it in the middle - above the stand - we cut a notch, also half the thickness of the beam - 50 mm. No more preventing wood from splitting. We cut down the timber at the ends in the same way as those that go along the perimeter: into half a tree. It fits into the prepared gash.
Cut out a seat for the cross beam
A children's house must have a solid margin of safety. Therefore, we play it safe in every connection. To give the structure stability under lateral loads, we will install jibs. We cut them from 50*50 mm timber, sawing the ends at 45°.
Preparing the jibs
We put it at a standstill, squeezing well.
Installation of jib
After installing the jib, we lay the board. This will be the floor of the house.
Without an assistant - no way
We cut the flooring from the boards. It is more convenient to work with a jigsaw, but you can also use a hacksaw.
We cut off the excess boards, leveling them along the timber
On the finished flooring we assemble the frame of a children's playhouse. We use timber 50*50 mm. We position the beams strictly vertically, first fasten them with nails - two on both sides, then reinforce them with corners on self-tapping screws (also on both sides).
Assembling the frame of the house on the second floor
We increase the rigidity of the structure by installing jibs. Then we nail the second floor trim. We simply nail these beams between the pillars. They must be sawed off with great precision so that the building does not warp. We strengthen the joints with corners, then install the jibs.
We put the jibs at the bottom, then assemble the upper harness
We do not nail the jib in the place where the entrance will be.
The main frame is assembled
Next, we install intermediate posts to form windows. The fastening method is the same: two nails on top/bottom, then two corners.
Ready for sheathing
They covered it with boards left over from the packaging of the equipment. You can use it from pallets, buy an inch board (12-13 mm thick), cover it with clapboard or imitation timber, logs, siding.
Sheathing goes quickly
When the sheathing is almost finished, we begin to assemble the rafter system. It’s easier, of course, to make a pitched roof - make one wall higher and no problems. But the gable one looks better, although it is more difficult to execute.
For the rafter system, we place two boards per edge and connect them at the top, sawing off the corners. The ascent depends on the desire and amount of snow. If there is a lot of snow, raise your skate higher. If not, maybe about a meter or less. We knock it down with nails, then we strengthen the connection with overhead plates.
Assembling the rafter system
When building houses, they place either a metal plate or a piece of board here. We decided to use a board.
Reinforcement with overlay
Next, you need to form a gash so that the resulting triangle rests on the upper beam. We put it on, mark the place and roughly cut it out. Then we adjust it so that the rafters “sit” tightly.
It is important to place the rafters correctly
Using the finished sample, we mark the other rafters. We cut it out, knock it under two rafter legs at an angle (all should be the same as a carbon copy). Having installed it on the top of the house, we check the verticality. Then we nail it with two nails on both sides and place the corners.
The rafters are standing
Now the sheathing boards are laid on the rafters. The roofing material will be ondulin. We lay the board 11*100 mm in increments of 30 cm.
The sheathing is mounted
Based on the thickness of the board (11 mm), we use self-tapping screws 25 mm long to fasten the ondulin (so that they fit well into the board. We put rubber gaskets under the caps to prevent leakage.
Laying of roofing material on the roof of the children's house is completed
Next - finishing work and safety - railings.
Start of painting
Railings made of treated, sanded boards. Screwed onto powerful 90 mm self-tapping screws. Two for the bottom beam - one for the sheathing board.
Railings are installed on the “veranda” of the house. Powerful self-tapping screws, three for each plank.
At the top, the railings are connected by a 30*30 mm beam. Then a board will be nailed to it - a handrail.
Almost ready
Railings ready for painting
It was decided to put a sandbox downstairs. It is not difficult to assemble: eight boards on the walls, connected at the corners using bars, with a side board nailed on top. Then the sandbox is painted. Read about how to make sandboxes here.
Painting the sandbox in four pairs of hands Installed in place Final version (for now)
Even a “non-builder” can build such a children’s house with his own hands. There are no particularly complex jobs; you can get by with basic tools.
Several options from the same series are pictured below. Two are houses with a slide, and one is a one-story option, more suitable for girls.
Downhill
Sports corner at the bottom
Children's playhouse with slide One-story “open” option
Making your own playground is described here.
Almost real. From leftover building materials
After building a house, garage, or bathhouse, materials are often left in such small quantities that nothing major can be made from them. The child will be happy with a playhouse that looks like a real one. The author of the idea is natashka131 from the website babyblog.ru.
Size - 2 x 2.2 m (without veranda), height at the ridge - 3 m.
To work you will need:
- bars of various sections;
- plywood 1 cm thick;
- OSB boards;
- roofing material;
- siding;
- parquet;
- circular saw, miter saw, screwdriver.
1. Assemble the base of the building from timber 100x150 mm and 50x150 mm. Make a frame from 50x50 mm bars, then cover it with plywood, including the ends of the roof. Make extensions under the veranda and cover the roof with OSB sheets.
2. Cut out the windows with a jigsaw, having previously made pencil marks. Close the roof.
3. Cover the house with siding. It’s okay if the remains are of different colors: you can make the walls striped or decorate each side in a different tone.
4. Cover the floor inside and outside with moisture-resistant parquet.
5. Make a railing from the remains of the parquet. You can also frame the veranda with railings made of slats, processed with a milling cutter and varnished.
6. Glaze the windows, make trim from scraps of parquet.
Nuances when planning a house
When planning a house for children, you need to consider some important details:
- The playhouse must be safe to use.
- It should be as similar as possible to a real home.
- The roof of the house should be made of good material so that it does not get wet from the rain.
- It’s worth decorating everything inside so that the child feels comfortable and enjoys playing in it.
- All elements of the house structure must be well sanded, without protruding nails or sharp corners, so that there is no risk of injury.
- It is not advisable to place the house too low from the surface of the ground. Optimal height 1-1.3 m
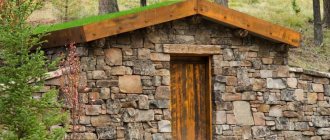
Tsala Treetop Lodge, South Africa
0
Source:
Rooms at Tsala Treetop Lodge are located high above Plettenberg Bay, on the very tip of South Africa. In addition to the two-bedroom cottages, the hotel offers ten apartments, which are tree houses made of stone, wood and glass. Each home includes a living room with fireplace and access to a private pool.
Tree selection
Having decided to build a tree house, you must first find the very tree that will become the “foundation” for your building. Let's say your property is located in a wooded area and you can afford to choose from a sufficient number of trees. What points should you pay attention to?
Tree species. If we talk about plants typical for our latitudes, linden is not suitable because the wood is too soft, and poplar, chestnut and willow are not suitable due to a weak root system, so oaks and maples are best suited for the construction of such objects.
Of the fruit trees, only the apple tree is suitable for building a tree house. However, it can also be equipped with extremely lightweight structures designed for children to play with.
Thickness and direction of growth of branches . If you are going to build a house using one tree as a pile, then the girth of its trunk at the level of the support should be at least 94 cm, but if several “wood piles” are planned and the load will be distributed, then the permissible limits shift to 70 cm. If If you have at your disposal a tree with a thick trunk and a spreading crown, then the base for the house can be “fitted” between the branches.
An example of attaching base beams to tree branches
Physical state . Even if a fairly powerful tree grows on your site, the dimensions of which, in theory, allow you to build a house on it, it will be of no use if it is sick or infested with pests. No matter how large the tree may seem, safety should always be at the forefront. Therefore, before you start designing a house, make sure that the tree is healthy enough to serve as its foundation.