Underfloor heating is becoming more and more commonplace in our homes. The floor is heated using water heating, laying pipes in a screed, or electricity - various heating elements that convert electricity into heat. It is not always possible to install a water heated floor - in old apartments it is impossible to obtain permission for it. It’s easier with electric heating - you can find an option even for old floors that provides minimal load. But in order for the house to be warm, it is necessary to first calculate the electric heated floor. Then the cost of arrangement will be optimal, and the power will be sufficient even for the coldest periods.
Underfloor heating significantly increases comfort levels
Principle of calculation of underfloor heating systems
Design elements
For the calculation, you need to take into account the installation of an electric heated floor. The scheme of this type of heating includes:
- a heating element;
- power cable;
- heating temperature sensor;
- thermostat.
Thermal sensors monitor the heating temperature, and the heating elements provide heating accordingly. These parts are mounted directly into the floor and, using installation (power) cables, are connected to a thermostat, which sets the operating mode.
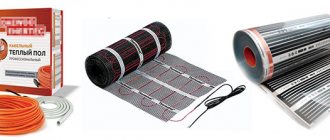
The following can be used as a heating element:
- heating cable;
- infrared film coating;
- mesh mat.
The most demanding installation technology is a heated floor system using a heating cable, and the most unpretentious design is considered to be a film floor.
Heating cables are used to install a cable underfloor heating system. Single-core is cheaper compared to two-core, but its calculation and installation is much more complicated. An electric floor using a single-core cable creates an electromagnetic field over the entire installation area, characterized by significant intensity. For this reason, this type of heating is not recommended for residential premises.
A two-core thermal cable is easier to install; thanks to the directional movement of current in both directions, the inductive effect of such a design does not exceed permissible standards. To calculate an electric heated floor, it is recommended to take into account the geometry of the room area.
Two-core cable
General calculation rules
The calculation of heating power depends on the area of the room, its type and operating mode. Each of these parameters has a certain effect on the power indicator.
Heated room area
When installing a heating system, only the space not occupied by furniture and household appliances is taken into account. Only free space is also taken into account for the calculation. The area under furniture and appliances is not taken into account for the following reasons:
- insufficient air circulation under objects leads to overheating;
- excess heat negatively affects these objects.
To calculate the area, the total area occupied by interior items is subtracted from the total value.
How to place heated floors under furniture
Heating mode and room type
The calculation of an electric heated floor directly depends on the operating conditions. An important role is played by the purpose of the heating system: whether it will be the only or auxiliary source of heating.
To calculate a warm floor, it is recommended to use average power values. Its indicators will be from 150 to 180 W/m2 in the case of the main source. The heated area under these conditions must be at least 70% of the total.
The system used as an additional source allows values from 110 to 140 W/m2.
Power indicators depend on the thermal conductivity of the room. The floor, purpose and other aspects are taken into account. So, for example, for a kitchen it is enough to use 120 W/m2, and for a glazed loggia you will need a power of 180 W/m2.
Premises located on the ground floor require increased heating power by approximately 15-20% of average values.
For the system to be effective, it is necessary to make additional insulation of the room to avoid heat loss.
Calculation of heat losses
Typically, underfloor heating systems do not act as the only source of space heating, but some plan to heat the house this way. But before making this engineering decision, it is important to make sure whether a particular room can be heated only in this way.
Electric heated floor
If during the period of use of the system, heat loss does not exceed 100 W/m2, then the floor heating system will be quite sufficient to warm up the room. However, it is quite difficult to make calculations on your own to obtain the necessary data, since complex formulas are used. So it is recommended to use an online calculator for calculating the heat loss of a room. If heat loss exceeds 100 W/m2, then the thermal insulation of the room must be improved or an additional heating system must be installed.
Reminder before installation. Partial storage heating
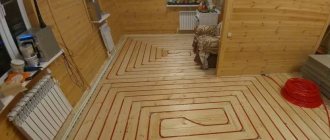
Reducing energy costs can be achieved through the use of heating systems operated at night. To do this, it is necessary that heat accumulates in the concrete screed during low tariffs and heats the room during the day. The concrete screed is heated by heating cables; the intensity and rate of heating, the accumulation of heat depends on the thickness of the screed, the depth of the cable and the material of the floor covering. Heating cables can be used both for laying in the base and leveling screeds. Partial storage heating is usually used with flooring materials such as linoleum, wood, and carpet. It is necessary to make sure that the thickness of the screed is sufficient to accumulate heat, otherwise additional heating sources will need to be installed.
Determining the desired temperature in the rooms
The final floor temperature depends on the purpose for which the room is used. For example:
- +29-30 degrees – halls, hallways;
- +27-29 – offices, living rooms;
- +30-35 – floors near windows, on verandas;
- +32 – bathrooms, toilets;
- +17-19 – gyms.
Installation of water heated floor
In this case, the coolant temperature should not be less than +40 degrees or exceed +60. The heating system should be such that the difference between the temperature indicators of the forward and return pipes in the case of water floors does not exceed 15 degrees. Otherwise, the base will be heated completely unevenly.
The balance of thermal/hydraulic loads for a water floor must also be optimal and adjusted. Therefore, the heating circuits must have a certain length in accordance with the diameter. The optimal pipe option is 18 mm, since even with a small amount of water such a pipeline will work correctly and heat the base.
Calculation of mounting tape
1. Number of strips of tape pcs. 2. Tape laying step 3. Cable space beyond the lentum4. Tape offset from line Am
The mounting tape is usually supplied complete with the heating cable.
Attached to the concrete base of the floor with 6x40 mushroom dowels. The distance between the tape strips is from 45 to 70 cm. The smaller the cable laying step, the smaller the mounting tape laying step, as a rule.
The heating cable is fixed to the tape using fastening tabs located every 2.5 cm.
To install the cable directly on insulation with a thickness of more than 5 mm, use a metal mesh with a thickness of 0.75 - 1.0 mm with a cell of 2.5x2.5 mm. The cable is fixed to the mesh using plastic clamps.
Calculating the circulation pump
To make the system economical, you need to select a circulation pump that provides the required pressure and optimal water flow in the circuits. Pump passports usually indicate the pressure in the circuit of the longest length and the total coolant flow in all loops.
The pressure is influenced by hydraulic losses:
∆ h = L*Q²/k1 , where
- L —contour length;
- Q - water consumption l/sec;
- k1 is a coefficient characterizing losses in the system; the indicator can be taken from hydraulic reference tables or from the equipment passport.
Knowing the pressure value, calculate the flow rate in the system:
Q = k*√H , where
k is the flow coefficient. Professionals assume the flow rate for every 10 m² of a house is within 0.3-0.4 l/s.
Among the components of a warm water floor, a special role is given to the circulation pump. Only a unit whose power is 20% higher than the actual coolant flow will be able to overcome the resistance in the pipes
The figures regarding pressure and flow rates indicated in the passport cannot be taken literally - this is the maximum, but in fact they are influenced by the length and geometry of the network. If the pressure is too high, reduce the length of the circuit or increase the diameter of the pipes.
What to consider when installing heated floors
- Heating cables are not installed under furniture or stationary objects
- It is necessary to observe the installation interval within the design limits and the minimum bending radius
- Heating cables must not be allowed to cross each other.
- The cable must be in a uniform and homogeneous environment along its entire length
- To avoid overheating, the cable must not be installed inside the thermal insulation layer
- To avoid physical damage, the cable should only be laid on a clean surface.
- The heating cable should not pass through a moving seam, kinks or be installed in areas of possible overheating. Distance to heat sources, such as a fireplace, sauna stove, etc. must be at least 0.5 m
- The possibility of using a heating cable with flooring materials is regulated by their manufacturers
- Resistive heating cable must not be shortened or extended
- A 30 mA residual current device must be used in all zones
- The angle of installation of the corrugated tube under the sensor on the wall should be such that the sensor can be easily removed in the event of its failure. The sensor is installed in the middle between the turns of the cable
- The installation interval may be smaller in areas of maximum heat loss, for example, windows, but not less than 2 bending radii
- Do not turn on the cable until the screed or leveling solution has completely dried. The exact timing is regulated by the manufacturers. For concrete screed this period is about 30 days, for leveling mortar or glue - up to 14 days.
Select flooring type:*
* Each type of flooring corresponds to a certain range of specific powers (from and to inclusive).
Indicate the dimensions of the room (m / m2): *Length × Width or Area The heating area should not exceed 15 m2 Fields are required Please indicate a smaller area. If you need to heat an area of more than 15 m2, then divide it into 2-3 parts that will be less than 15 m2 and select a suitable heating mat option for each. Specify a smaller area. If you need to heat an area of more than 15 m2, then divide it into 2-3 parts that will be less than 15 m2 and select a suitable heating film option for each. Length × Width or Area The heating area should not exceed 50 m2 Fields are required Specify a smaller area. If you need to heat an area of more than 50 m2, then divide it into 2-3 parts that will be less than 50 m2 and select a suitable heating cable for each. Why is this necessary?
Calculation of UNIMAT rod mat
The UNIMAT infrared rod mat has a self-regulating function, so it is not afraid of being blocked by furniture and the area of the set should be equal to the area of the room.
For convenient control and economical use of heated floors (up to 35%), a thermostat is designed. There are mechanical (manually controlled) and programmable thermostats with functions of saving settings, modes to reduce energy costs, etc.
Our stores offer a wide selection of multifunctional thermostats for heating systems from European manufacturers, the most popular among them are:
- TI 200 and TI 950, THERMO;
- 320 and UTH-130, CALEO;
- from DEVI – Devireg Touch.
Correct temperature
To achieve maximum comfort levels, we recommend maintaining the following floor surface temperatures:
- Linoleum 26-28 °C
- Ceramic tiles/concrete floor 26-28 °C
- Laminate 23-27 °C
The maximum floor temperature can be limited by a thermostat.
If you do not know the maximum permissible surface temperature for your flooring material, please contact the manufacturer.
Important! Wood is a good thermal insulation material.
Calculation rules
To install a heating system on an area of 10 square meters, the best option would be:
- use of 16 mm pipes with a length of 65 meters;
- the flow rate of the pump used in the system cannot be less than two liters per minute;
- the contours must be of equal length with a difference of no more than 20%;
- the optimal distance between pipes is 15 centimeters.
It should be taken into account that the difference between the temperature of the surface and the coolant can be about 15 °C.
The optimal method for laying a pipe system is represented by a “snail”. It is this installation option that promotes the most uniform distribution of heat over the entire surface and minimizes hydraulic losses, which is due to smooth turns. When laying pipes in the area of external walls, the optimal step is ten centimeters. To perform high-quality and competent fastening, it is advisable to carry out preliminary markings.
Table of heat consumption of various parts of the building
Heating cable installation data
Heating cable laying step
m
Number of strips (threads) of cable
PC
Length of 1 strip (thread) of cable
mRecalculate
The cable laying pitch is calculated by the formula: q=S/L, where S is the area where the heated floor is laid, L is the length of the heating cable. When installing a heating cable, in most cases, electrical tape or metal mesh is used, so the laying step is usually a multiple of 2.5 cm: 7.5 cm / 8.75 cm (alternating 7.5 and 10 cm) / 10 cm / 11.25 cm (alternating 10 and 12.5 cm / 12.5 cm.
It is strictly prohibited to shorten or extend the heating cable. The correct choice of heating cable and the correct installation diagram makes it possible to evenly lay the cable over an area that best matches the desired size of the heated floor.
The cable distance from walls and furniture is at least 5 cm, from heating devices and heating pipes - at least 10 cm.
Connecting (for a single-core cable there are 2) and end couplings (for a two-core cable) are located in the screed pouring area at a distance of more than 10 cm from the wall. The couplings must not be bent. Only the cold ends of the heating cable are laid into the wall.
Installation of a two-core cable is somewhat easier than a single-core cable, since there is no need to return the second cold end to the installation site of the thermostat. Due to the so-called “return”, the number of strips when laying a single-core cable is only even, while for a double-core cable it is both even and odd.
How to calculate a warm water floor
Let's see how many materials are needed to install a water heating system in the room. In this case, the calculation of the number of pipes per 1 m2 is done as follows: you need to find out how much heat loss in the room will be. The easiest way to determine them is with the help of an online calculator, which includes data about the building itself, as well as weather conditions outside. Let them be equal to 80 W/m2. Let’s take the area of the apartment where the heated floor system will be installed to be 80 m2. As a result, the total heat loss can be found by multiplying two values 80x80 = 6400 W. It is this value that will have to be compensated using all heating systems with a power reserve of up to 20%.
Water heated floor
Table. Pipe calculation depending on the loop pitch.
| Step, cm | Consumption, m./1 sq. m. |
| 10 | 10 |
| 15 | 6,7 |
| 20 | 5 |
| 25 | 4 |
| 30 | 3,4 |
Typically, the distance between water lines is maintained at about 15 cm with a pipe cross-section of 16 mm. Then the power of 1 m2 of floor will be about 100 W. Dividing the total area of the room by the step size, we get: 80/0.15 = 533 m. This is exactly how many meters of pipe will be required to install a water heating system in this apartment. The length of each contour is calculated in approximately the same way.
Attention! Near the walls of the room adjacent to the street, the step will be slightly smaller (10 cm). Taking this into account, the footage of the water pipeline is calculated.
In construction stores, pipes of a certain length are available for sale - from 50 to 240 m. They are wound into coils. And to connect the entire system to the collector, you will have to buy larger diameter water pipes.
Heated floor pipe circuit length calculator
Go to calculations
Link to source.
Calculator for electric heated floors
The most important criteria for calculating a heated floor are indicators such as the area of the room and its design features, as well as the features of using this heating system. The power of the heated floor and the choice of a specific connection scheme directly depend on these indicators.
Area calculation
You should start by determining the usable area of the room. For the calculation, only the free spaces of the room should be taken into account, i.e. those areas of the floor that are occupied by large furniture or other interior objects are excluded. This is done for several reasons. Firstly, the floor area under the furniture will not be used by you to move around. Secondly, installing a heated floor requires sufficient ventilation, which is very difficult in conditions of space limited by various objects. Thirdly, do not forget that constant heating due to underfloor heating will negatively affect furniture products. That is why the area occupied by the location of various large objects should be excluded from the calculation of your square meters.
Find out the required thermal power
To calculate all the parameters of a future heated floor - water or electric - it is necessary to determine how many watts of heat to supply to heat a particular room. We suggest calculating the required heating power in the simplest way - by area or volume of the room.
Advice. Installing underfloor heating circuits is not a cheap pleasure. The price of work, taking into account materials and components, ranges from 5-8 USD. e. per square meter (without installing and connecting the boiler). If you plan to hire a team of craftsmen and do not have a heating system design, require all calculations from the contractors, then compare the results.
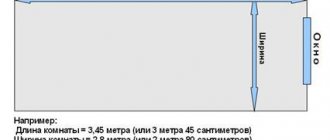
As an example, we use the layout of a small one-story house of 100 m² (according to external measurements), shown in the drawing. Please note that corner rooms with light openings and external walls will lose much more heat in winter than internal ones - a corridor, a bathroom and a hallway. The nuance is taken into account in the proposed methodology:
- By measuring and multiplying the lengths, find out the square footage of each room.
- Multiply the area of rooms with one outer wall and a light opening by 0.1 kW. This category also includes central rooms (in the example, the hallway, bathroom and corridor).
- Heating rooms located in the corners of the building will require more thermal energy. The square footage of a room with two external walls and a window should be multiplied by 0.12 kW (kitchen and children's room).
- If there are 2 or more window openings in a corner room, the area is multiplied by 0.13 kW (living room and bedroom on the layout).
The calculation results are the required heat output of heating circuits or radiators in kilowatts separately for each room. With the obtained figures, you can proceed to the next stage of calculation.
Note. The indicated values are valid for the central zone of the Russian Federation and the Republic of Belarus. For dwellings located in the south, the thermal power values must be multiplied by a factor of 0.7. In the northern regions, an increasing factor of 1.5-2 is applied to the results.
The above method is not suitable for rooms with ceilings of 3 meters or more. In such cases, the required amount of heat is calculated by the volume of the premises, multiplied by 35, 40 or 45 W, depending on the location inside the building. The calculation of the load on the heating system is described in detail in a separate article.
Determination of heating heat transfer by volume of rooms with ceilings of 3 m and above
Description of installation
Laying the cable in a leveling tie.
- Recommended for floor structure thicknesses greater than 100 mm.
- The reinforcing mesh must be laid in a layer of base screed (> 6 cm).
- The cable is mounted on the surface of the base screed after it has dried.
- To secure the cable to the floor surface, use a mounting tape of appropriate lengths attached to a tie. The temperature sensor is installed between two turns of cable in a corrugated tube.
- The thickness of the leveling screed depends on the characteristics of the accumulation and the material of the floor covering.
- For floors with ceramic tiles, the thickness of the screed should be greater than for wooden floors to ensure uniform heating of the surface.
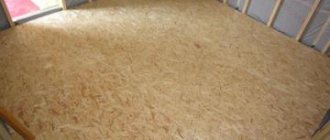
- 1. Old floor material;
- 2. Primer;
- 3. Heating cable;
- 4. Mounting tape;
- 5. Floor temperature sensor in a corrugated tube;
- 6. Leveling solution (tile adhesive);
- 7. Leveling solution (if necessary);
- 8. Floor covering;
- 9. Thermostat;
Features of electrical floor systems
The technology for preparing and laying out electric heating elements differs from the design of water circuits and depends on the type of heating elements selected:
- resistive cables, carbon rods and cable mats can be laid “dry” (directly under the coating) and “wet” (under screed or tile adhesive);
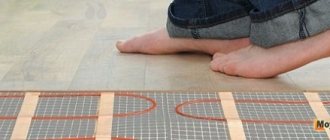
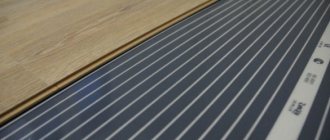
- carbon infrared films shown in the photo are best used as a substrate under a coating without pouring a screed, although some manufacturers allow installation under tiles.
For reference. Self-regulating rod systems are carbon heating elements connected in parallel by two conductors. If one rod burns out, the remaining elements will increase the heating power and continue to heat the room.
Electric heating elements have 3 features:
- uniform heat transfer along the entire length;
- the heating intensity and surface temperature are controlled by a thermostat based on sensor readings;
- intolerance to overheating.
The last property is the most unpleasant. If in a section of the circuit the floors are filled with furniture without legs or stationary household appliances, heat exchange with the surrounding air will be disrupted. Cable and film systems will overheat and will not last long. All the nuances of this problem are covered in the next video:
Self-regulating rods easily tolerate such things, but another factor begins to influence here - it is irrational to buy and install expensive carbon heaters under furniture.
Calculation of heated floors
For beginners who find it difficult to calculate electric floor heating on their own, there are special services. You can use an online calculator to calculate heated floors and special programs. This method allows you to quickly determine the power of film or cable heating systems.
How to calculate a heated floor without using online services? To do this, you can use the following formula: P = Pm * Sroom, where Pm is the power of the material used, and Sroom is the area occupied by the heating system (useful).
Usable area is expressed by the difference between the total area and the area occupied by interior items. The power of the material is selected according to average indicators, taking into account the nature of the room and its thermal conductivity properties.
Cable laying pitch per sq.m. is selected independently in such a way that the resulting power of the material corresponds to generally accepted average values.
Heating mats
The use of heating mats in underfloor heating systems is the simplest method of installation and calculation. The mats are a mesh on which a two-core heating cable is laid at the required intervals. An adhesive layer is applied to the mesh, which greatly simplifies the installation of such systems.
This material has a specific power per m2 of 100 - 150 W/m2. Sometimes there are mats with a power rating of 200 W/m2.
Film systems
Infrared film flooring is based on the application of the intersection of graphite strips with copper-silver conductors connected to them. The film is quite thin. With its help, surrounding objects are heated (infrared radiation), which is considered optimal for installation in residential premises. The dimensions of the film materials make it easy to fill any floor area.
The infrared rod heating system is considered innovative. It consists of flexible heating elements made of carbon, silver and graphite. The peculiarity of such mats is that when the heating reading reaches 60, the power consumption decreases. This heating system is the most economical of all existing ones. It does not require a thick layer of screed. Such materials are produced in the form of mats ranging in size from 0.5 to 25 meters in length. The disadvantage of this type of heating is the high cost of materials due to the special technology and novelty of the method. Therefore, today this type of underfloor heating is not widespread.
The efficiency of the heating element is affected by the method of installation of the heated floor. Concrete screeds in which heating systems are installed must be at least 3-5 cm thick. This reduces heat loss. Thermal storage concrete floors with a thickness of 10-15 cm provide effective heat transfer into the room.
What can affect heat transfer?
To begin with, I would like to dwell on what a correct and high-quality heated floor should be, regardless of what coolant - electricity or water - it will work on. So, such a heating system will work differently depending on the thickness of the base or the quality of the heat insulator , which means that all these points must be taken into account. It is believed that the thickness of the thermal insulation material should not be more than 3 cm, and it is better to purchase the material with a reflective layer - this will make it easier to retain heat indoors.
Advice! It is recommended to purchase polystyrene foam with a density of about 35 kg/m3 as a heat insulator.
Do-it-yourself warm floor
The thickness of the concrete screed should be about 4-10 cm, especially if we are talking about laying a cable or water floor. Inside, it is reinforced with a reinforcing mesh, onto which, by the way, coolants can be attached. Due to this, heat will be redistributed better. If you plan to install a water floor, it is recommended to purchase pipes made of metal-plastic or cross-linked polyethylene with a diameter of 16-20 mm - with them it is easiest to provide the system with optimal power sufficient to warm up the rooms.
Scheme of a heated floor under a screed
Pipe for heated floor
Determination of room heat loss
If heat loss exceeds the specified value, then you will need to choose a different heating system, or supplement the heated floors by installing radiators. Perhaps the house should be further insulated.
The resulting heat loss is divided by the area of the heated premises. This is the preliminary calculated power of water heated floors per square meter. The final calculation is performed in a special computer program.
If our heating system using floors of the specified design consisted only of it, then the calculations could be considered complete. But it is necessary to take into account the section from the collector to the boiler, taking into account, at the same time, the hydraulic resistance of the section.
Which cable is better, two-core or single-core?
The difference between a single-core and a two-core cable is as follows:
- The need to install a thermostat. The self-regulating cable does not require installation of a temperature sensor and regulator. In this case, heating is carried out in separate areas.
- Presence of an electromagnetic field. Some types of single-core cables have high-quality Teflon coating. The protective layer effectively reduces radiation levels. Other types of single-core wire create an electromagnetic field of greater intensity, so they are recommended for use in walk-through rooms, hallways, balconies, baths, saunas, etc. With warm two-core floors, radiation is completely absent, which makes it completely safe for use in residential premises: bedrooms, children's rooms, etc.
Some manufacturers, in an effort to reduce the cost of self-regulating heated floors, change the internal structure, leaving only the heating matrix and minimal insulation. The correct method for choosing a self-regulating cable is associated with the need to determine whether the cable has external insulation and a copper shielding layer. The presence is indicated by the markings CT, CF, CR.
About film heaters
Calculating the amount of infrared film is much simpler and comes down to selecting a heating material based on size and specific heat transfer:
- Calculate the room's need for thermal energy (section one of this publication).
- Sketch the layout of a room with stationary furniture. Calculate the size and square footage of the free area.
- Film heated floors are laid out at a distance of 15-20 cm from the walls. Draw these stripes on the sketch and subtract their dimensions from the free area.
- The last task is to place an infrared film of the required total power on the remaining area. Select rolls of the desired width and heat transfer from the manufacturer’s catalog.
Keep in mind that thermal film can only be cut across, guided by special lines (interval - 250 mm). Adjacent canvases can be laid end to end or with a calculated interval, but not overlapping. For the bedroom from our example, the amount of film is calculated as follows:
- The required heat transfer of the floor circuit is 1.08 kW. If you take a product with a heat output of 130 W/m², you will need 1080 / 130 = 8.3 m² of film heater. Taking into account the reserve - 9 m².
- The roll width is 0.5 m. To collect 9 squares, you need to take a film 18 m long.
- Since there is 15 m² of free space in the bedroom, this type of heater is quite suitable.
Subtleties you need to know about
The typical diagram by which power is calculated gives an objective result only if the room is properly insulated. Thermal insulation means not only the laying of roll materials under heated floors, but also the installation of double-glazed windows on the windows.
Therefore, before installing the system, it is necessary to thermally insulate the room. This will prevent unwanted heat loss. Particular care should be taken to insulate rooms that are located on the ground or have a basement.
You need to choose thermal insulation based on the selected engineering system. Only foil thermal insulation can be installed under infrared floors. Otherwise, part of the heat will go to heating the rough foundation or the neighbor’s ceiling.
Another very important point that is worth paying attention to is the step of laying the heating element. If you have infrared floors or heating mats in front of you, then you can skip this point
They are a roll material, the basis of which is a special mesh or film. The heating element is attached to this base.
If you opted for cheaper cable systems, then the cable will have to be laid manually. In this case, the installation step will have to be determined independently. You don’t have to bother and do everything by eye. But in this case, the system may not work efficiently. And it will be quite difficult and expensive to redo everything.
Let's look at how to determine the laying pitch of a heating cable using the example described above. The power of an electric heated floor should be 2700 W. The cable length in this case should be about 130 meters. To calculate the installation pitch, you need to multiply the usable area of the room by 100, and divide the resulting number by the length of the heating cable. We get: 15*100/130=11.5 cm. This is the laying step.
To simplify installation work, you can purchase a special mesh onto which you can pre-attach the heating cable. If the cable is not fixed during installation, it will move. As a result, the laying step between turns will change. As a result, uneven heating of the base.
Calculating power for an engineering system is quite simple
It is important to correctly insulate the room, choose insulation for the base that is compatible with the engineering system and competently approach the issue of arranging heavy furniture under which the heating cable cannot be placed
https://youtube.com/watch?v=J8GJC6lEL-c
Design
An important element of the “electric floor” system is the thermostat and temperature sensor, which perform the control function. For residential premises, the simplest version of the thermostat is often used, which has control over the floor heating mode. The temperature sensor is placed in a corrugated tube placed between the sections and securely hidden in the screed.
For more powerful systems, from 1 kW/m2, you can use a thermostat equipped with a programming function. It has programming modes for a specific warm-up temperature for a day and a week. As a rule, this allows you to save more than 30% of energy.
The thermostat is mounted on the wall within the electrical switch - this makes it more convenient to use. Although there are models available that are installed in the electrical panel of an apartment.
Each sensor model is designed for certain parameters of this value. If exceeded, the device may fail or operate incorrectly.
Advice
If the heating area is large, then it can be divided into several zones. Often in such cases, the warm floor electric exon is divided into two or more independent systems. To minimize costs, you can install in each of them a thermostat from the same company Ekson-Mex, designed for a power of 3.6 kW.
To install electric floors you also need:
- mounting tape, with which the heating sections are fixed to the floor;
- a corrugated tube that performs two functions at once: protecting the sensor and facilitating access to it in case of testing or replacement;
- thermal insulation, which increases efficiency and profitability, as it limits heat loss. For rooms on the ground floor, it is recommended to install insulation from 5–10 cm thick foil-coated solid foam slabs; for those located above, cork or penofol is sufficient, of course, if the room above and below the floor is heated.
Factors taken into account
First, a few words about what warm floors are. This is a system located under the floor covering, consisting of pipes connected through the boiler to the water supply. The hot coolant, spreading through the pipes, evenly heats the entire room.
The advantage of such floors is that heat flows rising from the floor warm the air and make the temperature in the room as comfortable as possible. After this, the cooled air drops to the level of the radiators, heats up again and continues to circulate around the room. In addition, when your feet are constantly in contact with a heat source, it is almost impossible to freeze, even wearing the lightest clothes.
The calculation always begins with determining the type of heating system. A warm floor can be used as an additional heat source, or it can act as a contour of a combined system. In the second case, a completely different approach is required, since it is necessary to take into account the type of pipe layout, the number of heating sources and much more. The main difference between these systems is the power of operation.
Before you start laying the floor, you should consider:
- Weather data, that is, average temperature indicators of the place of residence.
- Detailed floor plan. The materials from which the building was constructed, the type of glazing of the apartment, the dimensions of window and door openings, floor and area are taken into account.
- Volume of heat loss. To calculate this parameter, it is necessary to calculate the presence of heat sources, the average temperature in the room, the thickness of the floor, the type of floor covering and the presence of insulation.
In addition, it is worth taking into account the presence of carpet and the type of furniture in the room. It is also important to remember that before you start insulating the floor, you need to work on sealing the walls and windows
Basically, heat loss occurs precisely because of thin walls and poorly installed double-glazed windows. Taking these factors into account will significantly reduce the cost of installing a heated floor.
When calculating power, the necessary parameters of the heating circuit are determined in parallel, that is, the number of pipes, their length, as well as the features of coolant circulation. The result of a competent calculation will be a finished installation scheme and the exact cost of construction work in an apartment or private house.
Recommendations for choosing screed thickness
In the reference books you can find information that the minimum thickness of the screed is 30 mm. When the room is quite high, insulation is placed under the screed, which increases the efficiency of using the heat given off by the heating circuit.
The most popular backing material is extruded polystyrene foam. Its heat transfer resistance is significantly lower than that of concrete.
When installing a screed, in order to balance the linear expansion of concrete, the perimeter of the room is decorated with a damper tape. It is important to choose the right thickness. Experts advise that for a room area not exceeding 100 m², install a 5 mm compensating layer.
If the area values are larger due to the length exceeding 10 m, the thickness is calculated using the formula:
b = 0.55*L , where
L is the length of the room in m.
Rules for laying IR heated floors
You need to follow a few simple rules for installing infrared heated floors:
- The first line of film should be located at a distance of at least 100 mm to the wall and no further than 400 mm.
- The pitch of the film cutting line is 250 mm; the film cannot be cut in other places.
- The distance between adjacent film strips should be 10 mm or higher.
- The permissible length of the floor strip is 8 m.
Under laminate
When laying film heated floors under laminate, follow the rules:
- To prevent infrared film from overheating, it must be distributed in areas where there is no furniture.
- In order for the room to be heated with maximum efficiency, the film floor must cover at least 70% of the area.
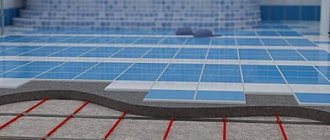
Installation diagram of IR heated floors for various types of finishing floor coverings
Next you need to draw a plan for the location of the heating elements. On paper, reflect the locations of the furniture and heating film.
Laying is done on a surface that has been leveled beforehand.
The concrete screed should not have any differences. To prevent heat from escaping from the thermal film through the floor slabs into neighboring apartments, a thermal insulating substrate (polypropylene) must be laid on the floor, the thickness of which is 3-4 mm and covered with foil on one side.
Thermal insulation strips are secured with thermal insulation tape, and they also need to be carefully trimmed around the perimeter of the room.
The heating film can only be cut in the places marked on it. They are highlighted with a dotted line and a scissors symbol.
If you cut the film diagonally, you will simply ruin it.
The distance of the film from the wall should be 10 cm.
The heating film strips are laid on the substrate one next to the other with a gap of at least 5 mm, but not more than 1 cm.
You cannot bend the heating element at an angle of 90 degrees or more, as it will stop functioning.
Connection diagram for IR heated floor
In places where the thermal film is cut and the conductive busbars are cut, it is necessary to install bitumen insulation, which is included in the heated floor kit. The contact must be installed in the center of the end of the conductive busbar and pressed well with pliers. Using a sharp knife, it is necessary to strip the current-carrying wires by 5-8 mm and clamp them with pliers in the contact terminal, then the entire contact is insulated with bitumen insulation. The infrared heated floor is connected in parallel with copper stranded wires with a cross-section of at least 1.5 mm². It is also recommended to install a temperature sensor so that the automatic floor heating works correctly.
At a distance of 20-25 cm from the wall on which you will install the thermostat, use a hammer drill to perform a groove. Place the temperature sensor into the hole formed under the heating film.
In order for the sensor to show the correct temperature, it must be placed on a heat-insulating substrate.
After all the above manipulations, the thermostat is connected.
Upon completion of installation, check the functioning of the IR heated floor. All thermal films should heat up when turned on. Only after making sure can you lay the laminate on heating elements.
Under linoleum
Laying under linoleum is similar, but has its own characteristics:
- At the first stage, prepare the base, because... The floor can only be installed on a flat and stable surface.
- The mats can be cut into 25 cm pieces. The edge is insulated with a special tape. The gap to the heating system pipes should be 30 cm.
- The film must be laid with the copper bars facing up; overlapping joints is strictly prohibited. The remaining steps are carried out in accordance with the instructions. A prerequisite for high-quality heating is the connection of a thermostat.
- Then linoleum is laid. In small rooms, the coating is laid and left for a couple of days, after which the edges are pressed against the baseboards.
There are different ways to install linoleum
When carrying out work, take into account the fact whether it will be necessary to disassemble and move the system in the future, and also pay attention to the technical characteristics of heated floors
As you can see, infrared film heated floors are an excellent option for a heating system, and its installation is not that complicated. Therefore, everything can be done with your own hands.