In low-rise private construction, there is a trend towards a rational approach to the construction of cottages, dachas or country houses for permanent residence.
Everyone wants to reduce the cost of construction, but at the same time preserve the thermal conductivity and reliability of the building as much as possible. These requirements are met by wall blocks made of cellular concrete: foam concrete, aerated concrete and others. Manufacturers offer the market new construction and finishing materials.
In view of this abundance of alternatives, an unsavvy person has to solve a number of issues. Let's consider one of the most popular options in the form of step-by-step instructions - DIY construction from foam blocks.
Building a house from foam blocks with your own hands
Having decided to build a house on his own or to order, the owner needs to have in-depth knowledge for proper execution or control.
How to build a house from foam blocks without construction experience
We will skip the preparatory stage, because... this point is covered separately - where to start building a house on your site (step-by-step preparation: design, documents for individual housing construction, comparison of materials, when and in what sequence to fill the foundation, erect walls, install the roof, etc.).
Attic and ceiling
In order to build a ceiling, as a rule, ready-made products are used, namely concrete slabs from the factory and wooden beams. When buying beams, remember that they must be dry. It is advisable to tie the beams with 3 cm boards.
We are building a wooden frame for the second floor
The most correct thing is ground assembly of attic structures with further lifting and installation. The structure should be sheathed with boards, then waterproofing layers should be laid, and then the roofing should begin.
We are building a wooden frame for the second floor
DIY strip foundation for a house made of foam blocks
In low-rise construction, shallow strip foundations MZLF are very common. They are immersed in the ground by only 0.5-0.7 m, therefore they are more economical and easier to install than structures laid below the freezing level.
As a rule, the bearing capacity of the soil at this depth is sufficient to support a one- or two-story house. But in the layer of soil that freezes in winter, the forces of frost heaving act. They strive to push underground structures out. The exception is dry sand, which is unable to accumulate water.
To avoid heaving, when laying the foundation you must immediately provide for:
- Surface drainage and foundation drainage. Even if the site is elevated, accidental runoff is possible, which can enter the foundation area and wash away the soil under the base.
- Thermal and waterproofing. The protected structure resists negative influences much better, deforms less and lasts longer.
- Insulation of the blind area, in which the soil near the foundation does not freeze. This means that the influence of low temperatures is noticeably reduced.
In total, these actions will guarantee that the MZLF will not suffer from frost heaving on soils with weak and moderate heaving. But if the site has clay soil or quicksand is found, it is necessary to install additional piles. They sink below the freezing level or the quicksand zone, which increases the soil resistance due to the forces of lateral friction of the supports.
What will be needed for construction
No matter how even we strive to make the foundation, soil subsidence cannot be uniform.
Therefore, in 99% of cases, the first row requires a lot of concentration for the installer.
You will also need the following tool:
- Great level.
- Small level.
- Long tape measure for measuring walls.
- A short tape measure for measuring load-bearing partitions.
- Shovel for applying cement mortar.
- Rubber hammer.
- Wide brush.
Also for construction you will need masonry mortar, construction adhesive and foam adhesive.
Masonry mortar is used at the first level of blocks, when it is necessary to significantly level the level.
The difference in total can reach several cm, and only masonry will help to lift the blocks.
When choosing it, please note that some types are able to smooth out even 8 cm of inaccuracy.
Laying the first level of blocks under the rope
An adhesive solution will be needed to fill the gaps between the blocks and for small, up to a couple of cm, errors. Foam adhesive is sold in cans and can be used when the blocks lie perfectly flat.
It practically does not create gaps between the blocks, is well distributed in space and tightly glues the building material together. Working with foam is much easier and installation is faster, since there is no need to mix the solution.
Final stages of work
The cast tape is aged for 28 days. The first 3 days it is necessary to water it with water every 4 hours, then for a week watering is done every 8 hours. This allows you to equalize the stress and humidity of the outer and inner layers of the tape.
The formwork is removed 10 days after pouring.
NOTE!
Despite the long curing period, you should not try to shorten it, even if you feel that the concrete is already quite hard. The foundation is a critical element of the building, which does not allow for a free approach to technology.
Construction process
You can build a one-story foam block house with your own hands. To do this, you will need to strictly follow the instructions. Let's get to know her.
First of all, you will need to build a foundation. He plays one of the most important roles in the construction of any house. It can be built not only by an experienced craftsman, but also by the owner of the home himself.
Let's look at how to do this correctly using the example of a strip structure that can be used in the construction of a foam block house:
- first you will need to make precise markings, for this purpose they dig trenches of the required width and depth;
- a “cushion” of sand and gravel is placed at the bottom of the trench, the thickness of which can be from 15 to 20 cm;
- after this, construct the formwork from boards (you can also use permanent polystyrene foam formwork), the thickness of which should be about 5 cm, place the spacers in such a way that there are meter gaps between them;
- When making formwork, start installing reinforcing bars;
- do not start pouring concrete until you wet the boards with water;
- lay concrete gradually, compacting each layer with vibration;
- Having completed the above stages, the foundation must be covered with sawdust or woven material;
- Now remove the formwork and begin waterproofing the structure using appropriate materials.
When you finish pouring the foundation, you need to wait until it gains strength. This may take a month or a little more.
Next you can start laying the walls.
- Place waterproofing materials on the base. This will be necessary so that moisture rushing from the soil does not collide with the foam blocks and does not spread across the entire plane of the walls. To do this, sheets of roofing material must be laid on a small liquid layer of cement mortar.
- Next, a corner block is placed on the mortar. The first part needs to be properly leveled using a mallet and level. The block must be positioned horizontally (this applies to all planes).
- The corners of the house are the first to be arranged. They need to be raised to a height of 4-5 blocks. The resulting openings as a result of such work must subsequently be filled with foam blocks.
- If you need to make holes or recesses in the blocks for communication elements, it will not be difficult to make them due to the flexibility of foam concrete.
- Having laid out and correctly oriented the starting row, you should proceed to further laying walls and partitions in accordance with the project plan.
- Each subsequent row of blocks must be made in relation to the previous one.
- Supplement the load-bearing structures with an armored belt.
- To arrange jumpers, ready-made parts of the appropriate shape are usually used.
- The attic floor is laid in exactly the same way as interfloor structures in houses with two or more floors. But keep in mind that the slabs cannot be laid directly on the foam blocks. For this purpose, a poured monolithic reinforced concrete belt is usually used. The floors are laid on such a base.
- When constructing an attic space, it is permissible to use structures made of wooden or metal beams.
After laying the foam block walls, you should proceed to constructing the roof.
This is done in this order:
- first, the rafter beams are installed;
- then elements such as counter-lattice and sheathing are assembled;
- then the thermal insulation material is laid;
- The next step is laying the roofing.
Only after completing all of the above work can you proceed to the interior decoration of the resulting foam block home. Conventional plaster mixtures are not recommended to be applied to foam concrete, as it absorbs moisture. Most often, such mixtures are applied to plasterboard or plastic bases with pre-designed frames (metal or wood).
If we are talking about finishing the bathroom and kitchen, then here you will need to lay vapor barrier materials. Only after this can gypsum fiber sheets be installed on the walls, onto which the tiles will later be glued.
The following floors can be laid in a foam concrete house:
- wooden;
- laminate;
- linoleum;
- porcelain stoneware/ceramic tiles;
- self-leveling floor
Second block level: residual alignment
For the second layer, masonry mortar can no longer be used. If any errors remain, or the solution has settled too much in some place, use an adhesive solution.
If you are sure that everything is smooth, you can use foam. Sometimes the entire second layer is laid on foam, except for 1-3 blocks that unexpectedly fall into the masonry mortar.
Correct application of the solution: create an air layer inside that retains heat
Foam, as we wrote above, is very easy to work with. Before applying it, the block is moistened with water, for which a wide brush is useful.
The foam is pressed under pressure in two parallel strips onto the bottom block and onto the side wall.
It holds the building material securely and dries very quickly. Try not to get yourself dirty, as it is extremely difficult to remove foam from clothes or hair.
Just remember the rule: each laid block must be checked by level from above and from the side.
Pile foundation
Pile foundation diagram
A pile foundation differs from a columnar foundation only in the type of supports. You won't be able to install the piles yourself. You will have to use the services of hired specialists, which increases costs. However, installing piles is the only correct solution if the construction of a house is carried out in swampy areas.
Types of piles
When constructing private houses, it is customary to use bored and screw piles. Supports with a thickness of 108 mm are capable of supporting a one-story building weighing up to 6 tons. For a two-story house, piles of larger diameter are used, which makes it possible to increase the step between them. The supports are usually buried down to 2–3 m. The load from the building falls on the sides and the supporting end of the pile.
Reinforcement and insulation of walls
Reinforcement is the key to strength. The reinforcement procedure is very important. Those who complain about the fragility of a house built from foam blocks, as a rule, initially decided to save on reinforcement. It is this process that prevents cracks from appearing in the future. After you have laid out the first row of foam blocks, you need to make grooves on their surface using a wall cutter (as a rule, a size of 0.4 m x 0.4 m is sufficient, and at the same time step back from the edge of each block by at least 6 cm). Make two grooves, they should be parallel and have rounded corners. Be sure to clean the grooves from any remaining dust, after which the adhesive solution should be poured into them. Place reinforcing rod inside. Then continue laying the rows. Every 3-4 rows it is necessary to repeat laying the armored belt. Some builders reinforce each row, this significantly slows down the construction process, but we can only guess how much this strengthens the structure!
Cleaning grooves for armored belts
You should know that when working on window and door openings, you should not forget about metal corners. The length of the corner to be laid (placed above the future window and doors) must be at least 0.6 m greater than the width of the opening itself.
According to observations, a team of 4 people copes with the construction of the walls of a 120-meter house on average in a week. If you work at a relaxed pace, three weeks will be enough.
Calculation of the foundation for a house made of foam blocks
The most popular design in private construction is reinforced concrete tape. We will talk about how to choose the right section, since this is what the essence of calculating foundations comes down to.
At the first stage, loads are collected. The most loaded section of the tape is determined. As a rule, this is an internal load-bearing wall on which slabs or floor beams rest on 2 sides. Next, the weight of all structures and materials is summed up, including the foundation itself, as well as loads from snow, wind, household appliances and furniture.
To take into account the uneven impact, safety factors for the load are used - for permanent ones 1.1, for temporary ones 1.4.
To find the weight of the wall, the density of the foam concrete is multiplied by the volume. Foam blocks can have a density from 400 to 1200 kg/m³, depending on the purpose of the material:
- In private construction, lighter grades D400, D500 with a density of 400-500 kg/m³ are used for masonry walls. They have low thermal conductivity and are strong enough to withstand the weight of the ceiling, roof and snow.
- High grades are used where there is heavy load. This is a multi-storey and industrial building.
To take into account the weight of the foundation, its dimensions are pre-assigned. The width must be no less than the thickness of the wall. The height is calculated as the foundation depth plus the base part, if it is made of reinforced concrete. Typically the width is 40 cm, the height is 70-100 cm. The density of reinforced concrete is 2500 kg/m³.
The roof must be calculated taking into account not only snow loads, but also wind loads, since on a pitched roof they are divided into horizontal and vertical components. All calculation results are summarized in a table. The pressure under the sole is found by summing the loads and dividing by the width of the belt.
The next stage is determining the bearing capacity of the soil. If studies of the geology of the site have already been carried out, then information about its characteristics is at your fingertips. If not, the task comes down to determining the type of soil yourself. It is recommended to moisten a small portion of the soil with water from the depth of the sole and try to roll a ball or cord. Wet clay is plastic, retains its shape well, loam is looser, sand crumbles almost immediately.
Further in the table you can find the corresponding standard load-bearing capacity
At the final stage of the calculation, it is necessary to compare the actual pressure under the base of the foundation and the standard bearing capacity of the soil. If the first value is less than the second, everything is fine. With the chosen dimensions, the foundation will be quite reliable. If on the contrary, you need to set a larger width, calculate the pressure for the new value and compare again.
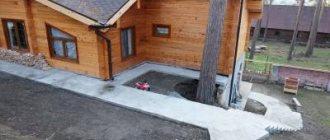
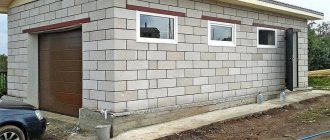
Facade finishing
Since you are building a house, this means that you, first of all, want comfortable living conditions for yourself and your family. The appearance of the house is an important component of comfort, so the surface of the walls must be finished from the outside, otherwise the house will darken and turn into a “gloomy castle.” Moreover, the aesthetic component is not the main reason for the need for external work; finishing enhances the parameters of foam concrete, the house becomes stronger and warmer, and moreover, sound insulation characteristics increase.
Exterior decoration of the house
There are several ways to decorate a foam block house:
- Decorative panel. It is necessary to leave an air gap between the walls and hanging cladding.
- Mixtures that are used as concrete plaster.
- Stones or bricks for finishing.
- Painting with silicone, waterproof and steam-resistant paint.
As for the interior decoration, here “there are no comrades according to taste and color” - the interior design depends solely on your taste and imagination.
Blueprints
The construction of any house begins with a competent design and a detailed drawing indicating all the components of the future building. It is when designing a home that its layout is developed. Let's consider several attractive projects of one-story foam block houses.
If you want to build a small house in the country, then you will like the project of a neat 7x9 m structure:
- it can be built on a strip-monolithic foundation;
- for external walls it is permissible to use a combination of foam blocks and gas blocks;
- floors are made of reinforced concrete;
- For a simple gable roof, metal tiles are suitable.
Conventionally, such a building can be divided into two halves. On the left side there is space for a small bedroom of 9 square meters. m. Directly in front of it, it is worth placing a more spacious hall, combined with a kitchen located on the right side of the home (this area will occupy 23.7 sq. m.). Behind the kitchen on the right you need to allocate a small space for the boiler room (2.5 sq. m).
The last room on this side will be a combined bathroom of 2.9 square meters. m. The areas near the front door and the door leading to the backyard should be continued with small hallways of 4.1 and 3.1 sq. m. m (for the back door). In such conditions, it is quite possible to equip an attic.
Also today, many people order projects for foam block houses, the dimensions of which are 8x8 m. As a rule, two-story buildings have such parameters, but this does not mean that they cannot be used for one-story houses.
So, in a building measuring 8x8 m there is room for the following rooms:
- most of it should be allocated to a spacious living room combined with a kitchen (28.60 sq. m);
- Opposite the living room and kitchen, allocate space for a hall running from the front door to the back door (15.4 sq. m.) to divide the building into two halves;
- on the right side of the hall there is space for a bedroom or guest room (13 sq. m), a small bathroom (5.8 sq. m), as well as a dressing room (7.20 sq. m), located in the corner of the building.
A foam block house measuring 8 by 10 m can be successful.
Let us consider in detail which rooms (and what area) can be located in such conditions:
- at the entrance to the house you can organize a neat terrace;
- the first room next to the terrace will be a vestibule (2.7 sq. m), which turns into a hall (3.42 sq. m);
- on the left side of the vestibule and hall, place a bathroom (6.3 sq. m);
- on the right side, organize a comfortable living room (20.56 sq. m);
- right behind the living room you can arrange a small kitchen (11.2 sq. m);
- Opposite the kitchen (on the opposite side - on the left) allocate an area for a bedroom (10.6 sq. m).
If you are planning to build a small block house measuring 6x8 m, then you should consider the following project.
- such a house can have the simplest possible shape;
- place the hall in the right corner of the home;
- in front of the hall, equip a small bathroom that will conditionally separate the entrance part of the house and the bedroom located in the corner on the right side;
- Opposite these rooms, place a large living room, separated by a partition from the kitchen.
A block house measuring 9x9 m will be more spacious.
Below we will consider how to arrange all the necessary rooms in such a structure:
- divide a small hall between the kitchen on the right (8.9 sq. m) and the bathroom on the left (toilet - 2.8 sq. m, bathroom - 3.6 sq. m);
- allocate the remaining space to a spacious hall and dining area (34.8 sq. m), install a staircase in the corner leading to the attic;
- in the attic, place a study (8 or 11 sq. m), behind the wall from it a bedroom (14 sq. m), and after the bedroom another study (12.1 sq. m), located in the corner;
- place the bathroom on the left side of the second office (8.7 sq. m);
- organize a small balcony with an exit from the first office.
A more spacious house of 9x10 or 10x10 m can be equipped in a similar way; such a structure can be supplemented with a garage, separated by a partition from the boiler room. On the remaining area it will be possible to arrange all the standard rooms.
Preparing a foundation pit and load-bearing cushion for a two-story house.
Strip foundation depth for the house.
Preparing a pit for a two-story building.
Having developed a foundation pit, the bottom is measured using a level and the edge and area are cleared of crumbling soil. Then markings are made for the load-bearing concrete pad. The width of such concrete preparation is 100−1200 mm, with a thickness of 150−250 mm. It can be used to mount both a monolithic foundation and a block one. The formwork is prepared according to the diagram, installed around the perimeter, using reinforcement as stops, simply driving them into the ground.
Reinforcement is done in one tier, with class A 1-3 reinforcement. The mesh cell has a size of 200×200 mm, the joints are knitted with wire. The laying depth of the load-bearing belt is at least 1.8−2.2 meters for medium heaving soils of type 2. What is important when laying is to make a cushion of crushed stone under the base. The thickness of the pillow for a two-story house must be at least 120 mm. Crushed stone is laid on compacted soil. Then water drainage measures are installed or waterproofing material is laid. If construction is frozen for the winter, a pit is dug at the lowest point of the pit to collect water. The size of the sump (storm pit) must be at least 6 cubic meters.
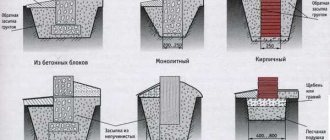
Types of foundations
For the construction of the foundations of houses made of foam blocks, the following structures are used:
- Tape - in the form of a strip of rectangular cross-section, which is located along the perimeter of the building and under the load-bearing internal walls. Made from monolithic or prefabricated reinforced concrete. May be deep or shallow.
- Slab - a solid reinforced concrete slab on a drainage pad. The depth of installation is usually small, unless the project provides for another option, for example, a ground floor or basement.
- Pile-grillage is a hybrid of shallow-depth strip and pile foundations. The piles are connected at the top by a reinforced concrete beam, which rests on the ground or is sunk to a shallow depth.
It is not recommended to install pile foundations with a grillage raised high above the ground under stone buildings. Even a slight uneven settlement of the foundation can cause the house to crack.
Backfill depth for a one-story building.
Having set up several mines, we check after 24 hours whether there is any water in it. If it’s dry, you can look at the depth of the dense soil. When drilling with a change in soil layer (determined visually), measure the depth with a tape measure. It is better to make holes along the entire perimeter of the site, drawing up a map of the occurrence of load-bearing soil.
When checking, use a drill diameter of 200−250 mm. By drawing a preliminary sketch, you will have an idea of where and how much to dig. You will have to take into account several more important factors, the level of freezing and the depth of the bearing layer of the earth. This is also relevant for one-story and two-story houses made of any material, not just foam blocks.
Roof
Victor chose a pitched roof for self-construction of a house made of aerated concrete for a number of reasons:
- erecting a rafter system alone is very difficult and quite dangerous;
- instead of useless attic space for a one-story house, you can get 100 square meters. meters of usable area;
- This roof design made it possible to obtain a closed “stone” contour inside, with normal ceilings.
The roof has a complex structure:
- prefabricated monolithic floor with aerated concrete filler
- extruded polystyrene foam (15 cm layer, for insulation)
- extruded polystyrene foam to create a slope. The height difference over a length of 7.5 meters is 15 centimeters.
VictorborisovFORUMHOUSE Member
Just in case, let me remind you: a flat roof is not flat, it has a slope of 1-5 degrees (usually 2), and a mandatory drain. There are no pools on a flat roof.
- screed;
- classic built-up waterproofing in two layers with top coating.
The ceiling was poured in the fall.
This stage of construction was the most nervous. There was a whole epic with low-quality beams: it turned out that the T-blocks did not physically fit into them; I had to wait several days for the supplier to replace them. All this time, our user continued to pay for the rental of telescopic stands. At the same time, the weather deteriorated sharply - it was heading towards winter, and heavy, prolonged rains gave way to a sharp cold snap. There were entire pools of water in the house, and the roof covering, which was prepared for concreting, was frozen over.
But, if you consistently solve all the problems that arise, they will be successfully resolved. Victor entered winter with the frame of the house erected. The rest of the roofing work was completed in May. And subsequently our user made a green roof.
VictorborisovFORUMHOUSE Member
The total duration of construction from the beginning of excavation work to concreting the floor is 4 months. Let me remind you that this is my first construction experience in my life.
The construction season could have been completed, but Victor still managed to complete the partitions, install windows, doors, take out the garbage, insulate the floor, install electrical wiring and prepare the walls for plastering.
How to choose a foundation for foam concrete masonry
The entire load from the house, including the weight of walls, decoration, furniture, roofing and snow, is transferred through the base of the foundation to the ground. Therefore, the first and most important condition for a structure to work well and be durable is that the bearing capacity of the soil matches the load transferred to it.
Before installing the base, you need to determine:
- soil type;
- ground water level;
- freezing depth in your region.
It is also important what kind of relief on the site - calm or with changes. When there is a difference in heights, the construction of a foundation is more expensive than on relatively flat terrain. One of the ways to level the surface of the earth is to carry out terracing. The result is soil grades that are used like a regular earth foundation, but are less durable.
Common situations affecting the choice of foundations:
- If the soil is very weak and its thickness is more than 1 m, it will sag under loads under any combination of other factors. Uneven settlement is the scourge of all stone buildings. Therefore, if there is peat on the site with a depth of 1 m or more, foam concrete as the main building material will have to be abandoned in favor of wooden structures.
- Strong and dense soil combined with a low (below 2 m) groundwater level and flat terrain - any type of foundation can be used.
- On a flat area with a high groundwater level and weak soil (which is strengthened in depth), we can recommend a deep strip foundation so that the base rests on strong layers. A pile foundation with a recessed grillage also works quite well.
- In areas with height differences of up to 2 m, strong soil and low groundwater level, houses made of blocks can be installed on a strip foundation with a strictly horizontal base. Then a basement room is formed under the ceiling, which is used for your own needs.
A combination of variable relief and high groundwater level is rare. But if this is your case, in order to lower the groundwater level, it is recommended to arrange foundation drainage with liquid discharge by gravity to the lowest point of the site into a drainage ditch or well.
Pile-grillage on bored piles
Such a foundation can be considered a reinforced version of the MZLF or pile foundation. It is reliable in almost all types of soils, including weak and waterlogged ones.
For a house weighing about 100 tons, the optimal diameter of piles is 30 cm. They are placed at the corners of the building, at the intersection of walls and every 1.5-2 m around the perimeter. According to SNiP, the distance between the supports should be no more than 6 pile diameters, that is, in our case, 1.8 m.
The diameter of the working reinforcement rods is 12 mm, the clamps are 6 mm. Each structure will require 4 rods. The pile must be immersed to a depth below the freezing level of 10 cm, which can be accurately determined in the manual for foundation design SP 22.13330.2016 or in tables posted on the Internet.
The standard dimensions of the grillage tape are 400x400-600x400 mm. For pouring, you need to use concrete of a grade not lower than M250-350.
The pile-grillage structure is installed in several stages:
- Site layout. It is usually carried out using specialized equipment - an excavator, a bulldozer. They cut off the fertile layer and move it to the dump.
- Marking. Both instrumental and manual methods are used. The first ones are more accurate and faster, the second ones are free.
- Drilling holes for piles. It is almost impossible to drill wells of large diameter and depth with hand drills, so it is advisable to do this using automated installations.
- Manufacturing of frames. Working fittings are bundled in 4 pieces. clamps in increments of 30-70 cm.
- Installation of formwork in wells. Cylinders made of roofing felt, pipes made of asbestos cement or polyethylene are used. In dense, non-shattering soils, it is possible to concrete piles without formwork.
- Installation of reinforcement cages strictly vertically and alignment under the level. To fix the protective layer, special plastic gaskets are put on the rods.
- Preparation and pouring of concrete. The proportions for M250-M350 can be found in the table:
- Filling of crushed stone cushion to a height of 20 cm with layer-by-layer compaction. It is carried out no earlier than 3-5 days after pouring concrete. Crushed stone fraction - 30-50 mm.
- Laying thermal insulation - 50 mm thick polystyrene foam boards.
- Installation of grillage reinforcement. The pile outlets are tied to the foundation frame. At this stage, sleeves for communications are installed so as not to make holes in reinforced concrete later.
- Assembly and installation of formwork. At home, plank boards with spacers and supports are made.
- You can use reusable plastic formwork, which after installation can be used on other objects. Technologically advanced and convenient is permanent formwork made of rigid extruded polystyrene foam or DSP boards, which does not require dismantling and at the same time insulates structures.
- Pouring concrete. During monolithic work, you need to take as few breaks as possible and try to fill the entire volume at once. If this is not possible, the cold seam is placed in the least loaded place. During the process of laying the solution, compaction is carried out using deep vibrators or improvised means to expel air bubbles out.
- Excerpt. Concrete must be protected from precipitation, overheating or freezing. In hot weather, the surface is periodically moistened with water and covered with film, and insulated in cold weather.
- Dismantling of formwork.
After the concrete has hardened, waterproofing is carried out, as well as thermal insulation, if it was not performed during the installation process. After 28 days the base can be loaded.