The use of any type of tile (tile, porcelain stoneware, natural stone) in interior design poses several difficult challenges for homeowners. The success of the repair depends on their decision. One of these problems is the choice of grout. Opponents may object: “grinding the joints between the tiles is not a problem. This is a normal technological operation." This was the case at the end of the last century. Nowadays the choice of fugue species in composition and color is so large that it is not difficult to get confused. In the end, it may turn out that the best tile grout was somewhere nearby.
The editors of the construction portal StroyGuru decided to figure out how to beautifully seal the seams between tiles with minimal financial investment, while simultaneously protecting the tile adhesive from destructive processes under the influence of unfavorable factors.
What is grout
Anyone who has studied it even a little knows about the richness of the Russian language. The diversity is also confirmed by the morphological analysis of the word grout. Dictionaries give several interpretations:
- flour porridge;
- last plastering operation;
- a special mixture for sealing joints between laid tiles. Another term is sometimes used: "fugue".
We are interested in the latter explanation. A more complete version of the interpretation of the concept is as follows: grout is a whole group of building materials for filling the gaps between tiles.
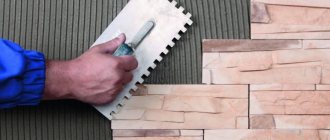
The essence of the technical process is to fill the free space between the laid cladding with a plastic mass, which is glued to the edges of the tile, after which it hardens during the setting or drying process. As a result, a waterproof partition is formed that protects the tile adhesive from moisture. At the same time, the fugue does not shrink during the hardening process thanks to special additives. No shrinkage, no cracks.
The goal is to completely seal the installation.
Functions
The fugue performs several important functions:
- protects the seams between tiles from moisture and dirt;
- masks defects in facing material;
- strengthens the masonry, extending the service life of the cladding;
- prevents the development of pathogenic microflora (mold, fungus);
- gives completeness to the laid ceramics, covering gaps in joints and giving an additional decorative effect to the facing material.
Epoxy products - a guarantee of reliability
Cement grout can be matched to any option. But some conditions are not suitable for cement materials, reducing their service life. If you are going to lay tiles in swimming pools, bathrooms, bathhouses, in a word, where there is high humidity, it is better to use epoxy fugue. Any epoxy grout consists of resin with additives, fillers and hardeners. To obtain the finished mixture, you need to mix these components, and then you get a high-quality and plastic mass. It is extremely difficult to work with such a mixture, since it has a high level of viscosity, so even for professional builders it is a long and difficult task. But upon completion of the work, you receive high quality seams, they become durable, bright, stable and have a service life of up to 45 years. Therefore, many builders consider epoxy mixture to be the best fugue for laying tiles
Advantages of epoxy resin grout:
- +Resistance to temperatures, chemical influences, corrosion;
- +Long service life;
- + Saturation of the palette.
- -High price;
- -Difficult to implement.
Flaws
Recommendations for selection
The information above is enough to choose the right material for jointing gaps in tile cladding.
- For dry areas of the wall (kitchen splashback, bathroom, glazed balcony), a regular powdered cement mixture is sufficient.
- Rooms with damp conditions, where tiles are constantly in contact with water or steam, are recommended to be jointed with polyurethane or latex compounds. Epoxy will also work.
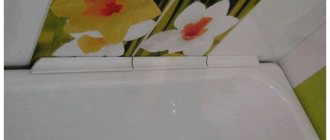
- Expansion joints and troubled surfaces are sealed with latex, polyurethane or furan fugue.
- For heated floors, it is advisable to use a polyurethane or latex mixture - a cement fugue is too hard and may crack.
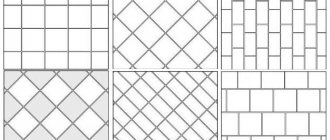
- Depending on the width of the seam, the following are purchased:
- for gaps up to 3 mm wide - plastic compositions without mineral fillers (sand);
- gaps of 4-6 mm - any mixtures filled with sand of the finest fraction;
- wide paths from 10 to 20 mm will require a cement fugue with the addition of plasticizers and coarse quartz sand.
- Tile with a glossy surface is afraid of compositions with sand. Here you need a latex or polyurethane mixture. You can also use finely ground cement without mineral filler.
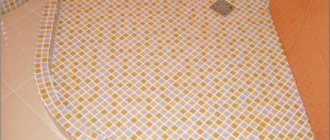
- Mosaic and glass tiles are best jointed with epoxy.
- For tiles with a textured surface, it is advisable to buy cement-sand grout. Ready-made mixtures lead to excessive consumption of material - a lot of it remains on the surface of the cladding.
Everything is clear here. The biggest problems arise when you need to decide how to choose a tile grout based on color.
What grout color to choose
The simplest solution in this situation is to recommend that consumers buy fugu according to their taste. But there are several design rules that will help you navigate among multi-color mixtures.
- A light (gray or beige) shade unifies the pattern on the tiles, simultaneously visually increasing the size of the room.
- It is better to grout floor tiles with darker mixtures - dirt is less visible.
- Dark-colored joints highlight the color and texture of the tile well.
- Walls with plain tiles look good with a fugue 1-2 colors lighter or darker than the tiles.
- Patchwork tiles are best grouted with transparent compounds.
- Multicolor panels will receive even greater expressiveness from the “chameleon” mixture.
- The contrasting shade of the seam will highlight the color scheme of the cladding.
A special program located here will help you choose the color of grout to match the tiles.
Requirements for grouting compounds for ceramics in the pool
The operating conditions for ceramic lining of swimming pool bowls are specific. These are prolonged contact with open water, exposure to salts and chlorine, temperature fluctuations and other unfavorable factors.
The pool is a complex hydraulic structure, therefore special requirements are placed on the facing materials for it.
Therefore, the adhesive composition for arranging seams in the pool must have the following properties:
- strength and hardness - to counteract the pressure exerted by water;
- a high degree of adhesion is a condition necessary to ensure the integrity of the cladding;
- elasticity - a characteristic of the adhesive necessary for the grout to neutralize the deformations of the pool bowl after the mixture has cured;
- water-thermal and frost resistance - qualities necessary to counteract prolonged contact with water, freezing and temperature fluctuations;
- resistance to chemical reagents, salts and chlorine - inertness to salts dissolved in water, including marine, household chemicals and chlorine used for disinfection;
- antifungal activity - the ability to counteract the formation of fungus on its surface in the favorable environment of warm water;
- environmental friendliness – absence of any toxic emissions into the environment;
- aesthetics - a thoughtful color addition, contrasting or tonal, of an artistic solution for finishing the pool.
Grout mixtures whose names include the words “Pool” or “Aqua” have all of the above characteristics in combination. If these words are not on the packaging, then the material is selected based on the description and instructions for use.
Four ways to calculate consumption
Mathematical
You need to know the dimensions of the tile - length (A), width (B), thickness (C) - and joint width (S). These data are substituted into the formula, where 1.6 is the average density coefficient of the fugue.
Using simple calculations, the required amount of material is obtained in kilograms per square meter. It is better to add 5-10% to the resulting value.
Table
There is no need to remember mathematics; for standard tile parameters everything has already been calculated and entered into the table.
Experimental
This method is the most accurate. The joints of adjacent tiles are filled around the entire perimeter with a small, precisely known amount of grout (100 g, for example). When all the material has been used up, the treated area is determined. The total square footage is divided by the result obtained, then multiplied by the weight of the material used (0.1 kg in our case). The final figures will show the actual volume of planned consumption, because arise not from the average, but from the actual filling of the seams.
Calculator
The easiest way is to use our calculator:
*Grout density:
Don't forget to add 10-15% to the calculated value for losses.
Basics of color selection
A win-win solution is to use white fugue or chameleon mixtures. They match any cladding color. The white finish visually highlights the tile layout and its clear geometry, and the chameleon mixture merges with the surface, creating a monolithic effect, although they are only available in epoxy. If you want to experiment, you need to select a shade taking into account the rules given below.
Advice! Do not decorate the entire area at once, test the color combination in a small area. Wait until the mastic dries, because... at the same time she brightens.
Some features of plastering other ceilings
Wooden ceilings
Mesh for ceiling plaster
Plaster on a wooden ceiling
Before applying the plaster mixture, a metal mesh with cell sizes of 100x100 mm is attached to the ceiling, or two-layer shingles are filled so that the nail heads do not extend beyond the slats. This is done to avoid cracking and shedding of the plaster, especially if the house has a residential attic or second floor. The plaster is applied in two layers, each of which is carefully leveled with a spatula and dried.
Plasterboard ceilings
Ceiling plaster from plasterboard
The process of plastering plasterboard sheets involves filling dents and joints with a building mixture. In cases where the gaps between the drywall blocks are significant, experts advise using serpyanka in the necessary areas. However, it should be remembered that the maximum layer thickness in areas not covered by the mesh cannot exceed 15 mm.
Application of decorative plaster
Decorative plaster
Decorative plaster
There is also a so-called decorative finishing of ceilings, in which the surface treated with plaster is not further puttied. This finishing method allows you to get an interesting texture and unusual design solutions, especially when combining different application techniques.
Ceiling decorated with decorative plaster
PlasterRelief texture of decorative plaster for the ceiling
The ceiling, plastered and treated with P150-170 grit sandpaper, is ready for further work. As a rule, it is impossible to level the surface “to zero” without using putty.
How to plaster in the bathroom
When plastering walls in the bathroom, you need to take into account increased humidity and temperature changes. Only cement mortar meets these conditions and gypsum is not suitable in any case.
The main steps when leveling the walls in the bathroom are the same as when plastering the room. You just have to take into account the peculiarities of leveling the walls for decorative tiles.
Under the tiles it is necessary:
plastering should be carried out according to the beacons; strict adherence to the geometry of the room; Pay special attention to the installation location of the bathtub or shower.
The angles must be 90 degrees, even if this means increasing the thickness of the plaster layer.
If the geometry of the room is violated, square decorative tiles will show all its irregularities when laid.
Mechanized plaster - pros and cons
A few words about mechanized plaster. Mechanized plastering of walls involves the use of all kinds of equipment. This article is about do-it-yourself plastering, so I won’t write much about it. There are many types of equipment: a plastering station, a powerful compressor that uses a special gun, or special plastering installations on guides.
Of course, there are many advantages to using technology, such as speed and enormous output. But the disadvantages are that if you plaster apartments, then this is not such a huge amount of work in which you can use a plastering station. It takes longer to wash it than to plaster the apartment. A compressor with a special gun (hopper) is a more suitable option for apartments and small cottages. But you still have to mix the solution manually and tighten it accordingly. One of the advantages is the speed of application, but you still have to sweat. There is also such a device as a “manual plastering machine,” but that’s a completely different story, which is used in decorative coatings. In general, the thing is quite funny, I wouldn’t mess with it.
Preparatory work
Before applying plaster, the wall must be prepared. The period of further operation and the quality of the work performed depend on this.
First of all, we clean the surface of old coatings.
We are deciding whether we will install beacons or whether we can do without them. To do this, you need to measure the curvature of the walls using a level.
The next stage is primer; the universal primer weber.prim.multi, suitable for both interior and exterior work, can help us with this. You can take any deep penetration.
It increases adhesion, removes dust from the surface and can prevent the appearance of mold; the strength of adhesion of the plaster to the wall depends on its quality. Apply the primer with a roller.
All detected cracks must be repaired, otherwise the plaster may also crack in the future.
When preparing walls, it is necessary to take into account the material from which they are made; read about these features below.
Removing old plaster
When renovating a new house with bare walls, you can skip this step. Old walls will first have to be cleaned of the existing plaster.
We tap the entire surface of the wall. We find poorly adhering pieces of old plaster and begin to knock them off from these places.
If the old mortar gives in easily, then you can knock it down with a simple hammer, otherwise we resort to using a hammer drill with a spatula attachment.
Before starting work, do not forget to put on a respirator, headphones and gloves, as there will be enough dust and noise.
Upon completion of work, collect all waste in bags and throw away. Dust the walls with a vacuum cleaner or a simple broom.
The last thing at this stage will be priming the surface with a deep penetration primer (2 times possible).
After complete drying, you can proceed to further work.
Sealing cracks
If there are cracks, they must be repaired; the method of eliminating cracks largely depends on their size.
Elimination of narrow, deep cracks:
- widen the crack to gain access to its full depth;
- Clean the entire resulting surface from dust and treat it with a primer (twice if necessary);
- After complete drying, seal the crack with gypsum or cement putty.
Elimination of narrow, not deep cracks
A not deep, narrow gap can be sealed with silicone or sealant from a bottle with a narrow spout.
After complete drying, cut off any protruding excess with a sharp knife.
Sealing wide cracks
A wide crack is treated with a primer from the beginning.
To speed up the process, the gap can be sealed with foam. After complete drying, cut off any protruding excess with a sharp knife.
Padding
At first glance, this stage of preparing the wall before plastering seems unimportant, but it is not. The quality of plastering and its service life depend on priming.
Two types of primer are used:
Deep impregnation primer
It penetrates deep into the surface and holds small particles together.
Sold in cans in the form of a white or yellow liquid. Be sure to carefully look at the label, as it comes in concentrated form and requires dilution.
Can be applied with a roller or brush.
Primers for smooth, concrete surfaces
These include concrete contact, sand primer, etc. They also serve to increase the adhesion of the treated surface.
Mix well before use. Apply with a wide brush.
After priming, allow to dry for 24 hours.
How to plaster walls with your own hands for a beginner: video and features of application to various surfaces
Modern production offers a wide variety of plaster mixtures. Before plastering walls with your own hands, you should familiarize yourself with the characteristics, composition and recommendations for use. Different surfaces require different approaches.
Brickwork works
Plastering brick walls can be done with either cement mortar or gypsum mixture. For exterior work, only a cement mixture is suitable. Since this type of work is carried out on the initial masonry, they must be completed flawlessly, avoiding swelling and defects
It is important to consider the time it takes to complete the brickwork. If the construction work was carried out not very long ago, the walls should be allowed to shrink for some time to prevent cracking
Repair work on brick foundation
If you need to plaster brick walls with a previously applied finish, it should be completely removed. And only after complete cleansing of dust and dirt should you begin repair work. A brick base requires the installation of beacons, since the walls have quite large defects and deviations. All the following works are similar.
To help you learn how to plaster a brick wall with your own hands, you can familiarize yourself with the step-by-step process in the review, watch this video tutorial:
Work on concrete surfaces
For concrete walls, plastering work should be carried out more carefully. For better adhesion to the previous layer, the plaster should be rubbed in with some force for a more durable connection. Otherwise, the entire application process is no different from performing work on beacons.
Notched wall
Wooden wall plaster
The process of plastering wooden walls inside a house is somewhat different from the previous ones. The main difference is that plaster does not adhere to a clean wooden surface. First, you should make a frame from the lathing, which can be made of wooden slats or metal mesh.
When installing wooden sheathing or shingles, thin slats with dimensions from 3×15 to 5×20 mm are used
When purchasing, it is important to pay attention to the quality of the wood; it should have a light color. When fastening, the nails are not driven in completely, but to the middle, so that the head can be bent and additionally press the rail
Lathing a wooden surface
Under the sheathing, you can install additional thermal insulation from felt, after pre-impregnating it with an antiseptic. The metal mesh is attached in a similar way.
Before plastering a wooden wall, carefully watch the instructional videos. The process is not complicated, but you should know many nuances of the technological sequence. The mixture is applied as usual. You need to be careful when pouring the mortar onto the sheathing; there may be voids behind it. Therefore, work should be performed at an angle of 45° alternately on one side and the other.
Foundation plaster
Before plastering the foundation of a house with your own hands, you must completely clean all surfaces of dirt, dust and greasy deposits. If the concrete base is more than a year old, you can apply notches for better adhesion of the mortar. On a brick foundation, use a spatula to clean all the seams from the old mortar.
In the second stage, all surfaces are generously primed, then deep defects are leveled with cement mortar. The same mixture should be used to fill previously cleaned joints in the brickwork.
To ensure reliable adhesion of the mortar to the foundation, you can pre-tension and secure the metal mesh. After which you can begin the technological sequence of applying cement mortar. All work must be carried out in warm, dry weather.
Metal mesh on the foundation
What are solutions made from?
What types of solutions are there?
- Clay;
- Lime-gypsum;
- Lime;
- Cement-lime;
- Cement;
- Terrasite.
Regardless of the type, the solution should be viscous. Cement mortars are suitable for interior and exterior work. This solution is not afraid of moisture, which means it can be used in rooms with high humidity. The cement mixture is the strongest of all, however, the process of its production will take more than 12 hours.
Lime mixtures are sensitive to moisture, which means that they can only be used in rooms with moderate humidity. It is also suitable for exterior finishing, but only if the surface is not constantly exposed to water. To ensure the strength of the composition, gypsum is added. Working with such mixtures should be quick: they will harden within half an hour after production.
Clay mixtures are used to finish wooden surfaces. Clay is afraid of water, which means it can only be used in dry rooms or in rooms with normal humidity.
The plaster must contain three components: binders for adhesion, filler to give strength and water to create the desired consistency. If it is necessary to add some more properties to the characteristics, then a comparable substance can be added.
The surface is plastered in several layers. You need to decide, why exactly are you plastering? If for leveling, then you need a composition that is as astringent as possible. If you use plaster as a primer, it should have a medium viscosity. As a spray, the presence of binder should be kept to a minimum.
When making cement mortar for spraying, the ratio of binder - aggregate is 1:3, primer is 1:2, and finishing mortar is 1:1.5. Clay mortar implies the presence of aggregate 4 times more than the clay itself. And the lime mortar is twice as much.
What can I add?
- Lime;
- Gypsum;
- Liquid soap;
- PVA glue.
Lime is added to increase elasticity. In addition, its presence will make the solution less susceptible to moisture.
The plaster will allow the solution to harden faster. This is especially true for cement mortar. But don't add too much or it will harden right in the mixing bowl.
Liquid soap adds elasticity and increases adhesion; your solution will be more flexible, which means it will lie more evenly on the surface. PVA glue will add strength and adhesion to the material. Subsequently, during operation, the solution will not crack.
The most common filler for mortar is regular sand. Quartz sand is the highest quality, but others will do. The sand must be sifted to remove debris.
Required Tools
- Mixing bucket. Any container will do, as long as it is clean.
- Measuring container
- Drill or hammer for mixing.
- If you don’t have a drill, then a shovel, a strong stick, or anything that can be used to stir the heavy mixture will do. But doing this manually will be quite difficult.
- Binder
- Aggregate
- Water
If necessary, prepare additional additives to improve the characteristics of the mixture. How to calculate in what quantities you may need components? Cement consumption for plastering walls: calculate the surface area and multiply by the layer of plaster. The minimum layer width is 6mm.
Covering
We have already talked about how to start plastering walls, what the second layer should be, and now we will talk about the third, penultimate layer of plaster.
This layer is called the covering. Its main goal is to eliminate shortcomings that could have arisen during the previous stages.
The previous two layers resembled dough in consistency, cover it in such a way that it resembles sour cream in its thickness
It is very important that the surface is perfectly smooth, so there should be no lumps in the mixture. To do this, first sift all the ingredients necessary to create the solution through a special construction sieve.
In order to properly plaster walls, it is necessary to strictly adhere to the sequence of applying all layers and carrying out the above work. Therefore, follow these instructions in the order the items are listed.
At the next stage, you need to moisten the wall with water, and then apply the prepared solution. To do this, use a special spatula for plaster. Next, take a grater and use slow circular movements to even out the resulting layer as much as possible. The technique for applying the previous and this layer is slightly different. If previously we waited for complete drying, then at this stage it is necessary to immediately begin grouting.
Procedure
The process of grouting after plastering consists of several stages, the first of which is applying the coating.
The plastered surface is wetted using a spray bottle. This is necessary in order to increase the degree of adhesion of the primer layer to the covering. Moisturizing should be done evenly, without skipping. At the same time, the surface should not be heavily wetted; water should not flow in streams. This is done 15–20 minutes before applying the composition. If the working area is very large, then it must be divided into sections and only the one that will be processed should be wetted. If you don’t have a sprayer at hand, you can use a brush. Wet it in water and spray it on the wall. To apply the coating you will need a trowel and a wide spatula or a metal rule. The solution is poured onto the work surface in small portions. You should start from the top, gradually distributing the composition over the entire wall. The tool must be pressed with force so that the solution becomes denser and penetrates even microscopic irregularities. The excess is removed immediately. The maximum thickness of this coating is 2 mm. After the mortar has adhered, you can pick up a trowel and begin grouting the cement plaster. Some masters prefer to do this simultaneously with applying the composition.
When to do this does not make much difference and does not affect the result. The main thing is to distribute the composition well over the surface so that all irregularities disappear. Let's consider each of the methods in detail.