A mosaic shower tray decorates the room, giving its design originality. Special tiles are glued to the surface of the walls and floor, which do not become slippery when exposed to water or soapy water. Since installation does not require special equipment, the apartment owner can install the mosaic elements himself.
Kinds
When choosing a grout, factors such as the level of humidity in the room, the width of the joints, the need for mechanical stability of the mosaic and the frequency of wet cleaning are taken into account. Accordingly, the desired mixture is selected - most often these are cement- and epoxy-based products.
Cement grout
The cement-sand mixture is easiest to work with, both for an experienced tiler and for a beginner. To improve the characteristics, additives are added to the mixture - plasticizers, stabilizers and water repellents. Cement products are recommended for use in cladding, where the width of the joints does not exceed 3-5 mm.
Cement grouts are mixed with latex or water, and to protect them from moisture they are coated with a polymer water-repellent varnish. The rough surface and the tendency of seams to darken and become clogged with dust make cement grout less attractive than others, but cheaper.
Epoxy grout for mosaic
Preparations based on epoxy resins are recommended in cases where the seams are rubbed down for a long time, and there are no plans to dismantle the mosaic for several years. In addition to resins, they contain decorative and coloring pigments in the form of mother-of-pearl and sparkles, and fast polymerization of the composition is ensured by hardener substances.
The epoxy coating is very durable and smooth, not prone to mechanical damage, exposure to aggressive chemicals and clogging with dust.
However, working with epoxies is more difficult than working with cement-based products. Due to its thickness, the mashing process requires considerable effort, and rapid hardening requires some skill.
Epoxy grout can only be removed from joints together with the tiles. Therefore, grouting work should be carried out as carefully as possible.
Selection rules
To select a bathroom grout, you should pay attention to the following material parameters:
- water resistance;
- degree of shrinkage;
- strength;
- degree of moisture absorption.
Leading grout manufacturers:
- Italy;
- Germany;
- Poland.
Grouting joints between tiles is a simple process, but it also has its own rules and features. To carry out bathroom renovations, you should study the recommendations of specialists or hire professionals to carry out these works.
Rules for working with grout
- Mosaics are glued only to a perfectly flat surface. Mosaic will not be able to hide holes, gaps and other defects, and it will hold up worse.
- Epoxy grout sets quickly, so prepare it in small portions, which must be used within 20-25 minutes.
- You need to remove the “epoxy” from the surface of the mosaic immediately, before it hardens.
- They begin grouting a day after cladding, when the glue has dried a little.
- It is allowed to work with grout mixtures only with a soft silicone or rubber spatula. Metal devices must not be used.
- The container for preparing cement grout must be clean and the water must be free of impurities and debris.
- Do not add too much water to cement. Excess moisture will make the mixture “weak” and the coating unstable.
Design and interior design options
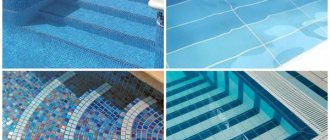
In small bathrooms, as a rule, separate areas of the room are decorated with mosaics: niches, ledges, bathtub. The rest of the room is decorated with tiles. This combination will visually enlarge the room and reduce repair costs.
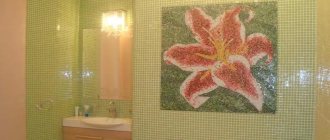
An excellent option for decorating a small room would be to place a small mosaic panel on the accent wall.
A bathtub and shower cubicle tiled with mosaics add a special touch to the room.
The mosaic countertop under the sink with a niche for the washing machine looks convenient
Shelves and ledges can also be tiled
The mosaic wall in the shower looks very impressive
Mosaic grout consumption per 1 square meter
The determining factors when calculating the consumption of the grout mixture are:
- dimensions of the mosaic - the smaller the elements, the greater the consumption;
- width and depth of joints - more grout will be needed to fill large gaps between tiles;
- grout density – recommended consumption for a specific brand;
- unforeseen situations - the need to eliminate defects and unevenness of the foundation will require additional expenses.
The amount of the required mixture can be calculated using the following formula: (k+d)/(k*d)*z*m*n = consumption in kg/m2.
Letter designations:
- d – mosaic width in mm;
- k – its length in mm;
- m – width of the tile joint;
- z – thickness of the mosaic element;
- n is the density of the mixture in kg/m3 (varies from 1.5 to 1.8).
It is recommended to carry out calculations when the tiles have non-standard dimensions. For the rest, you can rely on the data indicated on the grout packaging.
Features of laying technology
tidy up the floor in your shower with mosaics yourself . The process will not take much time, but you should know the step-by-step algorithm of actions. The standard technology for laying mosaics in a shower consists of several main steps:
After the adhesive has hardened, the mosaic surface is stronger than a tiled floor. In a similar way, you can lay the walls and ceiling; the shower cabin will last as long as possible, creating a bright mood every day.
Source
How to grout a mosaic?
Grout, incorrectly or carelessly applied to the surface of the mosaic, can ruin the appearance of the coating and negate all efforts to lay the tiles. Let's figure out how to use grout correctly for a decent result.
Cleaning tiles and grout
If we are talking about fresh masonry, then the seams do not require special cleaning. It is enough to wait until the tile adhesive dries - this is at least a day, and preferably two days. After making sure that the mosaic is held securely, remove all plastic crosses (if any) and any remaining adhesive mixture. To do this, it is most convenient to use a foam sponge with a hard side or a large-bristled brush.
Then carefully wipe the mosaic and seams with a damp and dry cloth. If necessary, you can use a vacuum cleaner - it will remove any remaining dust that the rag did not reach.
Making the first batch
Experts recommend not mixing the entire volume of grout at once. It is better to start with a small portion and observe how the composition behaves, and also adapt to the grouting process yourself.
They are guided by the instructions indicated on the packaging of the product - you need to prepare the batch strictly in accordance with it, without exceeding/decreasing the volume of the components. To mix, you should use a metal spatula, a construction mixer, a drill or a screwdriver with a special mix attachment.
The most difficult thing to prepare is epoxy fugue - due to its dense consistency, it is difficult to turn and becomes softer only after prolonged mixing. The cement grout is left for 7 minutes to bind, then mixed again and work begins.
When preparing a cement mixture, the dry component is added to the liquid, and not vice versa. It is better to take a little less water, and then gradually bring the mass to the desired consistency.
Surface protection
Mosaic is very sensitive to mechanical and chemical damage, so it needs protection when rubbing. A special spray will help create a protective layer - it is sprayed onto the entire surface of the cladding in 20 minutes. It is important to wait until the product has completely dried and then begin grouting.
The spray will create a thin film that will prevent the viscous mixture from drying out. When the finishing work is completed, the remaining product along with the protective layer can be easily removed with a soft sponge or rag.
If there is no protective spray, the edges of the mosaic can be blotted with a sponge soaked in water. To make it easier to remove grout residue, the surface is periodically moistened with water from a spray bottle.
Seam filling
Step-by-step instruction:
- Take a rubber spatula and scoop more grout onto it.
- Use a wide diagonal motion from top to bottom to move straight across the mosaic, trying to capture as many elements as possible.
- Once again, pass along the surface, pressing on the area between the tiles so that small indentations remain.
- If the area of mosaic tiles allows, wet a gloved finger and run it along the seams. This will help to slightly deepen and level the layer.
The grouting mesh will speed up the process of filling joints. These are fiberglass sheets with perforations and silicon carbide coating. But due to the risk of scratching the mosaic glaze, beginners should not use the device.
Moistening the grout
In the first 4 hours after applying the tile filler, it is recommended to moisten the joints. This is especially true for rooms with low humidity levels and high air temperatures. Wetting will improve the hydration of the solution, strengthen the joints and prevent cracking. Moisten the seams repeatedly with liquid from a spray bottle or a foam sponge well soaked in water.
Removing the remaining grout from the mosaic
Removal of mixture residues will depend on the composition. If epoxy-based grout was used, the mosaic should be cleaned immediately, without waiting for the composition to dry. If the mixture is cement, the residue can be removed after 30 minutes, when a separate section of the mosaic has been processed.
“Epoxy” is removed with a solvent; for cement compositions, ordinary water is suitable. Wash the tiles with a rag or sponge with a hard layer in a circular motion, periodically rinsing the device with water.
You should not put too much pressure on the mosaic so as not to damage the glaze. It is better to wash the rags in two containers - in one to wash off the remaining grout, and in the second - to wash it clean. Complete the process by wiping with a dry cloth.
The grout will take about a day to dry. During this time, the mosaic should be protected from ultraviolet rays, drafts, temperature changes and getting wet.
Color grout
So, if you didn’t worry enough in the process of choosing the color scheme of the tiles, then choosing the shade of the grout will more than make up for these worries.
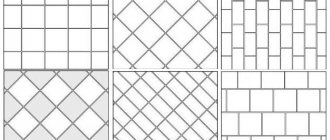
That's why. For example, slight changes in the tone of even ordinary gray grout can affect the appearance of the entire mosaic. First of all, you need to decide whether you want the color of the grout to contrast with the color of the tile, to unite the elements or, on the contrary, to separate them, which will ultimately either soften the image or make the mosaic clearer. The picture above shows how using different shades of gray changes the appearance of the project. The drawing in all the pictures is the same. The only difference is the color of the grout.
Notice this difference and how the different grout colors look directly in the colored mosaic example.
Example of real mosaic and grout Notice how the color of the grout changes the appearance of the mosaic
| White grout | Light gray | Dark gray | Coal |
Examples of mosaics - the pattern is the same, only the colors of the grout differ. The samples are placed side by side, the lighting is the same.
If you cannot decide which color is best suited to realize your idea, then it is best to make similar samples. Glue the tiles to a piece of wood and apply different colors of grout. This will help you make your choice.
So which color is better? It depends on what your mosaic looks like. Most often they use light gray, dark gray and less often - charcoal or black. Try to avoid white, it will often make the mosaic look dull. In any case, make samples with colors that you might like; if in the end you are not satisfied with any option, use a moderate sulfur.
Using colored grout
The difficulty with using colored grout is that the wrong color can ruin a perfectly laid mosaic, but once you feel more confident, try using russets, dark blues and dark greens.
The picture above is an example of the impact that colored grout can have on the overall appearance of the mosaic. Again, the only difference is the color of the grout.
An unusual result of using grout of different colors in one mosaic
If you're really into it, it's worth trying different grout colors in one mosaic. There will be more work, but the result will be incredible. Even subtle changes in color can create a noticeable effect. The photo below shows a wall mosaic. The seams on the wings of the butterfly and dragonfly are treated with black grout, and all the rest are treated with a moderate gray shade. Thanks to this, the grass and sky appear lighter, a single image is obtained, and the illusion of wing mobility is created.
To do this, cover those parts of the mosaic that will have a different color grout, apply regular grout first, let it dry, then move on to the next area. There will be more work, but the effort will be rewarded.
Why do customers choose our store? Read reviews:
Often during renovations, grouting is the last thing people remember, but in vain. Not only the service life of the mosaic panel depends on its choice, but also how spectacular previously unremarkable surfaces will become. We will tell you in more detail using the example of projects by Russian designers.
Tips for use
8 important recommendations from tilers:
- A grout that is identical in color to the mosaic will help hide imperfections in the coating.
- Contrasting grout is used only for zoning space. The exception is when the seams must be in harmony with the design elements of the room.
- Inexperienced tilers should use not individual tiles, but entire modules consisting of several dozen mosaics. It's faster to work with them and easier to avoid mistakes.
- Before starting work, the grout should be tested on a small, inconspicuous area of the coating.
- It is better to fill the seams of wooden mosaics with epoxy compounds, since the coating may crack under the influence of the liquid cement mixture.
- If the mosaic moves slightly during the grouting process, it can be returned to its place with the smooth part of the spatula, but only during the first 30 minutes.
- Glass mosaic is rubbed with transparent compounds or neutral shades.
- The grouting area for one approach should not exceed 2 m2.
Basics of color selection
A win-win solution is to use white fugue or chameleon mixtures. They match any cladding color. The white finish visually highlights the tile layout and its clear geometry, and the chameleon mixture merges with the surface, creating a monolithic effect, although they are only available in epoxy. If you want to experiment, you need to select a shade taking into account the rules given below.
- Tinting to match looks better when the joints are slightly darker than the tiles. It is possible to select a shade to match the color of the decor, but such solutions are not always successful.
The grout is slightly darker than the tiles. - The same color of tiles and fugue creates some monotony, but also brings a sense of integrity. On a white wall, grout for tiles in a small bathroom that matches in color will be the right choice: the room will visually expand.
White tiles with light grout. - Contrasting combinations are good for mosaics, but are not recommended for porous and rough cladding. You should not use them when refinishing masonry, especially if there is damage: a contrasting fugue will draw attention to the defects. It should also be taken into account that such solutions can visually
Contrasting grout.
make a room smaller, for example – white tiles with black joints. - It is necessary to use grout and tiles of different colors taking into account the interior, otherwise you will end up with an irritating mix. According to classical canons, a maximum of three colors are allowed in a bathroom.
Advice! Do not decorate the entire area at once, test the color combination in a small area. Wait until the mastic dries, because... at the same time she brightens.
How to clean and protect tiles from fungus and dirt?
Among the protective agents for tiles and mosaics we can recommend:
- water repellents - impregnations with moisture-repellent properties that create a thin protective layer on the seams;
- polymer varnish for the space between tiles - penetrates into the depth of the grout, creating a more durable protective layer that collects drops on its surface;
- silicone or acrylic sealants - used in “problem” areas where contact with water is most likely (corner seams, areas near the sink, bathroom, plumbing fixtures).
Seams protected from moisture will not accumulate bacteria and fungus. To protect against mold, fungicides are also added to the grout, which do not give the fungus a chance to grow.
If the fungus still prevails, and unpleasant stains of dirt appear on the seams, the following will help:
- white vinegar - spray it onto the seams, leave until dry, and then remove dirt with a brush;
- hydrogen peroxide - the algorithm of use is similar to vinegar;
- tea tree oil – 1 tsp. dilute in a glass of water, spray on the seams, do not rinse;
- furatsilin – 1 tablet, dissolved in a liter of water, apply and thoroughly wash the seams;
- household chemicals – chlorine-containing and anti-mold agents such as “Isocid”, DALI, “Antifungal”, “Mill Kill”.
Read more about how to remove mold from tile joints in this article.
Use Cases
Bathroom finishing options can only be limited by your imagination. It is important to know moderation in everything; it is not necessary to cover all the walls with it. It will be enough to place the correct accents on individual areas of the room.
Let's consider common decoration options in detail.
Sink area
Decorating the sink area will allow you to focus on the work area, while protecting it from moisture. Most often, decorative frames are laid out for mirrors, shelves and window openings.
Mosaic in the sink area protects the wall from excessive moisture and dampness
Vertical surfaces
Wall cladding above the bathtub will completely transform the room. It is on this that the main attention is concentrated.
Laying a mosaic on the wall above the bathroom is the most popular option.
Laying out the partition separating the bathtub from the bathroom with metallic-colored material creates a unique effect.
Covering the floor with mosaics gives the interior a special appeal. In addition, this coating is reliable and will serve you for many years.
The main advantage of mosaic flooring is its high wear resistance.
The display in the form of a “rug” under the sink or a panel in the very center of the room looks very original. Glass mosaics of dark shades are mainly used to decorate the floor.
Cladding of individual surfaces
The mosaic looks best when it is allocated individual surfaces, such as niches and shelves.
Mosaic shelves look effective and very stylish
Selected individual elements combined with the overall interior give a special coziness.
Individual mosaic elements give the bath a special coziness
You can also highlight the shower area by creating a vertical stripe that will blur the boundaries of the space, visually increasing the height of the room.
A mosaic wall in the shower erases the boundaries of space in the room
Bathroom with complex geometry
Mosaic is ideal for tiling a room with asymmetrical walls or a sloping ceiling. With its help, you can not only beat up asymmetrical walls, creating an original ornament, but also decorate plumbing items, for example, a sink or bathtub.
Removing grout from the mosaic surface
When the grout has completely dried (and not just set), you can begin the final removal of plaque. The amount and intensity of deposits depend on how thoroughly the sponge or rag was washed and how often the water in the container was changed.
The most effective way to remove excess grout is to use a hose to spray clean water. There is no need to rub anything, use rags or abrasives. If there is no practical possibility to implement such a method, they resort to the dry method. The best option is felt fabric; it is quite abrasive, but at the same time soft and will not damage the mosaic coating.
The only exception is complex mosaics with a textured and grooved surface. Here you will have to resort to a special solvent that can penetrate into the smallest crevices.
After laying and grouting the mosaic, all that remains is to take care of periodic maintenance of the coating. Splashes should be removed from the surface in a timely manner, wiped dry, and avoid contact with alcohol-containing and alkaline products that deprive the mosaic of its shine.
Installation of a tile shower tray in the bathroom of a city apartment
1. We waterproof ourselves from our neighbors below
On the bathroom floor, a cement-sand screed is made over the floor slab. The location and release of the sewer pipe at the installation point of the pallet is preliminarily provided. After the screed has completely dried, waterproofing with cold bitumen mastic is carried out only in the area where the pallet will be mounted. Bitumen mastic in a liquid state is applied using a wide brush in 1-2 layers, allowing each layer to dry separately. Separately, when waterproofing, it is worth paying attention to the corners and joints of walls with a rough screed.
Attention!
Only the area where the concrete pan will be poured is insulated with bitumen mastic. For the rest of the floor area in the bathroom, the tiles are glued to a cement-sand screed.
2. We install the external formwork
Having made the markings and outlined the clear boundaries of the future pallet, they begin to install the formwork. A structure in the shape of the letter “L” is knocked out of an edged board if the shower stall is located in the corner of the bathroom. If the shower stall is located tangentially to one of the walls in the bathroom, then the formwork is knocked down in the shape of the letter “P”. Having laid the knocked down formwork in place so that the boards do not move away during pouring, they are temporarily supported with various heavy objects.
3. We reinforce the base of the future pallet
From reinforcement with a cross-section of 8 mm, rods are cut, equal in length and width of the future pallet, and from the prepared rods a reinforcing lattice with a cell of 100x100 mm is knitted. For example, a pallet with external dimensions of 100x90 cm is made. This means we prepare 9 rods 97 cm long, and 9 rods 87 cm long. A lattice is laid out from the resulting rods on a flat surface and all intersection points of the reinforcing rods are knitted with burnt wire with a diameter of 1 - 1.5 mm. The finished connected lattice is placed in a previously installed wooden formwork, while either special reinforcement holders or small fragments of stones are placed under the lattice and the waterproofed ceiling so that when pouring concrete the lattice is in a slightly raised state.
Overview of methods
Types of adhesives
Mosaic tile adhesives are divided into three types:
Cement-based adhesives are sold in the form of dry powders, then they are diluted with water according to the instructions. The advantage of such mixtures is high adhesion and good ductility. They are cheaper than dispersions and two-component formulations, which explains their frequent use.
Cement adhesives are divided into three subgroups:
The first type is suitable for gluing mosaic modules or individual fragments on a solid base, for example, on a plastered surface or on a concrete screed.
Mixtures with increased elasticity are recommended for laying mosaics on “warm floors”, for outdoor work, and for lining swimming pools. If the cladding will be subject to temperature changes or vibration, for example, due to the proximity of a metro or railway to the house, then use an elastic solution. The same applies to new buildings, which may still shrink.
Which glue is better to choose
The construction market offers a wide range of adhesive compositions. A person who decides to lay a mosaic canvas on his own cannot always decide which adhesive is best for gluing the tiles. Before buying a product, you need to familiarize yourself with the types of formulations and their main characteristics.
Cement glue
Dry mixtures that are diluted with a solvent to a semi-liquid consistency before laying the tiles. Recommended products:
Ready-made adhesive for mosaic tiles on an acrylic base with the addition of additives and resins. Use immediately after opening the package. The main advantage of dispersion solutions is that they do not lose their properties during long-term storage in tightly closed containers.
Dispersion mixtures are elastic and resistant to vibration. The following are in demand among craftsmen:
Two-component adhesive
Reactive (two-component) composition consisting of a base and a hardener. Popular brands:
Two-component mixtures harden quickly, so you need to try to lay the mosaic elements without mistakes. If you have little experience in gluing decor, then it is better to choose slow-hardening products for laying mosaics.
Which type of mixture will be the best depends on the type of mosaic, surface characteristics and some other factors.