When choosing or purchasing expensive tiled decor, you need to have a clear understanding of the options for laying out tiles in the bathroom.
Recommendations from professional craftsmen can significantly save money. In addition, the correct arrangement of ceramic elements provides a unique twist, allowing you to create an exclusive design in a relaxation area.
Our material provides rules for laying out tiles in the bathroom. They will help beginning tilers avoid common mistakes.
Brief overview of the article
How to distribute tiles correctly?
Proper placement and fixation of ceramic tiles on a vertical plane is to avoid a large number of scraps and strips during the installation process, thereby reducing expensive expenses. By following professional recommendations and techniques, it is possible to achieve such an effect that the finished result will look flawless.
For example, consider the following example. You purchased a tile measuring 60 cm x 20 cm, and the vertical plane is 210 cm. The thickness and width of the joints will not be taken into account in this case. Their size should not exceed 5 mm.
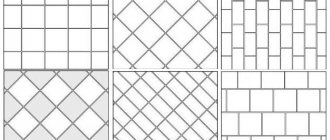
Let's look at several programs for laying out tiles in the bathroom. They include:
Tools and materials for finishing work
When the required amount of tiles has been purchased, in addition to them, you need to prepare tools and consumables for work.
Tools you will need to lay the floor with ceramic tiles.
Tools for work
Tools you will need:
- Construction level 1000 mm long.
- A tape measure, the length of which must be at least the length of the diagonal of the room.
- Painting (mooring) cord for marking the surface of the base before laying tiles.
- A tile cutter, sander or other tool capable of cutting tiles.
- A trowel or wide spatula with a serrated edge. This allows you to distribute the adhesive solution over the surface as evenly as possible and avoid the occurrence of voids.
- Conventional spatulas 100÷150 mm wide.
- A set of a roller, a sliding rod-handle for it and a special bath with an inclined ribbed surface. All this is necessary to prime the floor surface.
- Rubber spatula for filling the joints between tiles with grout.
- A clean container for mixing glue and then grout, approximately 10 liters in volume.
- Construction mixer or electric drill with appropriate attachment.
- Rubber hammer - if necessary, knock the tiles down to the general level of the cladding.
- Construction gloves and rubber knee pads - these items will help you avoid getting hurt while working and make it more comfortable. When cutting tiles with a grinder, safety glasses and a respirator may be useful.
In addition to these tools, you will need a metal ruler and a marker for marking the tiles. As well as a rag and a sponge for cleaning the tiles both after laying and after applying grout.
Materials for laying tiles
Materials for tiling the floor you will need:
Tile adhesive and grout for joints (fugue) are the main materials for tiling the floor with ceramic tiles
- Primer composition - it is used to treat the base surface of the floor to ensure reliable adhesion to the tile adhesive. The quantity depends on the area of the room. And it is better to count on applying primer twice. However, if a house or apartment is undergoing renovation, then the primer is always purchased with a substantial supply - it will always find a use. For example, there may still be wallpapering or other finishing ahead.
- Cement-based tile adhesive.
- Grout mixture of the selected color.
- Plastic calibration crosses that determine and maintain a uniform width of tile joints during installation. Their cost is low, so you can take them with a good supply.
But for glue and grout, it is better to calculate the required quantity.
Tile adhesive
The adhesive consumption depends on the size of the selected tile. The larger it is, the thicker the layer should be and the greater the height of the tooth of the comb spatula. Therefore, as the size of the tile increases, so does the consumption.
You can use the following table:
| Tile size (for rectangular - along the long side), mm | Recommended ridge height of a notched trowel, mm | Approximate consumption of adhesive solution, kg/m² |
| no more than 50 | 3 | 1.9 |
| from 50 to 100 | 4 | 2.5 |
| from 100 to 200 | 6 | 3.8 |
| from 200 to 300 | 8 | 5 |
| from 300 to 400 | 10 | 6.3 |
| over 400 | 12 | 7.6 |
It’s even easier to calculate using our online calculator below:
Calculator for calculating the amount of tile adhesive
The result is shown taking into account a 10% margin. The masonry scheme here has no effect on the glue consumption.
Grout for joints
When grouting joints, the spacer must completely, to the full depth, fill all the gaps between the tiles. Therefore, the total consumption will depend on the following initial values:
— Dimensions of tiles in length and width. This directly affects the “density of the joints,” that is, their specific length for each square meter of the floor surface being tiled.
— The thickness of the tile will determine the depth of filling the joint with the fugue.
- And, of course, again this is an area to be tiled.
The online calculator below will help you make the calculation quickly and accurately.
Calculator for calculating the required amount of grout for joints between tiles
Go to calculations
The final value is given taking into account the traditional 10 percent margin.
Method No. 1
We start making the layout first in the corner part. For this we will use a whole tile. From it we lay a row consisting of 4 elements, and decorate the remaining centimeters with trimmings.
It is recommended to choose this option for arranging ceramic decor in cases where the size of the scraps is approximately half the size of the tile itself. For example, if the length of the vertical plane is 240 cm, then this layout option is considered the best solution to avoid a large amount of waste;
Selection of adhesive mixture
Compositions for gluing floor tiles can be purchased dry or ready-made. Bulk mixtures require subsequent dilution with water right before laying the material. They are sold in bags and packages. You need to prepare glue at home according to the instructions, strictly observing the proportions. The advantage of using dry mass is the ability to dilute only the required amount of substance for installation, and an affordable price.
Ready-made mixtures are produced in plastic buckets or canisters. They are ready for application and begin to harden upon contact with air. Due to their high cost, they are purchased only if it is necessary to lay tiles over a small area, for repair work on an already finished coating. With certain skills, any adhesive mixture can be replaced with cement-sand mortar.
Method No. 3
In the third option, it is recommended to first calculate the tiles for the bathroom with the layout. The exact number of entire ceramic rows located across the entire width of the wall will help to correctly position all the details. In this, the number of whole parts is 4 pcs. Subtract 1 whole element from the calculations. We lay out all the remaining parts from the central part to the edges.
In this case, three ceramic tiles measuring 50 cm will cover 150 cm of the wall width. As a result, 60 cm remains, which will be filled by 2 trimmings of 30 cm each. This layout option is considered the most correct. It helps to achieve a symmetrical arrangement of each element and will reduce the number of cuts during work.
Features of laying slabs on different types of surfaces
Depending on the material from which the base is made, there are some differences in the laying of tiles. The reliability of the coating and the quality of adhesion depend on this.
Wooden floor
When working with this type of coating, it is recommended to adhere to the following sequence of actions:
- remove the paint layer from the surface;
- check the joists for strength. If the boards are not securely fastened and sag, they need to be secured with self-tapping screws;
- when installing new logs, it is recommended to fill in an expanded clay layer between them;
- cover the wooden surface with plywood. The sheets are laid at intervals around the perimeter of the room in increments of 15 to 20 cm;
- if gaps have formed between the floor and the wall, they must be blown out with foam;
- Prime the plywood with a waterproof primer.
By following this sequence of actions, laying the tiles will be easier, and the coating will remain attractive for a long time.
Drywall
Using drywall as a base for installing tiles has a number of significant advantages. For example:
- working with the material is simple and accessible for independent implementation;
- it is possible to save material consumption.
Drywall should be laid on aluminum profiles. The edge of the base should be treated with mastic that has moisture-resistant properties.
Experienced craftsmen recommend, if possible, installing an additional layer of waterproofing material. This will prevent the possibility of mold and mildew developing.
Using PVA glue, a plaster mesh should be glued to the surface of the sheets, and then treated with a primer. This increases the strength of fastening the tiles to the base. Each layer must dry for at least 60 minutes.
Photo of tile layout in the bathroom
Selecting a mixture for grouting
The cladding will acquire a finished aesthetic appearance if its seams are properly sealed. The final stage of finishing the floor will help hide the resulting defects and protect the cracks from the penetration of dust and moisture. When carrying out grouting work, it is necessary to strictly follow the technology. The choice of material will depend on the size of the gaps.
If the seams between the elements are wide, more than 5 mm, it is better to choose a resin-based mastic for grouting. A small space at the joints must be sealed with moisture-resistant cement-based compounds. Places in contact with the wall must be treated with silicone sealant.
Grouting joints performs not only practical, but also decorative functions. The material of the desired shade can be purchased ready-made or made with your own hands. Pure white grout is used if it is necessary to hide unevenness during installation and other defects. With ideal installation, the design of the seams in contrasting colors will look beautiful.
Other corner design options
Installing a profile is an optional condition for upgrading the ribs between enclosing structures lined with tiles or mosaics. You can perform the same operations correctly in several ways:
- grind the edges of the cladding at 45 degrees;
- lean the tiles overlapping each other;
- Leave space between the tiles for grouting.
The most difficult is the corner on a short box, a podium, formed by three planes at once - two vertical walls, one horizontal plane.
Universal trims: internal and external corners when laying tiles
If we take as a basis not cheapness, but indeed ease of installation, it makes sense to pay attention to laying tiles in the internal corners, as well as in the external ones, using trims. These are a kind of functional profiles of a special shape, which are most often made of plastic, but can also be aluminum or even brass. For external corner joints they have a U or L-like shape, and for internal corner joints they often have the appearance of a concave arc. There are also a variety of convex trims, but they are used less frequently.
These trim profiles will easily help solve such a complex issue as how to lay tiles if the corners are uneven, because these defects must be hidden from view. To glue the trim, you can use liquid nails, sealant, as well as the usual tile adhesive that you used to lay it, but only if we are not talking about cement compounds.
There are also complex trim designs for which installation with cement or cement-based adhesive is truly acceptable. Such trims are attached immediately to the mortar, since their edge is driven under the tile, where it is finally fixed. This is a fairly basic process that even a beginner can complete. At the same time, trims reliably protect the seams from moisture entering them, therefore, preventing the proliferation of bacteria, as well as the growth of mold and fungi.
Overlapping method
The perpendicular joining method is used for right external/internal corners. The end of one tile is located at a 90 degree angle to the other, flush.
The same seam is left between the tiles as in the adjacent rows. The joint is positioned in such a way that the solid tile masks it when viewing the room from the doorway, as in the photo below.
Cutting tiles at an angle
Another very popular method for making corners when laying tiles is cutting them at an angle of forty-five degrees, then you get a beautiful joint, but you can’t do this without special equipment.
The most affordable method for grinding tiles at an angle is to use a professional electric tile cutter, which allows you to turn the cutting diamond wheel at the desired angle. However, such an instrument is quite expensive, so not everyone can afford it. How to cut tiles at an angle without a tile cutter is worth reading the article on our website, where everything is written out and laid out on shelves for ease of understanding.
It is worth understanding that for a beginner this installation method may be overwhelming, since there are many nuances and subtleties that will have to be observed. It is very important that the tiles match perfectly, otherwise a harmonious appearance will hardly be achieved. If the corners themselves are not even enough, you will have to level them using tile adhesive, which without much experience “by eye” will definitely not work the first time.
Burying method
The method is used only for external corners, called the “Kremlin corner”, bevelling, trimming, sharpening, cutting at 45 degrees. The ends of the tiles are cut at 45°, the decorative elements are joined closely to each other without seams or grouting.
You can grind off unglazed ceramics from the back of the cladding manually with a file or a whetstone. However, it is more convenient to use an angle grinder with a flexible diamond disk “Turtle” with a grain size of 50 units.
The outer corner in a combined bathroom often ends up on the edge of the inspection hatch under the tiles. In this case, instead of regular grout, use silicone sealant of a suitable color.
This material has increased plasticity, even after hardening, it does not fly off the edge of the tile.
Forming an angle at the junction of three planes
An additional element - a capsule plug for an external/internal corner - is available exclusively in collections of metal corners from domestic and foreign manufacturers.
The tiled profile itself is ideal for cladding the ribs formed by connecting walls.
Plug capsule for metal trims.
The plug is designed to fit into a vertex formed by the intersection of two or three edges. One side of the capsule is inserted inside the profile, the other two are adjacent to the remaining layout on the adjacent walls.
Wall-floor joint
To decorate the internal corner formed by porcelain stoneware flooring and tiles on the bathroom wall, the following methods are used:
- embedded profile made of polymer material, metal, ceramics; Aluminum corner corner.
- patch corner PVC, aluminum, brass;
Corner for the internal corner of the invoice. - baseboard for tiles; Embedded plastic plinth for the bathroom.
- ceramic or porcelain stoneware border.
- without a plinth - this is the most aesthetic and correct option; the joint is grouted with tile grout.
A regular PVC skirting board does not fit well with ceramic cladding, however, this is the only option with cable channels inside for electrical wiring, ensuring high maintainability of the wire.
Connecting the wall to the ceiling
The choice of layout for designing the angle of contact between the wall tiles and the ceiling depends on the method of finishing the floor slab:
- whitewashing, painting - overlay polystyrene foam fillet, glued to both surfaces;
Foam ceiling plinth in the bathroom. - PVC panel - profile made of the same material; PVC profile.
- suspended ceiling - special insert. Connecting tiles to a suspended ceiling without a plinth.
Bathtub connection unit
The main problem with the junction of the bathtub bowl and the walls around it is to ensure tightness. The classic option is to tile the walls entirely along the entire height. There are several methods for designing the junction of the bathtub to the wall:
- sealant is a budget option, but short-lived;
Seal the seam with sealant. - border tape - heated with a hairdryer, has an adhesive layer for fixing one edge to the wall, the other to the bathtub bowl; Border tape.
- polymer plinth – F-shaped profile with a long bottom shelf, side plugs included;
Sealing the bathtub against the wall with a plastic baseboard/ - ceramic border - low manufacturability of installation due to the short length of the elements and their large number; Upgrading the bathtub junction with a ceramic border.
The downside of all of the above options is the lack of tightness of the upper joint, plus the easy dismantling of the bath without destroying the lining. But at the same time, the most reliable technology is wall cladding from the side of the bathtub, when its bowl is partially embedded in the wall.
Laying tiles from the side of the bathtub.
The bottom row is usually trimmed to even out the lack of horizontal lines and to hide other defects. After which, you have to mask the defects of tile cutting. For this, a PVC layout is used, which has elastic properties to compensate for the linear expansion of the bath when heated.
Useful tips from experts
When choosing a material, you must carefully study the characteristics of each type of tile. They must meet the needs of the owners. It is necessary to take into account the degree of strength, thickness, and the need for a glazed coating.
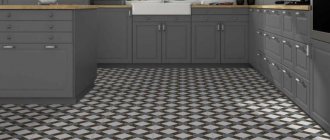
The texture of floor tiles should be moderate. Slight ribbing will prevent slipping. If the patterns and grooves protrude too much, this may make cleaning difficult. The gloss will highlight even the slightest dirt.
It is better to dilute the adhesive composition for installing tiles in small portions. If unforeseen circumstances arise and the installation process slows down, it will not be able to dry. Only cold water is used for mixing. Hot liquid will deteriorate the quality of the adhesive solution.
The material can only be laid on a flat, clean floor; door frames and baseboards must be removed. It's easier to work along guide lines. The resulting gap between the outer row of tiles and the wall can be hidden with a plinth or you will have to glue a ceramic strip.