When renovating a bathroom, the question arose about choosing tiles. The stores have a huge selection, but the cost of floor tiles is much higher than wall tiles. For example, we liked Lasselberger tiles; they are identical in appearance to both walls and floors.
And really, how can you tell the difference between wall and floor tiles? Look more closely at the markings; if a palm is depicted, this is for wall coverings; if it is a leg, then it is for the floor. It's simple.
Then I had another question: is it possible to lay wall tiles on the floor? The consultant in the store first fell into a stupor for a few seconds, and then said that these two types of tiles have differences that are important to understand when gluing.
What is a notched trowel used for?
A tile putty knife is a small construction tool consisting of a flat piece of stainless metal and a plastic handle. Some spatulas have teeth of various shapes and sizes - this tool is called a comb and is used to distribute the adhesive evenly and economically over the surface of the tile. The tile comb leaves behind small grooves that are filled with glue when the tile is pressed against the wall. Due to this, the following operating features are achieved:
- The quality of the masonry. The adhesive layer will be uniform on each piece of tile, so the tile will automatically lie on one plane (you need a flat base).
- Connection strength. A large amount of adhesive on the tile increases its weight. When using a comb, the amount of adhesive will always be the same.
- Speed of work. There is no need to regularly squeeze out the adhesive from under the tiles and remove its excess. On average, the speed of work increases by 2-3 times.
- Economical. The spatula allows you to use the amount of glue recommended by the manufacturer - you won’t have to overpay for overuse.
- Purity. Since the tiles are not stained with excess adhesive during the process, the end result looks great even without washing the tiles.
Laying decorative stone using a notched trowel
It is most convenient to work with a notched comb with two straight and two smooth sides - you don’t have to change regular and notched trowels - one plays the role of two.
Selection by material of manufacture
It is very important what the spatula is made of:
● Stainless steel. Durable tool, easy to buy, just clean the comb. Durable, suitable for any tile.
● Painted metal. With active use, the paint wears off and the metal of the spatula rusts. Suitable if stainless steel is unavailable for some reason, but requires careful care.
● Plastic. A cheaper option, but too light, so the comb may break if you force it. And you definitely need force if you are laying large tiles that require a large amount of glue. The most undesirable type of spatula.
Types of combs for tiles
Renovating a bathroom or kitchen is not a frequent occurrence, so the choice of construction tools should be approached carefully - otherwise, you will have to change the tiles every two to three years. To prevent such a scenario, you need to choose a spatula that will be convenient to work with. Typically, experts divide toothed construction tools into two categories:
- Spatula made of high quality stainless steel. This tool allows you to distribute the adhesive evenly over the tile, and its teeth do not deform over time. A stainless steel spatula can be safely washed under running water - it is not afraid of corrosion. Such a tool is expensive, but it will last a very long time.
- Spatula made from plastic. A budget option for construction tools - purchased for several hundred rubles. The main disadvantage is the low strength of the material. During operation, the teeth may break off or wear off over time. The tool is considered disposable and is not suitable for a professional builder.
The construction tool also differs in the shape of the handle and where it is attached. There are specimens whose handle is located on the working surface, which is quite convenient - you don’t have to put a lot of effort into working. On other varieties, the handle is attached just above the metal plane - it’s not very convenient, but it won’t break.
Combination of several techniques
If you want to make your bathroom original, you can use several masonry techniques at the same time. For example, the base is an imitation of brickwork, and the interior panel in the shower is in the form of a parquet board. You can use elite tiles with a beautiful figured shape. It is used to line the following areas: near the sink, faucets, and shower head riser.
Beautiful bathroom design with tiles Source dizajninterer.ru
Tooth size and shape
When choosing a spatula, it is extremely important to pay attention to the shape and size of the tooth, since the quality of future work will depend on this. Let's start with the classification of combs with triangular teeth - such a tool is designed to work with glue applied to mosaic or PVC-coated tiles. The spatula is marked with the following letters:
- A - spatula with a standard tooth size (suitable for most types of work);
- B - highly specialized comb with wide teeth (when you need a lot of glue);
- S - a spatula with closely spaced teeth (reminiscent of a hacksaw in shape).
Table of notched trowels
The tool with the letter “C” deserves special attention, designed for laying medium-sized tiles and having square teeth. To work with large pieces of tile and uneven substrates, a comb marked “R” is usually used - irregular or rectangular teeth. A spatula with the “M” index is used to work with concrete (installation of heated floors) or synthetic mixture (characterized by strong spreading).
The size of the teeth plays no less important role than their shape . Using this parameter, you can regulate the consumption of adhesive intended for attaching floor or wall tiles, depending on its weight and dimensions. Here are the main sizes of the cloves and brief information on their use:
- 1.2 and 0.6 mm - used in decorative work, where a very thin layer of glue is needed;
- 3 mm - suitable for installing decorative mosaics made of colored glass;
- 4 mm - for working with small tiles (no more than 12x12 cm);
- 6 mm - a universal tool for working with medium-sized tiles (up to 20x20 cm);
- 8 mm - the spatula is suitable for installing large tiles (dimensions up to 30x30 cm);
- 10 mm - the comb is used for installing thick, heavy tiles (up to 10 mm thick);
- 12.5 mm - the tool is suitable for working with the heaviest tiles.
Types of combs for applying glue
Do you have to work with a porous or uneven surface? Just use more masonry mixture (cement mortar, glue) and a trowel marked "R". But don’t overdo it—excess glue will make the tiles heavier.
Features of laying wall tiles on the floor
Wall tiles laid on the floor, must have a sufficient thickness.
If you are going to perform a laying wall tiles on the floor, be sure to take into account that it is less vicious than the floor, because it has a soft texture and a fairly high rate of moisture absorption. Therefore, you need to choose a more solid can be, what you can do even visually:
- Firstly, it should be homogeneous and with a more compact structure;
- secondly, have a greater thickness.
We now turn to the process of its installation. It should be noted immediately that the tile for the walls can be laid on the floor. The main conditions are no voids and perfectly flat floor surface. This is usually achieved by making ties and made cement-sand mortar.
The second option is the use of water-resistant plywood or gypsum fiber board (gypsum fiber boards), which are much stronger than drywall and well suited to the base under floor tiles. If properly put on a floor tile for walls, then it will serve for a long time and is very reliable.
How to choose a comb for laying tiles
It also happens that instruments of similar size and shape, made of the same material, differ greatly in price. An inexperienced builder will think that an expensive trowel is the best choice. However, experts recommend paying attention to the following nuances:
- Working plane length. Ideally, it should be equal to the width of the tiles - in this case, installation will be easy and quick. If you can’t find a spatula that matches the size of the tile, take a larger tool (running a small comb over a large tile several times is quite tedious).
- Handle shape. Usually it is perpendicular to the metal plane and is made of plastic covered with rubber. However, do not forget to pay attention to the size of the part - the handle should fit comfortably in your hand. Otherwise, it will be inconvenient to operate the spatula, which will lead to a deterioration in the quality of work.
- The presence of a varnished coating on the wooden handle. If it is not there, you risk putting a splinter in your palm while working. In general, it’s worth buying a comb with a wooden handle only if the price of the tool is strictly fundamental. After all, a spatula with a plastic handle is lighter and more durable.
- Tool rigidity. The spatula should not be too hard, otherwise it will be uncomfortable to work with. At the same time, the comb should not be too flexible - such tools break quickly. Therefore, in the store, do not hesitate to pick up the tool and try to bend it - ideally, it should bend a little, but not be deformed.
- Price. In most cases, it is an indicator of the quality of the product. However, branded combs have a premium due to the company's popularity. In rare cases, an expensive tool will be worse than a cheap one. But still, buying a comb with the highest price tag for one-time use is not the best idea.
To check whether the correct trowel was chosen for the job, builders recommend applying a small amount of mortar to the wall, then running the sharp side of a comb over it and applying the tile. If the adhesive squeezes out from under the tile, it means that the comb is not suitable for working with a particular type of mortar or size of tile.
What do glue manufacturers recommend?
In addition to the recommendations of professional builders, it is also worth listening to the words of tile adhesive manufacturers. After all, they are the ones who know well what the tool should be like in order to leave behind the optimal thickness of the adhesive mixture. If the comb is selected perfectly, the adhesion strength of the tile to the wall will be maximum. Therefore, on packages of construction adhesive, manufacturers often indicate a table corresponding to the size of the tile and the thickness of the teeth on the spatula:
| Comb tooth length | Minimum tile size | Maximum tile size |
| 3 mm | 50 mm | 70 mm |
| 4 mm | 70 mm | 100 mm |
| 6 mm | 100 mm | 200 mm |
| 8 mm | 200 mm | 300 mm |
| 10 mm | 300 mm | 500 mm |
| 12.5 mm | 500 mm or more | |
If the teeth on the spatula are too small, there will be insufficient amount of glue on the tile - it will not adhere well and will come off over time. Too large teeth guarantee huge waste on repairs and peeling off the tiles (the glue will not hold the heavy mass of the tiles).
Spatula with teeth of various sizes
Different types of glue have different compositions, therefore, the shrinkage coefficient and setting time will not be the same. In order for the repair work to be carried out to the highest possible quality, it is recommended to deviate from the average parameters indicated in the table above and follow the indicators characteristic of a particular brand of glue:
| Ceresit CM11 Plus | |
| Maximum tile size | Maximum tine height |
| 5 cm | 3 mm |
| 10 cm | 4 mm |
| 15 cm | 6 mm |
| 25 cm | 8 mm |
| 30 cm | 10 mm |
| Ceresit CM14 Extra | |
| Maximum tile size | Maximum tine height |
| 15 cm | 6 mm |
| 25 cm | 8 mm |
| 30 cm | 10 mm |
| 45 cm | 12 mm |
| Ceresit CM12 | |
| Maximum tile size | Maximum tine height |
| 30 cm | 10 mm |
| 60 cm | 12 mm |
| Ceresit CM17 | |
| Maximum tile size | Maximum tine height |
| 10 cm | 4 mm |
| 15 cm | 6 mm |
| 25 cm | 8 mm |
| 30 cm | 10 mm |
| 45 cm | 12 mm |
One last tip: be sure to follow the manufacturer's recommendations when diluting the adhesive in a bucket. Even with a slight violation of the proportions, the characteristics of the adhesive may be lost. It is not recommended to use a substance whose expiration date has already expired (usually glue is stored for 3-4 days after dilution).
Applying adhesive to tiles with a spatula
The quality of the repair depends on the skill of the person laying the tiles. Typically the wizard's procedure looks like this:
- We spread a solution (cement or adhesive) on the wall or floor.
- We cut the adhesive solution with a spatula with teeth of the required size.
- Press the tile firmly into the mortar and tap it with a rubber hammer.
If unevenness in the masonry is detected, changes can be made within 15-20 minutes after installing the tiles - after which the mortar sets and hardens.
The grooves created by the comb should be straight. Otherwise, voids will begin to form in the places where the tiles touch, causing the tiles to hold up worse.
Sometimes builders apply the solution to the tiles, then work it with a spatula and press the tiles against the wall. This method is considered longer and requires a certain skill from the master, but it is fully justified by the quality of the repair - all the tiles lie evenly and tightly to each other, even if the plaster on the wall is done poorly.
Applying adhesive to tiles
There is a technology that provides super-strong adhesion of tiles to the wall. It is usually used when laying large tiles with dimensions greater than 50×50 cm. The work algorithm is as follows:
- Apply the amount of solution recommended by the manufacturer to the wall.
- Remove excess using a metal spatula with large teeth.
- Spread the remaining solution onto the tiles and remove the excess with a smaller spatula.
- Attach the tile to the wall and level it using a rubber hammer.
This masonry procedure is considered one of the longest, but it provides unsurpassed adhesion to even the heaviest tiles.
After work, do not forget to thoroughly wash the spatula in a bucket of water. If this is not done, the solution remaining between the teeth will dry out - working with such a spatula is fraught with a decrease in the clearance between the grooves and the loss of part of the adhesion force.
Difficulties in carrying out work
| Whether it is possible to glue new tile ceramics onto the previous one also depends on the condition of the original coating. It is worth carrying out installation work if no more than 20% of the old tiles are in poor condition. We are talking about that part of the old cladding that does not hold well, is wobbly, cracks and chips are visible. If it is more, then you should think about what is more profitable and calculate all the risks. |
How to lay tiles without a comb
In order for porcelain tiles or tiles to adhere firmly to the wall or floor, it is important to evenly distribute the adhesive solution over the surface. But what to do if there is no ridge, and repairs need to be carried out as soon as possible? Well, you can try to use a regular spatula, although achieving uniform distribution of the glue will not be easy (if you make a mistake, air voids will appear). However, if you accurately measure the required amount of mixture and carefully distribute it over the surface, lightly pressing with a spatula and getting rid of excess material, the tile will hold securely. The main thing is to pay attention to differences in the level of the wall or floor - the most common reason for the formation of voids.
Keep in mind that laying tiles without a comb increases the consumption of the adhesive mixture, which leads to an increase in the cost of repairs. Too thick a layer of mortar reduces the strength of the fastening - the glue cannot withstand the weight of the tile.
Tool preparation
To lay tiles you will need not only a toothed comb, but also several available tools:
- at the preparatory stage - hammer, chisel, wire brush, terry brush;
- when priming - a roller or paint brush, a square, a building level, markings;
- for applying glue - a trowel, a rubber mallet, a ruler, a glass marker, a tape measure, a tile cutter or a special cutting machine;
- when finishing and cleaning seams - a grater, a foam sponge, a rubber spatula.
Before using glue, it must be diluted in a plastic container. The basic rule when working with a toothed scraper is that the glue is applied in straight lines, without curls. This will avoid the formation of voids. The choice of adhesive base depends on the operating conditions of the tile. The adhesive mass is intended:
- for heated floors;
- for deformable surfaces and gypsum fiber sheets;
- The basic design is a conventional DSP screed.
Amounts of tile adhesive for a specific area
Alternative to a notched trowel
If you cannot find a suitable toothed tool, and the dubious prospect of working with an ordinary spatula is not encouraging, it is recommended to create a comb yourself. A homemade tool may be even better than a factory one, since stores do not always offer a wide selection of spatulas for various types of work. To create a comb you will need the following tools and materials:
- a metal plate of small thickness will serve as the base of the spatula (it should be sufficiently smooth and rigid to be comfortable to work with);
- a pencil or marker and a ruler - will be needed to apply markings on the metal (it will serve to cut out the ridge);
- a wooden block and a jigsaw - with their help you can create a simple and convenient handle for a spatula (do not forget to sand the wood and varnish it);
- a screwdriver and small self-tapping screws - used to attach a wooden handle to a spatula (an alternative is to use high-quality construction glue);
- A disc grinder is an important tool needed to cut a comb from a piece of prepared metal.
Marking a metal plate
For experienced craftsmen, the entire stage of work should already be clear. But in order not to forget anything in the process, it is better to have before your eyes instructions with a specific algorithm of actions:
- Using a pencil and a ruler, create a drawing of the future spatula on a piece of paper. It is necessary to indicate the exact dimensions of the teeth, their number and calculate the size of the tool.
- Carefully transfer the markings from the drawing to the metal using a ruler and marker. It is important not to make a mistake here so that there are no difficulties with further stages.
- Using a grinder, carefully cut out the ridge of the spatula. Remember to follow safety regulations.
- Using a jigsaw, we cut out a blank for the handle, grind it and coat it with varnish - this will increase the service life of the spatula and prevent splinters from getting under the skin.
- We attach the handle of the spatula to the metal part with self-tapping screws. For convenience, you can use a wooden strip of the required thickness, placing it between the handle and the plate.
There is an easier option for creating a comb with your own hands - you will need a regular flat spatula and a grinder. We simply apply markings to the metal, and then make the necessary cuts of the required size.
Making a comb using a grinder
A comb spatula is an indispensable tool that allows you to evenly distribute the adhesive solution and eliminate the appearance of air voids under the tiles. In order for the job to be done efficiently, you will have to choose the right tool, with the desired shape and size of teeth. Only in this case will the mixture consumption be close to the recommended mark, and the tiles will remain securely on the floor or wall for many years.
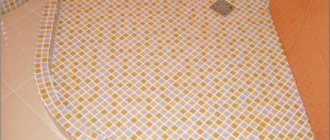
Floor covering requirements
A high-quality floor covering must meet the following requirements:
- wear resistance - under the influence of gravity and constant friction, a material that is not designed for such an impact can quickly lose its appearance;
- resistance to chemicals - floor coverings are washed much more often than wall tiles;
- increased strength - the floor covering has to withstand a significant level of load, which wall tiles in some cases may simply not be able to cope with;
- safety - the floor covering should not be slippery.