Not every person can purchase a marble countertop. A tabletop made of tiles has undeniable advantages. This design is quite often installed in the bathroom. You should know that the countertop in the bathroom will be exposed to moisture and high temperatures. The tiles that are laid on the countertop must be combined with the tiles that are laid on the floor and walls.
Scheme of tile laying options.
Why choose tiles
Ceramic tiles, like any other material, have their advantages (compared to analogues):
- Affordable price. Not everyone can afford to install marble or natural stone countertops in their bathroom, so ceramic tiles are an excellent alternative for many.
- Versatility. The tile fits perfectly into any interior, regardless of its stylistic orientation. It can be either classic or modern style. Not every material has this property.
- Practicality. Ceramic tiles are highly waterproof, durable, last a long time and are resistant to mechanical damage. In addition, it perfectly tolerates temperature changes and the effects of abrasive detergents. The tiles are easy to care for and easy to clean and wash.
- Range. Regarding this point, tiles can rightfully be placed in first place in the ranking of assortment diversity. No other finishing material can boast so many shapes, sizes, textures and shades. This allows you to use tiles to create truly unique projects.
Pros and cons of tiling
This finish has its advantages and disadvantages.
| pros | Minuses |
| Strength, practicality, durability and wear resistance. | The seams between the tiles accumulate dirt. |
| High hygroscopicity, steam and moisture resistance. | Over time, the grout may lose its original appearance. |
| Resistance to various mechanical influences and temperature changes. | During use, chips may appear on the edges of the tabletop. |
| Easy and simple care. |
Choosing a countertop type
A tiled bathroom countertop can be of the following type:
- Monolithic design with sink. This option looks very stylish and laconic. The room will look more spacious and easier to clean.
- Built-in design. This type is the most common. A sink integrated into a tile countertop in a bathroom opens up a wide range of stylistic possibilities.
- Countertop with countertop sink. It looks very original, given the variety of sinks available. An ideal option for those who decide to make a bathroom countertop from tiles with their own hands, since installing an overmount sink is the easiest way.
Why do you need undermount sinks?
When a home owner is developing the design of his bathroom, the first thing he does is allocate locations for plumbing fixtures and household appliances. Quite often it turns out that all the devices are placed along one wall.
In such cases, interior experts recommend using a tabletop for decoration. This solution provides an opportunity for different things to acquire a common appearance and form a general direction in this room.
By taking a non-standard approach to creating a washbasin with a countertop, you can get a bright detail in the interior of the bathroom.
Indeed, only a countertop can combine both a sink and a washing machine in one place. However, we note that not all sinks are suitable for carrying out such a modification.
The most appropriate sinks are wall-mounted sinks and models that have a tulip leg as part of their design. For such purposes, the best solution is to use overhead sinks or built-in models. They are best suited for tabletop decoration.
Mounting options
There are several ways to install the countertop:
- Floor-mounted mounting. The tabletop can be installed on a cabinet or legs. This method is the most reliable and sustainable.
- Suspended design. The device is attached to the wall using pre-installed brackets. Such a countertop made of tiles in a bathroom looks modern and stylish, creating a light effect.
Design features with built-in sink
Such products owe their name to the method used during installation. That is, when installing them, the washbasin crashes into the countertop. The tabletop is installed on legs fixed to the wall, using corners and special brackets.
The entire structure of the console and bedside tables is built under the tabletop. Methods for embedding products can be very different:
- plumbing fixtures can be recessed below the level of the countertop;
- the product may protrude above the tabletop level.
Currently, cut-in washbasins, based on the criterion of design form, are divided into the following types:
- oval;
- square;
- rectangular;
- round;
- asymmetrical.
Tile sizes
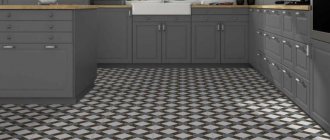
The choice of ceramic tile size depends on a number of parameters. First of all, it is necessary to take into account the dimensions of the room itself. If the bathroom is quite spacious, then you can take large-sized material - 30*30 or even 60*60 centimeters. These tiles are more convenient to lay, and they are also easy to maintain.
But few can boast of the large size of this room, so most often small-sized products are used to cover the tabletop - 10*10, 15*15, 20*20 centimeters. The small size of ceramic tiles visually expands the boundaries of the room. In addition, it fits in a small bathroom much more logically than in large blocks.
Choosing a product manufacturer
There is a huge range of manufacturing companies from different countries that produce a variety of configurations of countertop sinks for the bathroom. You can buy them in certified stores. Before you give preference to any particular manufacturer, check out the table below.
| Image | Manufacturer and model | Material | Average price, rub. |
| Linkasink Bronze Brocade Sink | Metal | 53 194 | |
| Macro Cup | Faience | 37 485 | |
| GSI MODO | 18 277 | ||
| Gala Emma Square | 6 010 | ||
| Laufen Pro | 8 530 | ||
| Franco Ceccotti WAVE | Tree | 112 700 | |
| Ledeme L124-9 | Glass | 6 800 | |
| ArtCeram Tai | Ceramics | 14 152 | |
| GSI Old Antea | 31 040 | ||
| Sheerdecor Sfera | Stone | 23 600 |
All further use of the device depends on the choice of manufacturer
Color solution
The range of tiles presented in stores is very diverse. The variety of colors and patterns makes it possible to choose the material for any stylistic decision.
The most popular colors for decorating tile countertops in a bathroom are white, blue and all its shades. Marine themes are always popular in bathroom design. This trend is still in great demand today. This includes turquoise, azure shades, sea green and other rich and dull tones. The tabletop can be made exactly to match the wall and floor, or, conversely, become the main accent in the room. To do this, the product is made somewhat darker or completely contrasting.
Neutral and practical shades of ceramic tiles – beige, sand, black and gray – are no less popular. These colors go well with furniture and fit harmoniously into any interior style.
A tile countertop for a bathroom sink can be made in monochrome or combine several colors that are similar in shade. The most daring ones choose products in which two or more contrasting tones juxtapose. Black and white, sea green and white, red and black go well together.
Tiles of brighter shades are selected when the tile countertop in the bathroom (photos presented in the article) is made to match the wall and ceiling. For example, if the room is decorated in lilac and white, then the table under the sink can be made bright purple.
As for choosing a print or pattern, it all depends on the style of the room. Most often, plain canvases are laid out or those that combine no more than two contrasting shades. Some opt for multi-colored mosaics, but you should be careful here, since it is appropriate to use this material only if it is already present in the interior.
The nuances of choosing overhead sinks
Sinks can differ from each other in only two parameters: the material from which they are made and the shape. But various combinations of these two parameters give a large number of models. Usually in every store you can find catalogs containing photos of all kinds of washbasins of various shapes and shades.
Overhead sinks can be very varied in shape
The material in the case of overhead sinks ensures not only the strength and reliability of the product, but also the overall appearance. Indeed, unlike cut-in washbasins, this one shows not only the inner surface of the bowl. To make bowls of this design, faience and ceramics are often used. Such washbasins are in demand due to their low price and easy care. Antique lovers will likely prefer more exotic materials such as copper and brass. Although it should be remembered that caring for such products is more troublesome and it will be necessary to regularly use special products to maintain a decent appearance.
Overhead sinks are made from various materials
Glass washbasins are quite popular; they have a stylish appearance, are easy to clean, and are affordable. You can find overhead bowls made of natural and artificial stone. But here it is worth considering that for the same washbasin made of natural stone there must be a suitable countertop that can withstand the weight of the structure. Some people prefer an acrylic substitute, because it costs less and is easier to care for.
Advice. You can hide scratches on acrylic washbasins yourself by polishing the damaged area with a piece of felt.
The most common shapes of overhead sinks are circle, oval and rectangle. These are the most popular types and the choice between them depends on personal preferences and operational issues, such as installation location. For example, a round washbasin would be more appropriate in a corner, while a rectangle or oval would look better when installed along a wall. Although here everything depends on the designer’s idea. The main thing is that access to the sink is free.
Designer countertop sink in the shape of a coffee cup
In addition to standard geometric products, you can find solutions that are completely unique in their shape. Basically these are bowls made in the form of a flower bud or some other object. Sometimes there are figures of irregular shape, fancy blot-shaped shells and many other unusual and sometimes unexpected shapes. Problems with choosing a form usually arise not from a lack of assortment, but from its excess.
Selection and installation of bathroom countertops
The fastening system and the height of the countertop are determined by the level at which the sink and plumbing are installed.
Designing a bathroom that includes installing a tile countertop opens up vast possibilities for creating a stylish interior. In addition, it allows you to hide communications and a washing machine. The washing area becomes more comfortable and a functional area appears for storing related accessories and other parts.
Having decided on the style of the product, you can install a countertop under the tiles in the bathroom with your own hands. When choosing a ready-made structure, you will not need any special abilities or skills for installation. After studying the instructions below, you can easily do the work yourself.
Materials for making countertops
It is worth considering what you can use to make a countertop under the sink. Most often used:
- Chipboard or MDF. These materials are distinguished by reasonable prices, ease of processing and installation. The main disadvantage of particle boards is their sensitivity to moisture or mechanical damage. If the protective layer is damaged, the service life of the furniture is reduced many times over.
- Porcelain tiles or natural stone. These are premium materials. Interior items made of stone look attractive. However, the material is heavy, making processing and installation difficult. Expensive natural stone is extremely rarely used when decorating standard apartments.
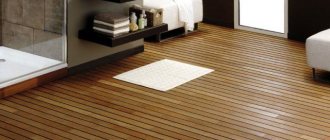
- Wood. Hardwoods are durable, safe, and resistant to moisture. To provide additional protection, a treatment such as varnish is required.
- Plastic. Using this material allows you to save on bathroom renovations. Plastic is insensitive to moisture, but the light weight of the structure does not allow it to be tiled. Under mechanical stress, the plastic is destroyed and cracks appear on the surface.
- Glass. It is used to create unusual interiors. Tabletops are made from tempered glass, which gives them high strength. The disadvantage is the rapid contamination of surfaces. Glass is regularly cleaned of soap or lime deposits.
- Drywall. The universal material is used to assemble structures of any shape and size. It is well suited for self-assembly of tabletops or cabinets. The sheets are fixed on a metal frame, which gives the structure the necessary rigidity. Facing with tiles or mosaics protects the cladding from moisture.
DIY tile bathroom countertop
Designs covered with ceramic tiles for the bathroom are very popular due to their practicality. But not everyone has the opportunity to pay a builder for installation of the product. Therefore, many people do this work on their own and do not lose anything.
To install the countertop you will need:
- Metal corner.
- Level.
- Roulette.
- Goggles for eye protection.
- Construction knife.
- Screwdriver.
- Electric jigsaw.
- Spatula-comb.
- Silicone spatula.
- Sponge.
- Grinder with a nozzle for polishing stone (disc-turtle).
- Tile cutting device.
Necessary materials:
- Ceramic tiles 30*30.
- Plywood sheet, 19 mm thick.
- Cement particle board, 6–13 mm thick.
- Screws.
- Masking tape.
- Paste for tiles.
- Grout.
- Sealant.
Installing a sink on brackets
This is the simplest and most common installation technology. It includes 5 stages:
- On the installation wall, draw a straight line parallel to the floor with a pencil. The height is determined individually.
- We measure the thickness of the wall of the device, the one that will be adjacent to the wall. The resulting parameter is the distance that is measured down from the drawn baseline; we draw another line at the measured mark. This is where the brackets will be attached.
- Measure the exact distance between the brackets. We attach them to the base line and mark the attachment points. We drill holes at the marks, insert dowels into them and attach the brackets to the wall.
- According to the manufacturer's instructions, we attach the bowl to the brackets.
- We connect the mixer and siphon.
Creating a plywood base
Not sure how to make a tile countertop in your bathroom? First you need to prepare the frame. The foundation formation process consists of the following steps:
- Removing the old countertop. You can assemble the base for the structure yourself, either new or leave the old one if it is in good condition.
- Using a level, check whether the cabinet is installed straight.
- Preparing the surface for laying tiles. You need to take plywood and cut out a frame that will be attached to the base. Expert advice: if you plan to lay heavy tiles, then it is recommended to lay plywood in two layers or strengthen the first one with stiffeners.
- Fastening the frame. The cut sheet must be fixed to the base using screws, corners or plates on the bottom side.
How to make a contact layer for tiles?
Tools used for tiling work: 1 – plastic tank; 2 – grater with sponge; 3, 4 – metal grater; 5, 6 – notched spatula; 7 – rubber grater; 8 – brush.
The cut DSP sheet should be impregnated with a primer inside. A layer of glue, which is intended for tile work, is applied to the top of the plywood with a notched trowel. The DSP sheet is installed and secured with self-tapping screws to the plywood in the upper part. The joints between the wall and the contact layer must be filled with silicone-based sealant. A strip of DSP sheet is secured to the outer side edges with self-tapping screws. The joints between the side edge and the strip must be treated with the same silicone sealant or tile adhesive. After this, the joints are coated with liquid glass.
A painting mesh should be installed on the manufactured surface and treated with a waterproofing compound. Next, all layers of table tops and edges that are located on the sides are processed.
When the surface is dry, you can begin cladding.
There is another manufacturing technology that has gained recognition in the West.
Stages of laying tiles.
- Two layers of plywood are fastened together.
- The side edges are treated with a waterproofing compound.
- A painting mesh is fixed to the surface.
- All this is treated with a waterproofing compound.
- Beacons are displayed. For beacons, 2x3 cm slats, gypsum profiles or racks should be used. The beacon installation diagram is shown in Fig. 1.
- You will need to make a cement cushion 1-2 cm high.
- The first rail is installed and secured to the side edge of the tabletop so that it is located 2 cm above the plywood sheet. The rail is fixed strictly level, and it must be maintained horizontally. In the future, the slats will need to be removed, so you should not secure them with a large number of screws. You will need to use 2-3 pcs.
- The second rail is attached flat along the base. Using a level, you will need to check the horizontal line between the 1st and 2nd beacon slats.
- Then the beacon slats are placed on the sides of the tabletop, then they are secured with self-tapping screws.
- In the place where the hole was cut under the sink, you will need to screw two slats to the piece of plywood that was left as a result. The piece is installed in the hole under the washbasin and secured with self-tapping screws, which are screwed through the slats into the plywood.
- Next, the solution is prepared. As a cement cushion for the countertop being made, you can choose tile adhesive, a mixture of sand and cement, or a sand-cement mixture with the addition of glue. When preparing the solution, you will need to add 1 part latex to 2-3 parts water. This is necessary in order to obtain a durable coating that will not absorb water.
- The solution that has been prepared must be applied with a trowel and leveled over the beacons with a large spatula. After the solution has set, you will need to unscrew the slats, first making contours along the hole for the washbasin with a spatula. A piece of plywood is removed along with part of the applied mixture.
- After this, the edges are trimmed. The surface is smoothed with a metal spatula or trowel. In order to get a smooth surface, you need to lightly moisten it with a spray bottle.
- After the applied solution has completely set, it is necessary to remove the beacon strips. If a mixture of sand and cement was used, then you need to wait 5-6 hours. Tile adhesive requires approximately 12 hours to dry.
- The edge is puttyed with a solution, after which the solution is added to the places where the beacons are located. The entire surface should be leveled with the layer of mortar and then smoothed.
- The countertop should be left for 3-4 days.
Installation of DSP
Due to the high coefficient of thermal expansion, tiles cannot be laid directly on the plywood surface. The top of the plywood is sheathed with DSP. Stages of work:
- Preparing a piece of DSP according to the mold. You can cut out the desired shape with a grinder, but in this case there will be a very large amount of dust. It is better to use a knife - make grooves of 2-3 mm and break off along the contour on the corner of any surface.
- Fastening the DSP. The finished sheet is attached to the plywood using self-tapping screws. The holes should be countersunk so that the heads of the studs are “recessed” into the surface.
- Processing the end of the table top. It is necessary to cut a strip 5 centimeters long from the DSP and fix it at the end under the top part.
- Fixing the DSP sheets with a fiberglass mesh.
- Preparing the hole for the sink. You need to take a jigsaw and cut a hole where the sink will be installed. Most modern sink models come with a template. Before you start cutting, you need to drill a hole exactly in the middle of the tabletop into which the jigsaw blade will be inserted.
Various photos of bathroom countertops with tiles are posted in the article. They can also be used as an example or sample.
Assembly of the structure
The first plywood layer is secured especially securely, since the structure should not move. The screws should have a length of approximately 4-8 cm. A layer of plywood is installed in the side ties of the body in the lower part. To secure it, you will need 3-4 screws on each side. The side walls are extended to this layer of the tabletop using metal corners and self-tapping screws.
Fig 1. Beacon installation diagram.
Glue is applied to the top of the plywood sheet, which is intended for working with wood; you can use wood glue, PVA or similar, but it must be moisture resistant. The adhesive composition must be applied to the base in a zigzag manner. Another layer of plywood needs to be pressed and tightened with self-tapping screws. To prevent the heads of the screws from sticking out, you will need to use a drill to countersink the places where they are secured in advance. Self-tapping screws are located around the perimeter and in the middle of the sheets, and the step should be 15 cm. A strip of plywood, which has a width of 4 cm, is attached to the resulting edges using self-tapping screws. The upper part of the plywood is cut using a disk on an angle grinder.
A painting mesh is attached to the top of the second layer of material using a construction stapler, the cell pitch of which is 1-2 cm. The mesh is placed on the side edges of the sheets and is fastened with tension. It is important to secure the mesh securely and evenly.
It is recommended to cover the edges of the plywood with masking tape and burlap, and then coat them with tile adhesive. Next, the edges are treated with a waterproofing compound. The joints between countertops and walls are impregnated with silicone sealant.
The procedure for laying end tiles.
At this stage, the countertop can be covered with porcelain stoneware. All that remains is to properly treat it with a composition to protect it from moisture. In this case, you can use ready-made compositions or make the mixture yourself using liquid glass, latex, water and fine sand. After this, the surface is dried and coated.
The contact surface for cladding can be made additionally.
There are two options:
- The tiles are laid out on a moisture-resistant gypsum fiber sheet or on a DSP sheet.
- The tiles are laid on a layer of cement to ensure durability and reliability of the structure.
Laying tiles
The process of laying tiles on a countertop is similar to working with other surfaces. It is performed as follows:
- You need to take a small spatula and apply tile adhesive to the smooth surface of the comb. Next, it needs to be evenly distributed over the surface of the countertop. Use the serrated side of the comb to remove excess. This is done in such a way that even grooves of glue are formed. Expert advice: the mixture should be applied in sections, as it quickly hardens and loses its plasticity.
- The laying out of elements begins from the first row. It should protrude slightly beyond the edge of the base so that after laying the tiles on the end, the surface is level. In addition, instead of the initial row, you can install special corner elements.
- When laying ceramic tiles, seams are made, so it is necessary to use plastic crosses.
- It is recommended to constantly check the evenness of each tile using a level. This is done so that defects can be corrected before the glue hardens.
- After the solid tile elements have been laid out, you need to take a tile cutting device and make adjustments (substitute or cut off pieces).
- As soon as the surface of the tabletop is ready, you need to move on to facing the end. Glue the 5 cm wide sections with tile adhesive and secure them temporarily with masking tape.
Equipment installation instructions
Once the necessary tools and materials are prepared, you can begin to work. It is carried out in several stages.
Choosing a sink location
It is clear that the place where the sink will be located is predetermined. But now you need to accurately designate the device’s seat. It is important to take into account several key points.
The equipment can be installed almost anywhere on the countertop. It would be a mistake to assume that this can only be done exactly in the middle of the base.
When placing the sink close to the edge, you need to understand that the remaining section of the base must be wide enough so as not to lose strength and not break off during use.
In addition, you need to make sure that utility lines can be easily connected to the sink and that nothing should interfere with them.
The internal load-bearing elements of the cabinet should not interfere with the connections. If this is not the case, the sink should be positioned differently, since damage to the supporting structure threatens to destroy the cabinet.
Note that in addition to marking the location of the bowl, before starting work, you should also mark the attachment points of the tabletop on the wall, if it does not rest on the cabinet. In this case, it is marked according to the principle of determining the installation height of the sink.
Preparing the main template
To properly embed the sink into the base, you will need a template. This is the name of the paper part that follows the contours of the sides of the product. Usually the template comes with the sink.
To do this you will need a sheet of cardboard of sufficient size. It is laid on a horizontal surface, after which the sink is placed on it bottom up. The device is pressed against the cardboard and carefully traced along the edge of the sides.
The finished template is cut out with scissors and used for its intended purpose. Some people prefer not to bother with preparation and outline the sink directly on the countertop.
Marking the base for equipment
The marking procedure will vary somewhat depending on the method of securing the sink under the countertop. First, we take the template and place it in the place where the equipment will be located.
If it is assumed that the sink will rest with its sides on the edge of the hole, proceed as follows: carefully measure the size of the sides, then carefully trace the template.
From the edge of the resulting part, we retreat a distance inward equal to the size of the sides and draw a new boundary for the hole. It should be such that the product lies resting on the edges of the hole.
If the sink must be recessed into the countertop, proceed differently. In this case, the mounting hole must match the size of the sink so that it can be lowered into the base.
To fix such a product in place, special fasteners are used. To mark the so-called semi-built-in sink, a template is used that follows the contours of the product at the built-in level. As in the case of a sink “recessed” into the base, it is traced exactly along the contour; no allowances need to be made.
Making a hole for the device
For standard wood-based worktops in a variety of finishes, the easiest way to make a hole is with an electric jigsaw.
First you need to prepare a hole through which you can insert the jigsaw blade. To do this, take a drill and drill a hole in that part of the tabletop that will subsequently be removed. We insert the blade and start cutting.
We carry out the work extremely carefully and accurately so that unwanted chips and cracks do not appear on the base. Carefully clean the walls of the finished hole with sandpaper. They must be smooth and even; chipping on them is unacceptable. Now you need to protect the cut of the base from moisture.
To make it more convenient to work, you can take a narrow spatula. We put sealing tape on the sealant. It can be made of thin rubber or polyethylene foam.
Connection of utilities
Now it will be convenient to connect utility lines to the sink installation site. Let's start with the sewer. If necessary, we make holes in the cabinet and insert the pipe into the structure. We arrange everything as conveniently as possible for the subsequent connection of the sink.
Next we work with the water supply. We put pipes inside for cold and hot water. The faucet is usually installed on the countertop, if so, it is better to install it at this stage. If the faucet is installed on a sink, then it is fixed to the device before attaching it to the countertop.
First, we assemble the mixer, following the assembly instructions, which a conscientious manufacturer must include in the packaging with the product. We fix the flexible eyeliner. There are rubber cuffs on its fittings.
Experienced plumbers advise moistening them with water before screwing them into place. After the mixer is ready for installation, we place a special o-ring on its lower part.
Now you can cut a hole in the countertop for the mixer, then insert the device into it, passing the liner into the hole. We place a pressure washer on the back side of the tabletop, having previously installed a special rubber gasket under it.
During operation, it will prevent possible leaks. Next, screw the nut onto the stud. We level the mixer as much as possible and tighten the fasteners.
After we have completely tightened the nuts, we check that the mixer is installed correctly and firmly. It should not rotate or move. The appliance must stand firmly in its intended place.
All that remains is to connect it to the water pipes. The nuts of the flexible line are screwed onto the corresponding parts. For better compaction, you can additionally use fum or flax tape.
Installing the sink into place
We apply sealant to the sealing tape pre-glued to the cut of the mounting hole, and place it on the mounting points for the sink, if any. We bend the fasteners slightly so that they do not interfere and insert the bowl into the hole.
Rock the product slightly to find the optimal position for it. After we find it, we tighten all the fasteners completely and carefully remove the excess sealant that has protruded around the bowl.
If the sink is a countertop sink with wide sides, be sure to coat it with silicone sealant underneath. This will protect the resulting seam from the damaging effects of moisture. We carefully examine the cabinet with the sink from the inside.
All gaps and seams are carefully treated again with silicone sealant. We do the same with the junction of the base and the mixer.
Siphon installation and connection
We start with assembling the product. As in the case of the mixer, we carry it out exactly according to the manufacturer’s instructions. The most important point when carrying out this procedure is maintaining the tightness of the connections.
We pay special attention to the bottom plug, since it bears the main pressure of the liquid. It is advisable to carefully inspect it before purchasing for the presence of burrs, chips and other defects. There should not be any, otherwise the integrity of the gasket will be compromised.
It happens that the manufacturer supplies siphons already assembled. In this case, you should not be lazy and disassemble the device.
This way it will be possible to check the presence and integrity of the gaskets, as well as the fastening of all elements of the device. We assemble the siphon, controlling the clamping force so as not to accidentally damage the product.
When installing the bottom plug and all equipment connections, it is advisable to secure the gaskets with sealant. We tighten the elements of the device without strong pressure, but until it stops.
Having installed the outlet pipe in place, tighten the fastening screw, and then remove the excess sealant with a damp cloth.
Experienced craftsmen remind you that the installation height of the siphon can be adjusted using the outlet pipe. We attach the siphon to the sink and secure the part with the trap with a screw. Then we connect the main part of the equipment to the sewer pipe.
If the sink design is designed to install a drain with an overflow, two pipes are connected to the bowl. After this, it is advisable to conduct a test run, even if it is intended to connect additional equipment to the same pipe.
This will make it easier to deal with possible problems. At the time of the test run, we close the additional holes with special plugs.
We open the water supply and check the functionality of the siphon. If everything is in order, turn off the water and, if necessary, connect additional equipment.
Plumbers recommend additionally securing the drain hose from the washing machine with a clamp to prevent it from being torn off by water. The hose extending from the siphon should not be stretched or twisted so that the outflow of liquid is not complicated in any way.
Source: https://sovet-ingenera.com/santeh/rakovina/vstraivaemaya-v-stoleshnicu-rakovina.html
General points
There are several modern technological approaches for installing a kitchen sink, which are selected depending on its form factor and connection features, the material of the bowl, the layout of the kitchen space, and the location of the furniture in it. Please note that:
- It is not recommended to place washing equipment near the hob and refrigerator. This unspoken rule of the “triangle” is associated both with energy (fire, water and cold are incompatible) and with optimal aesthetic perception;
- The sink should be located next to the work table, on which preliminary cutting and preparation of food is carried out for further cooking. Therefore, if the kitchen area allows, the hostess’s workplace is divided into 2 zones - for doing dirty work and a clean one, where ready-made dishes are finally served;
- When designing the placement of the washing bowl, take into account its connection to communication lines (water supply and sewerage). The simpler (smoother) and shorter the inlet/outlet lines are, the lower the consumption of pipes, fittings, loss of water pressure and the likelihood of drain blockages.
Installation of the sink flush or below the level of the countertop. Unusually shaped sinks
An undermount sink can be mounted flush with the countertop - however, this is a labor-intensive process that requires experience, since it involves removing the layer of countertop under the edge. The depth of removal is equal to the height of the side with a layer of sealant.
If you decide to install and connect the sink so that it is below the table level, you will have to resort to the services of specialists. After all, this installation method is chosen for expensive structures - not made of steel, but of natural, artificial stone. In this case, special tools are required for fastening - for example, a jigsaw and diamond-coated saws. Indeed, in such sinks there may not be a hole for draining water - complete sawing of products is not carried out in industrial conditions. Sinks made from natural materials are secured with a special mounting adhesive.
As for sinks with unusual shapes, they come with a paper template from which the installation hole can be cut.
Video description
Watch the video on how to embed a stone sink into a countertop:
We install ceramic products
Ceramic sinks have the following feature: one part of the sink is overhead, the other is cut into the countertop. Such models are fastened using a combined method. To ensure the reliability of the structure, both sealant and mechanical fixing devices are used.
In addition, to secure the sink, load-bearing structures are made from wooden blocks. You can do this yourself. Wood should be treated with antiseptic agents.
Products made of ceramics and natural stone are very heavy, so when installing them, durable countertops and cabinets are requiredSource www.build2last.ru
Buy or make it yourself?
You always want to make your bathroom not only beautiful, but also functional. And well-chosen furniture and other interior items will help with this. As a rule, a lot of bottles, jars, and rags are always stored in this room, which are needed not only for taking care of yourself and your appearance, but also for cleaning the premises. And when it’s all just put together haphazardly and using whatever, the picture turns out to be unflattering. It is much better to use some kind of furniture to store items.
Small cabinet under the washbasin - DIY options
One of these interior items is just a cabinet under the sink. Usually it not only hides the drain running from the sink itself to the sewer pipes, but also has a lot of shelves hidden behind the doors. And on these shelves you can put all kinds of bottles and boxes - there they will not be conspicuous and disturb anyone with their presence.
Of course, the easiest way is to just buy a sink cabinet. Nowadays all kinds of products are produced from a variety of materials, having any shapes and sizes. But it cannot be denied that our apartments are such that they do not always meet any standards. And for this reason, choosing a cabinet for a sink is often not easy. In this case, you should just think about doing it yourself.
Built-in vanity unit
On a note! The question arises - why not order a cabinet from a professional? The answer is simple - not everyone can afford to pay for an expensive custom-made designer item. Sometimes it is much cheaper and easier to do everything yourself. But you will have to spend your personal time. Plus, private craftsmen can be very busy with work, and they will have to wait for more than one month for their cabinet.
It is important to understand that not everyone can make a cabinet - you need to have certain work skills. But if there is a desire, then even a beginner will definitely succeed in creating a cabinet. You just need to put in more effort and study all the necessary information in advance. And it’s better to choose a model that is as simple as possible - complex options may not work out the first time without the proper skills.
Cabinet with drawers under the sink
Types of cabinets
Cabinets can have not only different sizes, but also different shapes. They can also be divided into several types depending on the method of their installation and location.
Cabinets may be different
Table. Varieties of sink cabinets depending on the installation method.
| View | Description |
| Floor | This is the most popular model, and its popularity is due to the versatility of products in this category. Such cabinets are distinguished by their stability and simplicity of design, and you can also place fairly heavy objects in them, since there is no risk of collapse. Typically, such products have legs or a base. Often they can be additionally fixed on the wall, which increases their reliability. Models can completely close communications. But they are unlikely to be suitable for modest-sized bathrooms, as they occupy quite a large space. However, with the right selection of models, they will look good and be useful. But putting a washing machine in a bathroom with such a cabinet can be problematic. |
| Hanging | These are, as a rule, very interesting and light-looking models that take up very little space, as they are located directly under the sink itself. They are especially relevant in small rooms and where plumbing does not allow the installation of a monolithic floor structure. However, the wall on which such a cabinet is fixed must be strong and reliable. Also, usually you cannot put heavy objects in such furniture. They are more difficult to install than floor-mounted ones, which often discourages the choice of such a model. But, nevertheless, this is also a popular form. |
| Corner | It is easy to guess that such cabinets are installed in the corner of the room. Moreover, they can be both floor-mounted and suspended. Allows you to save free space and decorate the interior. The optimal solution for small spaces. The cavity of such a cabinet is usually very spacious and allows you to hide many things and objects from prying eyes. |
Hanging cabinet
Also, cabinets can be divided into two types depending on the type of bowl of the sink itself. Thus, they distinguish cabinets for a mortise sink, when the thicket itself is installed on the upper surface of the cabinet by cutting out a cavity in it for it. Here it is important to take into account the fact that the plumbing product fits tightly to the edges of the cabinet , and the hole for it is accurate. Otherwise, unsightly gaps may form.
There are also cabinets for an overhead sink. Such a bowl is installed on top of the furniture itself - a small barrier is created on the countertop from the boundaries of the sink.
There is a wide range of different and interesting models of sink cabinets on sale.
On a note! There are also so-called consolidated washbasins. They are connected to the cabinet itself, representing a solid structure. You won’t be able to do this yourself, except in rare cases, and then only with a high level of skill.
Romantic interior in Provencal style
The mild and sunny climate of the southern regions of France is associated with calm, pastel colors. Several characteristic features will emphasize the originality of the interior in a rustic style:
- the color scheme is formed by light pastel shades (sand, cream, white, beige, lilac, light green);
- you can lay out an interesting pattern on the work surface, but any combination of shades should not look provocative;
- Provence style assumes the presence of a variety of textile decor (curtains, tablecloths, pillows, upholstery). The shades of textile patterns should be reflected in the palette of the tabletop.
Recommendations for choosing material
Basic principles of using a square:
- It is preferable to line the tabletop with glazed products. This is the easiest material to maintain. Such elements are resistant to loads, temperature changes, and pollution. The main accent of the interior will be shiny squares;
- The non-standard tile relief or texture will appeal to fans of original types of finishes. Caring for such products is more difficult and takes longer. Removing dirt from your countertops will require different cleaning products, time, and extra effort. The cleaning procedure will be simplified by brushes and special metal sponges;
- the optimal size of squares for finishing a work area is 15x15 cm. To visually expand a small room, it is advisable to lay them out in sizes 10x10 cm or 5x5 cm. The mosaic canvas will also decorate a small kitchen in an original way and visually make the room more spacious;
Two popular installation types of kitchen sinks
A wide range of kitchen equipment users are most familiar with two types of washing bowls - overhead and mortise.
Many overhead sinks can be classified as a universal and inexpensive segment, however, today they are becoming less and less common. They are distinguished by simple designs, mainly made of thin stainless steel. Their installation usually does not cause difficulties even for home craftsmen. Often installation is carried out on top of a separate cabinet, thus replacing the tabletop with it. The popularity of overhead bowls is also supported by the fact that they:
- have a limited number of models;
- when installed, they rise above the level of the working surface to the height of the flange, which does not look entirely aesthetically pleasing;
- have a design for which it is difficult to achieve a tight seal of the gap under the edging flange, where moisture then penetrates and dirt collects.
In the segment of overhead sinks, special models have begun to be found, for example, made of stone. However, they cost a lot, so they are not widespread.
Built-in sink - its name speaks for itself. Under it, an opening is cut out in the common tabletop (working surface), where the sanitary bowl is mounted. The edges of the opening are waterproofed, and the mating gap is carefully sealed. Due to the tight fit, as well as the slight elevation of the sink above the countertop, moisture and dirt do not accumulate. Such modern products have a significant selection of models that are precisely matched to the overall style of the kitchen set. For example, a mortise sink, in addition to the standard rectangular one, may have a round, oval, angular or special complex shape, manufactured to special order.