A wall-hung toilet, like its compact brother, can also break or start leaking. This situation is not at all a sign of impending expensive repair work with the collapse of the walls in the bathroom - repairing the installation for the toilet can cost a little money. Moreover, you can always try to eliminate the problem yourself.
We suggest that you familiarize yourself with the methods available to independent craftsmen for troubleshooting a wall-hung toilet. We list the main causes of breakdowns and the “symptoms” indicating their occurrence. Attention was paid to both the plumbing fixtures themselves, installed on the support frame, and the fittings of the flush cistern.
We supplemented the detailed diagnostics and scrupulously outlined methods for restoring the functionality of plumbing fixtures with visual illustrations and video tutorials.
Grohe installation repair
Grohe plumbing fixtures are functional and designed to last.
The Rapid series installation systems are well thought out, easy to install and maintain. They are perfect for any wall-hung toilets: standard, rimless, with a bidet function and a water supply point. Grohe installations rarely need repairs. The reliability of German plumbing products is confirmed by the manufacturer's 10-year warranty on systems and tanks. Features of Grohe installations:
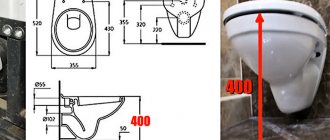
- the steel supporting frame can withstand a load of 400 kg;
- double flush and tank adjustment reduce water consumption by 50%;
- sound insulation ensures silence when draining;
- insulation from condensation eliminates dampness, which provokes the development of fungus.
Installations are installed in a plasterboard partition or in front of a wall. The range of models allows you to choose the required installation height. Different water connection options: rear, left, right make connection easier. Flush buttons can be mounted on a vertical or horizontal surface.
Self-repair VS calling a professional plumber
Periodic inspections, cleaning, and replacement of the tank mechanism do not take much time and can be done independently. To facilitate further maintenance and search for spare parts, after installation, save the instructions with the installation diagram and part numbers.
But, if you do not understand plumbing, then it will not be easy to determine the cause of the malfunction, carefully dismantle the fittings, and select a similar one for your model.
If you lack practical skills, it is better to refuse to repair the Cersanit installation yourself and entrust the work to a professional.
Leave a request for a technician to visit you within the Moscow Ring Road for free
To other materials:
- Wisa installation repair
- How to remove a button from installation
Possible problems and methods for repairing the Grohe installation
German quality ensures performance and durability. Breakdowns and repairs of the Grohe installation are the result of accidental damage or operation in a system with hard water. As a rule, frequent malfunctions are eliminated through the inspection window behind the flush panel. During repairs, it is recommended to use only original spare parts for Grohe installations.
Incorrect flush operation
After draining, the water does not shut off completely, but continues to flow into the bowl in a thin stream. Water consumption increases, and difficult to remove stains appear.
The cause may be a worn seal in the drain mechanism or some debris blocking its operation. The fittings must be removed and inspected for cracks in the gasket and adhering contaminants. In the first case, the problem is solved by replacing the seal ring, in the second - by cleaning.
Source
Common types of breakdowns and their possible causes
A master guarantees high-quality plumbing repairs. However, you can carry out repair work just as well on your own if you know how to fix a toilet installation. You should always start by identifying the cause of the malfunction, after which it is eliminated. To make it easier to navigate the problems that arise, we localize them according to individual installation nodes:
- tank;
- frame;
- toilet.
Tank
What causes the owners the most trouble is the tank, or rather its fittings. Although rare, the tank body also creates problems, and rather big ones. Let's look at the causes of malfunctions in more detail.
The tank body is leaking. The plastic body of the tank may leak water through a crack caused by:
- frame distortion - during installation, mistakes were made in fastening the frame due to carelessness, as a result, due to uneven stress, the plastic may crack over time;
- A strong accidental blow to the body after some time also leads to the formation of a crack.
The installation does not hold water. The constant flow of water into the toilet does not lead to catastrophic consequences, but it spoils the appearance of the bowl: red streaks appear and the water bill increases. This is possible for several reasons:
- low quality of plastic mechanisms of the drain unit - they become bent over time and do not ensure a tight fit of the valve to the drain hole;
- the membrane valve is coated with plaque (hard water) and does not hold water well, resulting in a constant overflow of water;
- the valve or membrane has naturally worn out during operation. The water either does not hold or overflows;
- a foreign object has fallen under the valve: hair, construction debris, etc.
Water flows into the tank continuously. This is usually one of three reasons:
- a crack has appeared in the float and, having filled with water, it does not rise;
- the float lever is deformed - the float cannot rise up;
- the diaphragm valve is damaged.
Water either does not enter the tank completely or flows very slowly. Coarse and fine filters clogged with dirt do not allow water to pass through.
Continuous, strong flow of water into the toilet. In this case, the problem is in the exhaust valve: it has become worn out or deformed over time.
The drain button does not work. Quite rarely, but installation owners are faced with the fact that the drain button does not work. There are several reasons:
- the latch broke, as a result of which the pusher changed position and went deep into the tank;
- the rocker arm broke;
- The rocker arm has come out of the hook of the valve lifting rod.
The given malfunctions and the reasons that caused them are inherent in all installation models, regardless of whether it is a popular brand (Sanit, Tece) or an unknown brand.
Frame
The installation frame is designed to weigh about 400 kg. This margin of safety is explained by the fact that the frame bears the load not only of the person sitting on the toilet, but also of the components attached to it. This strength is ensured by powerful metal profiles. However, not all manufacturers meet this criterion.
On sale you can find models with a load rating of 600-800 kg, as well as 100-200 kg. The lightweight frame is designed for children. From an adult (70-80 kg + toilet + water tank) it can bend or crack with all the ensuing consequences.
Toilet
Problems with the toilet itself can be twofold:
- The toilet installation leaks after flushing: water appears on the floor in the toilet. There is only one reason in such cases: the sealing of the earthenware (porcelain) pipes with plastic fittings has been broken, where water leaks;
- Chips and cracks appeared on the toilet bowl - the problem arose due to careless handling of heavy objects. They fell on the toilet and damaged it.
How to adjust the flush speed in a Grohe installation
Grohe wall-hung sanitary ware enjoys well-deserved popularity among users due to its first-class product quality, reliability and functionality. But not everyone knows how to adjust the flush of an installation when the drainage system of the structure is isolated behind a wall and hidden behind a protective screen. In the case of a classic toilet, you just need to open the tank, remove the valve and adjust the water flow rate. When working with overhead equipment, things are a little different, but not much more complicated.
How to fix a toilet installation yourself?
Candidate of Sciences, permanent expert of the site, a real, and not abstract (unlike other resources) person.
Military sailors have a very precise expression, which is constantly confirmed in everyday life: the speed of the squadron is determined by the speed of the slowest ship. No matter how hard installation manufacturers try to extend the life of their plumbing fixtures, they constantly run into the problem of rapid wear of individual parts and assemblies. Therefore, breakdowns occur quite often even with such world-famous brands as Geberit, VitrA, Viega, Grohe, etc. And here the owners are faced with a dilemma: call a plumber or repair the toilet installation with their own hands.
The principle of a wall-hung toilet
Many users are misled by the lack of visible flush elements. It is necessary to understand that the plumbing equipment is not entirely built into a blank wall. In fact, the auxiliary part of the toilet, including the tank, does not differ in operating principle from classic models, but is hidden in the installation. For ease of maintenance, the internal system is freely accessible. Thus, the wall-hung sanitary ware works like a regular toilet with easy customization of functionality.
A distinctive feature of the system: the presence of two modes for adjusting the volume of drained liquid. There are 2 switches on the side of the valve - one is designed to adjust the small drain, the second for the large one. Adjustable pitch - 0.5 liters. At the bottom edge there is a screw mechanism that visually resembles a plastic washer with threads. The filling of the tank is adjusted by lightly turning the element counterclockwise and clockwise.
Operating Tips
Trouble-free installation service depends on the quality of workmanship. It is wise to choose manufacturers who value their reputation and have positive user reviews.
When purchasing a toilet, inquire about the availability of a service center for this brand. Find out if repair kits are sold for the model. If you plan to carry out periodic inspections yourself, it is advisable to immediately buy filler and bottom cuffs.
Purifying water from impurities and reducing hardness is an important condition for the durability of the product. During periods of shutdown of water supply to the house, be sure to close the inlet shut-off valves of the bathroom to prevent clogging of the filters with large fragments of oxides and scale.
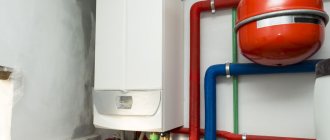
It is advisable to stop frequent drops in network pressure (P) by installing a reducer with a pressure gauge. The simplest and cheapest are small-sized piston and membrane options. Automatic regulators allow you to set the operating interval, electronic ones are good for a private home if there is a hydraulic accumulator or pumping station.
The minimum hydraulic pressure is usually 0.5 bar. The output value P2 is adjusted to approximately 2 - 3 bar, checking with the rating range of the bowl fittings. With these parameters, the flow rate is close to the calculated one.
The lid microlift works properly without any effort. Helping with your palm or slamming the lid sharply is prohibited; such actions lead to breaking a weak spring, loosening the hinge, and loosening the tightening of the base to the bowl.
Advice! If you need bathroom renovation specialists, there is a very convenient service for selecting specialists from PROFI.RU. Just fill out the order details, the experts will respond and you can choose who to collaborate with. Each specialist in the system has a rating, reviews and examples of work, which will help with the choice. Looks like a mini tender. Placing an application is FREE and does not oblige you to anything. Works in almost all cities of Russia.
If you are a master, follow this link, register in the system and be able to accept orders.
Source
Access to communications
To get to the drain valve, take a regular spade screwdriver and remove the plastic trim that contains the button.
Next, carry out work to adjust the flush of the Crohe installation, adhering to the following algorithm:
- Carefully remove the structure using a screwdriver and being careful not to damage the fragile parts;
- Take the valve in your hands;
- Make a few turns of the adjustment mechanism, slightly changing the position of the switches;
- Put the valve back in;
- Check the flush and make sure that the volume of fluid being drained has decreased.
At the last stage, install the protective panel with the button in place and check the system again for functionality.
As a rule, there are no problems with adjusting the flushing of the installation and supplying water in the required volume. But if there are noises, unusual sounds or leaks, call our plumber. The craftsmen are well versed in the design of various toilet models and can quickly debug the functionality of any plumbing fixture. To contact the operator, dial the number on the phone or leave a request on the website.
Source
Fixing the problem yourself
To find the source of the problem, due to which the toilet is out of working order, you can resort to calling a plumber, calling a neighbor who helps everyone and charges inexpensively, or try to do everything yourself.
The first option is safe, but requires agreeing on the time of the work and will cost a decent amount of money. Of course, this is the most convenient and simple option - you don’t need to do anything, twist, change - you gave the money and accepted the job.
The option with a neighbor/acquaintance of friends is like a pig in a poke. Questionable quality of work can lead to even bigger problems and more serious breakdowns.
To detect the problem and fix the breakdown, you need to disassemble the installation system, getting to its insides through the inspection window
The third option involves independently studying the installation system installed in your bathroom and repairing it. This is a simple activity that does not need to be rushed. It is important to take the manufacturer's instructions and read the relevant section carefully. If the instructions are lost, you can find them on online store websites or ask a plumbing store consultant.
All controversial issues that arise during the installation repair process can be viewed in thematic video clips. Models of fittings for built-in tanks from different manufacturers may differ from each other.
If you were able to disassemble the tank fittings according to the instructions, then you need to replace the broken parts using spare parts from the repair kit
Sometimes it is enough to disassemble the fittings of the drain tank, wash the components, replace worn parts, reassemble everything again, and the system works like a well-oiled mechanism - without failures.
Device overview and problems
Before you begin repairing the toilet installation, familiarize yourself with the device and operating principle. A frame made of rectangular steel profiles serves as the basis for a wall bowl, drain and sewer pipes, a plastic tank with fittings, and a flush control system.
Frame installation Cersanit. Composition of the Rapid SL Grohe installation
Filler (inlet, filling) and drain (bottom) valves are fixed inside the container, serviced through a technical window closed by a mounting box connected to the control panel brought out. Water drainage is initiated by a mechanical or pneumatic button located on the panel.
Here are possible installation malfunctions based on functional characteristics:
- Problems with the frame: distortions and movements occur due to improper installation and assembly of the frame; use of cheap profiles with low load-bearing capacity.
- Leaks at the connections of the inlet and outlet fittings of the toilet. They appear due to installation errors, frame deformation, aging, and seal defects.
- Cracks, chips of the bowl are the consequences of “crooked” assembly, accidental impacts during operation. At home, it will not be possible to reliably glue a broken one together, not to mention aesthetics.
- Breakage of the lid microlift mechanism. When securing the seat, carefully adjust the even fit to the bowl, then tighten the nuts. A typical failure is a broken spring. The difficulty lies in the exact selection of an analogue; a mistake can lead to a sharply falling or “freezing” lid.
- Failures of cistern cistern components are the most common cases.
Removing Geberit tank fittings
Using the Geberit with mechanical control as an example, let's look at the sequence of the disassembly process. First, be sure to turn off the water supply to the bathroom and empty the tank by pressing the release! Then you need to:
- Remove the flush button: lightly press the panel from bottom to top to disengage. Check out the explanatory pictures on the partition.
Remove the button. - Remove the pushers: turn, pull towards you.
Pushers
Removable with a twist. - Turn the side clamps or unscrew the two screws securing the frame and remove the frame.
Rotatable side clamps.
Screw mounting option. - Remove the partition by pressing the latches.
We dismantle the partition. - Remove the rocker arm assembly.
Remove the rocker block. - Close the valve inside the tank.
We close the valve. - Unscrew the union nut and disconnect the supply hose.
Disconnect the supply hose. - Remove the filler block.
Remove the filler block. - Perform partial disassembly for cleaning and washing.
We disassemble and wash the block. - Remove the drain valve bracket by moving the upper hooks apart (the fastening design differs for different brands).
Remove the drain valve mount. - Remove the bottom valve in parts: holding the bottom of the flask, turn the upper element until the bayonet connection disengages; snap off the small flush rod and turn it to the bottom.
Bayonet connection.
Released small flush rod (white) and bracket (black).
Video instructions:
Abnormal operation of the tank
European companies provide a 3-5 year warranty on valves and tanks, and 10 years on load-bearing elements of wall-mounted plumbing fixtures. The practical reliability of the system directly depends on the water treatment.
Often, products of well-known brands produced by Chinese factories are of mediocre quality; failures occur after months of service. We list the typical problems:
- The container does not fill or takes longer to fill than usual.
- Constant leakage into the bowl.
- The tank does not stop filling.
- The key does not work.
- Leaking in the body and/or inlet fittings.
Let us describe the probable causes of these situations.
Slow water flow
This may be due to clogging of the supply line filter or the built-in safety mesh of the filling mechanism (if equipped). Salt deposits, rust, and dirt prevent the filler valve from fully opening, even to the point of blocking.
Filling membrane yellowed from calcium deposits.
Turn off the cold water valve in the bathroom. Unscrew the cap of the brass filter, remove the mesh element, and clean with an old toothbrush. Rinse under running water and reassemble. If, after opening the tap, the filling time has not changed, you will have to remove the filling mechanism; we will analyze the procedure in detail below.
Important! Typical brass filters are equipped with a mesh with a mesh size of 500 microns. At the same time, solid particles already 50 microns in size, getting under the cuff, violate the tightness of the valve seat. Increased water hardness over a couple of months leads to identical results.
Sufficient protection for the filling and draining mechanism is provided by a two-stage battery with polypropylene cartridges with a filtration rating of 40, 10 microns. A softening module with a replaceable cassette or filled with polyphosphate salt is suitable against scale. A coarse filter with a stainless mesh 100 - 500 microns is required.
Continuously little water flows into the bowl
As a rule, the bottom valve is “sick”, the cuff of which has lost elasticity, has defects, and does not fit tightly on the seat due to contamination. Try draining the tank several times in a row; sometimes it is possible to wash away the particles that interfered with the closure, otherwise “surgical intervention” is necessary to disassemble the unit.
It may leak due to a lowered emergency overflow tube, lifting which eliminates the problem. If the tube is at the top, move the float lower, thereby slightly reducing the filling level. More often than not, the tank overflows due to the “fault” of the fill valve not closing the supply; it requires dismantling and inspection.
Water flows continuously into the tank
The flow is not blocked even with the float in the uppermost position. The reason is that the inlet valve is clogged. At a minimum, you will have to remove the control key, mounting box, partition to get to the fittings. It is recommended to remove the entire filling mechanism for inspection, washing, and possible replacement of the gasket.
The button doesn't work
A failure of a mechanical key occurs when the connection with the drain valve is broken, for example, one of the links has become disengaged, broken off, or jammed: a pusher, a rocker arm, or drain rods. Having restored the interaction of the parts, they check the work; the stuck parts will have to be replaced. We will discuss how to remove the control button below.
Check the opening of the bottom valve by pulling up the rods.
Sometimes the pneumatic key comes off, the impulse tube is not seated tightly or is torn. If the adjusted tube dangles, cut off the stretched end section, first making sure that there is enough length, otherwise replace the hose. A faulty pneumatic unit cannot be repaired by amateurs.
Leaking housing, liners
The most dangerous phenomenon, given its hidden nature, is that flooded neighbors can report trouble. Unfortunately, the crack permanently disables the tank. Craftsmen are trying to repair the container by gluing a strip of reinforced fiber and applying an epoxy compound, but the reliability of the method is questionable.
The main guarantee of “long life” is careful installation of the frame with level control and fastening according to markings according to company drawings. The absence of distortions will protect the plastic from increased stress. Handle the hammer drill carefully so as not to inadvertently snag the housing.
Fittings begin to leak through old gaskets and loose connections. Tightening by hand is generally accepted; the wrench is used only for metal hexagons. Hardened, wrinkled O-rings are replaced with new ones. Connections with gaskets are assembled without the use of silicone!
Conclusions and useful video on the topic
Video #1. It is possible to disassemble the installation without destroying the wall of the bathroom. How to do it yourself:
Video #2. The appearance of an unpleasant odor may be the result of an error when connecting the toilet through the installation pipe to the sewer. You can fix this problem:
Video #3. When water begins to appear under the wall-hung toilet, you need to find a breakdown of the installation:
Any breakdowns in the toilet installation can be repaired with your own hands. This is more effective than inviting a handyman, and cheaper than the services of a professional plumber. And familiarity with the installation system may be useful in the future, when the need for prompt repairs arises.
You can tell us about how you yourself repaired the support frame of a wall-hung toilet and share useful information in the block below. Please comment and ask questions.
The installation has been in place for five years now. It must have been a lucky purchase of the kit, since no repairs were required after so many years. When purchasing, pay attention to the permitted weight. A good filter was installed on the water pipe, since the water in our house comes with a high content of rust. By the way, the filter has to be changed very often, which may be why the plumbing works for a long time without repair.
I encountered the following problem: the water did not stop after the flush was completed. I fiddled with this tank all evening and the second day, I spent a lot of time and effort. Maybe, of course, my hands are in the wrong place, but for the future I decided for myself that everyone should mind their own business. Next time it’s better to call a specialist right away. Although everything is described here easily, it is actually a lot of time for a person who has never encountered this.
Thank you very much! Thanks to you, everything worked out for me.
Help with advice. I want to do it on my own. After drawing water, the water flows into the toilet through the flush valve. What and how to do? Tank "Groh" with one button. Thank you.
Hello. Most likely there is a problem with the seal. Detailed information on this topic is in this and this article.
Installation "Visa" in a new building. After installation, we used it only occasionally for a year, because... We're not living yet. Water stopped flowing into the tank after draining. As soon as you turn off the water supply valve to the apartment and open it again, it fills up. Then everything repeats itself. What is the reason - are there knowledgeable people?
The same nonsense with the installation “Visa”. Only used it for a couple of days, and then stopped filling after flushing))
Alexander, you need to slightly bore (make it oval) 2 holes in which the lever that is connected to the float is held. So it is necessary that the lever presses the gasket a little less. Then, at the moment of opening after draining the water, the pressure is released and the same thing happens as after closing/opening the water supply valve.
We installed the installation, and when flushing, water flows as long as you hold the button. When you let go, it stops flowing. How can I set it so that when pressed, the entire barrel is drained? Thank you
Hello. You will find this information in this article on our website. Please read.
Everything worked out! Thank you.
There is also a problem with water leaking into the toilet when it is at rest. A small amount, but still, it’s money being flushed down the toilet...
When I wash off, rusty water flows, what can I do? The water running from the tap is normal. Since the barrel is hidden behind the wall, it cannot be removed and cleaned, is there any way to remove rust?
Hello. For ceramic tanks - acid-based products, for metal and plastic - something alkaline. There are plenty of products in any household department of stores - Sanita, Silit, various gels, capsules, etc. You can, by analogy with a washing machine, use folk remedies - lemon juice, soda, vinegar, Coca-Cola.
Good afternoon Thank you for the complete and useful information for everyone. I just have a problem with a violation of the system for draining working fluid into the sewer riser. Background: we installed a ceresit wall-hung toilet, everything works well, sometimes after draining the water does not fill into the tank, but when you press it again 3 times, water does fill. Sometimes I heard water dripping into the tank; when you open the hatch, you can see that water is dripping from the internal parts when filling (I don’t know for sure). And recently a KSK plumber came, saying that we were drowning the neighbors below.
They opened up part of the bricked-up riser (the problem was with the riser) and along the way he saw that the water supply from the common pipe of the house to the toilet goes through a flexible hose, but according to the rules, he said it must be a plastic pipe. Because this hose can burst at any moment due to pressure or wear, metal corrosion, etc. - offered to replace it.
Question:
1. What is the probability of a break in the flexible hose (water is drawn through it into the tank and that’s it).
2. After this, we partially turned off the tap from this hose (to reduce the water pressure) - will this help?
3. But another problem arose (whether this is due to a partial shutdown of the water supply or not - I don’t know), but the water in the toilet began to drain for a long time and slowly, visually there was enough water volume, but it seemed as if there was not enough strength (it’s not clear how to write correctly) and even It’s just that when I poured out half a bucket of water, the dirty water stayed above the normal level for longer than usual and took a long time to drain away. I fell asleep at night "mole" - the situation did not change.
The main question for all experts is: what to do? Change the hose to a plastic pipe? Open the water supply? Or something different?
Hello!
I have two German wall-hung toilets with Geberit installation. They have been working for 20 years. One toilet stopped draining low water. When pressed, nothing merges. What could it be? How to fix the problem?
Same problem. Geberit installation. Suddenly, for no apparent reason, the small button began to be pressed freely and did not drain anything, the large one worked fine. I watched the videos and removed the release valve. I calmly lift the ear of the small drain, but I don’t understand how and what it should cling to in order for the valve to rise, there is a small plastic hook down there, it goes into the slot, but it also calmly comes out of it and doesn’t cling to anything, it goes in and comes out. I don’t understand how it should work, and I don’t understand where to read how a small drain should work. While I am using the large drain, the small one is resting and looking for materials.
Hello, something happened to the flush button, it’s a wall-mounted one with two keys, so where the keys meet in the middle of the button, they both jumped out and it turns out that they protruded forward (they folded over the roof of the house) they protrude now, how can I fix it?
I see water in my button, what could it be?
Hello. Somewhere there was a seal failure. Most likely in the flush mechanism.
Ask our experts and other readers
Source
Adjusting the water level
Violation of the optimal volume of filling the installation tank leads to unstable flushing at low levels or excessive water consumption at high levels. You can easily adjust the required amount of liquid with your own hands.
By dismantling the button and partition, you gain access to the fittings. By turning the pin, the float is lowered or raised, lowering or raising the fill level accordingly.
Adjusting the float position. It is not necessary to remove the filling block; you can rotate the pin through the opening.
The Geberit drain block is equipped with flag indicators that regulate the volume of large and small drains. Details from 2:45: , also watch the previous video from 2:25.
Vacuum systems from Grohe are equipped with an original mechanism for adjusting the volume of large and small release. The large drain is adjusted with a gate plug.
The gate (blue plate on the left) at the top is the minimum large drain. Moving the plug to its lowest position. Pressing the big shutter key. The gate at the bottom is the maximum large drain..
Economical drainage is regulated by moving the float along the flask. In the upper position, the minimum amount of liquid flows out, the lower position corresponds to the greatest discharge for the economy mode.
Pressing the economy shutter key, blue float at the bottom. Largest reset in economy mode. Moving the float up to reduce flow. Initiation of economy mode with the float raised. Remaining water after a small drain set to minimum.
Grohe recommendations for adjusting the Rapid SL system: