Installing a bathtub yourself is not too difficult, but it is a labor-intensive job. The container must be properly prepared, connected to communications, installed with the required slope and ensure that it does not wobble. To do this, it is advisable to choose the right materials and sequence of operations to make your work easier.
Installing a bathtub will not be difficult.
Install the legs
The first step is to attach the legs, which are usually included in the kit. To do this, turn the bathtub upside down without removing the packaging from the sides, and assemble the brackets according to the instructions. Depending on the material of the bathtub, the legs and their fastenings differ.
Acrylic bath
YouTube channel Cersanit Romania
These bathtubs have a special reinforcement insert made of plywood in the lower part, onto which the mounting plates are attached with screws, and the threaded rods of the legs are screwed to them.
You need to mark the mounting points in accordance with the instructions, then drill holes for the screws to the specified depth and tighten them with a screwdriver. To avoid making holes in the bathtub, use only the supplied self-tapping screws that have the calculated length.
Steel bath
YouTube channel “Alexander Cherepitsa”
Steel analogues are equipped with a pair of support-lodgments, which are glued with double-sided tape and pressed down with the weight of the bathtub. Another fastening option is four separate legs, fixed with special hooks on the bottom.
YouTube channel “Ruslan Viktorovich”
In the first case, it is necessary to degrease the surface with white spirit or another solvent and stick the supports. In the second, put the legs on the hooks and tighten them together with studs and nuts.
Cast iron bath
YouTube channel Craftstroy
Cast iron bowls also have four separate legs, which are attached to protrusions specially cast on the bottom with holes for bolts.
To install, you need to align the legs with the protrusions, secure them with bolts and nuts and tighten them with a wrench.
Nuances of installing a steel model
There are no particular differences in the process of installing containers made of steel from models made of other materials. It is installed in the same way as with an acrylic product. The algorithm of actions is the same, except for the method of attaching the legs. They are connected to the steel body using bolts, studs and wedges.
If bolts are used for this purpose, they are tightened alternately and gradually. You should not immediately tighten these fasteners too tightly, even if everything seems to be done correctly.
Fine adjustments of the supports may be required, which may not be possible once the bolts are fully secured. As you know, when filling a steel bathtub, the water jet makes a loud noise when it hits the walls. In order to muffle it, pieces of automobile rubber are placed in the gap between the surface of the container and the fastening of the supports.
Assemble drain fittings
The siphon and overflow system have the same design, regardless of the type of bathtub. As a rule, fittings are supplied with it. Otherwise, you need to immediately purchase the missing product in the store.
YouTube channel "Alexander Cherepitsa"
Study the assembly diagram specified in the instructions. Put the pipes in place and tighten the union nuts, having previously installed O-rings on all connections. Next, a rubber gasket is put on the siphon and the entire structure is pressed to the drain hole with a screw through the protective grill.
YouTube channel “Ruslan Viktorovich”
In the same way, the upper pipe is attached to the overflow hole on the bathtub. If the siphon has a drain valve rather than a regular plug on a chain, then a rotary handle is installed on the overflow grid according to the assembly instructions.
Siphon group assembly
Installation of the siphon is carried out in strict accordance with the manufacturer's instructions. Such fittings can be prefabricated or solid. Prefabricated - plastic elements are assembled on threaded connections. All bends are rectangular. A one-piece option is a siphon in the form of a solid curved pipe. In such a siphon, all bends are smooth, there are no threaded connections, which eliminates the possibility of leaks, in addition, smooth bends do not impede the flow of water. The drain hole under the siphon must be protected with rubber gaskets (rings). Through them we attach a hydraulic siphon seal to the bathtub. Then, we install the overflow through the gasket rings and secure it, attaching it to the overflow pipe.
Professional recommendations:
- Install the drain fittings by carefully turning the bathtub on its side.
- Before installation, each gasket must be lubricated with silicone.
- Gaskets are installed from the outside.
- A conical gasket is better, as it is installed with the tip facing the hose and does not damage the spacer when tightened.
- A conical gasket is better, as it is installed with the tip facing the hose and does not damage the spacer when tightened.
- It is important to tighten threaded connections as tightly as possible.
- The siphon connection must be direct to the sewer, without the use of corrugations. Such a correct connection will ensure that the water does not clog and will go down the drain faster.
- Drain/overflow is not always included in the delivery package; in some cases, the system must be purchased separately.
Try on and display the bathtub
YouTube channel Cersanit Romania
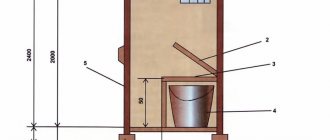
After installing the drain fittings, the bathtub is ready for installation. But before you finally fix it, you need to level the product and mark the border of the side on the wall for subsequent fastening.
To do this, move the bathtub into its place and, adjusting the height of the legs, check the horizontal position using a level. There is no need to make any slopes towards the drain: they are already provided by the manufacturer.
The height of the bathtub is selected according to location. As a rule, the distance from the top of the side to the finished floor is approximately 60 cm. The main thing is that the siphon is 3–5 cm higher than the sewer socket, otherwise the drain will quickly become clogged.
YouTube channel Cersanit Romania
After preliminary alignment along the sides of the wall, you need to draw a line with a pencil. This mark is useful for mounting wall brackets and stops.
Mount the wall mount
Massive cast iron bathtubs stand confidently on legs and do not require additional fixation. But light steel and especially acrylic ones are also attached to the wall for reliability.
Acrylic and steel bathtubs
YouTube channel Cersanit Romania
Such bathtubs are most often fixed with brackets in the form of hooks on which the bowl is hung. Homemade metal profile stops for drywall are also used, which perform the same function.
YouTube channel "Alexander Cherepitsa"
In both cases, the fastenings are installed on dowels, for which holes are drilled. Using the line of the top of the bathtub, mark the holes for the stops so that they are strictly under the edge of the sides and evenly distribute the load.
Cast iron bath
Products made of cast iron weigh from 80 to 200 kg, so they stand reliably and do not require additional fastening.
Install mortgages
If the bathtub comes with a factory-installed screen, then the design already includes all the necessary fasteners. If not, you will have to install embedded parts into the front side, to which the screen frame is then attached.
YouTube channel “Ruslan Viktorovich”
To do this, you need to cut a piece of a wooden block and glue it to the inside of the side with silicone sealant or polyurethane foam. If the bowl is adjacent not to three walls, but to only two, another block should be secured to one of the free sides.
Some acrylic bathtubs already have ready-made embeds in the form of pieces of timber along the perimeter of the sides. If you see such pieces of wood, it means you can do without additional inserts.
Room size
If the bathtub is located in a fairly small room and takes up space under the wall itself, the best option would be to install it before tiling work begins. The fact is that the square footage of an already small room will decrease due to the thickness of the tiles, and the opposite walls will converge in such a way that the plumbing simply will not fit between them.
Make thermal insulation
Acrylic and cast iron bathtubs retain heat well and do not require a layer of thermal insulation. Steel ones, on the contrary, cool quickly and are also very noisy when drawing water. Therefore, before installation, polyurethane foam, spray insulation or automotive sound insulation is applied to the bottom and walls of such bathtubs.
YouTube channel “Ruslan Viktorovich”
To do this, turn the bathtub over, wipe it with a damp cloth and cover it with foam, moving like a snake from bottom to top. The average consumption per bowl is 2–3 cylinders. The foam hardening time is 3–4 hours. After this, you can install the bath.
YouTube channel Valiev Andrey DIY
Sometimes, before applying insulation, the bathtub is pre-pasted with automotive sound insulation. The surface is degreased with a solvent, then the protective film is removed from the adhesive base of the sheets. After heating with a hairdryer, the sound insulation is glued to the bottom and walls of the bathtub, and then rolled with a roller.
Place the bathtub in place and secure it
YouTube channel “Pavel Sidorik”
Now you can finally install the bathtub in the prepared place and fix it using the selected fastener option, as well as seal the joint with the wall.
To do this, silicone sealant is applied to the wall just below the previously marked side line with a snake. Then the bathtub is carefully pushed into place. The sides adjacent to the walls are placed on installed brackets or profile stops. The bowl is pressed for a tight fit so that the sealant is slightly squeezed out.
Connect to the sewer
YouTube channel “Repair in detail”
After installing the bathtub, the siphon is connected to the sewer pipe using a corrugated pipe or a rigid pipe with corner fittings. The latter option is preferable: dirt accumulates much less on smooth pipes.
The rubber seals of the fittings are treated with a special lubricant or ordinary detergent, and then simply connected to each other. If there are doubts about their quality, the joints can be coated with silicone sealant to be sure. But keep in mind that disassembling them in case of replacement will not be easy.
Do not forget about the slope necessary for good drainage! The siphon should be 3–5 cm higher than the sewer entrance. With a smaller drop, the water will drain, but due to blockages the drain will have to be cleaned more often.
conclusions
As you can see, installing a bathtub with your own hands, regardless of the material it is made of, is not so difficult, and with the appropriate skills even a non-specialist in plumbing installation can handle it.
The most important rules that you should strictly follow when installing a bathtub yourself are as follows:
- it is necessary to ensure good support;
- the bathtub must be given the correct slope;
- it is necessary to carefully monitor how the sewer drain is connected;
- The joints need to be sealed properly.
If you follow these rules, you will be able to install a bathtub yourself, regardless of the material from which it is made, and the bathtub will serve you and your family members for many years.
Make a support pillow
Cast iron bathtubs have sufficient rigidity, while lightweight acrylic and steel ones can bend slightly under heavy weight. And although manufacturers allow installation exclusively on legs, for greater reliability, many craftsmen install a support cushion made of brick or gas blocks under the base of such bowls.
YouTube channel "Pavel Sidorik"
To do this, take a full bath of water. Then the floor is slightly wetted, bricks or gas blocks are laid under the bottom. They are attached to the floor and to each other using cement mortar. There should be about 5–7 mm from the top of the pillow to the bathtub - this space is filled with polyurethane foam. If the layer is larger, then over time it may sag and the support will stop working.
Complete hardening of the polyurethane foam takes about a day. All this time, the bath must be filled with water, otherwise the foam, as it expands, may raise the bowl.
What are the differences between products made of cast iron, steel and acrylic?
If the repair sequence is correctly followed, it is possible to extend the period of comfortable use of the bathroom. It is very important during the work to pay enough attention to the wiring of sewerage and electricity; usually, to resolve such issues, they turn to specialists. Today, the option when plumbing is installed after finishing the walls and flooring is not uncommon. Most often, an old bathtub is replaced with a new one: steel, cast iron or acrylic. As a rule, owners rarely purchase a device of the same type that was used before repair; this fact is explained by the search for more convenient solutions.
Acrylic bathtubs have an attractive design, but are fragile
When the shower is turned on and water is running, a steel product creates a lot of noise and quickly heats up and cools down. The walls of a cast iron bath take a long time to heat up and retain heat for a long time; it is very reliable, but its weight does not allow the product to be moved to the installation area without any problems. An acrylic product retains heat for a relatively long time, has an attractive design, is easy to install, but is sensitive to household chemicals and is fragile.
- Step-by-step instructions for laying ceramic tiles in the bathroom
- Installing a steel bathtub with legs - step-by-step master class
- Boar tiles for the bathroom and kitchen - secrets of laying unusual tiles
Mount the screen
After the work is completed, the space under the bathroom is covered with a screen. This can be a ready-made complete decorative panel, a purchased universal screen, PVC panels, as well as tiles on plasterboard mounted on a frame.
YouTube channel Cersanit Romania
The factory screen is attached to the walls and sides with latches, like a bathtub: holes for fasteners are marked according to the diagram in the instructions and fixed with dowels. The screen is then placed on the hooks and held in place.
For homemade versions, a frame is pre-built from wooden beams or metal profiles. The upper part of the frame is attached to wooden embedded sides, the lower part is attached to dowels or silicone sealant to the floor. Next, racks are installed between them in increments of 40–50 cm.
YouTube channel "Alexander Cherepitsa"
When laying tiles, the frame is pre-sheathed with sheets of moisture-resistant plasterboard. A screen made of PVC panels and other linear materials is attached directly to the frame.
If the screen is not removable, it is necessary to install an inspection hatch in the siphon area for maintenance. It is important to position the window so that access to it is not blocked, for example, by a washbasin cabinet.
Design the side joint along the contour
YouTube channel Cersanit Romania
The final touch in installing the bathtub is sealing the joints using silicone sealant. It is better to choose a white composition to match the color of the bath. Transparent will not look very neat.
Apply a layer of sealant along the contour of the bathtub, and then lubricate the sides and wall with soapy water so that the silicone does not smear when leveling. The excess is removed with a special spatula or a plastic card with a cut corner.
Preparation
This process is very important for proper installation of the bathtub.
Make sure that all necessary tools are available when assembling the bathtub itself and attaching it to engineering systems.
In addition to preparing your tools, do the following: