Self-installation of a shower drain in the floor under tiles with a water seal takes a lot of time and effort. The desire to create not only comfortable, but also pleasant external conditions for the shower stall entails studying the nuances when choosing and installing a drain. You can achieve an excellent result only by studying all stages of the work being performed. Let's look at the key features of drain holes, their differences and the installation process.
Installed water drain Source www.keramag.kh.ua
Purpose of the shower drain
- Dispose of used water from the shower;
- Catch trash;
- Retain sewer odors;
- Ensure the floor is sealed.
The material used to make the plumbing unit should not be subject to corrosion, so it is made of plastic or stainless metal. The external shape of this device can have a variety of configurations: round, oval, rectangular, square and triangular.
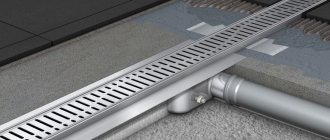
At the installation location - point drain holes (anywhere on the floor), linear and wall drains are placed along the walls or in the corners of the shower room.
For ease of installation, modern devices have variable assembly heights. It is possible to select drains with a single outlet or a continuous outlet. The passage has two outlets for water. When choosing, you need to pay attention to the diameter of the outlets; they must match the diameter of the pipes. You can do a trial assembly.
Criterias of choice
In addition to choosing the design of the shutter, it is advisable to select the size of the mesh so that it is convenient to lay the tiles on the floor: it is desirable that the size of the drain be a multiple of the size of the tile (including mosaics). Pay attention to the material of the case. For a shower stall in an apartment or house, plastic is quite suitable. These are the most affordable options. Floor drains made of polypropylene are more expensive, and stainless steel is even more expensive.
There are even corner models
It is also worth choosing the height of the ladder. The minimum value is about 6-7 cm, the maximum is up to 20 cm. Among the technical characteristics, this equipment only has a maximum throughput - how many liters it can dispense per minute. Select depending on the maximum pressure that your shower can produce: the throughput of the drain ladder should not be less than the maximum amount of water dispensed. Both parameters are measured in liters per minute (L/min), so there shouldn't be any problems.
Shower drain installation
- Water seal (dry seal) – siphons that block sewer odors;
- The decorative (also known as protective) grille is located level with the floor;
- Protective ring;
- The pressure flange ensures the tightness of the drain with waterproofing;
- Device body.
It is easier to install a shower when building a house. If you have to install it in an already finished house, you will have to first redo the floors at the installation site.
You should get a kind of five-layer cake:
- Thermal insulation;
- Floor reinforcement layer;
- Waterproofing layer;
- Second layer of reinforcement;
- Floor tiles.
Step-by-step instructions for installing a drain
Installation of the ladder occurs simultaneously with laying thermal insulation, waterproofing, working with cement-sand mixture and laying tiles. Therefore, the type of tool depends on the type of work.
The amount of material can be easily calculated if you take into account the manufacturer's recommendations indicated on the packaging. Considering the small area of the shower, the consumption will be small.
You will need:
- Expanded polystyrene for laying thermal insulation;
- Cement-sand mixture (CSM) to create strengthening and leveling;
- Isoplast, mastic and tape for waterproofing;
- Drain kit and PVC pipe set;
- Tile;
- Tile adhesive;
- Sealant and grout.
Conclusion
In this article I shared my experience and opinion, which is very subjective. I have ordinary customers, so I rarely supply premium products.
I always try to balance price=quality.
You can safely choose products from a popular and well-known European brand and it will work for you for quite a long time.
Don't go for the cheap stuff. When you make a shower drain in the floor and water leaks somewhere under the tiles, dampness and fungus will appear. This will be quite expensive to fix. As I already wrote above, replacing a tray or drain costs several tens of times more than the cost of the product and the work to install it.
I wrote my reviews about ladders and trays and talked about the nuances. If you found the article useful, please like it and ask your questions in the comments.
DIY gangway assembly
Having chosen a place to place the cabin, you can begin to dismantle the old floor covering. To do this you will need a hammer drill, a heavy hammer and a chisel (preferably with a handle). You will have to drill down to the concrete base.
If there is an old cast iron pipe in this place, then it must be replaced with a new plastic one (diameter 40 or 50 mm).
Work should begin with careful treatment of the floor and walls with waterproof mastic.
- It is advisable to repeat this procedure before each layer of the “pie”. Repeated processing will guarantee that moisture will not be absorbed into concrete and brick, which means that the possibility of fungus and mold appearing is eliminated.
- Plumbing manufacturers produce designs for installing drains that greatly facilitate the installation process. The cone-shaped slats are evenly laid with the thin end towards the drain hole, and all that remains is to concrete them. The required angle for water drainage is ready.
Video description
How to properly apply insulation, watch the video:
Installation of floor slope and waterproofing
The finished insulation with the drain body is covered with a reinforcing mesh for the screed. To drain water, it is important to mark the slope for drainage. Therefore, special beacons are installed, which are sold in any hardware store. Sometimes, the ladder is already equipped with guide strips that are adjustable in length. They are assembled in the form of a frame, which simplifies the process of pouring the screed at a certain angle to the drain.
After installing the beacons and taking the necessary measurements, the floor is filled with a solution of cement and sand. The drain hole must be completely covered with solution; only the top, the flange, remains visible on the surface.
It is easiest to make a slope towards the tray drain due to its direction of drainage in one direction. To a point drain, the slope is usually made from 4 sides, which is technically more difficult. The screed is dried for 3-4 days. A waterproofing substrate is spread over the dried surface; isoplast is usually used. In this case, it is necessary to cut a hole for the outer hole and secure the material along the edges with screws.
Assembling the drain unit
Before installation, you should calculate the location of the drain hole so that no difficulties arise during laying the tiles. Decorative elements of some drains have the same dimensions as the tiles. If the hole is positioned correctly, the grate will replace one of the tiles.
The outlet cuts into the sewer pipe; all joints and connections must be coated with plumbing sealant. If thermal insulation is required, then polystyrene foam can be laid on the concrete base of the floor, cutting out the contours of the structural parts of the plumbing on it.
As an option, you can make a warm floor by laying a special heating cable. Due to the small area and limited operating time, energy consumption will be insignificant.
Technical standards
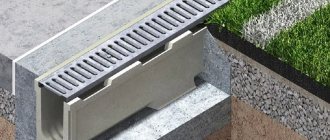
In the shower room there is always a drain installed on the floor. As a rule, this is one point towards which the slope of the floor covering in the shower towards the drain is formed. This ensures natural drainage and prevents flooding and water escaping beyond the low sides. To determine the optimal angle, you can take as a guide the standards that are prescribed in SNIP 2.04.01 from 1985 (16.9, 18.2) or in a more recent document from 2012 SP 30.13330 (8.4.4).
The vaults indicate that the tiles are laid with a level lowered towards the drain by 1 cm if the working base is within 1 meter wide. In the case of a larger area, the slope of the floor in a shower with tiles increases to 2 cm. The same applies to drain points. Regarding the sewer pipe, the parameter depends on the diameter of the channel and its length.
Source aco.bg
Laying the screed
Before creating a screed, all boundaries of the floor and wall must be closed. One option is damper tape, preferably self-adhesive. It is a poor conductor of heat, does not absorb moisture and is indifferent to temperature changes.
After gluing the tape, you can begin laying the mixed cement-sand mixture. The laid mortar is leveled using a rule (large ruler). If the slats are not laid, you will have to make a slope towards the hole (1 cm per 1 m of floor is enough).
Closing events
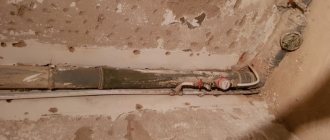
A water seal siphon is placed directly into the drain body. A receiving grid is installed on the drain hole.
Important! The grille should be installed on a thin polymer collar. This will ensure that it drains directly into the hole rather than along the edges of the grate. Draining along the edges is unacceptable if the pipe holes are assembled into a joint and the hole for the grate has a larger diameter.
After this, tiles with the required decor and height are selected. It is installed using special mounting adhesive and cut with a tile cutter in the required installation locations.
Finished bathroom floor with drain
Drying lasts at least two days, after which it is necessary to clean the joints from dried glue. This is done using a spatula and specialized cleaning products.
Laying waterproofing
You can begin protecting the floor and walls from moisture after the screed has dried - about 4 days. The membrane is cut to the size of the shower, a hole is made for the drain, it is laid and pressed against the flange using screws.
Particular attention should be paid to corners and joints: they can be additionally protected from moisture. For better adhesion, the isoplast is heated and pressed against the surface, forming reliable protection against water.
Instead of a membrane, you can use mastics:
- “Elastomix”, “Elastopaz”, “Tekhnoprok”. They are applied in a layer of 2-3 cm and perfectly protect against moisture.
- Next, the drain is assembled: a siphon is installed, a ring is put on, and a grate is installed.
- The grate can be removed to clean the siphon.
- Another layer of ligament is laid. The grate should be closed during cement work to prevent any solution from getting into the drain.
The laid solution should be periodically moistened for more durable and uniform hardening.
Side and fencing: to be or not to be?
The next point that needs to be considered is whether there will be a shower with a glass enclosure or just covering it with a curtain. Why is it important:
1.
When using a fence, there is no urgent need for sides of the tray; the glass partition will prevent water from overflowing outside the shower. At least most guards prevent water from overflowing over a pan without sides.
2.
The presence of a glass partition will allow you to use the area of the pallet to the maximum, because the fence can be placed along the outer edge of the pallet. When using a curtain, it should be located behind the sides inside the structure to prevent water from flowing down it onto the main floor of the bathroom. In addition, the presence of a curtain requires more internal space, since in cramped conditions this curtain will tend to jump overboard and pour water on the floor.
3.
Glass shower doors are quite expensive.
4.
Also, the disadvantages of the fence include the difficulty of cleaning: if the glass itself can be washed well with special cleaning agents, then perfectly washing all the connections and rubber bands is an unrealistic task.
5.
To use a curtain, you need a side of at least 4-5 centimeters in height. If, according to the results of the sewer drain assessment, the pan is too high, then the side will make the entire structure even higher.
The width of the side is chosen arbitrarily, if it is planned. You can make it at least 5 cm in its finished form (this is less than 3 cm without tiles), here you should focus on the space occupied and convenience. If space allows, it is better to make the side wider. For example, a 12.5 cm board (finished) is very comfortable and you can confidently stand on it with your feet. Standing on a narrow side of 5-6 cm is very inconvenient, so you will have to step over it all the time.
Therefore, when designing a pallet, you should weigh the pros and cons of the presence/absence of a fence. I’ll tell you my opinion: if it’s possible to make a larger shower, it’s better to opt for a curtain - it will be a better option. If there is a shortage of space, fencing is more acceptable.
Decorating with tiles
No one wants to shower in a room with cement floors. The reasons are clear to everyone. Therefore, at the final stage, ceramic tiles are laid. The choice of tiles is huge, the main condition is that they are not slippery.
There are many technologies and instructions for working with ceramics. In the shower, you should start laying tiles from the drain to the walls. If marked correctly, then you won’t have to cut anything near the walls. After the glue has hardened, you need to grout the joints using a waterproof material.
Materials
Once you have decided on the choice of equipment and location, we proceed to installation. All work can be done with your own hands without the help of specialists. To work you need to prepare:
- sifted sand;
- cement;
- material for thermal and sound insulation (foam is most often chosen);
- waterproofing membrane;
- adhesive composition or mastic;
- anti-slip tiles or mosaics from which the floor will be made.