0
3914
11.12.2015
Quite often a situation arises when, as a result of redevelopment in the bathroom, a shower stall has to be installed at some distance from the riser. In this case, for the drain to function normally, it is necessary to slightly raise the shower stall above the floor level. After all, when moving away from the riser, it is necessary to ensure a sufficient slope of the drain pipe so that the water goes into the sewer without any obstacles. You can raise the booth in two ways: build a podium on heels or an additional pallet. Let's look at both of these options in more detail.
Shower stall installed on the podium
Construction of a podium on stiletto heels
This option may be suitable for those models of shower stalls in which the tray is installed on a special metal frame with legs screwed into it. These legs are made in the form of long threaded pins, one end of which is screwed into the structural elements of the frame, and plastic stands are screwed onto the other, with which the booth stands on the floor. The threads on the rods allow you to adjust the height of the pallet to some extent, but this is unlikely to be enough to achieve your goal. Therefore, the task of raising the pallet to a greater height comes down to purchasing longer studs of the same diameter and installing them in place of the standard ones.
You may not be able to find hairpins that are the perfect length. In this case, you need to acquire a hacksaw and have the skills to work with it. Using this simple tool, studs of suitable length are cut from a long threaded rod. The plastic stands are unscrewed from the old legs and screwed onto the new blanks. The newly created studs are then screwed to the frame and secured with locknuts.
This is how the studs are located on the shower frame
This work can be done by anyone, as there is nothing complicated about it. You just need to be able to hold a hand tool in your hands. After installing the new legs, all that remains is to level their height and secure them.
What to make from
The materials for its manufacture are simple and affordable . These are brick, wood and concrete. Each has its own characteristics, which must be studied before starting construction work, and choose the appropriate one that meets your requirements.
Brick
Advantages:
- lasting;
- not afraid of humidity;
- economical;
- long service life.
Flaws:
- It is difficult to implement, since it is necessary to maintain the geometry of the form and the level of the surface in order to avoid distortions.
Peculiarities:
With the subsequent installation of the cabin, it is necessary to wait 2-3 days for the cement mixture to harden. To make it you will need: brick, cement, sand, water, marker.
Tree
Advantages:
- Ecologically pure.
- Safe for humans.
Flaws:
- Sensitive to humidity.
- Requires annual painting to increase service life .
Peculiarities:
You will need sealant, dry wooden blocks, a tape measure, a dark marker, and plastic panels. Before use, the wood is treated with a special agent to prevent mold and rot.
Concrete
Advantages:
- The construction is durable .
- Not subject to deformation.
- Long service life .
- The shape is varied, monolithic.
Flaws:
- High cost .
- Difficulty of execution.
- Long production time ( up to 4 weeks ).
Peculiarities:
Necessary materials: sand, crushed stone, cement, water 35°, formwork agent to give shape, reinforcement to prevent cracks from appearing in the product.
The main raw materials used in construction work, their advantages and disadvantages, allow you to choose the best option .
Installation of a tray for a shower cabin
This option has some features, namely that such work can be done quite quickly and cheaply. However, to do this you need to know exactly how high you are going to raise the shower stall. To correctly calculate this parameter, you will need an ordinary drain corrugation. It is installed in place and connected to a pallet, which is placed in the place where its final installation is planned. Make sure that the length of the corrugation is optimal, without tension and without bending.
Next, you will need the help of at least two more people. One should pour water into the pan, and the other two should lift it gradually. It is necessary to note at what height from the floor the most efficient outflow of water from the pan with a characteristic sound will be ensured. This height should not be too high, but at the same time sufficient.
Diagram of one of the shower tray options
In any case, this height needs to be calculated, and not made up out of your head. Most often, the best option is a 15-centimeter rise. The use of such a height is also supported by the fact that the height of the foam concrete block is exactly 15 cm. This is what we will use as the material for constructing the pallet. If in your case this height is excessive, then you can select smaller blocks. Otherwise, the missing height can be added with bricks.
Diagram of one of the shower tray options
Design features
The design of prefabricated shower cabins includes a closed structure with three wall panels and a door. Plumbing “corners” are mounted in the corner of the room and may have one or two doors (without a rear partition).
Monoblock analogues differ in overall dimensions, are easy to install, and have a wide range of models.
Modern sanitary cabins are equipped with a variety of accessories. Among them:
- hangers with shelves;
- handles and mirrors;
- shower heads of various configurations;
- foot massagers;
- remote control panels that make it as easy as possible to control the functionality of the device.
The electronic “stuffing” of plumbing boxes includes main lighting and decorative lighting, a fan, an extractor hood, a radio, telephony, and a liquid diffuser. Mechanical equipment includes diverter and mixer.
Making a template for the future podium
At the next stage, it will be necessary to make a template for the outline of the bottom of the shower stall. This outline will be used several times, so it is best to cut it out of plywood or a piece of drywall using a jigsaw. You can, of course, just cut it out of cardboard or oilcloth. The most important thing is that it ideally matches the dimensions of the shower tray. Otherwise, you will make a structure, but you will not be able to place the pallet in it evenly and stably. To achieve the required accuracy, you simply need to turn the bathtub over from the shower and place it on the material. Then trace its outline with a pencil and cut it out with the appropriate tool.
Conclusions and useful video on the topic
Useful information from the video will help you install plumbing equipment yourself.
Assembling the acrylic tray:
Intentions to change the furnishings of the bathroom in an apartment in a municipal residential building are not the exclusive prerogative of the apartment owner. Owners of municipal housing should remember the existing rules related to the reconstruction of premises and communications. Only after receiving the appropriate permission from the authorities can construction or installation work begin.
Do you have any questions, notice any inaccuracies, or want to add valuable information to this material? Leave your comments in the block below. Or maybe you had to assemble a shower tray yourself - share your experience with our readers.
Main works
When the template is made, it must be placed where the construction of the pallet is planned. Now you need to prepare a special adhesive solution using the following components:
- Tile adhesive of any brand – 70%;
- Assembly adhesive – 30%;
- Pure water.
Water is used in this composition to slow down the setting time of the glue, which is no more than 5 - 7 minutes. Using water, the glue is diluted to a consistency reminiscent of not very thick sour cream. Since even the use of water does not significantly increase the drying time of the composition, do not use too much of it. You need just enough to work it out in 7-10 minutes. It's better to make a new batch than to ruin the material. If you are still not sure how quickly you can complete the work, you can use regular cement mortar, but this will greatly increase the work time, since it will take at least a week to dry.
Next, we carry out the work in the following order:
- The outline that we drew on the floor needs to be primed and covered with mortar. After this, we begin to lay foam concrete or other material that was chosen for the construction of the pallet.
- We lay our template on the foam concrete block and level all the edges with a thick mortar. It can be obtained by reducing the amount of water, sometimes even to the point of no water at all. When leveling, you need to use a building level.
- After leveling the edges of the foam blocks, wait for the solution to dry completely and remove the template. After this, we level the entire top so that the pallet is perfectly level. For this purpose, the edges of the foam blocks can be used as beacons.
- Then we lay out the tiles on the dried surface, on which we place the template and draw the required contour. Then we cut the tile along this contour and glue it.
As you can see, there is nothing complicated. The main thing is to prepare all the necessary materials and tools in advance. In this case, a tray of the required height can be built very quickly, without spreading dirt in the bathroom for several days.
Ready-made podium for a shower stall
Is it worth collecting at all?
In most cases, the game is not worth the trouble. You can save money somewhere in the country by taking one pallet and nothing more. If this is acceptable, then the price difference will indeed be significant. Another option is when the delivery conditions are not satisfactory. Typically, an out-of-town seller will quickly begin to raise the bar. As a result, saving becomes unprofitable. More is spent on travel.
Another example is the inability to bring the product onto the floor. Modern new buildings have a freight elevator, but not Khrushchev-era buildings. Then it may turn out that assembling separately is more acceptable:
- A fully functional shower cabin weighs from 50 kg and above.
- The weight of the shower enclosure ranges around 30 kg.
It is not difficult to see that the entire product as a whole is not transportable alone, while individually the components can be carried by the average man. This is a compelling argument when there is no desire to pay additional loaders. That’s when you have to divide the shower corner into its components.
And here it turns out that the corner is often sold without a mixer. No, it is clear that a double-wall fence is devoid of this small, but expensive, detail, however, complete structures are supplied in a minimal configuration. This means that you will have to buy the mixer separately.
It is not difficult to deduce the rule of expediency of purchasing a shower enclosure based on its components. Here are some options:
- You already have a mixer, and there is no need to spend extra money.
- Difficulties with the delivery of bulky goods.
- There is a ready-made tile backsplash on one or two walls.
Installation of a shower cabin
What materials and tools are needed to make a podium pallet?
We list all the necessary materials and tools for making a podium for installing a shower stall:
- Foam concrete blocks or bricks.
- Selected solution type.
- Large and small spatula.
- Some kind of container for diluting the solution.
- Suitable material for the template.
- Building level.
- Any tool for mixing the solution.
- Tile.
- Special tool for cutting tiles.
- Pencil or marker.
When planning to build a pedestal for a shower stall, you need to think through everything down to the smallest detail so that your work is not in vain. Remember that a lot will depend on the correctness of the calculations and work, including the comfort, convenience and safety of using the shower stall. In addition, violation of the installation standards for plumbing equipment can cause an emergency.
general description
Hydromassage and modern shower boxes are distinguished by their complex design and versatility. They are focused on making massage, water and steam procedures as comfortable as possible.
Among the most popular sizes are shower cabins 80x80, 120x120, 90x90 centimeters. In terms of configuration, the devices in question are round, oval, rectangular, asymmetrical, and also made in a custom design with a variety of shapes and dimensions, taking into account the wishes of the customer.
Screen installation
Try on the decorative screen by tucking the top of the screen under the edge of the pallet. Adjust the plastic corners to secure the screen and tighten them with nuts.
The screen is secured with a self-tapping screw, which is threaded through a guide for a decorative chrome or white plug, then passes through the screen and is fixed in a plastic L-shaped stop for attaching the screen.
Cover the screws with decorative chrome or white caps (depending on which ones are included in the delivery kit)
Using these instructions, you can assemble a shower tray of any size. Whether angular, asymmetrical or rectangular. The only difference is the shape of the pallet, the assembly process does not change
If you don’t know how to assemble a Niagara shower cabin, read the instructions!
What to do if the septum is cracked?
Shower partitions crack much less frequently than shower trays, because the load on them is not as heavy . However, if a crack does appear on the wall or door, do not be discouraged. It is unlikely that it will be possible to restore the ideal appearance of the partition, but it is quite possible to restore its strength.
To do this, you will need the same set of tools and materials as for repairing a pallet. After preliminary surface preparation, treat the crack with epoxy. After it dries, apply a layer of acrylic paint on top. The final stage is coating the surface with acrylic varnish.
Rigid foundation
The void in the foundation made around the perimeter of the pallet is filled not with polystyrene or polyurethane foam, but with a cement mixture. This method has two advantages: low financial costs, high strength.
The disadvantages of hard gain include:
- Lack of thermal insulation. The cement mixture does not heat, the pan will be cold.
- Additional corrosion protection is required.
- Large time costs. The mixture must be prepared, distributed evenly in the void, and wait for it to dry.
Cement screed is good if combined with additional waterproofing. It is strong and durable.
Communications
Drain
The most important thing in all work related to the shower is to properly organize the drainage. After all, if you make it not low enough, the water will drain very slowly or stagnation will form. Therefore, to drain, it is important to find the lowest point in the container; for this you will need a building level.
To connect the drain to the sewer, you need to place the pipe with a slope of at least 2 centimeters per linear meter of pipe. The angle where the hose and sewer connect should be less than 45 degrees (or equal to this value). If everything is done correctly, blockages will rarely occur, and cleaning will not take a lot of time and effort.
If you are planning to install a monolithic pallet without access to communications, it makes sense to make a drain.
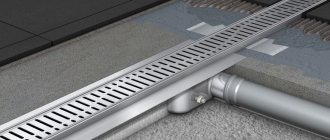
Ladder
The main task of the drains is to ensure the drainage of water. Compared to a siphon, they are more durable and reliable, and during repairs they do not need to be disassembled and assembled. There are even models that lock waste water, preventing it from entering the room in the event of a serious blockage. They drive water through pipes at speeds of up to 90 liters per minute. For contamination, the design has a special container that can be easily detached and cleaned. In addition, they differ from a siphon in a more complex design.
Gangway design
- Frame.
- Neck.
- Water seal.
- Insulating gate.
- Flange.
- Safety net.
Options for drainage structures can be equipped with one or several water seals. There are water seals with or without water. A common part for all models is the outlet pipe for draining. Choose the right model based on the following parameters.
Selection by parameters
- Length. Select according to drain size.
- Number of pipes. Or rather, the holes for them. The indicator depends on the location of the shower in the room. If it is in the middle of a chain of plumbing equipment, there will be two pipes, and if it is the last one in the same chain, then there will be one.
- Safety shutter. It's better to choose the option that has it. This will save you if an accident occurs and wastewater begins to flow inside the pipe. This is especially true for those whose drainage is below the floor level in the house, or whose bathroom is located in the basement.
- Decor. Despite the fact that this design has only a protective grille of visible parts, it can become a decorative element of the shower. There are even invisible options that create the effect of disappearing water.
Common installation mistakes and ways to prevent them
An incorrect pipe laying plan can ruin all your efforts. It would not be superfluous to add a water seal to the drainage system, protecting the bathroom from the appearance of unexpected odors.
If the drain is clogged or the volume of pipes under the pan is insufficient for quick flushing, there is a risk of again encountering problems with stagnant water and flooding the floor.
You need to make sure that the walls and floor of the bathroom are level. Otherwise, during installation you may end up with unintended gaps between the tiles and the sides of the cabin.