The most convenient way to update a plank floor in an old house is to lay a new material on the surface. With linoleum this is as easy as shelling pears, but what to do with a piece of flooring that is laid in a floating manner and requires the most even base possible? Have you decided to update the floor yourself and opted for laminate? Don't know how to install laminate flooring on a wooden floor? Learn the intricacies before starting installation, because during the repair process there may be a lot of pitfalls.
Laminate laid on a wooden base in compliance with the technology will serve no worse than other flooring
Features of the base
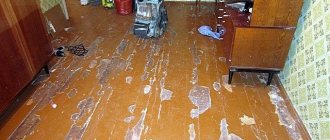
Wood is a rather capricious material, like most natural coatings. It is vulnerable to pests and rodents, is not moisture resistant and is highly flammable. Laying laminated boards on a wood base involves more difficulty than on other subsurfaces.
Manufacturers of laminated boards do not recommend laying the material on a natural wood subfloor. This is due to the property of wood to deform over time, which will also affect the evenness of the final floor.
However, if there is no particular choice and it is not possible to concrete the floor, be at least minimally careful.
- First, make sure that the base is suitable for subsequent loads and is intact. It should not have chips, cracks or crevices.
- If the flooring is made of untreated wood, inspect the boards for signs of fungus, rot, or pests.
- The floorboards themselves should lie flat, without sagging.
- Check that the boards are not rotten. The wood should not crumble in your hand, turning into dust.
Damaged boards and those adjacent to them must be replaced.
Important! If one of the above defects is present, the strips must be repaired or replaced.
If the floorboards have no flaws, but the entire covering is wobbly, simply secure the planks with any hardware. Laying the laminate ensures that the base is as level as possible and not shaky.
How to properly prepare a wooden base
Before installing the laminate, the old wood flooring is subject to thorough inspection to identify the following types of defects:
- Any traces of grease or oil stains.
- Old paint stains.
- All cracks that have arisen from shrinkage or mechanical damage must be sealed.
- Traces of mold, fungal infections, areas with rotten boards.
- All wooden parts that are subject to deformation or protrude beyond the plane of the floor.
- If poor fixation of any elements is detected, they must be secured with self-tapping screws or in other ways.
- Any irregularities that arise due to swelling of wood under the influence of external factors.
All unevenness and defects must be eliminated until a uniform, even, clean coating is achieved.
Why laminate? Advantages of the material
Every year, the increasing popularity of laminate is due to its attractive appearance, which can compete with many expensive materials. Drawings applied to the coating can imitate any texture without losing a decent appearance.
A wide range of laminate allows you to choose panels to suit any interior
Laminate is classified depending on its quality and performance capabilities. Thus, the most expensive and high-quality material belongs to the highest class.
However, in general, laminate of any classification has the following advantages:
- strength,
- easy care,
- environmental friendliness,
- wear resistance,
- long service life,
- ease of installation.
If laminate flooring is properly cared for, it can last for decades.
The minimum service life of laminate flooring with proper care is about 17 years. During use, the boards do not wear out, do not fade, and do not lose their aesthetic and performance qualities.
Prices for different types of laminate
Laminate
Pros and cons of the material
Laminate is the most popular flooring today due to many advantages:
- Low price (from 500 rubles per square meter). At the same time the quality is good.
- Laminated panels can imitate different materials, which allows you to choose the optimal solution for any room.
- The surface can be either smooth or textured, which gives it an even greater resemblance to natural wood.
- The chamfer around the edges makes the floor textured and also hides minor flaws in the form of unraveling seams.
- Small mass. The load on the base increases slightly. The average thickness of the panels ranges from 7 to 10 mm.
- The outer coating has high hardness and abrasion resistance, which ensures that it retains its attractive appearance for a long time.
- It is not difficult to install laminate flooring yourself. This will save a lot of money on the services of specialists. Thanks to the locking system, the joint is perfect. There is no need to glue or align anything.
The disadvantages are definitely worth mentioning:
- The material does not like sudden changes in humidity and temperature. Although the panel is reliably protected from adverse factors, it is not designed for long-term exposure. Most often, problems arise at the ends. That is why water spilled on the floor must be cleaned up as quickly as possible.
- When laying, it is very important that there are no differences in the horizontal plane. Even minor irregularities can cause damage to locks, widening of seams and squeaks when moving. The lock requires precise alignment; any deviations can cause problems.
- The bending strength is low, which requires a level base. Since the thickness of the panels is small, they bend if there is no strong support underneath them, which leads to damage to the joints.
- Locks in inexpensive laminate may not fit together well. They have to be additionally knocked out.
By the way!
There are moisture-resistant laminate flooring models for the kitchen that are not afraid of moisture.
Is it worth using?
Laminate is an affordable replacement for expensive parquet. It is actively used for renovation of residential and commercial premises. The material is easy to install, but is too demanding on the quality of the subfloor. It is possible to lay laminate on old floorboards, but only if a certain number of requirements are met, the main of which is high-quality and competent preparation of the base, including repair or replacement of damaged elements, leveling the base and the use of a substrate.
The piece strips have locks for connection and fixation in the desired position. No additional fastening to the base is required. Laminate flooring is laid loosely on a prepared wooden base, allowing it to “breathe”, contracting and expanding in accordance with changes in temperature and humidity levels.
If the laminate is statically and securely fixed on a wooden base, the floor may deform along with the rough base
The structural difference of laminate boards is that during installation the material does not need to be firmly fixed with glue or hardware.
The adhesive method for installing laminate flooring exists, but it is rarely used due to the high consumption of glue, the complexity of installation, the impossibility of reusing the coating after disassembling the floor, and the immobility of the surface.
The image above clearly shows what will happen to laminate flooring if it is firmly glued to a wooden floor.
The most widely used method of attaching laminate flooring is without the use of adhesive mixtures. Its advantage is that it provides good independent aeration of materials and, accordingly, decent ventilation of the floor. And a well-ventilated structure, as is known, does not rot and lasts much longer.
If the room is not heated or the humidity level is high, you will have to abandon the installation of common types of laminate.
Possible errors and ways to eliminate them
When installing a laminate floor on a wooden base with your own hands, beginners can easily make many gross mistakes that lead to increased costs and other negative consequences. To avoid this, experts and professionals often share useful recommendations with Internet users:
- Installation of laminate flooring on a damp base. The development of mold and rotting of wooden materials is possible. To avoid this, before starting installation, it is recommended to dry the base for several days using heat guns in a ventilated area. The moisture content of the material should not exceed 12%.
- Poor preparation of wood flooring. Any defects, unevenness, large gaps, as well as physical wear and tear of the old floor will undoubtedly affect the quality of the new laminate and the comfort of its use. Before laying, it is necessary to carefully inspect the old floor over the entire area, and then eliminate any identified defect.
- Poor quality substrate. Polymer or cork elastic material greatly increases comfort when using a new laminate floor. If you choose low-quality materials, over time, sagging and depressions will appear on the floor surface, the lamellas will begin to delaminate, and a characteristic creaking will be created when walking.
- Lay out the laminate before installation. It should be taken into account that preliminary marking and cutting of lamellas can lead to significant inconsistencies between elements during installation. Each plank should be tried on in place, when, after laying out all the previous slats in a row, the master will be able to accurately determine the distance from the penultimate element to the wall.
- Unreliable joining of lamellas. Each lamella should fit into the groove of the previous one with a characteristic click. Modern materials are distinguished by high-precision edges, which eliminates the formation of even a millimeter gap after joining. Thus, during the layout, the master can easily control the quality of the mating of the boards with each other.
- Lack of control over the result as you lay it. In the process of laying out and fixing the lamellas, the master may make minor mistakes. If defects are eliminated promptly, at each stage of installation, the owner of the premises is guaranteed a high-quality result. If minor defects are not paid attention to, the error can accumulate, which, when laying out the last row, will lead to significant inconsistencies that will be noticeable to the naked eye.
The expected result is achieved only in cases where the home craftsman strictly follows the technological maps, uses high-quality materials, and also takes into account all the recommendations of specialists.
In general, if laid out correctly, the finished floor covering should be used for at least the period stated by the manufacturer. Thus, these durability requirements are always projected onto a wooden base.
Area of application of the material
Despite all the artificiality of the laminate, its behavior during operation is not much different from OSB boards or plywood. The main element in the composition of laminated boards is a board created by pressing lumber.
Laminate structure and layers
The base of the laminate determines the scope of application of the laminate. Manufacturers do not recommend using poor quality material when decorating floors in rooms with high traffic levels and high humidity levels. Also, do not place the material in rooms where systematic wet cleaning is provided.
Laminated board is one of the best and most suitable coatings:
- in the living rooms,
- for bedrooms,
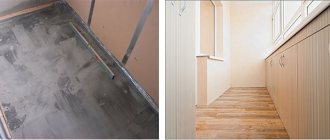
- on insulated balconies,
- in work offices,
- for children's rooms,
- in the halls.
For the hallway or kitchen, it is recommended to use moisture-resistant material made using HDF technology.
To decorate the floor in the bathroom, you can only use moisture-resistant laminate
The only unpleasant moment is the cost of such material. Often the buyer is not satisfied with it, and he makes a choice in favor of cheaper alternatives.
List of mistakes when laying laminate
Among the main mistakes that beginners make when working with laminate are:
- laying laminate directly on a concrete slab in apartments (it is necessary to create a screed, joists or any other type of rough covering);
- no technological gap during installation (the first row is moved close to the wall);
- laying on a curved base;
- snapping locks without technological tapping (the entire row must lie down on its own, for this you need to walk with a block and a hammer along the entire length).
Laminate flooring is laid using an extremely simple technology, which, when studied, can significantly improve the quality of the work performed.
Important! You need to carefully study the installation instructions for a specific laminate model before starting work.
Choosing a laminate
The durability of the floor depends on the quality and correct choice of the material laid on it.
In accordance with the purpose of the room for which the laminated board is selected, the material is divided into classes.
| Laminate class | Features and scope |
| 34 | It is used in huge shopping complexes, waiting rooms at airports and train stations, schools, hospitals and other public and administrative buildings with huge crowds of people. |
| 33 | Intended for public spaces with high traffic. |
| 32 | In home rooms of average traffic level (living room, hallway, balcony, kitchen area). |
| 31 | Used in rooms with minimal traffic (living rooms of apartments and houses). |
Class 31 laminate has the most affordable price. The latter type is characterized by high wear resistance and strength, along with a high price.
The higher the class of the laminate, the higher its cost, the better the quality and the wider the scope of application.
In addition to the class of the laminate, the price of the coating can be influenced by:
- degree of additional processing of slabs;
- base thickness;
- size of the protective and decorative layer (the larger the layer, the higher the cost);
- the presence of chamfers, embossing, etc.;
- country of origin (Chinese and domestic material of the same class will be much cheaper than European).
The manufacturer's brand also affects the cost of coverage. It is known that when buying a product from a well-known company, we overpay for advertising of a well-known brand.
Often in construction stores you can find materials from unknown brands that are in no way inferior in quality to expensive branded coatings.
Video - How to choose laminate? Secrets
Laying technology
Our step-by-step instructions will help you cope with the last stage and avoid mistakes when installing the finishing coating.
For work you will need the following tools and materials:
Installation of the laminated coating is carried out in 5 steps:
Checking conditions
Can I start styling immediately after purchase? No. First, check all the packs to ensure they are from the same batch or identical year of manufacture. Otherwise, there may be a difference in tone, a mismatch in the decor or even the locking part. This is especially common when purchasing finishing materials on sale. You can, of course, return or exchange the product within 2 weeks from the date of purchase, but do not forget the receipt or invoice.
The optimal period for acclimatization of the floor covering.
Check the climate conditions. They must comply with the requirements of the instructions:
The laminate must be brought in and, without unpacking, left in the room for 2 days.
Preparing the base
As noted above, the surface must be dry, smooth, solid and clean. Even the slightest defects must be eliminated in advance so that you do not have to disassemble the laminate or repair it later.
Laying waterproofing and underlayment
It is necessary to lay strips of film or membrane on the base with an overlap of 10-20 cm. It is recommended to glue the joints with tape. Then the substrate is laid end-to-end, the slabs or layers are secured to each other using adhesive tape.
Finish coating assembly
Installation should begin from the longest wall or from the farthest corner and gradually move towards the doorway. The first lamella must be laid against the wall, spacer wedges must be inserted at the ends where they adjoin the walls in increments of 30-60 cm. The second lamella must be placed (at an angle) with a narrow edge to the previous one, and snap into place. This is how the first strip is assembled. The last board is trimmed if necessary.
The next row begins with a trim of at least 30 cm in length (1/3 of the lamella length). Again, a strip is assembled, which is then joined to the first row. If it is necessary to form a pipe bypass or a protruding section, then a segment of the required size should be cut out of the strip, taking into account a compensation gap of 6-8 mm. The cut product is placed in place, and the trimmed part is subsequently decorated using suitable moldings and overlays.
Before installing the last row, you must carefully measure its width. The minimum value is 5 cm. If the specified figure is less, then manufacturers recommend cutting off the first row a little and moving the entire canvas. To avoid such a mistake, calculate the number of floor rows in advance or draw a plan diagram to scale.
Please note that the maximum size of a single piece of canvas is 60-120 m². For rooms with a larger area, it is necessary to install compensation gaps every 6-10 m, which can subsequently be closed with overhead thresholds made of aluminum or PVC.
When installing the planks of the last row, they are cut to the required width, placed in the gap between the wall and the canvas, tightened using a mounting bracket.
Installation of moldings
The finished coating must be decorated with finishing. To do this, skirting boards are installed around the perimeter of the room using glue, dowel-nails or self-tapping screws, and the dividing strip in the doorway or the joint area with another coating is covered with overhead thresholds and cork expansion joints.
After completing all work, the surface must be vacuumed or wiped with a damp, well-wrung out cloth. The floor is ready for use.
Advice! If you need floor repair specialists, there is a very convenient service for selecting specialists from PROFI.RU. Just fill out the order details, the experts will respond and you can choose who to collaborate with. Each specialist in the system has a rating, reviews and examples of work, which will help with the choice. Looks like a mini tender. Placing an application is FREE and does not oblige you to anything. Works in almost all cities of Russia. Without your desire, no one will see your phone number and will not be able to call you until you yourself reveal your number to a specific specialist.
If you are a master, follow this link, register in the system and be able to accept orders.
Source
Preparing the foundation
Dismantling an old plank floor in order to replace it with OSB or plywood sheets is a labor-intensive task and not everyone is able to do it on their own. But is it right to install laminate planks on old plank floors?
If laminate flooring is to be laid on a wooden surface, such a base requires a number of preparatory measures
There are a number of requirements that an old natural wood base must meet. The wood surface must be hard and dry. If bending is felt when applying force to any area, the floors are probably affected by rot or fungus. And if this deficiency is not eliminated before installing the laminate, the damage process will spread to the entire surface of the subfloor, which will ultimately lead to the need for a major overhaul.
To prevent the laminate from deforming after installation, it must be mounted on a solid, not shaky base.
Differences in the height of the subfloor should not exceed 2 mm per 2 m of base length. Laying laminate on a curved surface will lead to sagging of the material, deformation of the joints of the boards and creaking of the floor. Usually, if an old plank floor does not meet the necessary requirements, it is put in order by locally replacing damaged fragments.
If the floor is completely crooked, it is leveled with slabs of any sheet wood-based material
Diagnostics of old flooring
To assess the feasibility of laying new finishing material on such a base, you need to carefully examine the boards for the presence of parasites and damage.
To identify rotten boards, tap the surface with a hammer. The knock on undamaged material will be louder
Namely:
- insects and rodents,
- rot and mold,
- fungus,
- recesses,
- floorboards creaking,
- deflections or deformation of the planks.
If a visual inspection is enough to assess the external covering, then what to do with the internal frame?
Mechanical impact on the old plank floor will help determine its suitability for laying a new base over the planks
When walking on the floor, the floorboards should not creak or sag. Minor deflections under very heavy objects are acceptable, but the base must support the weight of a person. There should be no knots, depressions or protrusions on the covering, as well as gaps between the floorboards.
Elimination of defects
If the inspection reveals deficiencies that prevent further work, they must be eliminated.
Ideally, paint should be removed from old boards before laying laminate. It is by the same color of the elements that their suitability for use is determined
Ways to eliminate the shortcomings of a plank base:
- Subsidence of the floor surface. At the site of damage, the area is dismantled by dismantling several boards. Support wedges are placed under the joists and the floorboards are secured. If the floor sags over almost the entire area, the entire base will most likely need to be replaced.
- Rot and fungal microorganisms. To get rid of mold that affects the surface of the coating, it is necessary to replace the affected fragments, including their neighbors, with new beams or boards and treat the surface with an antiseptic. If for certain reasons this is not possible, lay a layer of waterproofing on the damaged base and level the surface with wood-based sheet materials (fibreboard, OSB, MDF or plywood). This approach should prevent further damage to the planks by the fungus.
- Slats creaking. Often, if a wooden floor creaks, it means that the boards are not nailed to the joists properly. Old hardware has become loose during use of the floor and new fasteners are required. Drive the existing nails on the floor into the boards until they stop and strengthen the base with black self-tapping screws. When screwing in hardware, make sure that their heads are well recessed into the surface.
- Recesses or small holes in boards. Traces of woodworm infestations are sealed with wood putty or a mixture of sawdust and PVA glue, and after drying, the surface is treated with bioprotective materials.
If, after strengthening the boards, the floor still creaks, you will need to strengthen the joists themselves. To do this, the covering is torn off, and a brick or timber is placed under it.
Sometimes floorboards make a squeaking sound when force is applied to the surface if they rub against one another. In this case, it is enough to treat the joints with talc or graphite powder, and seal noticeable gaps with a mixture of sawdust and PVA glue.
Leveling the subfloor
A wooden surface under a laminated board can be leveled in three ways. This is laying sheet slabs, wet screed or scraping.
If the curvature of the floor is insignificant, you can get by with scraping
Cycling
Cycling is used only on relatively flat surfaces to eliminate minor defects. To treat the floor with this method, you will need a rubber spatula, sandpaper, a hand plane, a sanding machine and a level. Before starting work, we recess the metal fasteners into the wooden surface. We go over the surface with a scraping machine and check the evenness of the floor with a level.
If there are chips or cracks, we seal them with wood putty. After the material has dried, the floor will need to be sanded again.
Cycling is a dusty process. After completing all work, be sure to clear the room of debris.
Installation of wood-based materials
Most often, a wooden floor for laying laminate is leveled by laying particle boards on top. This method allows you to further insulate and strengthen the base, perfectly leveling it without much effort. It is best to use 12-15 mm thick plywood for these purposes.
Laying plywood on an old wooden base
Rules for laying plywood on a wooden floor
- The slabs are mounted staggered, offset by half a sheet. This is necessary to more evenly distribute the load on the floor.
- To attach plywood, in addition to hardware, an adhesive composition is used. This is necessary to increase the stability of the sheets.
- Plywood, like any wood, has the ability to “breathe”. In order for the material to expand unhindered under the influence of temperatures, centimeter gaps are left between the plates.
When the plywood subfloor is completely installed, the surface is treated with a sander and covered with drying oil
Cement strainer
Wet floor screed is a more durable, but also labor-intensive option. Laminate flooring can be laid on a flat concrete surface without any difficulty and there is no risk of floor deformation. To fill a wooden floor with a screed, you will need to strengthen its structure, otherwise it will not withstand the load.
Wet screed on a wooden floor
To do this, the old floorboards are torn off and the joists are leveled. Expanded clay or gravel is poured between the beams. Alternatively, you can add dry insulation to the ready-made cement mixture. Cement is poured between the logs and the surface is leveled using the rule, using the logs as beacons (for this purpose they must be perfectly flat). The screed hardens in 4 days. It is advisable not to touch the floor during this period.
After the screed has dried, you can lay the underlay and install the laminate.
Prices for different types of cement
Cement
Online calculator for calculating the amount of laminate per room
Go to calculations
Strengthening boards with screws
So, all the materials have been purchased, let's start strengthening the floor with screws. There is an article on the site about what to do with a creaking floor in an apartment; it partially talks about this work.
Since the screws were difficult to insert into the wood, we first drilled holes about 70% of the length of the screw, and then used screws to tighten the boards to the joists.
We strengthen the floor in rows along the joists
Of course, if you have a powerful screwdriver, you will be able to do this much faster without additional drilling. In our case, the cheapest Chinese screwdriver, which quickly sat down, so the whole job lasted for several days. The main thing is to screw the boards tightly to the joists so that they do not dangle when walking. Since the doors will soon be replaced, we cut down the slopes to install the plinth.
We file the door slopes
During work, it turned out that there was too much blowing from under the floor on the street side, so we had to seal the gap with foam. In this case, you need to moisten the surface before treating with water, and also spray the foam after application, since the polymerization process of the polyurethane foam requires moisture.
There was a strong blow from the street from this gap
It got so much better
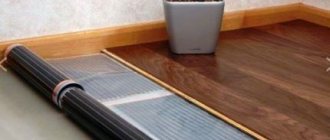
Why do you need a substrate and how to choose it?
The use of underlay under laminate floor panels is mandatory.
The backing under the laminate serves as a kind of shock absorber for the material so that it does not break or deform if there are defects on the rough surface
It performs a number of functions:
- final leveling of the rough surface,
- protection of the laminate from deformation,
- protecting the floor from moisture,
- uniform load distribution between the slats,
- additional floor insulation,
- noise absorption.
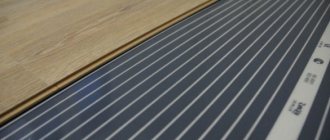
The most widely used backing material is polystyrene foam. It is much cheaper than the cork offered by the manufacturer, but is practically in no way inferior to it.
The construction market offers three types of underlay for sheet laminate flooring:
- Polyethylene foam . It is considered the most popular substrate due to its low price. The material has a foil layer, is resistant to moisture and microorganisms and protects the room from the cold. The disadvantage is that such a substrate quickly sags and eventually requires replacement. When choosing this type of substrate, pay attention to the density of the foam layer. The higher it is, the better the quality of the material. As a rule, for household purposes, a substrate of 2-3 mm thickness is sufficient.
- Polystyrene two-layer backing. Instead of foamed polyethylene, expanded polystyrene is added to the foil layer, which has higher performance characteristics. The substrate is not afraid of the formation of fungi and rot, and is resistant to mold and moisture. The disadvantage of the material is that it is difficult to install: due to the highly compressed foam, the substrate does not roll out well.
- Cork. This type of substrate is the most expensive. Made from pressed crumbs of cork tree bark, it can be natural or combined. This substrate is very rigid and resistant to stress, environmentally friendly, perfectly insulates the floor and protects the room from extraneous noise. Despite its naturalness, the cork substrate is biostable. Thanks to its manufacturing technology, the material masks unevenness in the subfloor better than other substrates. A significant disadvantage of cork backing is that the material is resistant to moisture.
Choosing a substrate for laminate
When choosing a high-quality cork substrate, pay attention to its structure. If you're paying for durability, make sure the material isn't see-through.
Prices for various types of laminate underlays
Underlay for laminate
What types of wooden base can laminate be installed on?
Laminate is such a universal type of flooring that can be easily installed not only on a pre-leveled concrete base, but also on the following types of old flooring:
- Hardboard - often serves as a backing for block parquet in old houses.
- Plywood - used for parquet boards in Khrushchev-era buildings, as well as for linoleum in old private houses.
- Piece parquet - provided that the coating has been preserved in its original form, it can be used as a reliable base.
- Wooden flooring with joists was used in almost every house of the Stalin era.
- Parquet boards were often used as part of municipal finishing in Khrushchev-era apartment buildings.
In most cases, all of the listed types of floors require minimal mechanical modification and leveling, since the laminate lamellas fit perfectly tightly together and are also laid on a pre-prepared base - a cork or penofol backing, which evens out most minor irregularities.
Calculation of the quantity of materials
To lay laminate flooring on a wooden floor with the most common method of leveling the surface, you will need the following materials:
- plywood,
- adhesive composition,
- hardware,
- substrate,
- laminate,
- plinth.
To count the number of hardware, we count the number of joists in the room (we determine their location by the nails in the floor) and count the boards. The resulting values need to be multiplied together, so we will get the required number of screws, to which we need to add 15-20% for reserve and unforeseen situations.
Old floorboards are screwed to the joists with one fastener in increments of 400-600 mm
Plywood sheets are screwed in increments of 150 mm . To calculate hardware for fastening sheet material, divide the length of the room by 15 cm, then its width and multiply the resulting values, not forgetting to add 15-20% to the resulting quantity for the reserve.
If you save on fasteners and increase the distance between hardware, the plywood will swell and vibrate when walking on the floor
To calculate the plywood itself, we measure the area of the room in which the floor renovation is planned. According to the obtained value, we calculate the area of the plywood, divide it by the size of the sheets (1500 or 750 mm2) and obtain the required number of slabs, rounding their number up.
To calculate the laminate and substrate we use the same technique. We write down the area of the room and go with this data to the hardware store. The consultant will calculate the required number of slabs and rolls independently.
At home, calculating the number of laminate sheets will be difficult, since all the slabs have different overall dimensions
When buying laminate, pay attention to the lot number. It should be the same on all boxes. Otherwise, the floor covering will differ slightly. If this is not important to you, you can save a lot of money by purchasing leftover material from different batches.
Pay attention to the integrity of the packaging. If it is broken, the slat locks may be damaged.
The amount of plinth is calculated according to the perimeter of the room, excluding doorways. Additional accessories, such as corners and caps, are calculated according to the individual design features of the room.
Important! When purchasing materials, do not forget about the necessary reserve in case of defects or other unforeseen situations.
Stage 4. Warm floor under laminate (if necessary)
It is not always possible to lay heated floors in a wooden house under laminate. If the apartment initially has wooden floors installed, then installation is possible, but has its own characteristics.
In the case of concrete floors covered with a finished wooden floor, it is recommended to completely dismantle the boards, pour a screed on top of the concrete base, and then lay a warm floor on top of it.
There are also a number of requirements for the quality and composition of the laminate that will be laid on top of the heated floor:
- the thickness of the die must be at least 7 mm;
- the formaldehyde emission class must be E0 or E1. Indicators E2 and E3 are prohibited from being laid in tandem with heated floors! When heated, they will evaporate dangerous amounts of harmful substances into the air.
Even if all the requirements are met, the heated floor cannot be heated too much. The maximum permissible temperature is 30–32 °C. When used at higher temperatures, the laminate will quickly become unusable, releasing toxic substances.
If you comply with all installation and safety requirements, the flooring will last a long time and will not harm the health of residents and their pets.
Types of heated floors
Warm floors come in three types:
- water. The screed contains pipes connected to the heating system. This option is the least expensive, but with this option it is difficult to regulate the heating temperature. It is worth noting that water floors are allowed only in private houses or apartments with autonomous heating. Residents of apartments with central heating are prohibited by law from installing this type of heated floor - this will result in a fine and forced rework of the entire system;
- electric. This option is much more expensive both in terms of installation and during operation, but it can be installed in any room. Also, the advantages of an electric floor include convenient temperature control (you can control not only the number of degrees, but also use several thermostats to turn on only individual zones of the heated floor) and a relatively small level of raising the floor;
- thermomats. This type is also called film infrared heated floor. Installation under laminate on a wooden floor is also acceptable for all rooms. During installation and operation, this is the most convenient option, but at the same time the most expensive. Therefore, you need to accurately calculate the required heating area (there is no heated floor under massive furniture) so as not to overpay.
Each option has its own installation and operation features, so when choosing, you need to focus on a specific situation.
Laying heated floor elements
According to the installation technology, water and electric heated floors require the presence of a screed laid on a layer of thermal insulation materials.
With this approach, the floor can no longer be considered wooden. But if during the renovation process it is already planned to use screed or mixtures to level the wooden floor under the laminate, then they can be combined with the installation of a heated floor.
But with this technology, before installation you will have to:
- Remove the boards completely.
- Cover the joists with moisture-repellent compounds and cover with a vapor barrier film.
- Fill the space between the joists with thermal insulation materials.
Only after this can you begin installing the screed and heated floor.
To avoid “wet” work with cement-sand mixtures, the “dry installation” option was invented. In this case, the logs and the space under the boards are processed according to the same scheme:
- The prepared boards are laid on top of the logs and grooves are made into them with a milling cutter for cables or pipes.
- Special metal plates are laid on top of the gutters to distribute heat evenly, and the cable is laid along them.
Another option for “dry installation” is using polystyrene boards. In this case, the subfloor is covered with an overlapping film. The edges are connected with construction tape. Polystyrene mats with bosses are laid on top, and a cable or pipe is laid along the gutters.
You can implement any of the options, but when carrying out repairs yourself, it is advisable to take into account your own skills and not attempt too complex work. The simplest option in this case would be to install a film thermomat under the laminate on a wooden floor.
In this case, it is enough to spread a reflective substrate (foil side up) on the prepared floor and place thermomats on top of it in the right places.
The film is connected to the thermostat. After which the entire floor is covered with thick polyethylene film (waterproofing barrier).
An important point: when installing a heated floor on a wooden floor, it is imperative to provide a ventilation system for the joists, otherwise they will rot very quickly.
Regardless of the type of heated floor chosen and the method of its installation, before laying the laminate, the heating system must be checked. Don’t just inspect the pipes or “ring” the wires, but connect them.
The water heating system is tested at the highest possible pressure. When testing electric heating, the test takes place in several stages, including turning the floor on and off.
Each time you turn it on, you need to increase the temperature by 5°C, gradually bringing it to the maximum permissible (this may take 2-3 days).
Step-by-step installation instructions
First, decide how best to lay the slats - along the floorboards, diagonally or crosswise. Experts recommend laying laminate flooring along the direction of the main light source. Otherwise, all seams will be very clearly visible, especially if the panels are joined poorly.
Diagonal laying of laminate flooring must be done in compliance with all the rules, otherwise you can ruin the interior
The correct way to lay laminate flooring, especially for beginners, is with the narrow side facing the window. When the slats are positioned along the light flow, the visibility of their connections is reduced.
Preparatory stage
When the material has been calculated and purchased, you can prepare the tools necessary for the job. A person who is not involved in interior decoration professionally may have questions, but, as a rule, all the necessary arsenal is located in every home pantry.
This:
- beating thread,
- building level,
- roulette,
- square,
- pipe bypass cutter,
- pencil,
- scissors or knife,
- jigsaw or hacksaw,
- screwdriver or Phillips screwdriver,
- rubber mallet,
- miter box for cutting wooden plinths,
- pliers.
Minimum required tools for laying laminate flooring
Also, in certain cases you may need a hammer drill, but not everyone has one. In any case, if a tool is not available, you can always rent it.
Laying technology
Before starting installation work, determine a place to store packages of material. Remove doors from hinges and clear the floor of unnecessary items. Clean the surface from dust.
If laminate flooring is laid on a plank floor without plywood or screed, it is better to lay the panels perpendicular to the old floorboards
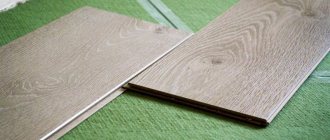
Step 1. Lay the backing. The material is laid parallel to the laminate slabs. If a single piece of underlay is not enough to cover the entire floor, carefully connect the joints with tape.
Laying the substrate
Step 2. Lay the first row of laminate , starting work from any corner adjacent to the main light source. First we connect the solid panels. Then we trim the fragments in hard-to-reach places.
Laying the first row of laminate
Step 3. When cutting the material, turn the board 180 degrees , apply it to the installation site and mark the cut line. In this way, all lamellas that require trimming are marked.
A simple and correct way to mark laminate flooring for trimming
Step 4. After forming the first row, we assemble strip by strip, connecting the modules to each other with locks. The next row is attached to the previous one only after it is completely assembled. After assembling the second row, carefully lift it, holding on to the ends, and turn it a little so that the lock snaps into place. You can achieve a tight connection by tapping the joints with your hand or a mallet.
For a tight connection, tap with a hammer or mallet
It is best to lay laminate flooring offset by half a strip. This will make the connection more reliable.
Laying the last row: features
The more laminate is laid, the more inconvenient it will become to work with. 80-85% complete , experienced specialists recommend continuing to lay the material from the opposite wall, standing on the already laid laminate. And then simply connect the resulting strip to the existing base.
The laminate must be laid, maintaining a centimeter gap between the panels and the wall. This is necessary for deformations so that the floor does not stand on end
Laying the last row causes certain difficulties due to the need for partial trimming of elements. Moreover, often due to the unevenness of the walls, the width of the stripes is unequal.
If cutting is required, it is better to leave it for later, when the main part of the floor is covered. This way you will see a visual picture and be able to distribute the material as rationally as possible.
Marking and cutting the planks of the last row is done one by one: strip by strip.
Laying laminate flooring in hard-to-reach places
Installation of laminated flooring in places of protrusions and niches, near door and window openings, heating radiators, as well as in places where communications pass, is difficult only at first glance.
The correct way to bypass pipes with laminate if communications are far from the wall
We go around the pipes. Communications may be close to the wall or further away from it. For such situations, there are two ways to bypass the pipes. First, measure and, if necessary, cut the strip. Then we mark the location of the pipes with a pencil, carefully cut out the holes with a milling cutter, not forgetting to leave a temperature gap, and cut the approach to the pipes. When the board has already been laid in its permanent place, we place a cut piece of laminate on the back of the pipes on the glue.
Gaps around pipes and other metal objects must be treated with acrylic sealant to match the finish
How to get around a door or window opening, niche or ledge? Before installing the laminate inside the doorway, do not forget to check whether the panel will close normally after installing the covering or whether it will require trimming. When laying laminate in such places, do not forget about the temperature gap. All corners and protrusions are measured and marked in approximately the same way as the pipe installation locations, and everything is trimmed carefully with a saw or jigsaw.
Even if the niche cut is unaesthetic, it will later be hidden by the plinth
Installation of skirting boards
When the entire floor is covered with laminate, we begin laying the baseboard. Planks made of wood or plastic are laid strictly along the perimeter of the room, bypassing corners and niches (there are internal and external corner elements to connect the plinth in these places). The plinth is attached to the wall with dowels and nails, then the fastening points are covered with a decorative strip.
To neatly go around corners, the plinth kit includes all the necessary additional elements.
When installing a wooden plinth, it may be difficult to cut corners of the elements.
After installation of all the necessary strips is completed, the spaces inside the doorways are closed with special thresholds. Upon completion of work, wipe the floor surface with a damp cloth.
Prices for various types of floor plinths
Floor plinth
Preparatory work
What is a wooden floor?
In most cases, a wooden floor is based on a concrete slab, on which logs were laid and a boardwalk was made. Usually a parquet board was laid on top, which served as a finishing layer.
The best solution would be to remove all the old coating, but this involves complex dismantling work. A particular problem can be caused by the removal of construction waste in conditions where the apartment is located on the top floors of an apartment building.
Possible problems with a wooden floor under laminate
Calculation of materials
You need to immediately plan the required number of fasteners for the floor.
Before calculating the required number of screws, you need to determine the location of the logs. To do this, part of the plank covering must be removed. Logs can also be detected through cracks and joints.
To calculate the required quantity, the area of the room must be divided by the area of the sheets. We round the footage up to the nearest whole and get the required quantity. You can also use our calculator on the product page
Strengthening the floor
Now let's move on to the practical part.
Forming the Foundation
To lay out the substrate and the laminate itself, you should create a flat area. To do this, we lay plywood or fiberboard. We screw in the fasteners every 15 cm. A small deformation gap should be left next to the wall. Appropriate cutouts are made for heating pipes.
To cut plywood, you can use a band saw or circular saw, or a hand saw will also work. You can put tape on the cutting line to prevent the veneer from peeling off. Read more about working with plywood in a separate article.
Useful tips
When choosing a substrate for laminate or the laminate itself for a bathroom, hallway or kitchen, it is better to give preference to non-natural materials. This will help save a significant part of the budget and prevent dampness.
For rooms with high levels of humidity, it is not recommended to use a cork backing, no matter how moisture resistant it is. Due to its porous structure, the material quickly absorbs moisture and fails.
The rolled backing under the laminate should be laid with a slight overlap of 10-15 mm
Laying laminate flooring on an old wooden floor is possible under any circumstances. The quality of the floor after repair will depend on the efforts and funds invested. For example, material laid on an unprepared surface may warp when humidity increases/decreases, or play and wobble when subjected to force. Even if you lay plywood in accordance with all the requirements, but do not prevent further damage to the subfloor by fungus, after a few years it will remind you of itself with unpleasant consequences. Do everything in compliance with technology and even the most inexpensive class laminate laid on a wooden surface will last for decades.
How to calculate laminate before purchasing
Before laying laminate slats on a pre-prepared wooden flooring base, you need to purchase the material. In order not to make a mistake in quantity, the material is subject to precise preliminary calculation. This operation is performed in several ways:
- Exact calculation, provided that the room has the shape of a regular rectangle, and the laminate is laid in the longitudinal or transverse direction.
In such situations, the length of the room is determined, which is divided by the longitudinal dimension of each lamella, after which the fractional remainder is calculated.
This operation is repeated for the transverse direction of the room, the dimensions of which are divided by the width of the product to find out the number of rows.
- The above algorithm is quite complex, and each consumer can easily make a mistake in the calculations. Experts recommend using a simpler empirical relationship - provided the laminate is laid out straight, the area of the room is calculated, after which 10% is added to this value for scraps. The risk of making a mistake in such situations is minimal.
- In cases where the laminate is laid out diagonally, at an angle to the orthogonal projection of 30, 45 or 60 degrees, in such situations the margin should be greater - up to 20%.
- If the slats are installed on the floor, according to a previously developed project, with an exclusive pattern, then the amount of laminate should be within 30%, which indicates a large number of trims.
It should be noted that the above dependencies are relevant for residential and public premises with a standard area of up to 30 - 40 m2. In the case of laying laminate flooring in extended spaces - halls, corridors of hospitals or schools, the area of which can exceed 100 m2, it is recommended to take a smaller margin - from 5% to 15%.
How to equalize elevation differences?
There are several alignment options. But most often scraping and plywood are used.
Leveling with a scraper
The method can be used when the differences are small. You will need a plane or scraper. First you need to pierce all the nails. Recess the heads of the screws so as not to damage the plane or scraper. You can then use a tool to remove the excess height of individual floorboards.
During the scraping process, it is important to check the evenness of the floor with a level so as not to remove anything unnecessary.
If the elevation differences are large, other methods are used.
Leveling with plywood
The method is very effective. Plywood is an environmentally friendly, practical coating, but more expensive than other methods.
When leveling with plywood, there are two ways: installation on a rough base, when the differences in heights are less than 1 centimeter, and laying on additional logs, when there is a large difference.
Plywood boards are applied to the subfloor using self-tapping screws and glue with small differences. First, the surface is cleaned and primed. Then glue is applied and the prepared sheets are laid. After the glue has completely dried, the sheets are fastened with self-tapping screws in increments of no more than 15 cm.
You can lay plywood sheets on an uneven, curved floor with differences of more than 1 cm using lathing, which will serve as leveling. First, the surface is also cleaned, beacons are installed, along which the logs are attached to the wooden flooring.
If it is clear that voids have formed, then additional blocks or plywood sections are placed.
Next, the sheets are cut into 60x60 cm squares and laid on the sheathing. The joints of the squares should fall on the logs. The sheets are screwed with a slight offset, without forming a cross-shaped intersection of the seams. The squares are fastened with self-tapping screws. But for them, you need to drill holes in advance so that the caps “sink” into the surface.
Self-leveling pouring of the base
This leveling method is implemented with a self-leveling screed, which is intended for wooden coverings. The composition of the self-leveling flooring product contains fiberglass, which secures the surface.
To level with a screed, the base of the floor is sanded, large voids are filled with putty, the base is primed and fixed with waterproofing around the perimeter.
A reinforcing mesh with an overlap of up to 10 centimeters is attached with a stapler. The solution is poured onto the surface and leveled with a spatula.