Locking devices that are installed in interior structures are subject to daily stress due to the frequent use of doors. Therefore, most lock failures are associated with wear and tear of individual elements. Also, locking mechanisms often fail due to improper or rough operation and external factors: dirt, high humidity, temperature changes.
Locks in interior structures, unlike metal entrance ones, do not serve the function of protecting property or residents. They lock the doors for a short time (for example, in a toilet or bathroom) or simply fix the door and unlock it by pressing the handle. Types of interior locks:
• handle with halyard tongue. The most common are push-action mechanisms. There are also rotary locking devices - nobs. They are round, the tongue is removed not by pressing, but by turning the handle clockwise or counterclockwise. Knobs are often equipped with a built-in latch; • latch. A separate locking mechanism designed to lock the sash from inside the room; • stationary handle. It is used extremely rarely on modern doors. It is a one-piece structure, rigidly fixed to the sash with bolts. Cannot be repaired, must be completely replaced; • full locks. It is quite rare on interior doors. Most often, cylinder or lever mechanisms, which can be overhead or mortise, are installed on entrance doors.
The design of locking devices and door handles that are installed in interior doors is quite simple. Therefore, when problems arise, you can try to repair the mechanism yourself.
How to repair door handles with your own hands
When using a door, the greatest load is taken by the handle and the locking mechanism associated with it, so it is not surprising that these elements often break. In most cases, you can repair the door handle yourself using a screwdriver and wrench. Sometimes it is necessary to replace some parts of the mechanism or the entire set.
Removing door handle fasteners
Installation details
You can install limiting devices yourself, since manufacturers equip the fittings with the necessary mounting holes.
The following tips will help you properly attach the fasteners:
- do not install the mechanism at the level of the door hinges;
- choose a place closer to the end of the canvas. This way the doors will last longer and will not be damaged by impacts;
- pay attention to the size of the handle. The latch should not allow the wall to come into contact with the handle.
Installation of floor limiters is carried out according to the following recommendations:
- wide passage. Do not install the clamp in the path of people;
- Maintain maximum proximity to the end when installing the clamp. This will preserve the integrity of the door leaf longer;
- Consider the dimensions of the handle. Failure to comply with the dimensions will result in damage to the wall.
Attaching the limiting devices is not difficult. Installation of clamps occurs according to the following plan:
- Selecting the location of the fastener and making marks with a pencil at the designated points.
- Drilling holes for dowels in the marking areas.
- Fixing the device on the wall or floor using self-tapping screws.
Types of pens
There are three main types of door handles:
- Round rotary. They are an integral part of the mortise lock, which is activated by turning the handle clockwise or counterclockwise.
- Push. The difference from the first point is the presence of a convenient lever handle, which opens the lock when pressed and closes it when returning to its original position. This option is the most convenient for both interior and entrance doors.
- Stationary (usually shaped like a ball or bracket). These handles are not connected to the lock; they perform a decorative function and serve as a handle when opening the door leaf. Repairing this type of door handle involves either tightening loose bolts or replacing it with a new product.
Round rotary handle secured with locking mechanism
Espagnols
A banal and primitive type of constipation with a simple device.
The gripping rod rotates and moves forward to close the door, where it locks into the hole in the strike plate or trim. Moving in the opposite direction helps open the door. Along the trajectory at the beginning and end of the latch movement there are protrusions for fixation. The updated device uses springs. The practical application of such constipation is observed in bathrooms.
The advantages of the design are the simplicity of the device and the availability of purchase.
Negative qualities include:
- lack of closure reliability;
- poor hold of the door leaf.
Components of the mechanism
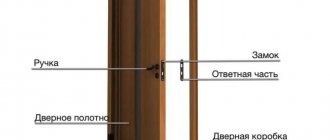
When the question arises of how to repair a door handle, the first thing you need to do is familiarize yourself with its structure. For those who have experienced installing a lock on a wooden door, this will not be difficult. Push and rotary handles consist of the following elements:
- Lever.
- Locking mechanism with bolt. Its operating principle is simple - when you turn the handle, the tongue (bolt) enters the counter hole on the door frame and blocks the door.
- Square (pin with a square section). Connects the handle and the lock.
- Decorative strip that masks fasteners.
- Return spring. Responsible for returning the handle to its original position.
- Handle travel limiter.
- Retaining ring.
- Plastic ring.
Elements that make up a door handle
False
The locks are equipped with a classic “dog”, which periodically jams, gets stuck or falls out.
Typical locks consist of a body with a mechanism that springs the handle and locks the structure when the latch is in the “closed” position. The body also contains a spring-loaded crossbar. The list of common causes of problems includes:
- manufacturing defect;
- errors when using constipation;
- deformation and mechanical damage to the device;
- violation of the geometry of the door leaf and frame or sagging fasteners caused by improper installation or a long period of operation.
It is enough to listen to the operation of the locking device, turning the handle several times. Noticeable friction, creaking and jamming of the lock foreshadow problems.
Types of door handle malfunctions and their elimination
If you find that the door handle is broken, you must first determine the cause. Experience in using door handles allows us to identify 5 types of breakdowns that occur most often:
- The handle sticks and there is resistance when turning.
- The handle falls off, but its fastening remains in place.
- The tetrahedral pin (square) inside the lock breaks.
- When turning the handle, the tongue does not move.
- The handle does not return to its original position after turning.
Now let's look at how to repair the door handle in each of these cases.
If the handle gets stuck
The metal parts of the mechanism are subject to abrasion during constant use, especially if dust particles get there. To avoid this, you need to monitor the presence of lubricant in the lock. Drop a little oil onto the bolt and turn the handle so that it is evenly distributed over all parts.
Sometimes the reason lies in loose structural elements. It is necessary to correct their position and tighten the mounting bolts more tightly.
How to properly lubricate the door mechanism
Repair if the handle falls out
The culprit of the breakdown in this case is the retaining ring, which either becomes deformed or moves, or may even burst completely. The repair will take time, but it will not be difficult to do:
- Remove the decorative rosette by turning it several times (sometimes it is secured with a small screw from the bottom, then you need to unscrew it first).
- Using a screwdriver, unscrew the screws or bolts that secure the mechanism.
- Remove the structure and check the condition of the retaining ring. If it is bent or broken (as is the case in most cases), you need to purchase a new spare part.
- Insert the retaining ring and the entire mechanism into place.
- Install the handle and secure it.
Removing the decorative strip and unscrewing the handle fasteners
Repair in case of breakage of the internal tetrahedral pin (square)
This is only possible when using cheap, low-quality products that are made from fragile material - silumin. In this situation, you will have to change the mechanism completely. To avoid such breakdowns, it is better to purchase steel structures from trusted manufacturers. The handle is replaced as follows:
- The fasteners at the base of the handle are unscrewed, then the handle itself is removed.
Unscrewing the screw at the base of the handle
If the tongue does not move when you turn the handle
If the latch does not work when opening the door, the cause of the malfunction is that the square is too short. It gradually moves towards the latch and presses it. As a result, she cannot function normally. In this case, you need to act like this:
- Buy a longer square from the market. If the length is longer than necessary, you can shorten it using a grinder.
- Unscrew one of the handles and remove the structure.
- Replace the square and return the handle to its place.
The handle does not return to its original position
If the handle does not spring back to the horizontal position, this does not mean that it is broken - perhaps the return spring has simply slipped off. You can put it in place in the same way as the locking ring. But sometimes the spring breaks, and this becomes a problem: it is very difficult to purchase this part on the market. Often in such cases the entire mechanism is changed.
Spring responsible for returning the door handle to its original position
Repairing the handle of a metal Chinese door
Sometimes it is necessary to repair the outer metal door handle, or rather replace it, since Chinese silumin fittings often break. This is easier to do than installing a lock on a metal door. The algorithm of actions is not very different from replacing the handle of an interior door:
- The fastener is removed.
- A square is extracted. If it is the right length, you can leave it.
- Attach the pads and gaskets and install the handle on the square.
- Put the bar in place, the bolt should fall into place.
- Screw in the fasteners.
Repairing a door handle in most cases is not difficult, the main thing is to correctly determine the cause. If the structure cannot be repaired, you should think about purchasing high-quality fittings from well-known manufacturers. To more clearly imagine how to disassemble a door handle, watch the following video.
Drying
Door drying
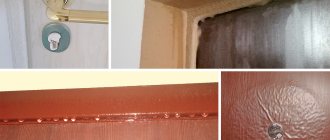
Interior doors are usually made of wood. This material is susceptible to various environmental influences. It can swell, crack and dry out.
The easiest way to restore dried doors is with metal corners. This is usually how old wooden doors are repaired. However, corners can disrupt the appearance of the structure. Therefore, it is better to use another method.
To restore the doors they must be dismantled. The doors are removed from their hinges and completely disassembled. All components of the structure are carefully treated with a special adhesive composition. The canvas is put in order, masking cracks and drying areas. The glued doors must be clamped in clamps and wait until they dry. Then the canvas is hung again on the hinges in the door frame.
How to disassemble a door handle with a built-in latch, and is it possible to repair it?
For any man who is able to handle a screwdriver and other tools, it will not be difficult to disassemble or install a lock with a latch on the door. Despite the fact that the door hardware is installed by the craftsmen who install these very doors, after some time it may need to be replaced. For example, in cases where the warranty has expired, the handle is broken, or if the fittings on the doors are different, but the design requires the same decorative elements.
Handles on metal entrance doors require special attention; their repair should be carried out before the handle with the latch completely fails and blocks the exit. And in such situations, information on how to properly disassemble and repair door handles should come in handy.
Why is it better to contact us?
- The technicians working for us are professionals, they know how to fix complex breakdowns, and for whom there are no insurmountable tasks.
- We will respond quickly to your call because we know how important time is to you, especially if every second counts.
- We have a set of necessary tools, locks, etc.
- You will receive a full guarantee of up to 3 years for the work performed, which is documented.
- The prices will please you. When placing an order, the visit of the master is free, the price only includes the work and the price of the materials used.
Replacement Tools
Of course, replacing a door handle cannot be done without certain tools. It would be advisable to prepare them before starting repairs. So, to disassemble and repair a door handle, you should have at hand:
- screwdrivers: flat and/or Phillips, depending on the screws used in the fittings;
- keys for assembling or disassembling fittings (as an addition to them, you can use the most common awl);
- pliers to hold individual elements;
- adjustable wrench;
- set of hex keys.
Cracks
Restoration
Repairing cracks and loose areas will require good glue and a press. As a press, you can use any heavy object that can press the canvas from above. The adhesive composition can be used to fill various defects and voids on the canvas.
If there are deep cracks in the door, then you need to use sawdust and varnish. Sawdust perfectly hides such damage.
Types of Latch Handles
The first thing you need to do if you want to change door hardware is to determine the type of broken handle, since further repairs will depend directly on this.
- Lever handles : at the time of installation, a latch coupled with a spring is built into the end of the door leaf. It does not allow the door to open on its own, leaving it closed. When you press the handle, this latch is recessed into the door body, making it possible to open it. These types of handles are most popular among buyers and are mounted both on the entrance metal door and on the interior door.
The fittings for these handles are also available in two different options. One of them is a version of the mechanism with a pallet overlay. The latter is installed directly through the lock, and the fittings are “strung” directly onto the axial rod, the selection of which is carried out in full accordance with the thickness of the door leaf.
If this rod fails, the entire door handle mechanism must be replaced; repairing individual parts is not possible.
There is an option with separate overlays. This is the simpler design of the two options, sometimes they may not have a lock. Normal operation depends on the size of the installed pads and the key hole in the handle.
- Knob handles . Translated from English, the word “knob” means “bump” or “knob.” This type is characterized by the fact that it is equipped with a lock in any case, regardless of the nuances of the shape of the handle itself. In most cases they are round in shape (which explains the specific name), and the keyhole is cut into the center of the handle. Knobs leave the opportunity to lock the door with a key or a lock built into the handle from inside the room.
The mechanism of action of this type of door handle is as follows: when inserted into the keyhole and turned, the key is activated, opening the door. This type of handle is more common for doors installed in bathrooms, and somewhat less common for interior doors. Also often used in hotels due to their more attractive appearance for guests compared to push handles.
If such a structure breaks down, repair remains possible without completely replacing the fittings.
Variants of problems requiring adjustment
When using a locking device for a long time, cases arise when the lock breaks down or begins to work incorrectly.
It is often easy to repair the mechanism yourself. Frequent problems with lock mechanisms that require adjustment:
- The locking tab does not close. The cause of the problem may be a misaligned door or insufficient hole diameter.
- Opening a door that requires effort. The cause of the malfunction lies in the skew of the door leaf.
- Difficulty turning the key and jamming due to the displacement of parts of the locking structure.
- The mechanism is jammed; the cause of the malfunction lies in the cylinder.
Below are the most common problems with popular types of locks.
How to disassemble
Since the types of handles differ in their mechanisms of action, it is not surprising that the methods for disassembling them will be slightly different.
Repairing and replacing the lever handle is a more time-consuming process. The procedure will be as follows:
- Remove the handle directly. There is a recessed screw located on the bottom or side of it, which can be unscrewed with a screwdriver or hex key.
- Removing the decorative trim. In most cases, it has a thread, so the procedure is simple.
- The panel is removed, hiding the remaining fasteners behind it.
- The bolts holding the mechanism itself are unscrewed.
- Next, the lock plate is unscrewed from the end side of the door and the second fragment is removed simultaneously with the axial rod of the mechanism.
There are some differences in dismantling push mechanisms depending on their category.
Mechanisms equipped with a continuous pallet overlay are mounted through a lock. The fittings are placed on an axial rod, which exactly matches the thickness of the door leaf. As noted above, it is impossible to repair such a lock; if the rod breaks, the entire mechanism must be replaced.
Handles with separate escutcheons are available with or without a lock. The dimensions of the pads themselves and the key hole play a fundamental role.
The video shows more details on how to disassemble a door handle to repair or replace it:
If a knob handle breaks, it is easier and faster to disassemble and repair than a push handle, although it breaks more often. Before removing the mechanism itself, you need to carefully inspect it. In most cases, on the inside (where the keyhole is located) there is a locking pin that secures the handle to the door leaf; sometimes it is hidden behind decorative trims. The pin is often equipped with a small spring for easier and more comfortable use of the fittings.
- First, the decorative trims are removed: they are secured with screws that are simply unscrewed with a screwdriver. If there are no screws, the linings are pryed off with a screwdriver and removed.
- To remove the pin, gently press it with a screwdriver.
- At the end of the door there is a strip with small screws at the top and bottom. A Phillips screwdriver will help here. The screws are unscrewed and the bar is removed.
- Carefully remove the inner part of the door latch.
After this, the dismantling of the knob handle can be considered complete, and a full breakdown analysis can be carried out and repairs can be made.
Repair stages
Installation of the door frame
3 holes must be made in the walls of the frame. All of them should be evenly distributed along the entire length of the walls.- When making holes, you need to calculate that they will fit dowels 130-150 mm long.
- The door frame is securely fixed with dowels through the holes.
- The gaps that remain after strengthening the box in the opening must be sealed with polyurethane foam.
- Excess polyurethane foam can be removed after work.
You can often solve the problem by purchasing new door frames.
How to remove an interior door, as well as a handle, lock, latch, etc.
Any person may need to replace or simply remove an interior door, and not only during a major renovation. What can we say about door handles, which quite often wear out and break due to constant use. How to independently solve these and some other issues will be discussed in this article.
- Tools;
- Remove the interior door;
- Remove the round door handle;
- Remove the door handle.
- axe;
- hammer;
- scrap;
- hacksaw or grinder;
- chisel;
- pliers;
- drill;
- feather drill, cutter;
- screwdrivers, hexagons or screwdrivers.
What to do if the lock is jammed
There are accessible and simple methods on how to open a jammed interior door. First, find out the reasons for the breakdown. They are:
Carry out a full diagnosis of the problem. Once the root cause has been established, you can open a jammed interior door without much difficulty. Start opening the door by determining where it is jammed. Insert a screwdriver into the opening. Determine where the door is held tightly. Insert a strong metal rod into this place and press on it, using it as a kind of lever. After fixing this problem, you should replace individual parts or the entire internal lock mechanism to prevent the breakdown from happening again.
Removing the interior door
There are two ways to dismantle an interior door. The choice depends on whether the door needs to be removed in the future or not.
- The door leaf is no longer useful
If you decide that you do not need the dismantled door leaf and the old door frame, then this method will suit you:
We take a crowbar and use it as a lever to remove the door from its hinges.
Now we dismantle the platbands along the entire perimeter of the box. Considering that in this method we do not count on reusing dismantled materials, we saw both vertical parts at a height of 60-80 cm from the floor at an angle of 45 degrees.
Next, insert an axe, a flat-head screwdriver, a chisel or something similar in this place and remove the platbands by lightly tapping with a hammer. We do this carefully so as not to damage the wall.
If the door had a threshold, then it also needs to be cut in the center and removed with a crowbar. But if the threshold is small, plastic, which is attached to the floor with special fasteners (as in the picture), then it is enough to pry it with something and remove it with your hands.
- The door leaf will still come in handy.
Sometimes a door needs to be saved for use in another location or for other purposes. Then the previous dismantling method will not work. In this case, we proceed like this:
There should be space between the floor and the door leaf. If there is a threshold instead, then it needs to be removed. How to do this is described in the previous method. We insert a crowbar or something similar into this space. Use it to remove the door from its hinges. To do this, just open and close the door, gradually pressing the crowbar. You need to remove the door when it is in the open position so that it does not rest against the top of the door frame. It is also better to do this together, to make it easier to hold the door. If the fabric is difficult to remove from the hinges, then you can lubricate them.
Now let's remove the platbands. If they are attached to nails, then take a sharp chisel or something similar and pliers. We insert a chisel between the door frame and the platband in the place where the latter is nailed. Next, we rock the tool a little in different directions until the nail comes out enough so that it can be reached with pliers. This way we get all the nails.
If self-tapping screws were used for fastening, then you just need to unscrew them and carefully remove the trim.
After removing the trim, you need to remove the mounting foam from the box. A sharp knife and Dimexide (sold at the pharmacy) are suitable for this. The action of the latter will soften the foam and it can be easily removed.
This way, we will remove the door structure without damaging it and can reuse it. And the door frame will remain untouched.
Remove the round door handle.
Round door handles are standardized; their sizes are usually the same, even between different manufacturers. But they may have different designs and, as a result, be removed differently.
The most primitive method of attaching/removing is shown in the image:
In order to dismantle such a handle, it is enough to unscrew two screws. The same goes for the latch on the end of the door.
But there are handles with a more complex fastening mechanism. In order to dismantle them, you will first have to remove the outer part, secured with a special button.
Such buttons can also differ: in some places you can see the button itself, and in others only the hole for it.
To remove a handle with such a mechanism, we find a button or hole for it. If the button is not immediately visible under the hole, then you need to turn the handle so that the hole coincides with the button. Then press the button and, turning the handle, remove its outer part. But be careful. It happens that the button gets stuck due to dust or oxidation. If you press down hard on the button, whatever you are pressing with, be it a screwdriver or anything else, can come off the button and damage both the handle and your hand.
After we have removed the outer part, it is necessary to remove the decorative element. To do this, we pry it with something, but do it carefully so as not to damage the door. Most decorative overlays have a special place where you need to pry it off. Usually this is the place below. Just in case, you can put something hard: a blade.
After we have removed the decorative element, all that remains is to unscrew the screws and the handle is removed. The process of removing the latch on the end of the door is absolutely the same for all handles: you just need to unscrew the screws and remove the mechanism.
The fittings are installed incorrectly
Door hardware includes hinges, locks, latches and handles. Quite often the reason for doors not closing is incorrect installation of hinges.
- When they are set too deep, when opening and closing the canvas, the hinged shelves bend and the fastening screws become loose. To eliminate this reason, remove the hinges and straighten their position along the adjacent surface. All self-tapping screws are tightened as much as possible with a screwdriver or screwdriver.
- An option is possible when the loops, on the contrary, are not recessed into the canvas or box, but protrude above the surface. They will have to be removed, and using a chisel and hammer, carefully deepen them, leveling them along the surface of adjacent door elements.
- Another possible reason is that the hinges are not designed to support the weight of the installed blade. They simply cannot withstand the load and become deformed. In this case, it is necessary to replace the hinges with stronger ones or install an additional hinge approximately 20-25 cm below the top fittings.
- Incorrect installation of hinges vertically or horizontally can also lead to defects. Their shelves attached to the canvas and the box must clearly coincide. Otherwise, not the entire core works, which gradually causes its deformation. If the hinges are fixed at different distances from the edge, then the door leaf will not be perfectly vertical, which means that cracks will appear when closing. These errors will have to be corrected by reinstalling the hardware.
- With prolonged use, the loop core gradually wears out. This leads to backlash. The door begins to wobble and the core begins to deform. You can temporarily correct the situation by placing a metal ring on the core. It is more correct to replace the worn element with a new one.
Important ! Locks and latches can often prevent doors from closing tightly. The cause may be installation errors, wear and tear due to prolonged or improper use, or design defects. Problems with this hardware will be discussed below.