A large selection of ready-made furniture, pleasing the consumer, is overshadowed by the impressive cost of designs or difficulties in selecting a model that fully satisfies requests. For many, searches on selling sites and trips to furniture stores end not in a successful purchase, but in the clear realization that making the desired cabinet is easier than buying it. The reason may be either the very high cost of the item you like, or the lack of furniture from a trusted manufacturer on sale. Making an individual order to a specialized company is also not a cheap pleasure. Users of the FORUMHOUSE portal are not afraid of difficulties and undertake to make furniture themselves, and share their successful experience with like-minded people.
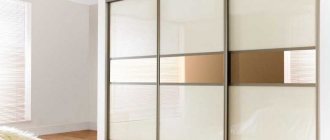
What is a screen and why is it needed?
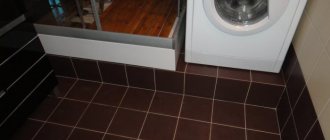
You need to start with the screen under the bathtub, because it becomes the basis (frame) for the door, which is installed in this false wall.
The screen is a barrier element that hides pipes behind a thin wall; its frame is lightweight and does not require special construction skills to create. The screen creates the integrity and organic appearance of the room, complements and transforms its design, becoming a logical extension of the walls of the room.
Purchased screen covering pipes
Screens are available in different designs: sliding or fixed, with a recess for feet or shelves.
Installation of swing doors is inconvenient. They successfully hide the pipes from view, but take up too much space in the limited bathroom space when opened. Usually they are simply impossible to accommodate.
As for fixed screens, they do not serve an important functional purpose. They hide the pipes and make the bathroom look presentable, but you won’t be able to get to those very pipes or the meter - you’ll have to remove the entire frame, and this is difficult and time-consuming.
Screens with a recess for the feet are convenient because they allow you to get close to the side, which is convenient when bathing children, while the pipes are protected and hidden from view. However, creating a frame for such a structure is more difficult, because you need to calculate the dimensions and position of the recess, etc.
Shelves on the screen are also convenient, but such options do not provide doors, which again looks nice, but does not provide access to the pipes. Plus, the size of the shelves forcedly increases the size of the screen; this option is not feasible in all bathrooms.
Application area
Depending on which room you plan to install the wardrobe in, there are several types of products:
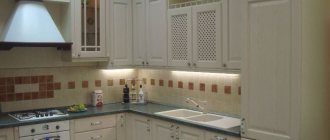
- Kitchen cabinets are small furniture models that form a work area or are located above it. They are often equipped with a shelf that divides the cabinet space into two zones. This technique is convenient for storing kitchen utensils. And the appearance of the structure will not be affected, even if the temperature in the room is high during cooking.
- A storage cabinet is installed in the bedroom or hallway. This design is much larger than a kitchen one and sometimes plays the role of a full-fledged wardrobe. Often a large wardrobe is built into the wall and equipped with many shelves and compartments inside. It may have a compartment for outerwear with a special mount for hangers.
- The bookcase, contrary to classical trends, is also implemented using plastic panels. It has a transparent door or is an open structure similar to a shelving unit. Such cabinets will be excellent protectors of books from dust.
- A plastic toy cabinet can be bought for a child's room. This colorful design consists of a frame and several pull-out containers that hold toys. The design is extremely comfortable and roomy. Specially made plastic is not toxic, and you don't have to worry about your children.
- A balcony is a kind of place for a closet, but for many, the wardrobe is an integral part of the loggia. It assumes the presence of a plastic wardrobe built into the wall of the balcony or selected exactly according to its width. If you have a small loggia, then in order to save space, you can place a compact plastic cabinet in its lower part.
- Plastic is one of the most suitable materials for the bathroom and toilet. Despite humidity and temperature changes, such a cabinet will be an excellent place to store hygiene and household items. It is often located above the sink and is sometimes complemented by open shelves.
A little about the material
Before making a screen door from plastic panels in the bathroom, you need to understand the advantages and disadvantages of the material. PVC panels are made from the synthetic material polyvinyl chloride; it is distinguished by its aesthetic appearance and durability, which means it is excellent for protecting pipes under the bathtub.
Bathroom storage option that doesn't snag pipes
Note! This door option is the cheapest, easy to use and hygienic, while protecting the pipes for a long time.
The advantages of this door option include:
- Large assortment of colors. You will be able to choose a screen that fits the walls.
- Resistance to conditions with high humidity, which makes this material option suitable for the bathroom.
- Ease of installation - no strong frame is needed, the door turns out to be light, almost weightless.
- The door surface is easy to clean.
This option also has disadvantages:
- There is a chemical smell in the first days after installation, but given that the size of the door is relatively small, the smell is not strong.
- The door, regardless of the size and strength of the frame, can become deformed due to sudden temperature changes.
- The version of the door made of plastic panels is not durable.
Fiberboard
The back wall, made of wood-fiber boards, is installed on the assembled furniture body. Its thickness is most often 4 mm.
This “backdrop” is attached in a lying position with self-tapping screws or a construction stapler. If a wall made of this material is mounted vertically, then it is first divided into parts and assembled in stages.
Fiberboard is made from low-quality round wood or wood waste - sawdust and shavings. They are processed into fiber mass. Various chemicals are added to it in order to increase the water resistance and strength of the future material. Next, it is sent to casting machines to increase humidity, and then under a hot press.
Advantages
Fiberboard has only one advantage - relative cheapness.
Flaws
This material has much more disadvantages.
- The strength of fiberboard structures, especially high ones, is very limited.
- A limited range of colors - no more than 5 shades.
- The material does not withstand high humidity, as often only one side is painted or laminated.
- Installation requires a lot of free space, which is physically impossible in small rooms.
- Often the wall has a persistent unpleasant odor.
- Due to the overlapping installation, the material is visible from the end of the furniture, which spoils the aesthetic appearance. Attaching tall wardrobes to the wall becomes more difficult.
Panel selection
The range of material choices is large. Moreover, if the walls are finished with the same panels, then there will be no difficulties with selection and installation. One option or another is selected based on the wall decoration and screen type.
The thickness of the panels is 0.5 or 1 cm, the option is chosen at the stage of constructing the frame, because the panels are installed on it. Knowing the dimensions of the panel, molding and decorative elements are selected.
When choosing one or another panel option, it is recommended to pay attention to the evenness of the material; in this case, installing the door will not be difficult.
Plastic panels for masking pipes under the bathtub
How to choose quality fittings
There are a great variety of alloys from which furniture fittings are made, so there is no need for a non-specialist to understand all these intricacies. In addition, manufacturing companies are constantly improving the quality of their products and patenting new compositions. The main things you should pay attention to when choosing accessories:
- The manufacturer's logo must be in the most visible place and clearly legible.
- The color of the metal must be uniform, without stains, burrs, roughness, or streaks.
- Open fittings are a thing of the past; it is better to give preference to hidden mechanisms.
- When opening and closing doors, they should not creak, knock, wobble or generally cause any suspicion.
- Drawers should not rattle, jam, or slide to the side.
- The finishing mechanism, if present, must work without any complaints.
By following these recommendations, you can not only choose high-quality furniture that is suitable in price and functionality, but also purchase a product that will last for many years, maintaining its presentation.
( 1 rating, average 5 out of 5 )
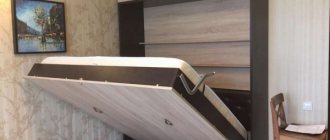
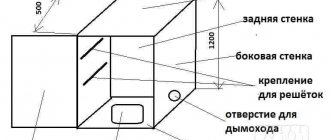
Beginning of work
The key point when creating a screen and doors in it is the frame. Since the panels are lightweight, they are made from different materials. In addition to the panels themselves of the appropriate size, you will need fittings - connecting and mounting.
Frame
To make the screen look like one with the bathroom and hide all the pipes, you will need to correctly calculate its size. It is important that the screen itself does not protrude beyond the edge, otherwise it cannot be avoided from constantly getting wet.
Convenient frame made of metal profile. This material is selected in accordance with the size of the panels. For the frame you will need a starting strip of the same color as the panels. Tools you will need:
- A knife (construction or stationery), its size is not important, the main thing is sharpness.
- Screwdriver.
- Level. The same size as a bathtub or larger.
- Hammer.
- Square.
- Construction stapler.
Marking
The first thing you need to do is mark the future dimensions of the frame; it should hide the pipes and not catch them. Markings are applied to the floor and walls. At all points where the frame comes into contact with the walls and floor, it will need to be secured.
The profile is fastened with dowels, the distance between them is 20-25 cm.
Note! For the frame, you can use profiles that are used when working with drywall.
After 40-60 cm, a vertical profile is installed, which will ensure the rigidity of the structure. The frame elements are fastened together using metal screws.
Door and panels
If the door is installed small in size and cuts into the surface of the panel, it will need to be mounted before installing the panel itself. The size of the door is chosen such that a guide for movement can be installed on the back side of the panel.
Door in plastic panel
After installing the door, the panel is attached to the guide and covered with a decorative element.
A rigid frame and a strong base are the conditions for furniture stability
If the frame is insufficiently rigid, the cabinets sway, and the main reason for this is the lack of reinforcement. Fiberboard sheets for rear walls cannot provide this. We add 25 cm wide chipboard cross ties to each section at different levels and secure the confirmations. This arrangement will provide maximum rigidity.
For a plasterboard cabinet frame, only a metal profile with purchased fasteners is allowed.
Incorrect installation and insufficient number of supports will deform the bottom under load. To prevent this from happening, we install supports every 30-40 mm from each bulkhead. The sliding wardrobe can be installed on supports 25 mm high with the possibility of adjustment through the holes at the bottom. The only drawback is the space between the bottom and the floor, which will be the trash can. The second option is to use kitchen legs with a height of 100 mm.
Wardrobe frame
Conclusion
The door in the screen under the bathtub is very convenient. Making it with your own hands is not difficult, it will take a little time and materials. The whole process will take hardly more than a couple of hours.
Many owners of residential property do not use balconies for any purpose, but such a decision is considered irrational. If you properly insulate and decorate this room, it can replace a storage room, dressing room or other room. For storing various items and accessories, cabinets installed along a certain wall of the room are considered preferable. It’s quite easy to make a balcony cabinet with your own hands, for which you can use different materials.
Selecting a design and creating a drawing
Before you make a cabinet on the balcony with your own hands, you should decide what kind of structure will be created. It can be presented in numerous types, differing in design, size and other characteristics.
Before directly choosing a specific type of structure, it is recommended to decide for what purpose the balcony cabinet will be used, since its dimensions and features must be suitable for the chosen purpose.
The most popular cabinets created for balconies include:
- standard design, equipped with three compartments. The doors can be sliding, and in this case you get a sliding wardrobe for the balcony. They can also be hinged. This design is quite large in size, so it is preferable to create such a cabinet with your own hands for a large room. If the loggia is small in size, then it is allowed to make two sections for the cabinet. Different materials can be used for production, and assembling a cabinet with a simple design is quite simple using standard tools. The products are attractive and spacious. They can be open at the top, and flowers or decorative decorations can be installed here;
- corner cabinet - selected if there is a small balcony. It does not take up much space and is also considered easy to create. By using an angle that often remains unused, the central part of this design is characterized by good spaciousness. A corner cabinet can have a different design, and the frame and lining can be made from different materials;
- pencil case - if it is impossible to allocate a lot of space for a closet on the balcony, then it is allowed to make a structure presented in the form of a pencil case. It’s easy to make cabinets for the balcony with your own hands; this video will help you with this. Usually it has many small shelves and compartments, so you can store many different items here. Usually a significant height is chosen, and any design can be chosen. The frame and cladding can be made from various materials. It is equipped with standard hinged doors, and such furniture can be installed anywhere on the balcony;
- a built-in wardrobe on a loggia is considered an excellent solution if there are various niches or recesses. Its size depends on the available space. Due to independent work, the production of a cabinet with optimal dimensions is ensured.
If during finishing you choose to cover the balcony with clapboard, then the same material can be effectively used to form an attractive cabinet, which guarantees a holistic and interesting interior. After choosing the optimal design, you need to start creating drawings. Often standard designs with two doors are chosen, and it is possible to choose both sliding and hinged doors. Drawings are generated independently or you can find suitable diagrams on the Internet. When working independently, the diagram must be made using special computer programs so that even the smallest details and design features can be calculated.
It is recommended to immediately create the detailing yourself, which involves highlighting all the parts, when combined, a complete piece of furniture will be obtained. Using such a drawing, building a cabinet will not be difficult.
The optimal dimensions for any cabinet are:
- height within 250 cm;
- width equal to 120 cm;
- depth from 45 to 60 cm;
- a distance of 35 cm is left between the shelves.
The above parameters are considered universal, but they can differ significantly, since when assembling the structure yourself, the space on the balcony allocated for installation, as well as its purpose, is taken into account.
Main features
In modern interiors, plastic furniture is increasingly being used - not only in the bathroom or kitchen, but also in the living room or children's room. When choosing a chest of drawers, it is necessary to take into account both the advantages and disadvantages of such a piece of furniture.
Positive sides:
- compactness - the features of plastic allow you to create models of any shape, so you can choose a functional and roomy one even if the room has little space;
- light weight - you can forget about the pain associated with rearranging, a lightweight chest of drawers can be easily moved alone;
- versatility of use - in a plastic chest of drawers you can store a wide variety of items, from bed linen, towels, papers, toys, to household chemicals and products;
- comfortable operation - lightweight boxes are simply removed, and their capacity is usually higher than wooden ones, which require the installation of special fasteners;
- easy care - surfaces are easy to clean, you can use household chemicals;
- The widest range of models of all shapes and colors will make it easier to choose exactly for your interior.
The plastic chest of drawers is easy to assemble yourself - you don’t even need tools, just read the simple instructions. The product can also be disassembled at any time, and its folded storage does not take up much space - this is very convenient for transportation.
There are also disadvantages to this design:
- You cannot store heavy objects - some modern plastics are close to wood in strength, but the cost will be high; most are suitable for storing only light and medium-heavy items;
- cannot be placed near batteries and heaters - this is fraught with both the danger of fire and melting;
- unprotected surfaces from scratches - most plastics have a fairly soft surface, so if your chest of drawers is not protected by an additional durable layer, it may lose its appearance over time due to scratches and dents.
All these disadvantages are compensated by a significantly lower cost compared to products made of wood and metal.
Preparatory stage
Before making a wardrobe on the balcony, you should carry out some preparatory steps, these include:
- formation of a drawing;
- determination of materials to be used for construction;
- it is decided which design will be used, and it must correspond to the chosen style for the balcony;
- fittings, drawers, fasteners and other elements are selected to create a truly beautiful design.
After the preliminary stages, you should prepare all the elements for work.
Materials and tools
Initially, you should decide what material the cabinet will be made from. The materials most often selected for these purposes are:
- wood - it provides an attractive and durable product. The wooden frame is highly reliable and resistant to various influences;
- Plastic – A plastic cabinet is considered inexpensive to create, so you won’t have to spend a lot of money to get one. But it is not recommended to make the frame from plastic, as it will not have sufficient rigidity and strength. The material is presented in various colors, so the shade of the plastic part is selected, due to which the optimal design of the structure is made.
Often a cabinet is created from lining on the balcony, which has good strength, attractiveness and the desired color.
After deciding what material will be used during work, the following elements are purchased and prepared:
- it is advisable to make the frame from high-quality wooden beams, the cross-section of which is 40x40 mm, but it is possible to replace the timber with metal profiles, and the resulting frame can then be sheathed with different panels or other materials for sheathing;
- Different materials are selected for cladding, but since the structure is made for a loggia, it is advisable to choose plastic or wooden lining for its finishing, and the thickness of the elements should be approximately 8 mm;
- it is allowed to choose plywood or chipboards for cladding, but these materials must be moisture-resistant, reliable and not the cheapest, and their thickness must be within 10 mm;
- to assemble the frame, you need to use high-quality furniture blanks, and metal corners are also prepared;
- purchased fasteners, which include self-tapping screws and dowels, as well as nails for fastening the rear wall;
- if you plan to equip the structure with doors, then choose what they will be made of, as well as what opening principle they will have;
- tools are being prepared, which include an electric jigsaw, but it can be replaced with a circular plate, an electric drill equipped with different drills for woodworking, a milling machine, a screwdriver, a chisel, a sheet and a building level.
Purpose of the rear wall
Its main purpose is to impart rigidity to the entire structure. Over time, the closet becomes filled with things, the weight of which may be distributed unevenly. If the rigidity is not enough, it will become deformed. It is the back wall that gives the furniture the necessary hardness and stability.
Gone are the days when cabinet furniture was made from solid wood. Today, back walls are most often cut from fibreboard (Fiberboard), laminated particleboard (LDSP), and plywood.
These materials differ in the following characteristics:
- purpose;
- hardness;
- thickness.
There are also significant differences in moisture resistance and fire resistance.
Preparing parts
It is necessary to carry out the process of creating a design step by step in order to avoid significant mistakes. It is recommended to carry out all work on creating the structure on the loggia, where the finishing has already been completely completed.
The design of a standard cabinet is considered simple, so you only need to prepare the parts correctly:
- parts of the future frame are being prepared, and we make them from wooden beams or metal profiles, and their dimensions must fully correspond to the pre-made diagram;
- the lining elements are cut out so that they have the required dimensions for fastening;
- fasteners are prepared for fixing parts of the sheathing to the frame.
If you do not have experience in this area, then it is recommended to first watch a video of creating a cabinet on a balcony with your own hands in order to take into account the main nuances and rules of this process.
Peculiarities
Plastic cabinets installed on the balcony perform several functions at once:
- the free space is filled, so a multifunctional piece of furniture is installed in the room;
- if you buy a spacious wardrobe, then it is used to store numerous objects and things, so they do not clutter up the space on the balcony, and are also hidden from view and laid out in optimal order in various compartments of the structure;
- plastic products can have different colors, so a model with the optimal shade is selected, which allows you to create a balcony in a unique color scheme.
Plastic products are optimal for balconies, as their advantages include:
- UV resistance. The balcony usually has large windows, so it is not possible to hide various objects in this room from the sun's rays. Plastic structures will not fade or melt at high temperatures if truly high-quality models are selected;
- resistance to high and low temperatures. Typically, a balcony is an unheated room, so it is required that all items are resistant to low temperatures or changes in temperature;
- attractive appearance - due to the ease of processing the material, special technologies are used for the manufacture of various plastic products. This leads to the fact that numerous cabinet models may have different sizes, configurations, colors and other interesting characteristics;
- spacious and multifunctional - choose a cabinet for the balcony, equipped with many storage systems and additional elements. They allow you to really store a lot of things in this design, so you can free up various furnishings in your living space.
The above advantages apply exclusively to the most reliable and high-quality structures made from modern alloy. Cheap structures can melt under the sun's rays or be destroyed by minor mechanical shocks.
Assembly
Any master begins work by marking the room where the work is performed. If you don’t have the skills, it is recommended to look at several photographs, which show step by step all the steps describing the creation of the cabinet. The main stages of assembling the structure include:
- Mark the places on the balcony where there will be a closet, and during work it is necessary to use a building level so that there are no distortions
- then begins fixing the ceiling and floor elements of the future frame on the loggia with your own hands;
- the master connects these parts using vertical posts, and they must be set using a building level, and fixation is carried out with self-tapping screws, the distance between which is approximately 40 cm;
- intermediate crossbars are attached, located horizontally, and they are designed to secure the shelves, and self-tapping screws and metal corners are used to fix them;
- further it is determined how to beautifully make the shelves, for which they must have the required dimensions, and also be installed in such a way that they do not protrude beyond the frame made;
- doors are created for the future structure, and photos of how these actions are done are presented below, and they must have optimal dimensions, calculated in advance in the process of creating the drawing;
- The resulting structure is sheathed, usually using lining made of plastic or wood.
Usually, the same material that is used to cover the walls of the room is chosen for covering the cabinet, since this solution is considered optimal for obtaining a holistic and interesting finish. Thus, if you carefully understand how to make a cabinet from lining, you will get a reliable, attractive and multifunctional design. It will accommodate many different items and will also fit well into the loggia.
Antique restoration
This method is more labor-intensive than the one described above. To decorate an old antique cabinet, only natural wooden materials are suitable. There is no need to completely disassemble the cabinet. But you will have to move it outside.
Attention. The aging process of wood is accompanied by a large amount of waste wood shavings and dust.
Rust must be removed from metal parts. Large wood defects are covered with putty
Panels and frames are cleaned of old varnish and paint. Then they need to be carefully sanded. In the process you will need to use:
- sandpaper of different grain sizes or a sanding machine;
- metal brushes with thin wire, synthetic or abrasive-polymer brush, as well as a sisal finishing brush;
- tourist gas can with burner;
- stains, impregnations or natural oils for wood.
Manufacturing and installation of doors
Doors that are optimal in size and appearance are certainly made for the cabinet. They can have different parameters, and their design is chosen in such a way that they fit well with the style of the room, its appearance and the cabinet itself.
Doors are often chosen for this design:
- standard hinged ones, but for their effective use there must be quite a lot of space in front of the cabinet;
- sliding ones, due to which a sliding wardrobe will be formed;
- roller shutters that open and close according to the principle of using blinds.
When choosing or creating doors yourself, it is necessary to take into account the width and height of the furniture made so that there are no difficulties with the process of opening or closing them. The most affordable are swing doors, which can be made from wood or plastic. After manufacturing and processing the doors, they should be placed on hinges, after which they are attached to the desired areas of the made cabinet.
Sliding systems are considered expensive because they require installation of guides on the sides, top and bottom. Additionally, a roller system is attached to the door leaf. This door option is needed to create convenience when using the cabinet. These doors make all the furniture look attractive.
Roller shutters are considered the most expensive, but their appearance is attractive, so they look good in any room. It is advisable to purchase roller shutters that have already been made at the factory, and they are sold complete with all the fasteners necessary for installation.
Thus, cabinets for balconies are considered the optimal solution, since they can store various items. They can be presented in different designs, and the most preferable is to create them yourself. In this case, furniture will be made that has the required dimensions and parameters. During the work process it is allowed to use different materials. The whole process is divided into successive stages, so first a drawing is made, parts are created, and then the structure is assembled and decorated. Simple steps ensure that you get beautiful and unique furniture that can accommodate many different items. Now you know how to make cabinets on the balcony with your own hands and it won’t be difficult, besides, photos of how to make them are presented in the selection.
laminated chipboard
Back walls for a cabinet made of laminated chipboards are a more reliable option than those made of fiberboard. They are stronger, mounted in an inset manner and have a decorative coating, therefore they are more aesthetically pleasing. This coating can imitate the structure of wood or be smooth.
Laminated chipboards are made from ordinary sanded chipboards with a lamination section connected. Covering the material with laminating film can occur using three technologies: lamination, lamination, smooth lamination.
To produce this material, a hot press is used, the temperature of which is 160-220 degrees. Several layers of prepared paper and a mixture of several resins are applied to the chipboard, which, when heated, turn into a durable film and reliably protect the surface of the material.
Laminated particle boards are manufactured in a variety of thicknesses. There are three options: 10, 16 and 18 mm.
Advantages
- High strength and durability.
- A large selection of colors allows you to choose a shade that matches the color of the case.
- Installation can be carried out in confined spaces.
- Possibility of fastening in several ways: euroscrews, corners, eccentrics.
- It has high moisture resistance and scratch resistance.
Flaws
The only drawback may be the high cost of this material.
The cost of installing laminated chipboard walls often reaches the cost of finishing work for the walls of premises.
Plywood
Plywood is one of the best, but expensive materials for the back wall of a cabinet. It has a smooth surface that does not require additional sanding. The production process uses heat treatment and drying. Therefore, the product retains its presentable appearance for a long time, does not dry out or become deformed.
Plywood is made from various types of wood, but the most popular raw material is birch.
Advantages
It has a smooth and durable structure, which is why smooth and high-quality veneer is made from it. After giving the desired thickness, the veneer sheets are glued together, resulting in the well-known plywood. Sheets of this material for the back walls of cabinets are traditionally made 3 mm thick.
Flaws
Despite all the advantages, plywood walls have their drawbacks, which can significantly complicate the installation process.
- There is a need to cut grooves in parts.
- If deformed, the wall may pop out of the grooves.
Video
In apartments - both small and spacious - there will always be items that are rarely used, but it is not advisable to throw them away. They interfere in everyday life, so until the next use they are sent to the balcony or loggia. Gradually a disorderly pile of things forms here. It tends to spread over the entire area. As a result, finding the thing you need at the moment becomes so difficult that it becomes easier to buy a new one. Installing a plastic cabinet on the balcony will help reclaim space from these deposits.
Accommodation
Plastic cabinets differ in location and room where they can be installed.
On the balcony or in the pantry
In both cases, they perform the main function - storing things that are rarely used, or they are objects that are quite large in size and take up a lot of space in living rooms. Most often, the parameters of these rooms are small and non-standard, so built-in wardrobes made to individual measurements fit best into them.
For such rooms, it is preferable to choose cabinets with a sliding or hinged mechanism, or an option without a facade. For the plastic model, placement on the street (balcony) is allowed.
In the bathroom and toilet room
In the bathroom, space is limited, so the size of the cabinets should be compact or small (depending on the characteristics of the particular room). The choice of model is based on purchasing the product from a trusted store with a good reputation. You can purchase this model in stores specializing in plumbing fixtures and bathroom furniture.
In the toilet room, cabinets are usually hung according to individual measurements, since these rooms are most often non-standard. Such cabinets usually store household chemicals, building materials, and household goods. In this case, installation with wall mounting is most suitable, since the only convenient place is to mount the cabinet above the toilet.
In the nursery
In the children's room, plastic furniture is most often used. Children's goods stores offer a wide range of different storage systems for toys, clothing, stationery and books.
Cabinets can be of a wide variety of designs:
- with or without hinged doors;
- with drawers or shelves;
- mounted;
- floor-mounted
Combination cabinets are popular, which combine open shelves and drawers of different sizes. Thanks to the internal functionality, you can sort toys into categories and put things in order in the nursery, instilling organization and neatness in your child from an early age. To make it easier for the baby to navigate, drawings or inscriptions can be applied to the drawers and facades using any marking system.
When choosing furniture for a children's room, it is important to comply with safety conditions. You need to choose cabinets made of good plastic, painted with high-quality dyes without toxic impurities
In addition, it is worth preventing furniture from tipping over. For this purpose, it can be equipped with wheels or securely attached to the wall.
When children grow up, it ceases to be relevant, so it is replaced with a wooden one. The design of children's wardrobes and chests of drawers is unlimited. If you wish, you can always find furniture in any shade with images of your favorite cartoon characters and fairy tales.
Materials for making cabinets
Plastic cabinets for balconies, which do not have other materials in their design, can only be manufactured in industrial conditions. Factories have the necessary equipment for casting cases, shelves and doors reinforced with stiffeners. Home craftsmen can only operate with plastic panels or rigid sheets. Their strength is very limited. To strengthen it, the structure has to be supplemented with wood or metal.
The design of a homemade cabinet consists of the following elements:
The frame can be made from:
- timber section 40x40 mm;
- galvanized profile intended for installation of plasterboard systems;
- profile metal pipe or corner.
Multilayer moisture-resistant plywood is suitable for making shelves. But it is better to put a board under heavy objects.
Place in the interior
Not every interior can be combined with furniture made of plastic, so before purchasing a cabinet you need to inquire about its combination with design trends.
Plastic looks best in modern concepts. This is an integral component of such styles as minimalism, hi-tech, loft, Japanese. But such material is not always combined with Baroque, Provence, eco and Italian design.
There is a compromise solution - selecting plastic with a special texture that imitates natural materials. In modern stores you can easily find a cabinet made to resemble wood in various colors. Another advantage of this model is its affordable price compared to cabinets made from natural materials.
Types of cabinet doors
The doors of plastic cabinets on the balcony are made by:
- hinged: they are becoming less common, since opening them requires free space equal to the width of the sash. But they last longer, close tightly and provide unlimited access to the contents of the cabinet;
- coupe: convenient for wide balconies, fits well into the interior. But they will take up part of the usable area of the product;
- sliding (“accordion”): less space is required to open them (compared to hinged doors). But the fit to the body is not high, so the contents of the cabinet will gather dust.
Roller shutters can be used as doors. In this case, the dimensions of the structure increase due to the mechanism that twists the canvas into a roll. Roller shutters are not cheap: from 4,770 rubles. And if the apartment owner himself cannot cope with their installation, he will have to pay an additional 3,000 rubles to the specialists.
Design
Plastic furniture can be of different shapes, volumes and designs. The parameters are subject to the stylistic features of the premises and their purpose. These are not just plastic boxes that perform a strictly basic function: the models differ in aesthetic perception. They can be special due to the color shade or decorative elements.
Plastic facades can be decorated using additional elements (rattan inserts, bamboo, mirrors). The use of a mirror helps to visually expand the space and complement the furniture with another function, and facades designed like rattan or bamboo make plastic furniture more solid, visually similar to wood furniture.
Below are examples of cabinets made of plastic panels, as well as options for their design and decoration, which will help inspire your interior design.
7 photos
For information on how to organize order using plastic cabinets in the nursery, see below.
Stages of work
First of all, you need to measure the width of the balcony and decide how much area the cabinet will occupy. If you plan to build a structure for the ceiling, you need to measure the distance from the floor of the balcony to the top slab (or canopy if the apartment is located on the top floor).
Next, a drawing is developed. It is not necessary to carry it out according to all the canons of engineering: it can take the form of a randomly executed drawing. But it must be detailed enough so that all the necessary blanks can be made from it and - most importantly - then assembled into a single structure without adjustments.
Universal sizes of balcony cabinets:
- width – 1.1-1.25 m;
- height – 2.4-2.5 m;
- depth – 0.45-0.6 m.
The cabinet assembly technology is as follows:
- Parts are made: timber is cut into racks, shelves are cut out of plywood, panels are prepared for cladding, etc.
- Mark the installation location of the frame. If you plan to build a cabinet to the full height of the balcony, first marking lines are drawn on the ceiling, and then they are transferred to the floor using a plumb line. The lower and upper contours are connected by vertical lines drawn along the wall.
- Fix the parts of the floor and ceiling frames of the frame.
- The resulting rectangles are connected by vertical posts. The beams adjacent to the wall are secured with self-tapping screws in increments of 35-40 cm.
- Additional horizontal bars are nailed, which will provide rigidity to the frame. At the same time, they will act as supports for the shelves. For fastening, metal corners are used, which are pre-installed on the lower surface of the horizontal parts.
- The frame is sheathed with plastic, and the back wall is installed from the inside of the cabinet, and all the rest are installed from the outside.
- The shelves are laid: they can be screwed with self-tapping screws to the supports or simply placed on them.
- The doors are made: frames are assembled from 12-15 mm boards and covered with sheet plastic. In tall cabinets, the doors can be divided vertically in two. In this case, the user will be able to open the zone that he currently needs.
- Doors are hung using “butterflies” or furniture hinges.
Plastic design options
A plastic cabinet for a balcony can theoretically have any size and configuration. In practice, one of six popular options is most often used.
Built-in wardrobe with three compartments
Plastic cabinets, divided vertically into three sections, are best installed on the loggia. They are not equipped with a back wall. The upper part can be used for flower pots. Sections can have the same or different heights. One of them can be left without shelves, and a bracket for hangers can be strengthened inside - you will get a convenient place for work clothes.
Closet
A product of this design can be installed flush against a balcony door. If the wardrobe is mounted on an insulated loggia, it can be used as a wardrobe, significantly saving space in the apartment.
Wardrobe built into the wall of the balcony
The optimal place to place a built-in cabinet:
- near a window or balcony door - provided that there is sufficient distance between them and the wall;
- under the balcony window: here it can be built in the form of a small bedside table with drawers;
- in the corner: an option most suitable for trapezoidal-shaped balconies. The sloping space will not fit any other furniture, but you can fit a spacious cabinet with shelves here.
Wardrobe divided into two parts
By dividing the cabinet into two parts, the owner has the opportunity to optimize the arrangement of its internal volume:
- in one compartment, fill many shelves for small things (or liter jars of preserves);
- the second is to equip it for storing large items. The shelves here can be made more powerful, and the distance between them greater.
Wardrobe without doors
A cabinet is often installed at the end of a balcony or loggia, the shelves of which are not closed with doors. It looks more like a rack, but differs from the latter in the presence of cladding on the sides and on the side adjacent to the wall. The contents of the shelves can be covered with a curtain.
Corner cupboard
On narrow balconies there is not enough space for a full-fledged locker. In order not to block the glazing, the cabinet façade is placed at an angle: from the balcony window to the border of the outer frame. The shelves in this case will be triangular, but the spaciousness of the structure is noticeable.
With the proper arrangement of large and small items, a corner cabinet will help to significantly unload the apartment.
Types of design
The most common decoration option is to apply a design to the surface of the facade using photo printing. The image can be an ornament, drawing, photograph, or imitate some material, such as metal, wicker, or wood. So, a chest of drawers decorated with a bright colored pattern will delight a child in a child’s room, while an imitation mahogany chest will look good in a hallway or bedroom.
Idea Alt Deco
A universal narrow chest of drawers with four sections, the facades of which are stylized as wood. Such a strict model is suitable even for a room in a classic style, and the spaciousness of the drawers will allow you to conveniently distribute the necessary items.
Characteristics:
- dimensions 40.5x50.5x95 cm;
- manufacturing material - high-quality plastic;
- color light brown;
- four deep drawers with handles;
- things will be reliably protected from dust and external factors;
- easy assembly.
It is practical and attractive in appearance. The pattern is securely fixed to the surface of the facade, the drawers can be washed (with the exception of abrasive products).
Little Angel Bears
The model is intended for installation in a children's room or bathroom. Calm beige color decorated with a soft, pleasant pattern. The drawers are very deep, with high walls, which allows you to conveniently store shampoos, gels and other containers with liquids.
The characteristics of the model are as follows:
- dimensions - 40x33x85 cm, weight 4.38 kg;
- material: high strength plastic;
- resistance to damage, moisture and ultraviolet radiation;
- long service life;
- safety - plastic and paint do not contain allergens and toxins.
A narrow chest of drawers can be easily placed in any part of the room. The smoothed corners of the frame eliminate the risk of injury for small children.
Advantages of using cabinets on the balcony
Any version of a cabinet installed on a balcony can save apartment residents from a number of problems:
- cluttering of the apartment: a lot of things that are a pity to throw away gradually occupy all the cabinet furniture and interior storage rooms, significantly complicating the search for the right item. And there is nowhere to put new things. All this “equipment” is transferred to the balcony cabinet, allowing you to freely arrange things that the inhabitants of the apartment often use;
- turning the balcony into a dump: the housewife, exhausted from the fight against clutter, takes everything that prevents her from living peacefully to the loggia. Gradually, a huge pile of necessary and unnecessary property accumulates there, completely filling the free space. The closet helps to put things in order and turn the balcony into a place to relax: all the trash is now stacked vertically, occupying a small floor area.