Replacing window fittings with your own hands is a complex and time-consuming process. Beginners are rarely lucky in this matter. It is necessary to have certain skills and knowledge in order to carry out all the work correctly.
If you decide to change the fittings yourself , remember that the majority did not cope with this task! Usually the matter ends with the fact that it is impossible to purchase the necessary spare parts at retail.
After all, you need to know the brand, series of fittings, take correct measurements and determine the technical parameters of the plastic window trim.
There are only a few who can find the necessary fittings. But even if you found what you were looking for, how to install fittings on a window without special tools?! If you still want to install the fittings yourself, then feel free to read on.
The window does not close
Most often, such a malfunction is observed on windows installed more than 10 years ago. At that time, metal-plastic structures were just gaining their popularity and there were no time-tested mechanisms.
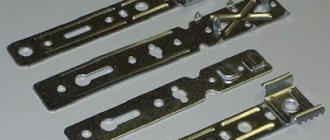
If problems arise with closing, first of all you should carry out a visual inspection of the fittings on the sash and the strikers on the frame.
Trunnion on the sash and strike plate on the frame
An inspection will help detect obvious damage to the fittings, as well as foreign objects that may have gotten into the mechanism and interfere with its normal operation.
Breakage of the strike plate
If everything looks fine on the outside, you should pay attention to other possible causes.
The sash is sagging
A common problem with large blocks with high opening rates. If the window is open in the swing mode, then the first thing to do is to lift the sagging edge of the sash by the handle, insert it into the frame and try to turn the handle to the closed position. If unsuccessful, you need to try to adjust the tilt of the hinges yourself. To do this, remove the decorative trim from them and use a 4-point hex to turn the adjusting screw clockwise.
Pull up
Bottom Hinge Adjustment
Incorrect operation of the blocker
The lock is designed to prevent opening in two modes at the same time. Visually, this is a spring-loaded plate fixed on the side of the opening element.
Blockers from various manufacturers
If the lock operates at the wrong time, for example, due to a quick and not entirely accurate turn of the handle when opening, the mechanism may jam. To bring it into working condition, you need to move the plate manually and completely turn the handle to the “open” position.
Other reasons for the incorrect operation of the blocker include deformation of the profile to which it is screwed and incorrect adjustment of the fittings. In such situations, the plate will not accurately fit into the seat on the frame striker and rest against it, preventing closure. The problem is usually solved by adjustment, except in cases where the deformation of the curved profile does not allow this.
Video instructions for adjusting the fittings yourself:
If the lock is completely out of order and does not allow you to close the sash, it is better to dismantle it - the window can function normally for some time without it. On most models of fittings, the assembly with a spring-loaded bar is unscrewed with a regular Phillips screwdriver. On some Maco models it is not removable. On Aubi products, the tongue may unbend over time, and to restore the mechanism to function, it is enough to bend it back into place (usually towards the street).
The fittings of the slot ventilator are in the way
If for any reason this element has changed its original location, for example, due to a loose fastener, then the sash will not be fully pressed against the frame and the handle will not be able to be rotated to the desired position. Adjusting the strike plate is quite simple - it has oval holes for self-tapping screws, along which the position is adjusted. If for some reason the bar cannot be moved, you should try to adjust the mechanism on the sashes.
Setting the axles on the frame in winter - summer mode
The bar, the operation of which is in doubt, can be removed - the sash, if handled carefully, will work normally without it. By removing and putting back all the strips one by one, it is enough to simply identify the faulty one and adjust its position.
Pros and cons of working independently
The advantage of doing it yourself is saving a significant amount , which would go into the master’s pocket. It should be taken into account that at the same time you can carry out lubrication and adjustment, for which they charge a separate fee.
If a similar kit is installed, then only ordinary tools are required, the scope of actions is reduced. The planks simply snap into place, the parts are placed in the same places with the holes, and this is a significant advantage of this case.
But if you install fittings from other brands, you will often need to drill holes, at least for the hinges, as in our example, you will need two additional tools - templates.
This is a disadvantage of this particular option for self-replacement, since the devices are special and it is unlikely that the average user will have them on the farm.
The disadvantage of doing it yourself is that it is quite a troublesome task : you need to select a kit, you will have to remove the heavy sashes, hang them again, you may have to cut the slats. At the end you will need to make adjustments and lubrication.
Top corner won't close
The upper part located above the handle may not close for the following reasons:
- The door sagged. In this case, the sagging is not as critical as in the case described above, and the lower part can fall into place. However, the upper pins will touch the striker, which is usually accompanied by a characteristic knock when trying to close the window. The adjustment is made depending on the installed mechanism. In some cases, it is enough to slightly adjust the position of the strike plate: release the fasteners, lower it slightly and fix it. Roto fittings allow you to adjust the angle of the sash.
Adjusting the standard strike plate - The top canopy is not working correctly. This is common with Aubi movements. The hinge rotates, which is why the corner of the sash on top of the handle is not fully pressed. It can be rotated manually to its original position and the window closed. However, this will only be a temporary solution, since the situation will definitely repeat itself soon. Aubi has closed production, so most likely it will be necessary to replace the mechanism with a new one.
How to choose window fittings?
At the moment, the window market offers a large selection of fittings with a wide range of prices. The most popular brands of window fittings:
- ROTO (Germany)
- SIEGENIA-AUBI (Germany)
- MACO (Austria)
- GU (Germany)
- SCHUCO (Germany)
- WINKHAUS (Poland)
Don't skimp on window fittings! A high-quality mechanism will last for many years.
Our company's specialists prefer the German brand ROTO. It is distinguished by durability, quality and reliability. The manufacturer guarantees 10 years of flawless operation with proper use and timely prevention.
The window is stuck and won't open
In most cases, the reason is the blocker mentioned above, or rather, its untimely operation.
If you inadvertently turn the handle down in the open swing position and then close it, the lock may operate.
The further sequence of actions depends on the model of the mechanism. First you need to try to re-close and open the sash alternately in tilt and turn modes.
If the handle does not rotate fully to any of the open positions, try the following:
- With one hand, lightly pull the top corner near the hinges;
- At the same time, try to rotate the handle to the swing position;
- Place the trunnion clamping eccentric vertically.
There are situations when the handle is not jammed, but, on the contrary, rotates around its axis, but the sash does not react in any way to the rotation. This indicates a breakdown of the fittings and in this case it is unlikely that you will be able to do anything on your own. The good news is that such breakdowns do not occur suddenly, but it all starts with play in the handle, which increases over time. Therefore, if you take timely measures and replace the faulty part, you can avoid unpleasant surprises.
Possible difficulties and errors
Common mistakes when replacing PVC window fittings yourself:
- Placing the trunnions in the wrong position, their mismatch with the mating parts, hooks.
- Use of ordinary rather than elongated self-tapping screws (38...45 mm) for fastening hinges.
- Do not remove burrs when cutting slats.
- They forget to lubricate and clean.
- The order of an event is incorrect, if a specific version of it is provided for in the instructions for a certain product (below is an example of a VHS brand manual).
- Do not use templates when drilling new holes for hinges: even a fraction of a mm matters here. It is entirely possible to carry out this procedure manually, taking very careful measurements, but at the user’s own risk, it will be impossible to correct the error.
Stuck in ventilation mode
The cause of jamming is usually the exit from the grooves or the breakdown of the so-called “scissors”.
In case of such window breakdowns, the main thing is not to apply excessive force to the handle and not to try to forcefully close or open the sash.
To restore the unit's functionality, you must do the following:
- Remove the sash. To do this, you first need to remove the top canopy cover, pull the special rod down and remove the hinge.
- When the top is detached, the sash is easily removed from the bottom hinge - just lift it a little.
Bottom loop - We place the sash bottom on the floor so that it is convenient to work with its top.
- We look for the grooves into which the “scissors” should fit and insert them into place. It may be necessary to press the lock bar or turn the handle.
- We assemble the block in reverse order.
Sometimes you can do without dismantling the sash. This will require certain skills and enough free space at the top of the window, since if the slopes get in the way, it will be quite difficult to push the “scissors” into place.
Jamming in the ventilation mode can also occur due to broken fittings, the presence of foreign objects in the mechanisms or grooves, misalignment of the sash and incorrect operation of the lock.
When might it be required?
Details change in such cases:
- Breakdowns of a critical nature, when repairs do not give the desired results. In these cases, it is not necessary to change the entire system - if diagnostics are carried out and it is discovered that some specific parts are causing the incorrect operation, then only those can be updated.
- I am not happy with the optionality, for example, a rotating mechanism is installed, but it was decided to mount a tilt and turn mechanism.
This may not always be possible if the system types differ significantly in their design. If interchangeability is possible, then sometimes it is enough to change or deliver one or several units, but often it is necessary to radically update the entire system, as a rule, when products of a not particularly well-known brand are installed. - If the design does not work well: the doors often warp and begin to creak. In other words, if there is a desire to install better and more reliable products.
- Mechanisms become deformed and lose their geometry due to deficiencies in the fixing parts.
Incorrect operation of a plastic window does not always lead to a mandatory replacement of the fittings: for example, a sash misalignment often occurs over time due to natural wear and tear, and it is enough to adjust it. Stiff movement, not closing completely can occur due to irregular cleaning and lubrication (the mixture accumulates dirt over time, becomes abrasive, thick).
If irregularities are observed when setting window modes or fixing them in a certain position, then the scissors may have come out of the grooves, and it is enough to put them in their places. Looseness of the handle can be caused by spontaneous unscrewing of fasteners due to vibration - you just need to tighten them.
If we consider critical breakdowns that lead to the need for a complete or partial update of the fittings, then these are, for example, the following:
- The handle and its functional parts are broken.
Of course, if there are similar small spare parts, for example a retaining ring, then it is enough to replace them. But usually there are rarely any spare individual special small elements of the handle on the farm and they are difficult to find on sale. Two parts of a broken body can be attached with self-tapping screws and reinforced with metal plates, but most likely the part will not last long, since constant loads will destroy even the highest quality connection if the element is not solid. It is more advisable to buy a higher quality handle made of a strong alloy (not plastic or silumin). - The gearbox is broken (crushed, cracked).
This is the response actuator-rotary part on the frame, which transmits commands from the handle, located immediately opposite it on the frame. It is a bar with a ring with a square cutout, into which a tetrahedral handle pin fits. Signs of failure - the handle, which is in good working order by itself, rotates, while control commands are not transmitted to the rest of the fittings. Usually this causes a grinding or squeaking sound. - Iron parts, hooks, pins, scissors, etc. were bent, fell off, cracked, and the hinge was torn out.
- Problems are constantly observed, the window does not work well, often jams, warps, the movement is tight - this means that the set is of poor quality, and here it is advisable to make a complete replacement.
The door hung on one hinge
In such situations, the sash is held in the frame by the lower canopy and upper “scissors”. The breakdown is eliminated as follows:
- We put the top of the sash in its working position - as if nothing had fallen out. To do this, you need to gently press the upper corner with your palm until it stops; you should not apply excessive force.
- Pressing the lock with your finger, place it vertically and turn the handle horizontally. The main thing is that the upper corner is pressed at this time.
- When the upper mechanism catches on the hinge, you can close and open the window in the usual way.
The most common cause of such a breakdown is considered to be incorrect operation of the fittings combined with the human factor. The window is transferred from the ventilation mode to the swing mode without completely pressing the top of the sash to the frame.
Instructions for old windows without a lock
Opening the frame simultaneously with its tilting
If this happens to you, do not panic. Calmly adjust the sash vertically so that it remains only in rotation mode. In this case, the top hinge should be pressed against the frame.
When making this repair of both fittings and mechanisms of PVC windows, the sashes should be kept completely open. The handle should also be moved to the same position, making it horizontal. If the locking mechanism prevents this, it should be disabled in accordance with the procedure described above. The doors are then closed by turning the handles down. To check the correct operation of the window mechanisms, the position of the handle should be slowly changed, repeating this action several times.
The handle does not turn all the way
First you need to identify the cause of the malfunction. This could be a deformation of the profile, displacement of the strikers, or breakage of the fittings. It is unlikely that you will be able to cope with the deformation on your own, but eliminating the displacement of the slats is quite a feasible task.
- Open the window and try turning the handle.
- If it moves normally to all positions, then in the closed state the clamps rest against the striker bars and thereby prevent the handle from turning completely.
- To find which clamp is not working correctly, unscrew each one one by one. Unscrew one and try to close the window; if that doesn’t work, put it back in place and move on to the next one.
- When the clamp is identified, adjust its position (raise it higher or lower by releasing the fastener).
If the handle does not turn in any position of the sash, the reason is most likely in the fitting mechanism. To find which part of it, do the following:
- Rotate the handle as far as it goes and look at the position of the trunnions. Since the closure is not complete, the trunnions should also not reach the stop. If one of them nevertheless becomes in the closed position, then this is the problem area, namely the incorrect pairing of the fittings.
- We turn the handle to the “open” position and dismantle the problem area.
- We remove the connecting elements and move the trunnion to the same position as the trunnions that did not close completely.
- We assemble in reverse order.
There may be several problem areas; if this is the case, then we identify each one and eliminate the defect using the method described above.
What tools are required for installation?
To install hinges on PVC windows, you need a certain set of tools, which, as a rule, every home craftsman has:
tape measure, high-precision ruler, construction corner for measuring imposts and sash before installing hinges;- building level to check the geometric accuracy of the sash installation;
- a pencil for marking the installation locations of fittings;
- a drill with a thin drill, the size of which should be 1 - 2 mm smaller than the diameter of the hardware;
- a screwdriver for fixing hinges using self-tapping screws;
- a screwdriver and a hex L-shaped key for adjusting the sash of the window structure before starting operation.
The tool must be of high quality, in good working order, cleaned of dirt and dust, and ready for use.
Replacing the handle
Problems requiring complete replacement are relatively rare. However, sometimes the handle cracks, the plastic chips, breaks due to the exhaustion of its working life, or it needs to be replaced with a mechanism with a lock if, for example, there are small children in the house.
- Open the window in swing mode and leave the handle in this position;
- Slide the decorative trim and unscrew the two mounting screws;
- Remove the screws and remove the handle;
Installation is performed in reverse order.
How much does it cost: average prices
When ordering services, you must take into account that most companies do not work with customer materials , that is, you need to clarify which brand is used.
The cost includes the price of products and installation; there is a minimum amount for a free visit (for example, if the order is over 2,500 rubles). The figure depends on the brand of fittings: there are expensive products (MACO, ROTO), mid-segment (Winkhaus) and cheap (Turkish Vorne, Kale). They charge a separate fee for lubrication and adjustment - this significantly affects the final estimate.
Average prices for replacing a complete set of fittings (without cleaning, lubrication, adjustment) range from 4,000 to 6,000 rubles.
The hinge is broken
The problem is widespread primarily on large sashes, especially if they are often opened in the swing mode. The entire load, and not a small one at that, falls on the lower hinge and soon its body cracks or, what happens less frequently, the screws break off. The only way out in such situations is replacement.
To make the procedure go faster and all other elements of the window to remain intact, it is better to change the hinge together. The situation can be aggravated by the breakdown of the upper hinge, since the massive sash, with the lower canopy turned out, significantly pulls on the top and often deforms its parts.
Sequencing:
- Remove the decorative trim from the hinges;
- Open the window slightly in swing mode and partially knock out the supporting axis with a hammer;
- A part of the axial mechanism will appear from below, pinch it with pliers and pull down until it is completely removed;
- Hold the sash, pull it slightly towards you, then lift it up. This should release the lower support. There is no rigid fixation at the bottom, so you just need to move the sash to the side and remove it from the frame.
Replacing the hinge is done with improvised tools, depending on the type of fastener.
Necessary tools
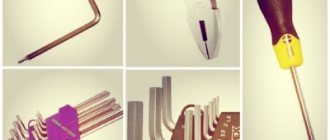
Actually, for all possible work on setting up windows, you will need the following tools:
- hex key 4 mm;
- a set of screwdriver bits in the shape of a star (marked T, TX);
- regular Phillips screwdriver size 3 or 4;
- pliers or pliers;
- machine oil or WD-40 aerosol.
Basically, a hex key is used for tincture, which is also often called a furniture key. The shape of the key can be in the form of the letter “G” or something similar. Master installers use a slightly modified key, which has another small bend on the upper smaller part for convenience, but a standard one will do.
Star-shaped attachments will only be needed in a few models of fittings, but it’s still better to have them on hand. To fasten the fittings themselves to the profile, bolts for a Phillips screwdriver are used. So, for example, to replace a door handle or adjust it, you will need it.
Everything happens much easier if adjustment of sliding windows is necessary. In this case, all the work comes down to adjusting the distance of the roller carriages on which the movable sash is mounted.
Features of plastic windows
The fittings and seals of plastic windows need to be changed periodically.
A plastic profile is a complex product; the quality of the window unit depends on its technical characteristics. The thickness of the window frame can be from 5.8 to 8 cm, they come in sizes up to 13 cm, they are equipped with multi-chamber double-glazed windows. Profiles are characterized by the number of air chambers inside, which are located along the entire length.
The design of a plastic window contains the following elements:
- frame on which the doors and fittings are secured;
- sash - a rotating or folding opening part;
- fittings for controlling the opening and fixing of the sashes;
- double-glazed window - a product made of two or more glasses, hermetically connected through gaskets.
A metal liner is installed in the profile to stiffen the frame. The number of chambers affects the thermal insulation characteristics of the window.
Easy removal method
If you need to repair a double-glazed window or remove the door to bring bulky objects into the room, then dismantling is simple. Especially when you have already had to deal with window installation or see how craftsmen work.
You will need a simple set of tools. To release one door:
- open the handle, find the loop in the upper corner;
- remove the pin;
- lift the structure up;
- remove after the fastening element has been removed.