Author: Sergey Grigoriev. Master, 11 years experience
Plastic windows are considered a very reliable design. But even with proper installation, after a few years the window may require adjustment. We’ll figure out how to do it yourself in the article.
IMPORTANT! We recommend that you adjust the fittings yourself only if 2 conditions are met:
- The window's warranty has already expired. Because whether you can achieve results is unknown. But the warranty will almost certainly be lost.
- You are firmly confident in your abilities. Otherwise, you can only make the situation worse.
Any window problem should be resolved by a professional. Remember that any incompetent third-party intervention can lead to serious damage to the window system.
Leave a request for a free call of a specialist to your site
Features of PVC windows
- The service life of plastic windows is 25-45 years;
- Provide excellent thermal insulation, maintaining an optimal indoor climate;
- Plastic windows boast a variety of shapes and colors;
- Excellent sound insulation, superior to windows made of other materials;
- Plastic windows are quite durable, do not burn and withstand external influences well.
The main feature of the design is that even during the operation of the windows, they can be adjusted and various problems can be eliminated. The adjustment procedure may be necessary for any window, since it does not depend on the time of operation and the quality of the structure. To avoid serious problems, it is necessary to periodically check the condition of the mechanisms that open and close the window. In addition, when the seasons change, it is important to inspect the fittings, checking their condition. Compliance with this recommendation will help avoid unexpected repairs and extend the service life of the entire structure.
Common problems
To repair the handle on a plastic window, you must first understand the reason that caused the breakdown or malfunction. What are the most common problems that users encounter when using plastic windows?
- Handle jamming.
- Handle not turning.
- Incorrect turning.
- Handle loosening.
- Mechanical failure.
Based on the nature of the malfunction, it is necessary to trace its cause and evaluate the possibility of adjusting the mechanism.
Tool for adjusting plastic windows
To adjust the window yourself, you need to prepare the necessary tools in advance:
- Hex wrench (No. 4). The hexagon is used to adjust internal threaded screws. The tool can have any shape, for example, curved like the letter “L”;
- A set of “star” bits for a screwdriver (marked T or TX). It is better to have a whole set at once, since different types of fittings may require attachments of different sizes;
- Phillips screwdriver (No. 3 or No. 4). This tool will be needed to work with various parts of plastic windows;
- Pliers or pliers. Any of these tools can work with eccentrics of different shapes;
- WD-40 spray, special grease or oil (table or machine oil). Any of these products can be used to lubricate the elements of plastic windows.
What tools will you need?
To adjust plastic windows yourself, you will need a fairly simple kit, including:
- Hex wrench No. 4;
- Pliers;
- Phillips and flat screwdrivers;
- A screwdriver with a set of bits of different shapes.
The tools from this set are usually always available at home. An exception may be a hexagon, without which the work cannot be completed - this is the main regulatory tool. If you don’t know what key is needed to adjust plastic windows and where you can find it, then contact any furniture hardware store. 4 mm hexagons are used when assembling any modern cabinet furniture, so finding such a key will not be a problem.
A screwdriver and screwdrivers will be needed to work with the screw connections with which the hardware elements are attached to the profile. Pliers are needed as an auxiliary tool.
It is recommended to additionally prepare silicone grease for the fittings. You can also use WD-40 or other similar spray lubricants.
Adjusting the pressure of a plastic window
The tightness of the entire structure depends on how tightly the plastic window sashes are pressed against each other. This means that with sufficiently strong pressure, neither in winter nor in summer you will feel that cold air is drawn from the windows. It is also worth saying that depending on the season, the clamping density may also change.
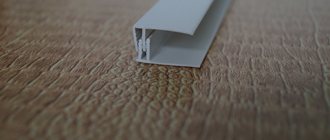
Replacing the rubber seal yourself
The service life of the rubber seal is 5-10 years. Its wear is easily determined visually. When purchasing a new element, it is advisable to give preference to German manufacturers; the quality of their products is always at their best. In addition, the rubber band will have to be replaced both on the frame side and on the sash.
The work algorithm is as follows.
| Illustration | Description of action |
| Remove the sash, unfasten the scissors and remove the seal, starting from the top. | |
| Insert the sash seal into the groove of the profile with the protruding “leg”. You can't pull it. Installation always starts from the middle of the top. When joining, coat the edges with glue. | |
| Replace the scissors. | |
| The seal is removed from the frame from the corner. | |
| Insert the seal into the grooves. In this case, the thick side should be directed towards the edge of the frame. Glue the edges of the elastic band and put the frame in place. |
The entire algorithm is presented in more detail in the video:
Adjusting plastic windows winter summer
Video
When winter cold sets in, the window should let in as little cold air as possible. If you ensure that the doors are pressed fairly tightly, this will protect the room from the cold. When the winter season gives way to a warm summer season, and there is no need to protect the apartment from cold air, the pressure on the windows needs to be loosened a little.
If at the beginning of winter you increased the pressure on the window sashes, then with the arrival of spring everything needs to be returned to its original state. The fact is that if you leave the sashes in this state, this will lead to rapid wear of the structural elements due to high stress, and will shorten the service life of the insulation, which quickly becomes thin due to constant and strong pressure and loses its heat-protective and sound-proofing properties.
In any case, before increasing the pressure, you need to make sure that the plastic windows really need this type of adjustment. To do this, you can run your palm along the entire window perimeter to feel the source of cold air. Instead of your palm, you can use a lit match or lighter, the flame of which will be more sensitive to even the smallest drafts. If after several years of operation of the windows the sealing material has worn out, then you will also need to strengthen the pressure.
How to clean and adjust fittings when clogged
PVC window fittings require careful treatment; they can be called the “muscle” of the system. During operation, street and household dust gets into it. If repair work has been carried out on the house, its consequences pose a serious danger to the functioning of the entire structure.
Advice! Manufacturers recommend cleaning and lubricating the fittings and moving mechanisms of a plastic window twice a year: in spring and autumn, as well as after repair work. This will ensure the product a long and impeccable service life.
The sequence of cleaning work is as follows.
- Remove the movable frame from its hinges.
- It is most convenient to start cleaning with a vacuum cleaner, this will prevent dirt from getting even deeper into the grooves.
- After mechanical cleaning with a vacuum cleaner, it is necessary to remove any remaining dirt and dust with soft cloths.
- Pour lubricant into the fittings. A special product should be used for sealing rubber bands.
- Place the sash in place.
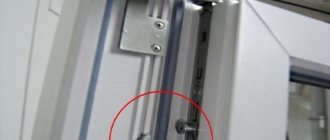
Clamp on windows with eccentrics
When opening a window, look at its end. There you will find three eccentrics, which also have another name - trunnions. They regulate the pressing force of the plastic window. To change the sash pressure, slightly move each eccentric away from the surface on which it is located and turn it a few millimeters to the side. This can be done using pliers.
To make the pressure stronger, start turning the eccentrics to the left. By turning these elements to the right you will achieve the opposite effect. Making the pressure stronger is quite simple, so you can adjust the windows yourself. The main thing is that the pressure density is the same. To do this, make sure that all eccentrics are unscrewed equally.
Pressure debugging
One of the first hardware elements that needs to be checked is the clamping bar. The tightness of the frame closure and the absence of drafts in the apartment depend on it. Here you should know that each manufacturer offers its own solutions for tuning and adjusting the pressure. In most cases, the density can be adjusted using an element such as trunnions.
To do this, you can use a screwdriver or pliers, which should be used to make a small turn. The trunnion has a notch that indicates the level of pressure of the plastic block. Since there are several such devices on the window, in order to achieve accurate operation of the fittings, it is necessary to adjust each pin. Some manufacturers may offer a manual on these procedures. The instructions are usually located on the website of the company that manufactures the accessories. There you can also find specialized photos that clearly show the entire debugging process.
Sometimes the pressure level can be adjusted using the bar itself. In this case, there will be an adjusting screw located on it, which needs to be turned by changing the position of the element. To make changes, first unscrew the fastener. Here you will need to use a screwdriver. Next, using a hex key, just like the hinges, the bar is adjusted with a slight movement. When the displacement is achieved, the clamp is again fixed to the profile of the plastic window.
By turning the handle, the functionality of the mechanism is checked, which should smoothly pull the sash to the frame. In this case, each trunnion should not experience problems with entering the seat of the rebate strip. If this happens, the trunnion or bar is again subjected to the adjustment process. For accuracy, you can find a plan. This scheme will allow you to complete the work as quickly and efficiently as possible.
Clamp on windows with plates
In some designs, window sashes are pressed using special plates. To adjust the pressure of such a window, pay attention to the end of the sash, where the hinges are located. If you tighten them clockwise, turning them with a key, the sash will press harder. Before tightening the sashes, be sure to check if there is a slight draft, so as not to increase the pressure on the sashes unnecessarily.
Replacement of glass unit
If one glass of a double-glazed window is damaged, the entire double-glazed window should be replaced; this is the most expensive type of repair of PVC windows. If you are not confident in your abilities, you can call a specialist, but this is an additional expense. To replace a double-glazed window, you don’t need any special knowledge; in extreme cases, you can watch a useful video where everything is described in detail.
First of all, you should dismantle the damaged glass unit; to do this, use a chisel or spatula to remove all the beads. After removing all the beads, you can easily pull out the damaged glass unit.
Rice. 9. Replacement of double-glazed windows.
To install a new double-glazed window, you should order it from a specialized store or factory, indicating exact measurements. To avoid mistakes, you should measure the distance between the extreme points of the glass unit. You can also specify the window model, then the specialists themselves will select the required double-glazed window. To install a new double-glazed window, you should do all the steps in reverse order. The main thing is not to damage the new double-glazed window and carefully install the glazing beads. You can easily and simply repair a plastic window at home and not spend money on craftsmen.
Adjusting plastic window hinges
Video
Sometimes, even after putting the eccentrics into a state of strong pressure, the windows remain leaky. This can happen when the building shrinks. In this case, they say that the window has begun to sag. If this happens, then when the window is closed, not all the eccentrics end up behind the plate. For this reason, the sash is not pressed tightly enough, drafts appear and some of the heat from the room gets out. To correct this problem, it is necessary to move the sash to the side so that the eccentrics that are missing from the plates can freely engage with them. To do this, you need to determine which protrusions cannot reach the strike plates.
First, look carefully at the sash and remember where the locking lugs are. Now close the window, carefully grasp it in the places where the eccentrics are located, and gently pull it towards you. If the contact of the locking elements is good enough, the window will remain motionless. Otherwise, you will feel that the sash gives in to your traction and moves a little. This way you can understand in which part of the window the problem occurred.
Why did the sash sag occur?
There are quite a large number of reasons why plastic window sashes sag. In most cases, this is caused by an incorrectly installed glass unit that has gradually slid to the side and caused an imbalance. If this problem is not eliminated, then not only the hinges, but also the entire frame may fail. Therefore, it is urgent to adjust the position of the glass unit.
To do this, you need to remove the layout that holds the glass within the profile.
It is pryed off using a hard metal spatula or a thin but wide chisel. The work must be carried out very carefully, otherwise the layout may be damaged, which will not allow it to be secured in the plane of the sash. Next are plastic linings that support the double-glazed window in the center of the PVC frame. You can check the exact position using a regular ruler. Once everything is done, the layout returns to its original place.
Another reason for sagging PVC window sash is the turning of screws. Not every manufacturer conscientiously monitors how personnel comply with such laws as instructions. And if it is broken, then the hinges on the windows will not be fastened properly. The curled thread in the profile will not be able to hold the device, which will affect the position of the sash in the plane of the PVC frame.
This cannot be seen either in person or in photos, but the screws will need to be moved to a new location. But this may not be possible, since the position of the fittings is not intended for such displacement. There is another reason, where self-tapping screws are also present. In this case, the hinges are secured properly, but the length of the screws is too short. Here it will be enough to simply replace the short screws with longer ones.
Other reasons for sash sagging require complete replacement of windows or new installation. And you can do this yourself only if you have certain knowledge and the necessary tools.
Adjusting the top hinge
- Open the door;
- Using a hexagon, turn the adjusting screw located near the top hinge at the end of the sash clockwise several turns;
- We close the sash.
If it turns out that the upper corner of the window does not close well, you need to move it. To do this, open the window as wide as possible so that you can easily reach the hinge. At the top of the sash you will find a hinge. Please note that its design is different from the bottom one, but it also has a hole for a hex key. Find the adjustment screw in the hinge (it's located on the side). If, while checking the sash, you find that the eccentrics located further from the hinge do not close, turn the screw in the opposite direction from them.
Please note that the sash and hinge should not fit tightly against each other. There should be a small distance between them (a few millimeters) so that the tilt and turn window mechanism can fit into it. Therefore, after turning the key half a turn, be sure to check that the window can open and close freely.
If tightening the hinge does not help, you need to press the upper corner of the sash against the frame. To do this, you will have to use the screw located on the tilt-and-turn mechanism. To access this element, open the window in two positions at the same time. To do this, open the sash and press the lock. This element may look like a locking tab or tab.
Pull the lock all the way (while holding it), turn the handle, pulling the top edge of the sash towards you, and open the rotating mechanism. Locate the hexagon tab on one of the plates. By turning this protrusion, you can control how tightly the upper corner of the sash will be pressed against the window.
Winter and summer mode
Most often, plastic windows need to be adjusted for the new season: in winter, complete tightness is desirable, and in summer, you can let in a little fresh air. This is achieved by adjusting the sash pressure density. It's easy to do it yourself. Once you figure it out, you’ll be surprised how simple everything is...
The window sash is pressed to the frame using pins. These are movable metal protrusions on the side surface of the sash. When the handle is turned, they move behind the mating metal plates mounted on the frame. In order to be able to adjust the tightness of the fit of the sash and frame, they have an eccentric - either they themselves are made of an oval shape, or in the center of the round protrusion there is an adjustment with an offset center. By changing the position of the trunnions (see photo), you change the degree of pressure, that is, eliminate the draft from under the sash.
Adjusting the pressure of the plastic window sash to the frame
As you can see, the shapes of the locking protrusions can be different. Various tools can be used to adjust them. If your window has eccentrics like those in the picture on the left - oval-shaped protrusions - change their position using pliers: clamp it and turn it in the desired direction.
If the locking tab is round, as in the picture on the left, it can be slotted for a screwdriver or hex key. After examining them, you will easily understand which tool you need: a regular screwdriver or a No. 4 hexagon. Insert a key or screwdriver into the slot and also turn it to the desired position.
Place all the protrusions in the same position. Please note that they are not only on one side of the sash - the outer one, but also on the inner side (at least one, but there is one), and can also be at the top and bottom. Set all the existing locking lugs in the same position, otherwise the frame will warp and there will be blowing from under it.
Turn the eccentric using pliers or a hex wrench.
When adjusting the fittings of plastic windows, remember that weak pressure corresponds to the summer mode of closing plastic windows, standard or strong - to the winter mode. If you carry out maintenance work in winter, first set it to the standard position and check if there is airflow. It is not recommended to immediately pinch the rubber bands on new PVC windows. In this position, the rubber seal installed around the perimeter is strongly pressed. Because of this, over time it loses elasticity. A normal seal has a 15-year warranty, but still... If the pressure is immediately set to maximum, the rubber will deteriorate faster. As a result, once again setting the winter position on the plastic windows, you will find that it is still blowing from under the sash, and the rubber is all cracked. This means it's time to change the seal. This is also not very difficult, but it takes more time, and you still need to buy tires.
So: the winter and summer positions of plastic windows are set by changing the position of the locking lugs - trunnions. Everything is explained in detail in the video below. After viewing, adjusting plastic windows yourself will finally cease to be a problem.
Read how to install a mosquito net on a window here.
Bottom Hinge Adjustment
- Remove the cap from the bottom loop;
- We insert the hexagon into it and make several turns clockwise;
- We check the free movement of the sash and, if necessary, make adjustments until the problem is eliminated.
If, during the check, you find that cold air enters the apartment from the bottom of the window, then it is the bottom of the sash that needs to be pressed. To do this you will have to adjust the bottom loop. At the bottom of the window, you can make two types of adjustments: in the horizontal and vertical plane. In this case, we need to adjust the sash in the horizontal plane.
First, open the window and find the adjustment hole at the bottom of the hinge. A hexagon must fit into it (sometimes an asterisk is suitable for this hole). Insert the key into this hole and turn clockwise to bring the bottom corner of the sash closer to the hinge.
After moving the sash a little, check the result of the work by trying to close and open the window. If the sash closes tightly, you can finish. If you have tightened the bottom hinge all the way, but the window still does not close tightly enough, return everything to its original state and find another adjustment screw on the bottom hinge. To do this, open the window as much as possible and remove the plastic cap from the hinge. To do this, pull the bottom edge of the plastic towards you a little, then up and the protective element will easily come off.
Once you remove the plastic, you will find a small indentation at the top of the hinge where the screw is located. Insert the hex key (#4) into it. After you turn the key clockwise, the sash will begin to rise. To begin, make only one turn and check the result of your work by closing the window. If one turn is not enough, repeat again.
When is it required?
The hinges on PVC windows are adjustable in 3 directions - horizontally, vertically and for clamping. Changing the position of the mechanisms for securing the sashes is necessary when any of the following situations occur:
Up down. The hinges are adjusted in the vertical plane by turning the screw located in the upper part of each suspension, where the fixing pin is installed.
Position adjustment is required when the sash sag or sag over time.- Right left. The hangers can also be adjusted horizontally by turning the corresponding screw. The correction mechanism is located on the inside of the hinge, at the point where it interfaces with the movable sash.
- Clamp - relevant for the lower hinge, it provides an even gap at the junction of the sash with the fixed frame, when tilting the element.
If a misalignment is detected on the sash, an individual position is set on each hinge.
On a note. If a structural element needs to be moved entirely, the screws on different hangers must be turned equally.
Primary
At the factory, the hinge mechanism is automatically adjusted to the neutral position so that when adjusted in all directions, identical play is formed. After installing the window, this position does not always ensure comfortable operation of the window, which requires minor adjustments to the structural element.
This work is most often performed by the installation team upon completion of installation and sealing of the cracks. Before making adjustments, specialists check the normal movement of each movable leaf and the functionality of the mechanisms. As a result, the customer receives a fully adjusted window with the correct position of the hinges.
After use
During long-term use of the window structure, the hinge mechanisms may become deformed, or their settings may be lost. This is expressed in the onset of the following symptoms:
The sash touches the adjacent fixed frame profiles when closing or opening the window, which indicates a misalignment of the frame.- A crunching sound or creaking sound that is heard every time the moving part of the window is turned - the mechanism requires adjustment, since an uneven position causes stress concentration.
- The movement of hinge joints is difficult in the absence of lubrication on the contact surface.
Note! For normal operation and increased service life, the window structure must be adjusted at least once every 12 months. These measures apply not only to the hinge mechanism, but also to locking pins, handles and other fittings.
Window maintenance: replacing or lubricating the seal. Lubricating hardware
Video
It is quite easy to understand that the seal has worn out. To do this, just run your hand around the entire perimeter of the window and check if there is a small draft or cold spot. In this case, no matter how hard you try to press the sash or tighten the hinges, nothing will help. The only way to correct the situation is to completely replace the sealing material. Remove the old material and secure the new one in its place using a flat-head screwdriver. To avoid rapid wear of the material, do not stretch it too much when installing.
In order for window parts to last longer, they need care. Therefore, it is so important to lubricate regularly using special products, as well as machine or household oil. It is necessary to process all parts of the window that are subject to friction - eccentrics, adjusting screws, etc. Before starting lubrication, clean the parts to be treated from dust, dirt and the old layer of lubricant.
Cleaning the fittings from accumulated dust
Once every 5-7 years, windows need deep cleaning to remove accumulated dirt in hard-to-reach places. Without cleaning them in a timely manner, sooner or later you will have to repair them, since their functioning will be impaired. Repairs are quite labor-intensive in terms of the weight of the structure, so it is advisable to carry out the work with assistants.
(function(w, d, n, s, t) { w[n] = w[n] || []; w[n].push(function() { Ya.Context.AdvManager.render({ blockId: "RA-510923-1", renderTo: "yandex_rtb_R-A-510923-1", async: true }); }); t = d.getElementsByTagName("script")[0]; s = d.createElement(" script"); s.type = "text/javascript"; s.src = "//an.yandex.ru/system/context.js"; s.async = true; t.parentNode.insertBefore(s, t) ; })(this, this.document, "yandexContextAsyncCallbacks");
Scheme for adjusting elements to keep them clean and tidy:
- remove the sash from its hinges, removing the overhead frame elements;
- remove the top axle;
- remove the sash from the lower hinges;
- carefully set aside.
Removal of elements must be done with an assistant.
The surface of the sash is carefully inspected and the screws attached to it are unscrewed. The mechanism parts are washed well, preferably using specialized solutions that are easy to apply with a brush. After this, the structure is dried well in the fresh air or with cold air from a hairdryer. Lubricant is applied to each driving mechanism. The fittings are assembled in the reverse order and installed in their original place.
Before assembling the window, all fittings must be lubricated.
Adjustment, repair and replacement of handles
If the handle on the window is a little loose, adjusting it will be quite simple, since this problem arose due to loosening of the mounting screws. To fix everything, move the plastic trim to the side and tighten the screws with a simple screwdriver. If you notice that the handle has become difficult to turn, try to fix this problem as soon as possible. Otherwise, it may turn out that this element completely breaks due to excessive efforts in trying to open or close the window.
To make the handle easy to open and close again, you need to clean and lubricate the locking mechanisms. Remove dust and dirt from them, wipe and lubricate all moving parts. For this purpose, use only those oils that do not contain alkalis or acids. After lubricating all moving elements, check the operation of the handle by opening and closing the window several times. After lubrication everything should move more smoothly.
If the handle still does not move, or the window does not close when you turn it down, the lock may have moved while adjusting the window. You can find this element at the end of the sash - it is a metal plate placed slightly obliquely relative to the end. Now align the lock and turn the handle.
It also happens that the breakdown cannot be fixed, and the only way out is to replace the handle. First remove the plastic cover. To do this, you need to find a small recess on the protective element, which is designed so that the cover can be easily removed. Pick it up with your finger and pull it towards you, turning it in any direction. Under the plastic you will find two bolts. Unscrew them, remove the handle and replace it with a new one.
Possible errors and difficulties
When adjusting the hinge mechanism of a PVC structure, beginners may encounter a number of difficulties:
- Tight movement of the adjustment screw when turning with a screwdriver or wrench. This problem indicates low quality or lack of maintenance of the fittings over a long period of time. Before making adjustments, all metal parts should be treated with a penetrating lubricant to facilitate the sliding of the metal.
- Turning the adjusting screw should be done using hand tools only. A highly sensitive mechanism ensures that the element moves with each rotation of the part by 90-180 degrees, and therefore the use of a screwdriver will not allow achieving increased accuracy.
- If, after making the adjustment, the sash opens with a crunch, this indicates a lack of synchronization between the positions of the upper and lower suspension, which must be eliminated immediately after identifying the problem.
If, after completing the adjustment, the sash does not meet the requirements for comfortable operation, you should seek help from professionals. Such malfunctions indicate a breakdown of individual mechanisms and the need to replace them as soon as possible.
Features of brand adjustment
Plastic windows from different manufacturers are manufactured using the same technology. However, during operation, you can discover some features inherent in certain brands of eye systems and accessories, which are worth knowing about in advance.
Adjusting plastic windows Rehau
- The windows of this brand can be adjusted in several planes: down and up, right and left. In addition, you can adjust the clamping force;
- If the window is equipped with fittings from the Siegenia Aubi brand, to adjust the structure it is necessary to tighten the screws;
- When purchasing a REHAU blitz product, please note that it uses Roto brand fittings. This means that you will only have to use hex wrenches to make adjustments.
Adjusting VEKA plastic windows
- To increase the pressure and prepare the structure for winter use, turn the locking tenon 90 degrees using a hex wrench. This tenon is located under the top turn;
- If the handle is jammed and you cannot close the window, move the sash slightly in the opposite direction. To do this, use the adjusting screw, which is located under the lower hinge;
- If the handle breaks down and there is no way to restore or repair the element, turn the plastic attachment 90 degrees, unscrew the screws located under it and replace the handle with a new one.
Adjusting MACO fittings
- It is necessary to adjust the window sash in the vertical plane only if, when closing the window, problems arise with the lower edge of the sash. To do this, you need to get to the top of the lower loop by removing the protective cap from it;
- If you need to adjust the sash horizontally, find the second screw on it. It is located on the side at its base. Using a key, turn the screw in the desired direction: clockwise - bringing the sash closer to the hinge, counterclockwise - moving it away;
- To adjust the pressure, find the eccentrics at the end of the sash. Their standard position is an angle of 45 degrees. To increase the pressure, turn the eccentrics to a horizontal position clockwise using a spanner or pliers.
Now you know that adjusting plastic windows is quite simple. If you follow the tips and recommendations described in our article, you will be able to solve almost any problem on your own, without the help of a specialist.
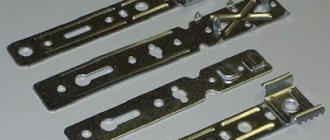
Main components that need adjustment
Adjustment may be required for any moving elements of plastic window fittings, which include:
Bottom swivel hinge
Top hinge with tilt and turn mechanism
Locking pins
Do-it-yourself repair and adjustment of plastic windows may be required at several points. In particular, it may be necessary to adjust the sash vertically, horizontally, adjust its pressure to the frame, and set the lower angle correctly
What to do when the PVC window handle is faulty
Another weak link in the structures is the handle. If it malfunctions, it will become impossible to open or close the moving part. The most common problems encountered are:
- fasteners have become loose;
- the handle does not turn well;
- the unit is jammed.
Let's take a closer look at troubleshooting each problem.
The handle is loose
If the handle becomes loose, this means that the fasteners have become loose and the mechanism may fail. To work you will need a screwdriver and 2-3 minutes of time.
- Pull the cover towards you and move it to the side.
- Tighten any loose screws.
- Put the cover in place.
Repairing a loose handle
Problems turning the handle
If the handle is difficult to turn, there may be several reasons for this:
- The lubricant inside the mechanism has dried out. This problem is easily solved. It is enough to apply lubricant to all moving parts of the handle and pour it into the holes. Then you need to turn the handle several times so that the composition is distributed over all nodes;
- the fittings are clogged , to do this you will need to disassemble the handle and clean it. If you can’t turn to specialists, you’ll have to act on your own. First of all, you need to photograph the mechanism. This will make it easier to determine the order of its assembly. Then, take everything apart, clean and lubricate. After this, reassemble the handle;
- the mechanism has failed. To fix this problem, you will need to find a suitable mechanism and replace it yourself.
WD-40 is suitable for lubricating moving parts.
Craftsmen can immediately install a handle with a security lock
Jamming occurred
If the handle is stuck in the “open” or “closed” position, it means that the lock has been activated. It is installed in the mechanism in order to protect the structure from sudden breakdown, and, unfortunately, sometimes it works spontaneously and always at the wrong time.
In the open or closed position of the movable structure
You can correct this situation with your own hands. The procedure depends on the brand of accessories:
- for “AUBI” fittings, the algorithm of actions is as follows: put the sash in a vertical position, find a plate with a spring on the end side at the level of the handle, press it against the rubber seal, then turn the handle;
- On the handles of other manufacturers, find a locking tongue on the end side. It is located at an angle relative to the opening window. To unlock, you need to turn it over to a vertical position, then you can turn the handle;
- If the lock breaks or slips, to adjust it, you need to open the window slightly, unscrew the response mechanism, place any plastic pad under it and tighten it.
Adjusting the blocker
Adjusting the response mechanism
Another option for unlocking a window can be seen in the video:
In reclining position
If the handle is stuck in the ventilation mode position, most likely the element called the scissors has broken. The action algorithm is as follows.
- Remove the movable sash from its hinges.
- Install the upper scissor assembly into the prepared grooves.
- Turn the handle slightly to the side. Press the lock if the handle does not turn.
- Check the correct functioning of the locking unit.
- Reinstall the window.
If adjustment does not help, you need to lubricate the moving parts of the scissors with a special compound, such as WD-40.
The scissor lock is a regular button
What to do if the movable structure opens in two positions simultaneously
This can happen when the user starts to turn the handle while the window is open, and the lock will activate. The algorithm of actions is as follows.
- Turn the handle up.
- Carefully, without additional effort, press the movable window structure from above to the frame.
- Holding the movable sash with your hand, lightly press the lock bar. At this time, the handle should be turned to the opening mode parallel to the window sill.
- Check the functionality of the handle in different modes.
Sequence of actions in case of opening the sash in two directions simultaneously
How to replace a PVC window handle
If the handle breaks or none of the adjustment options helps, there is only one way out - install another one. When choosing new fittings, pay attention to the following factors:
- quality of the handle;
- shape and color, which should be in harmony with the overall interior;
- handles with a lock have appeared on sale - this is excellent protection against children, the mechanism will protect the window from unauthorized opening.
Let's look at the entire procedure for replacing the handle in more detail.
| Illustration | Description of action |
| Turn the handle parallel to the window sill. | |
| Move the decorative trim aside and unscrew the screws. | |
| Remove the handle from the plastic window. | |
| Take the whole pen. Holding it by the body with one hand, turn it at an angle of 90º with the other. | |
| Bend the cover and turn it perpendicularly. | |
| Insert the handle into the holes. It should fit exactly into the groove and fasten with screws. | |
| Turn the decorative trim to a vertical position. |
You can watch the entire process in more detail in the video:
Advice! If the decorative trim is closed, it cannot be moved to the side. There is a recess in the lower part into which you can insert a flat-head screwdriver or a file and pry it slightly. The bar will move away from the knot.
The window is stuck and won't open
In most cases, the reason is the blocker mentioned above, or rather, its untimely operation.
If you inadvertently turn the handle down in the open swing position and then close it, the lock may operate.
The further sequence of actions depends on the model of the mechanism. First you need to try to re-close and open the sash alternately in tilt and turn modes.
If the handle does not rotate fully to any of the open positions, try the following:
- With one hand, lightly pull the top corner near the hinges;
- At the same time, try to rotate the handle to the swing position;
- Place the trunnion clamping eccentric vertically.
There are situations when the handle is not jammed, but, on the contrary, rotates around its axis, but the sash does not react in any way to the rotation. This indicates a breakdown of the fittings and in this case it is unlikely that you will be able to do anything on your own. The good news is that such breakdowns do not occur suddenly, but it all starts with play in the handle, which increases over time. Therefore, if you take timely measures and replace the faulty part, you can avoid unpleasant surprises.
Handle stuck open
Usually it gets jammed due to a malfunction of the locking mechanism. To unlock the handle, you need to return the locking mechanism to its normal position. To do this, find the blocker and identify the manufacturer. For example, the locking mechanism of the AUBI brand and the Roto brand will be different.
Important! The blocker itself is usually located on the end side of the sash and looks like a plate.
- If you have the “AUBI” , then the mechanism should be positioned vertically. If it is in a different position, press the lock and, without releasing it, turn the fittings to the position you need.
- If you have the brand “Maco” , “Roto” or other brands, then find a metal protrusion, the so-called. “tongue”, in the normal position it is located at an angle to the frame. Then push it down until it is parallel to the frame. After this, start turning the handle to the required position.
Ready! As you can see, repairing window fittings is not a difficult task at all.
Go ahead.
Elimination of blowing from the hinge side
This ailment appears as a result of the poor quality of the purchased window. To solve it, you will need plates, which you can either buy or make yourself from, for example, plastic rulers.
Important! When creating the plates, keep in mind that they should not rest against the inside of the glass unit, otherwise it may crack. For greater efficiency, we recommend making plates whose thickness is equal to the thickness of the glass.
Once you have purchased or created the plates, you need to find a place to insert them. First, remove the glazing bead, which is located on the hinge side. When you remove it, you will see other plates underneath - you don't need to touch them.
Move the sash away from the glass unit by 3-6 millimeters, and insert your plates approximately in the middle. Then push the sash back and check if there is any air flow.
Stuck in ventilation mode
The cause of jamming is usually the exit from the grooves or the breakdown of the so-called “scissors”.
In case of such window breakdowns, the main thing is not to apply excessive force to the handle and not to try to forcefully close or open the sash.
To restore the unit's functionality, you must do the following:
- Remove the sash. To do this, you first need to remove the top canopy cover, pull the special rod down and remove the hinge.
- When the top is detached, the sash is easily removed from the bottom hinge - just lift it a little.
Bottom loop - We place the sash bottom on the floor so that it is convenient to work with its top.
- We look for the grooves into which the “scissors” should fit and insert them into place. It may be necessary to press the lock bar or turn the handle.
- We assemble the block in reverse order.
Sometimes you can do without dismantling the sash. This will require certain skills and enough free space at the top of the window, since if the slopes get in the way, it will be quite difficult to push the “scissors” into place.
Jamming in the ventilation mode can also occur due to broken fittings, the presence of foreign objects in the mechanisms or grooves, misalignment of the sash and incorrect operation of the lock.
Damaged double-glazed windows - no problem, step-by-step guide to action
In more complex cases, a complete replacement of the double-glazed window or glass will be required. It is advisable to invite professional specialists for such work. If desired, all manipulations can be performed at home yourself.
Complete glass replacement
A double-glazed window is a sealed structure that consists of several sheets of glass. Sometimes there is a need to replace it. This may happen in the following cases:
- glass is broken or cracked, respectively, depressurization of one chamber has occurred;
- condensation appears on the glass surfaces, and the desiccant rolls down in the form of yellow resin;
- street noise can be heard in the room, it became necessary to install a noise-absorbing double-glazed window;
- drafts have appeared that are not regulated by any of the above methods. Accordingly, heat is not retained in the room;
- the structure has lost its tightness, or it is necessary to install a double-glazed window with a large number of chambers.
Depressurization of a double-glazed window
To replace a double-glazed window, you must perform the following manipulations.
- Determine the marking of the glass unit, which is printed on the aluminum frame, and order a similar one from the manufacturer.
- First, remove the bead from the vertical side of the glass unit, then the closest one from the free corner. After dismantling all beads, remove the glass unit. It is advisable to use a spatula and mallet when working.
- Install a new double-glazed window, having previously laid the straightening plates.
- Secure the beads until you hear a characteristic click.
Glass unit marking
The procedure for dismantling a double-glazed window
How to replace glass in a double-glazed window with your own hands
Replacing glass in a double-glazed window requires certain knowledge and skills. Let's look at the whole process in more detail.
| Illustration | Description of action |
| Remove the beads around the perimeter of the glass unit. | |
| Remove the glass unit and place it on a horizontal surface with the broken glass facing up. Using a utility knife, cut through the sealant around the perimeter to the spacer frame. | |
| Remove the broken glass from the glass unit. | |
| Cut off the sealant layer at a slight angle, wipe the new glass with a cleaning agent, remove all dirt and place the washed side inward on the glass unit. | |
| Thoroughly treat all connections with plumbing grade silicone. Acrylic sealant cannot be used in this case. Wait until it dries completely, cover the edges of the structure with tape, insert it into the frame, and install glazing beads. |
You can watch the entire process in more detail in the video: