Installation of window sills is an important stage of construction, which simultaneously ensures comfort and safety in rooms for various functional purposes. Thanks to well-chosen geometric parameters and high-quality installation, the window sill board fully satisfies the required indicators for strength, reliability and durability, maintaining its original technological characteristics throughout the entire operational period.
Currently, concrete window sills are becoming increasingly popular because, in addition to their high strength and reliability, they are distinguished by a wide variety of geometry and textures to suit every taste.
- What document regulates the installation of window sill slabs?
- What should be the height/distance of the window sill from the floor?
- How long should the window sill be?
- How far should it protrude from the wall?
- How to choose the right width?
- How deep should the window sill be?
- What thickness?
- What should the slope of the window sill be according to GOST?
- What should be the installation of a window sill according to GOST: video
Window sill in private houses
Private houses can be located in different parts of the country, so there are a huge number of possibilities for placing windows. Nowadays, some people get rid of walls altogether and install windows instead, getting a stunning view.
If the structure of the house or finances do not allow you to formalize this idea, you can try placing the window sill at the same level as the floor.
A good idea for private houses would be to install windows that will be located on two floors at once. If your house is located in places with a cold climate, building a balcony or veranda would be a good solution. To learn how to install the window sill to the desired height, watch this video:
For an attic or second floor, the landing should be about 90-100 cm. This height will provide a good view from the window and will keep the room warm.
The optimal location dimensions are presented in the following table:
In general, there are no standards for window placement. The location of the window sill board largely depends on the type of room and its functions.
Wall cladding methods
Finishing the wall behind the battery can be expensive or cheap, but in both cases it is not done quickly.
Battery repair steps:
- We remove the battery, otherwise it is impossible to fully seal the surface. When removing it yourself, first turn off the water supply valve and return valve.
- There is water in the radiator; when unscrewing it from the taps, place a low bucket or, better yet, a wide basin. The battery is removed from the mount when the water has completely drained. It’s safer to call a technician, because if the heating is on and the ball valve on the jumper is old, it’s dangerous.
- In order not to spoil the clean floor and carpets, you should stock up on large pieces of film and cover the entire path from the front door to the radiator.
- Next, we inspect the wall for defects and prepare it. We remove the bumps of old plaster and paint with a hammer and chisel, paying attention to the place where the baseboard is, it should be as even as possible.
- We remove debris and fill small cracks with putty. Once they have dried, we completely level the niche with plaster.
- The dried plaster is primed 2 times, the layers dry for 2 hours.
The radiator has been removed, the wall has been prepared, now you can choose the finishing method, and there are many of them. By the way, there are “dry” finishing options behind the battery, for which the surface does not need to be leveled, you just need to remove the protrusions and prime it.
We putty and glue wallpaper
Let's continue the topic of plaster. The method is expensive and time-consuming: you need to buy a lot of materials, and the plaster takes up to a week to dry. Beacons are not placed in the starting layer; this is a small surface; it is quite possible to level it without beacons.
After drying (up to approximately 5 days), we prime the wall, let it dry and apply the finishing coat. To save time, it is better to buy a bucket of ready-made putty. The dried surface is sanded with a sharp spatula, this way there is less dust in the room. Cut out the required pieces of wallpaper, take special glue and paste over it. They start gluing from two opposite sides, so that the joint of the pieces is in the middle, behind the battery. Next, measure out the pieces of plinth, drill holes in the hay for the fastening and install it.
Installing drywall
Finishing the wall behind the battery also means finishing the wall with plasterboard. The method is well suited in a house with plasterboard walls, it’s less hassle: at the same time you make the sheathing under the gypsum board for the battery. This is also possible with brick walls. They make a metal frame on which the sheets will be attached. GCR withstands exposure to warm temperatures very well, does not crack over time and has low heat transfer.
In this regard, it is perfect for finishing the space behind and around the battery. If you install insulating material between the wall and the gypsum board, then 10-30% of the heat will remain in the room. You just need to remember to drill holes in the drywall so that warm air from the radiator can enter the room. The joints between the sheets are pasted over with a thin mesh and puttied. A thin layer of finishing mixture is used to level everything flush with the wall. When everything was dry, all that was left was to paint the wall.
To increase operating efficiency, a heat-reflecting film is glued behind the rear wall of the radiator
There are also special heat reflectors that direct warm air into the room, but not everyone has proven the effectiveness of such a device.
We glue plastic panels or ceiling tiles
This option is the most budget-friendly, but it allows you to give the area under the battery a well-groomed look and even well insulate the thin wall where the niche is located. We are talking about the use of modern material - foiled polyethylene foam. It is mainly used for thermal insulation. It comes with double-sided aluminum coating and single-sided, with denser polyethylene inside and regular, self-adhesive and not. The simplest one is also suitable for finishing a niche.
Rarely does anyone glue ceiling tiles anymore, but they do exist as a finishing option.
Before pasting, the wall is also prepared, but not as thoroughly as in the case of plaster. We knock down the unevenness, remove the dust with a rag, seal small cracks with a solution of alabaster and sand, it dries quickly and you can continue working. You need to carefully measure the size of each wall with a tape measure so as not to spoil the penofol. Next we glue the insulation. We use universal acrylic-based mounting adhesive and a mounting gun. It sticks perfectly, and temperature does not affect it in any way.
They start gluing from the widest wall behind the radiator, then seal the top wall and the sides. The insulation can be covered with white or wood-like plastic panels using the same glue. The panels must be chosen the same width as the window sill protruding above the niche, so as not to cut it in this place. If necessary, the side parts are trimmed along the plank. External and internal corners are trimmed with special plastic strips to match the panels. Instead of a plinth, you can use a special strip with two sides into which panels are inserted.
The battery, like the wall behind it, can be designed as a design element, but then the wall behind it must be perfect
The second cladding option will be polystyrene foam ceiling tiles. It is easy to cut out pieces of the desired size from them, they are sold in a variety of colors, smooth and embossed. They begin gluing from the bottom up, so that whole pieces of tile are visible in a visible place. It is better to decorate the window sill with a ceiling plinth at the first stage, and then “pull” the tiles to it. Here you can also use corner strips. The tiles near the floor can be glued at the joint to the baseboard, or you can remove it, veneer it and attach the baseboard back. In addition to decoration, ceiling tiles have good thermal insulation characteristics.
Correct installation of window sills
Installing window sills during a major renovation of an apartment is an inevitable operation. Even if your new apartment has window sills from the developer, then with a high degree of probability these window sills will still have to be replaced: careless installation, the window sill itself is of poor quality, damage during the renting out of the apartment.
In most cases, the customer gives preference to inexpensive PVC (plastic) window sills in white matte color, which are unpretentious in operation. This option is acceptable for budget renovations if your windows do not face the sunny side or you plan to have blind curtains. Otherwise, under the influence of sunlight, a budget window sill will quickly lose its presentation: temperature deformations, fading of plastic (yellowing, etc.). Such installation of a window sill is not always financially justified.
When making high-quality apartment renovations for yourself in the long term, it is better to give your preference to higher-quality window sills (Moeller, Danke, Werzalit). This is no longer just plastic colored in the mass, but window sills made on the basis of wood-polymer mass from environmentally friendly materials with various acrylic coatings, imitating the textures of wood or marble of various colors, allowing to please the refined tastes of any client for the implementation of his design project. In addition to decorative qualities, such a window sill has great torsional rigidity, durability and wear resistance, and high-quality geometry. When installing a window sill, you must be guided by certain technologies.
When purchasing a window sill, you need to take the dimensions in advance and understand how it will be positioned. Since the store will cut you the required length for ease of transportation, and the width of the window sills are produced in multiples of 5 cm (20,25,30 cm, etc.). When installing the window sills correctly, it is necessary to agree with the customer on the overhang of the window sill relative to the wall. The “flush” option (flush with the wall) is shown in Fig. 1; this option for installing a window sill is preferred by those who plan to hang curtains and tulle to the floor so that the protruding window sill does not interfere. Those who plan to use the window sill functionally (storing decorative items, flower pots or making a window sill-tabletop) prefer a large window sill overhang (Fig. 2).
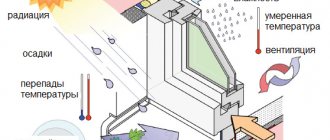
It is necessary to take into account that the large protrusion of the window sill in further operation will interfere with the convection of hot air from the heating radiator upward in order to create a barrier to cold air that penetrates into the apartment through the double-glazed windows. To improve convection in the protruding part of the window sill, it is necessary to make ventilation holes or install a ventilation grill (Fig. 3), which will not interfere with the rise of hot air.
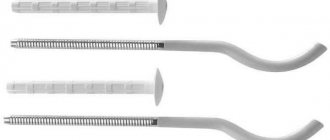
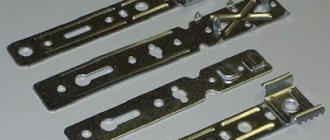
To install the window sill correctly, it is necessary to make a groove in the slope (if it is already made) into which the ends of the window sill will be placed to create additional rigidity of the structure in the coupling. On the side edges of the part that will fit into the groove of the slope, cut off the window sill (Fig. 4). At the end of installation, special end caps will be installed on the remaining part of the end (sold separately from the window sill).
The window sill can be installed on mounting or plaster mortar. For better adhesion with the adhesive, small length (25mm) self-tapping screws (25mm) should be screwed into the smooth back side of the window sill (not the front) in a checkerboard pattern (Figure 5.6), which after the solution (or foam) has hardened, will ensure reliable fastening
When installing, blowing out the polyurethane foam on the window sill should be done with good foam, giving preference to proven brands. In this case, you can be sure that the foam will not inflate and make your recently installed window sill “humpbacked.” Using a professional foam gun will allow you to use 2-3 cylinders to install window sills throughout the apartment.
home_and_garden
Stylish and comfortable home
Are your window sills long-eared?
Recently, Dmitry Sivak had a blog post about window sill ears.
In short:
Cleats date back to the days when every window had an internal casing around it, so it's normal for traditional styles. But if you are a design rebel or an art revolutionary, then feel free to make the window sill not only without side projections, but generally flush with the window opening.
There is one point that confuses me about all this. With roller blinds and Roman blinds, everything is clear if they are located on the window itself or along the width of the window opening:
But if they are dark, then light will shine through the cracks from under them.
What to do if the curtains are hanging on the wall?
If you make the window sill narrower, they will hang around the edges:
The topic of huge ears is also not covered:
What do you think? Have you ever thought about window sill ears? How are you?
Information about this community
- Placement price 50 tokens
- Social capital5 311
- Number of readers
- Duration 10 hours
- Minimum bet 50 tokens
- View all Promo offers
- —
- leave a comment
- 1
- 2
And in all apartments in the Russian Federation and the Netherlands there are lop-eared people everywhere :))))
By the way, I didn’t think that such a photo would ever be useful, so I didn’t take it. When we replaced the windows and window sills in our Stalinist building, there was almost a rail for the window sill in the walls right up to the frame, well, it’s the same as a groove in the slopes along which it was literally inserted there (in the original we had granite window sills).
But in Israel, most apartments have no window sills at all. This is one of the items on the list of things that plunged me into culture shock upon arrival.
I have such “ears” that they merge into one large marble window sill (15 cm from the wall, 40 cm from the window). Literally from one side wall to the other. Under it there are radiators under the sheathing, and where they are not there are small cabinets. I love large window sills, for flowers - it turned out to be such a large shelf.
Rather not “why”, but “why”. Plastering a window opening with a “eared” window sill is 100 times easier, because there is no need to maintain the thickness of the plaster to the nearest micron.
The argument with curtains doesn’t work at all, because... they change more often than window sills, even for the most careless housewives