If you need to repair the floor on the balcony, and you don’t know or can’t decide how to level and finish the surface of the balcony or loggia, then don’t rush to call a specialist because even a beginner can do this amount of work, and there is an opportunity to save money .
Follow the step-by-step instructions in this article, and you will see that this type of work is very simple and does not require excessive skills.
What types of floor coverings are there?
Types of floor coverings, their features
- Laminate. Currently in great demand due to its low cost, aesthetic appearance and variety of colors. ...
- Linoleum. Polymer material sold in rolls. ...
- Ceramic tile. ...
- Parquet. ...
- Self-leveling floors. ...
- Bamboo floor. ...
- Porcelain tiles. ...
- Carpet.
Interesting materials:
When to propagate gooseberries? When will you be allowed to vacation in Egypt? When will employees of the Ministry of Internal Affairs be allowed to travel abroad? When did Yugoslavia collapse? When will Russia resume flights with Belarus? When did Russia capture Bukhara? When to plant spring garlic in 2020? When to plant barberry in the fall? When to plant chrysanthemum cuttings? When to plant Syrian Hibiscus?
Selection of materials
What material to choose depends on whether the balcony is glazed, insulated or completely open. For each option, the material is selected individually.
For a glazed, non-insulated balcony
If your balcony is glazed, but does not have heating systems and there are no plans for such in the future, then it is necessary to select moisture-resistant materials. Despite the fact that the balcony is closed from precipitation, condensation will still form during temperature changes.
In this case, the following types of materials are suitable for leveling:
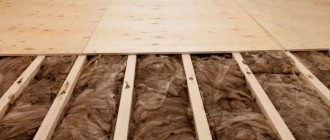
- moisture-resistant plywood;
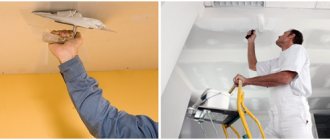
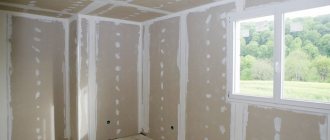
- drywall;
- gypsum fiber sheet (GVL);
- cement bonded particle board (CSB);
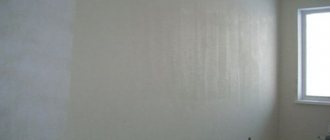
- cement strainer;
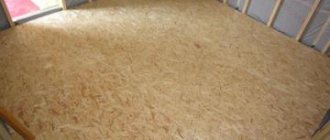
- oriented strand board (OSB).
Finishing materials:
- moisture-resistant laminate;
- tile;
- linoleum;
- carpet
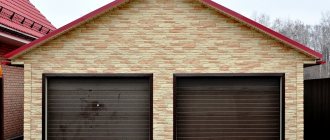
For an open balcony
The most difficult case when choosing materials is an open balcony due to constant precipitation and low temperatures in winter.
In this case, the following materials are suitable:
- cement strainer;
- oriented strand board (OSB);
- cement bonded particle board (CSB).
Finishing materials:
- terrace board;
- porcelain stoneware;
- ceramic tile.
Note!
The balcony slab should not be overloaded. If you plan to raise the floor by more than 5 cm, it is better to use lightweight materials and structures such as wooden beams (joists) or dry screed instead of cement.
For a glazed and insulated balcony
If your balcony or loggia is glazed, has or will have in the future a radiator, a heated floor system or one of the existing constant heating systems, then you can use materials that are used when leveling and finishing rooms in an apartment.
Heating mats and their types
One of the most popular and budget systems are heating mats. They represent a single heating cable, attached in a wave-like manner to a special mesh made of durable fiberglass. The devices belong to the class of systems with cable heating; they are installed exclusively on the floor.
Heating mats can have a length from 50 cm to 3 meters, the width of the reinforcing mesh holding the cable is usually 50 cm
A single- or double-core cable acts as a heat source. Its diameter varies in the range of 2.5-4.5 mm. To operate the mats, a power source of 220-230 W is required.
The cable is protected by a special plastic shield. The length of the cold wire usually exceeds 2 m.
Industrially produced heating mats are divided into two groups.
They are divided by cable type into:
- single-core;
- two-core;
Single-core systems . Their peculiarity is that they must be laid so that the two ends are connected to the thermostat. This significantly complicates installation, since cutting of mats is required.
Also, a mat with a single-core cable emits an electromagnetic field, so it is not installed in rooms where people are constantly present.
The main advantage of single-core heating equipment is its low price, the possibility of implementation in the bathroom, toilet, kitchen area
The double-core mat is an improved modification of the single-core mat. Here, in addition to the heating core, there is an electrical cable. Its implementation in the design allows one end to be connected to the thermostat, and the other to be hidden in the coupling, which makes it possible to complete installation anywhere.
The two-wire type mat practically does not emit an electromagnetic field, therefore it is completely safe for humans. It can be installed not only in the balcony floor, but also in any other room as a source of additional heat.
Heating mats also differ in power and can generate from 60 to 2300 W of energy. You can read below about how to calculate the required power of the mat.
Both single-core and double-core mats are reliable and can serve flawlessly for many years. Typically, single-core modifications are thinner than double-core ones, have more power, and therefore are able to warm up the floor surface faster.
Pros and cons of heating mats
Let's consider the features, advantages and disadvantages of heating mats.
- When using mats, the height of the room is reduced by only a couple of centimeters, taking into account the height of the tiles and the adhesive layer.
- The system is economical and uses electricity efficiently. If there is furniture on the balcony, then mats cannot be placed under it.
- Heating mats are easy to install. The only point that may cause difficulty is connecting the system to the thermostat.
- Heating mats are used for short periods of time. They are not designed for constant 24/7 operation.
You can apply tile adhesive on top of the mats and lay the tiles themselves. The choice of device takes into account the area of the heating surface and the heat loss of the loggia. For installation on a balcony, it is not advisable to take a long mat, since the device cannot be shortened.
You can only reduce the cold ends, so for the balcony you need to select a device that best matches the floor area.
Image gallery
Photo from
Components of a heated floor on a loggia
System fully prepared for installation
Laying floor tiles on heating mats
Electromats in non-standard shaped rooms
Installation of heating mats
Installation of heating mats must be carried out with care. It is important to protect the cable from mechanical damage. It is unacceptable to use cutting or sharp objects during installation or leave them unattended.
It is also important to try not to step on the cable. To eliminate the possibility of this incident, it is advisable to carry out installation in shoes with soft soles or without shoes, and before installation, the floor surface is completely cleaned of dirt.
Care should be taken when fixing the tiles, applying adhesive and cleaning the seams. While performing this work, you may accidentally damage the cable.
The installation of an underfloor heating system using heating mats includes a number of traditional stages:
Image gallery
Photo from
Stage 1: Laying heating mats on a leveled base
Stage 2: Cutting the underfloor heating system
Stage 3: Applying tile adhesive to the heated floor
Step 4: Laying floor tiles over the heated floor
Let's consider options for laying mats on different types of surfaces.
First, heat-insulating material is installed on the concrete floor of the loggia, then the floor is leveled, and a shock absorber is installed that will prevent deformation when heated. Then a mat is placed on the shock absorber, after which it is covered with tile adhesive, on which the tiles are laid.
At the last stage, the protective tube for the temperature sensor, thermostat is installed, and the cold wires are connected.
Before laying the mat, to ensure its maximum effectiveness, you can lay a layer of thermal insulation on the floor (+)
If the floor on the balcony is made of wood, then the surface is first leveled with a concrete layer of 7-9 mm, then heating mats are laid, hard foam is laid, and then the floor is covered with wood.
If the installation is carried out on an old tile covering, then make a concrete screed, install a heating element, cover it with tile adhesive, and then create a new tile covering. If the floor tiles were in good condition, then leveling screed may not be necessary.
Heating mats can be easily installed on the old tiled surface of the loggia without dismantling it (+)
Let's take a closer look at the installation features.
Before introducing mats into the floor surface, it is necessary to draw up a schematic installation plan.
The project should display:
- heated surface contour;
- laying diagram;
- location of the temperature sensor, thermostat, taking into account the location of the power supply wiring.
Before starting work, it is important to prepare the surface for laying mats. To do this, eliminate cracks on the floor with putty. After it dries, the floor is cleaned of dust and dirt. If the surface is wooden, you need to make sure that it is securely fixed.
Before installation, you need to install a groove for the tube that comes with the temperature sensor. It is important that it is located at the level of the top edge of the product at the same distance from the heating cables.
During work, you need to seal the tube on one side with electrical tape so that tile adhesive does not get into it. The second end is connected to the thermostat itself, which is located in the junction box.
Installation can be done in two ways - cable up or cable down. The first method is the simplest and is used most often in practice.
The method in which laying is done with the cable up is that the mats are laid with the mesh down. Next, using glue, the device is point-fixed to the floor surface.
Afterwards, tile adhesive of the required thickness (usually 3-5 mm) is applied to the surface of the mat, after which they begin laying the tiles.
It is important to distribute the glue evenly over the surface of the mat to avoid the formation of air voids, since during operation they can lead to overheating of the cable and its breakage
The cable must be completely immersed in a heat-conducting medium (tile adhesive, etc.).
The method in which the cable is laid with the cable down (i.e., with the mesh up), is more difficult to implement. Before laying the tiles, a mat pattern is made. To do this, it is spread out so that it completely covers the heated surface.
Next, the mat mesh is cut and then rolled up. A 2-3 mm layer of glue is applied to the floor, after which the mat is unrolled with the cable facing down and pressed lightly.
During installation, it is important to ensure that the distance between the cables is not less than 5 cm. A second layer of 5-6 mm adhesive is applied with a notched spatula directly onto the heating mat, after which the tiles are laid.
Finishing Instructions
Below are step-by-step instructions for finishing the floor on a balcony or loggia with your own hands using the most popular materials.
Laminate
- The first step is to measure the distance between the walls of the balcony and mark the required distance on the laminate sheets. You need to make a small gap between the wall and the floor covering. This is done if the size of the laminate changes due to moisture and temperature changes. The laminate should be cut at a right angle, otherwise it will not be possible to lay the slats evenly along the walls. In this case, an electric jigsaw is used to cut the laminate. You need to cut at a low speed to avoid the appearance of jagged edges, and when approaching the edge, the jigsaw needs to be moved even more slowly to avoid chipping.
- The next step is to lay a backing on the surface of chipboard or plywood. The underlay is laid on the floor cleared of construction debris.
- We fix the substrate to the wooden base using staples and a construction stapler. This is necessary so that the substrate does not fidget or move while laying the laminate. Alternatively, you can use double-sided tape.
- After fixing the substrate, we install the first part of the laminate. In this example, one piece of laminate covers the entire surface of the balcony; as a result, the seams are located perpendicular to the long walls of the balcony.
There are other ways to lay laminate: diagonally, longitudinally, herringbone or squares. In these cases, more finishing material will be required and there will be more undercuts. - Next, we move on to installing subsequent elements. The connection technology depends on the method of processing the ends of the products. In this example, there was a lock that snaps into place with a slight pressure on the lamella.
- Difficulties may arise in the area of the balcony door threshold. At this point it is necessary to cut the lamella into a recess. We measure the length and width of the recess, transfer it to the lamella and cut it out.
- The last element of the laminate is laid after preliminary cutting. On the last lamella, the cut must be made lengthwise. It’s okay if it turns out a little uneven, as this area will be covered with a plinth, and small defects will not be noticeable.
- The floor is ready.
PVC tiles
Vinyl tiles are an excellent solution for an enclosed balcony. Thanks to the variety of colors, you can independently create an original pattern on the floor that will decorate your balcony.
- ease of installation;
- water resistance;
- non-flammability;
- resistance to aggressive substances;
- highly decorative;
- small thickness;
- durability;
- environmental friendliness;
- practicality.
PVC tiles - a variety of shades and textures
In addition, the top layer has antistatic and anti-slip properties. The material is easy to cut, and therefore, when laying, you can even make an applique on the floor by choosing the appropriate pattern. There are plain models, wood, marble, and other natural materials. No glue or mastic is required to attach the covering to the base: the bottom layer of the tile is self-adhesive.
The material is laid on both a wooden and concrete base, the main thing is that it is as level as possible. If you have a wooden floor on your balcony, you can freshen up the interior by laying tiles on top of the boards. Such repairs will take a minimum of time, and the result will be very impressive. If laying is done on a cement screed, first grind and clean the surface from dust, then prime it. When installed on a dusty or uneven substrate, the quality of the coating will be very poor.
Tile
Ceramic, tiled, clinker, PVC tiles or porcelain tiles are suitable. The last three types are the most durable.
Pros:
- Decorative. You can lay out a mosaic or purchase tiles of an unusual shape.
- Water resistance. This finish is resistant to rain and snow and is easy to clean.
- Wear resistance. Withstands mechanical loads and frost.
But before you cover the balcony floor with this material, analyze its shortcomings.
Minuses:
- Cold surface. Only a heating system will help to insulate it.
- Poor sound insulation. Your steps and the sound of fallen objects will be clearly audible.
- Difficult installation. You will need a cutting tool, leveling the surface, and precise markings.
- Heavy weight. Porcelain stoneware is the heaviest. If the main plate is worn out, you need to find out how much weight it will support.
- Insufficient strength. This mainly applies to tiles. It may crack if dropped by a heavy object.
- High price. Porcelain tiles are the most expensive.
It is better to choose rough, single-fired ceramics - it is less porous and slippery. There is also an indicator of strength:
- 2-3 grade. If you walk on tiles only in house shoes.
- 4-5 grade. If you often go out in heavy street shoes.
It is advisable to buy the material at a time, with a small margin. This is due to the fact that shades may vary from batch to batch. Pay attention also to the external characteristics. For small areas, small, light-colored tiles are suitable. Large masonry will visually reduce the space.
Temperature sensor installation
To ensure the necessary microclimate in the room, thermostats equipped with a temperature sensor are used. They interact effectively with cable systems and IR film.
The functions of the thermostat include maintaining the set temperature, adjusting it, and optimizing energy consumption. Depending on the modification, the functions of the device may vary.
The principle of connecting the thermostat is the same for any system. We will consider the features of installing a temperature sensor for heating mats.
One thermostat is able to regulate the temperature of several heating mats at the same time. Cable systems are connected in parallel, the maximum current should not exceed 16 A, which corresponds to 3600 W at 230 V
If the total power of the mats is greater, then installation of the thermostat requires additional equipment in the form of an input circuit breaker, an RCD, a power relay, a directional circuit breaker, and a special thermostat.
To install the regulator, you must perform the work in the following order:
- create a special hole in the wall for mounting the box;
- make a recess in the wall to install the power wire and create a hole for laying the connecting channel;
- perform installation and configuration according to the instructions;
- place the sensors in a corrugated plastic tube with a diameter of 16-20 mm.
The tube must be hermetically sealed at one end to protect the wires from solutions and water getting inside. From the opposite end, the tube is placed in the installed box.
It is recommended to place the regulator close to the wiring in order to save on supply wiring; it is advisable to install it on the wall in a living room in the most convenient place
The permissible bending radius of the wiring is at least 5 cm. The tube with sensors is attached to the floor. It must fit between the loops at a distance of at least 20 cm.
It is important to remember that during installation you cannot shorten the heating cable, replace supply wires, make adjustments to the design of the thermostat, or carry out repair and installation work with the supply voltage turned on.
Garden parquet
Garden parquet, decking, decking - all these are names for very practical and decorative coverings made of wood-polymer composites or very hard wood.
- low weight of the coating;
- water resistance;
- weather resistance;
- aesthetics;
- ease of installation.
Garden parquet (decking)
The coating is produced in the form of compact modules that can be laid on logs or mounted on a flat surface, connecting like a construction set. The only disadvantage of decking is its cost, since not everyone can afford it. Garden parquet is suitable for floors on both open and glazed balconies, goes well with any type of decoration and gives the room a touch of originality.
What not to use
Materials intended for interior finishing work are strictly not suitable for decorating the floor of an open balcony:
When choosing the material for the future flooring of an open balcony, you should not engage in false economy. Cheap material will certainly save on repairs right now, but will require earlier and more frequent updating. At the same time, many expensive materials will pay for themselves due to their long service life.
Painting
You can paint the floor in an open area with any paint intended for outdoor use.
The method is simple to implement, the most inexpensive, but the result is “so-so” in every sense. You can paint the floor in an open area with any paint intended for outdoor use. This can be a water-based composition or a dye based on organic solvents (enamel, oil paint).
They usually paint a cement screed of satisfactory quality, considering this method of finishing the balcony floor as a temporary measure or for the purpose of saving. Such a coating does not last long in the absence of a roof - after a year or two the surface has to be renewed, and choosing the same type of paint that was used before.
If you decide to paint the balcony floor for the first time, the surface must be cleared of debris and primed. If there are cracks in the screed, they must be sealed with freshly prepared cement-sand mortar, having previously expanded them. You need to paint in two layers, with the second coated only after the first has dried.
Arrangement of the floor on the open balcony of a cottage or house
Important! Often, as a budget option, linoleum is laid on the floor in open areas. However, you need to be prepared for the fact that such material will not last long in such conditions. Linoleum resists moisture well, but is quickly destroyed by temperature changes, and the pattern fades from direct UV rays.
Tools for work
Before starting repairs, prepare the following:
- flooring material (linoleum, ceramic tiles);
Linoleum for balcony floor
- broom, shovel, mop with rag;
- hammer;
- construction foam.
Once everything necessary is ready, we proceed to the next stage of installation.
Pay attention to purchasing high-quality flooring to avoid premature cracks on the floor surface.
Warm floors on balconies and loggias: 4 arrangement options, installation instructions
Many people try to expand the usable space in their apartment by adding a balcony.
In warm regions, they even remove the door, combining the loggia with the living space. However, simple insulation is not enough to ensure a comfortable temperature, so it is recommended to install a warm floor on the loggia. It will allow you to maintain an optimal microclimate and use additional space to create a recreation area, dining room or office.
In the article, we will look at the types of heating systems that can be laid on the balcony, their pros and cons, as well as how to install them yourself. Methods for preserving heat in a loggia by insulating walls, ceilings or floors are described.