Laminate is one of the most popular materials used in houses and apartments for renovation. It has excellent performance characteristics and a low price. Due to its excellent cost-quality ratio, it has gained a lot of trust among people. Before working with the material, it is recommended to carefully study the rules for laying laminate flooring. You should take a responsible approach to the preparatory work and installation itself.
The final result after installation work is completed
Why does the laminate lift after installation?
There are several reasons why laminate flooring rises or swells after installation:
- If the coating is of poor quality and low class, it may rise over time; to correct the situation, it is necessary to replace all the material.
- If the seams are poorly processed, then you need to apply a sealant to fix the problem.
- This problem can occur in damp rooms where water drips directly onto the floor, condensation accumulates, or a humidifier is used.
- The material can rise because too little distance is left from the wall, and the laminate does not have the opportunity to expand with temperature changes. Therefore, the edges will rest against the wall, and the middle will begin to swell and tend upward.
- Troubles can also arise due to very heavy furniture located in the room.
Under what conditions can work begin?
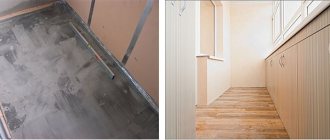
Laying can only be done after creating a level and secure base. Differences per 1 m should not exceed 3-4 mm. In addition, environmental conditions play a fairly large role. The surrounding area should be dry. Laminate can be used at positive temperatures in different rooms.
Among the places where it is not recommended to install laminate flooring are:
- bathrooms and rooms with humidity more than 70%;
- unheated premises;
- in places with increased load on the floor covering.
Laminate flooring is great for living rooms, kitchens, and living rooms. If the room is maintained at a temperature of 18 to 30 degrees and a humidity of 40 to 70%, then such conditions are considered ideal for the material.
How to repair lifting of laminate flooring due to moisture?
When a large amount of moisture gets on the surface, the laminate swells noticeably; to eliminate this problem it is necessary to carry out repairs:
- First, you need to remove the baseboards so as not to damage them, and then attach them back.
- Then the material is disassembled to the area where it is swollen; the next slab can be removed for reliability and confidence that it is not wet.
- After this, all water is removed from the screed and the base is thoroughly dried; if necessary, a new substrate can be laid.
- When disassembling the slabs, mark all the lines and in what order they were removed, later it will be easier to put them back so that no gaps form.
- If it is not possible to dry the slabs, they are replaced with new ones. Therefore, in such cases, the material is purchased with a reserve, since with an additional purchase it will be difficult to choose the required shade, and the new laminate will differ from the previous coating.
- If the humidity in the room is too high, then it is necessary to use a laminate of a higher class and quality, and fill the seams with sealant. If it gets wet, the laminate must be removed and dried on both sides.
Marking
Labeling plays an important role when choosing a laminate. There are markings on the back of each panel and the buyer should be able to read them. Here is the information contained in the labeling:
- Product class. This is the main parameter when selecting coverage for specific purposes. For example, class 33 is purchased for floors in commercial buildings with high loads. More details about this later in the article.
- Laminate panel thickness. The strength of the product depends on it, as well as on the class.
- Connection method. If R-CLICK is indicated, this indicates that no glue is used for installation. Accordingly, the material is reusable.
- Type of processing. Here you need to pay attention to the pictograms. So, if a plane is depicted, then the surface of the coating imitates processing by a plane.
- Lifetime. It is best to choose a material whose service life is at least 15 years. It is important to remember that the warranty period is calculated under proper operating conditions. Increased dampness, sunlight and other destructive factors significantly reduce it.
- Other markers. If there is a V, this means that there is a chamfer along the perimeter of the lamella. This product imitates real wood (boards).
How to repair the lifting of the laminate if the compensation distance is not observed?
If the laminate swells due to lack of distance between the wall and the material, the following steps must be taken:
- The plinth is carefully removed to preserve its integrity for future use.
- Then those areas where the slabs are located close to the wall are marked and trimmed so that there is a distance of 1.5 centimeters between the material and the vertical surface. This gap should be completely hidden by the baseboard, so first you need to measure its width.
- After the material is cut, you should not immediately attach the baseboard, but see if the distance between the material and the wall closes again. If this happens, then it is necessary to trim the edge again by 1 centimeter, and only then can the plinth be installed.
- To avoid problems with swelling and subsequent dismantling of the laminate, do not fix heating and furniture elements to the coating. The material must be located in a free position, otherwise, if it is rigidly fixed, it will rise not only at the joints, but also in the middle part of the slab.
- In the cases described above, it is possible to partially replace individual damaged areas of the material. But if the reason for the laminate lifting lies in the poor quality of the material, then it must be completely removed and replaced with a new one. When installing new laminate flooring, you should use a joint sealant to help prevent moisture from getting underneath the material.
- If the laminate rises due to an uneven screed, then it is necessary to remove the baseboard, remove all material, including the backing, and then carry out work to level the surface. After this, the laminate is laid back; if the slabs are in good condition, then the old material is used; if the deformation is too severe, it is necessary to purchase a new one.
Characteristics
The main characteristics of laminate are considered to be:
- length;
- width;
- thickness;
- number of lamellas in the package.
As you can see, everything is quite simple. It is based on these characteristics that lamellas are chosen for any purpose. In fact, installation and operation are affected only by the dimensions of the laminate.
An important point is that you should not assume that the strength of the coating depends only on its thickness. This is partly true, but the manufacturer plays a key role. Different brands have different standards, so thinner planks from one manufacturer may be stronger than thicker ones from another.
When choosing, it is better to look not at the number of lamellas in the package, but at their total area. Most often, packages come with 5, 8, or 10 lamellas. When calculating quadrature, it is usually rounded up. This allows you to protect yourself from material shortages.
Why do laminate floors make squeaks and crunches?
If laminate flooring is laid on a wooden base, then in the future it may make crunching and even squeaking noises due to wear and tear on the lower part of the floor. As a result, the laminate can become deformed and break; to prevent this from happening, it is necessary to correct the problem. To do this, the baseboards, laminate and underlay are removed, then the screed is performed and the lamellas are laid.
If the laminate creaks only in one area, then the repair can be done partially, remove the material, and nail the boards tightly to the base of the floor. When the boards are tightly fixed to the base of the floor, the laminate will not creak.
Install the thresholds
pol-exp.com
There are several types of thresholds. In addition to appearance, they differ only in the mounting option. Some are held on through dowels, others on hidden ones, and others have a special mortgage that is attached to the floor with screws and to the front part with a latch.
The nuances of installing one type of threshold or another are always indicated on the packaging. In general, the procedure is as follows:
- Measure the required length of the threshold and cut off the excess part.
- Distribute the fasteners evenly across the entire width of the opening.
- Drill holes using a hammer drill along the marks.
- Secure the threshold: all the way through, inserting screws into the groove or through the mortgage.
- If the fastener is not through, tap the threshold through a soft guide until it is completely seated.
Incorrect fastening of the material to the subfloor
Sometimes, due to ignorance, many decide to fix the material to the base using screws or nails. As a result, the laminate will rise and swell at the connecting areas, since the material must be in a free state. Its rise occurs due to the expansion of the material when the temperature changes.
This problem must be corrected by freeing the slabs from the nails; there is no need to remove the coating, it will level itself within a few days. If the problem is not corrected in time, the entire coating will subsequently have to be replaced.
Determine the direction of the light
The lamellas are laid parallel to the rays of light / education-web.ru
For laminate with chamfers, the direction of installation depends only on your preferences and the designer’s ideas. A coating without chamfers looks better when the slats are positioned parallel to the rays of light from the window. So the joints between the boards are almost invisible.
At the same time, laying along a wall with windows allows you to visually expand the room and is quite often used in narrow corridors and hallways.
Maintaining a gap between elements of heating and other origins
The compensation distance must be maintained not only from the wall, but also from other communication elements such as heating pipes, furniture legs, doorway clamps, and so on.
If the location of the door stop is planned, then it is fixed to the screed, and not to the laminate, the drilled holes must correspond to the gap, and the main element is selected so that this distance is closed.
If the pipes are circled, then a compensation distance is also left around them, and decorative elements are used to cover the edges. If these rules are followed, the laminate will not rise.
Eliminating swelling of laminate flooring at joints
The end lock connecting the panels is the most vulnerable point. It absorbs most of the spilled liquid. The surfaces of the panels are more protected, as they are covered with polyurethane or vinyl film. Typically, water penetrates into the structure of the material only a couple of millimeters, which is enough to cause the elements to swell and deform. During drying, damaged areas of the floor must be loaded, otherwise they will remain uneven forever.
Sequencing:
- Open the lock: using a tool, separate the tongue and groove. This will allow sufficient access to the ends.
- Dry the area where the material is swollen with a hair dryer, turning off the heating device.
- Experts recommend using an iron only in rare cases (in case of severe delamination of the material). Then the locking joint and all the cracks at the end are covered with PVA emulsion, then dried with a heating device. In this case, heat-resistant material should be used.
Helpful information! There are laminate locks containing special silicone inserts. They seal the temperature gap and protect the joint from water penetration. Despite the fact that this design was created quite recently, it has already shown high efficiency in the bathroom and kitchen.
In order to properly dry wet laminate, it is important to gain access to the inner surface of the locks Source stroy-podskazka.ru
Basic rules for laying laminate flooring
- Polyethylene is spread on the concrete screed so that moisture from the base does not penetrate to the laminate, this will prevent the material from lifting.
- The laminate cannot be fixed with nails or screws; it must be in a free position.
- It is necessary to leave a distance of about 1.5 centimeters from the wall or other elements to allow the material to expand freely and not deform.
- To prevent the slab from getting wet from the inside, all joints are lubricated with wax, then polished without leaving the product on the surface.
- The slabs should not be laid perpendicular to the lighting, otherwise the shadow from the joint will be visible.
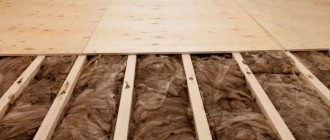
- When laying the material, it is necessary to use a backing, otherwise moisture will penetrate to the laminate, it will deform and become wavy.
- The plinth must be fixed not to the floor surface, but to the wall, otherwise the remaining compensation distance will not fulfill its function, and the surface will rise.
- Also, adhesives cannot be used to fix the boards, since the laminate will be tightly attached, which will also lead to swelling.
- In order for the surface to subsequently remain ideal, the screed must be smooth, without flaws and small debris. It must be cleaned with a vacuum cleaner.
- To make it easier to maintain compensation distances, I use special wooden planks, which are placed between the wall and the material when the installation is completed. This will allow you to make gaps of the same size around the entire perimeter.
It will be much cheaper to carry out partial floor repairs than to replace the entire surface, so it is necessary to start work in a timely manner. If you delay in solving the problem, you will have to change all the material, and this is not economical and labor-intensive. In order to avoid such defects in the laminate, it is necessary to install it correctly, using all the necessary materials that prevent moisture from entering the coating. And also make sure that the compensation distance is maintained, that is, the laminate should be positioned in free movement, then when the material expands, it will not rest against various surfaces and become deformed.
conclusions
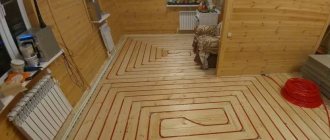
To summarize, we can recommend the following combinations of underfloor heating systems and finishing floor materials:
- for water TP in a concrete screed, use laid on tile adhesive, ceramic tiles, porcelain tiles, gress;
- for cable electrical transformer substations, use ceramic tiles or laminate laid directly on the heating elements on a layer of glue;
- for infrared film TP, use parquet or laminate laid on a plywood backing, and for special types of infrared film, use tiles on a thin layer of glue.
Replacing laminate flooring
If the drying process does not bring the expected result, the damaged laminate will have to be removed. You should start disassembling the floor only after it has dried a little. This will greatly facilitate the process of opening the locks. Dismantled parts are sorted according to the severity of damage; completely unusable elements are disposed of. It is recommended to moisten swollen areas (without cracks or delamination), cover them with paper, and then place them under load on a flat base. Drying and leveling of the material usually take two weeks.
During re-installation, slats that have lost their proper dimensions are attached in less noticeable places (under pieces of furniture). Often they have to be secured using dowels and adhesive. The remaining elements are laid according to the manufacturer's instructions. Wet lining material must be replaced. If a damaged lock does not allow a full connection to be made, the excess part of the end must be removed with a knife, then carefully align the joint. In such areas it is advisable to use polyurethane glue.
Laminate flooring is dismantled only in cases where it is swollen by more than 20% of the floor surface Source laminat-msc.ru
10th mistake. Perform the tapping with a regular iron hammer.
The laminate panels are connected using a special locking system. Different models and different manufacturers have their own. In order for the locks to snap well and the rows of panels of the seal to fit against each other, it is necessary to make a lining. It is better to perform it with a rubber mallet or hammer through a special hammer made of soft wood. Tapping with a regular iron hammer will break the locks and chip the edges of the panel. Damaged material will have to be thrown away.
Useful tips
When installing laminate flooring, the first step is to choose the right underlay material. The best option is a panel of compacted pine needles. It perfectly allows water vapor to pass through, so if it is flooded, drying the floor on such a lining will not be difficult. If you need to re-lay the flooring, the coniferous underlay will have to be replaced, and popular cork sheets can be dried in the open air, first covered with paper. Cork practically does not absorb moisture, but at the same time it collects foreign odors. Therefore, after removing expensive building materials, it is advisable to clean them with water, after adding a little hydrogen peroxide to it.
Finishing features
Such repairs perform several tasks at once, namely:
- helps to obtain an even more attractive external wall covering, as a background for furniture and decorative elements;
- helps to emphasize the style, makes it more expressive;
- enhances the comfort of the room.
Typically, a material that imitates natural wood is used for walls. Its embossed texture and colors are suitable for a warm and cozy atmosphere. The combination of this finish with furniture and flooring looks beautiful. The texture of wood goes well with any textile; modern electronics and lighting devices look good on it.
Repairs using laminate look good in both classic and modern interiors. The texture will help complement the aristocratic design, traditional country, rustic. Art Nouveau, Provence, and loft styles will perfectly complement this technique.
The range of material is huge. But you don’t have to use only wood laminate. Marble finishes, imitation of natural stone and ceramics look good in different rooms. You can choose any option and create a unique design that will delight others.
Advantages
All the advantages of the material as a floor covering are preserved when placed vertically. This:
- good rigidity and long service life;
- moisture resistance – manufacturers apply an additional layer protecting against moisture on the panels;
- ease of maintenance - just wipe the walls with a damp cloth and detergent;
- a large selection of shades and textures is the key point that makes laminate universal for any interior;
- ease of installation of the panels - fastening does not require a lot of time;
- savings on repairs - even a low-grade laminate for walls will be appropriate, because the loads will be several times less than when repairing the floor.
Wall after decoration
Disadvantages of use
When mentioning the advantages, you need to talk about the disadvantages. These include:
- the price is slightly higher compared to conventional wall panels;
- for fastening it is necessary to prepare a reliable base, because the coating is heavier than paint, wallpaper and even plaster;
- not suitable for rooms with sudden temperature changes.
For some, the listed disadvantages outweigh the advantages, but for most they remain insignificant. They are actually easy to work with to achieve a stylish and unique design.
4th mistake. Do not allow the material to sit indoors.
Laminate, by its nature, is sensitive to humidity and ambient temperature. Therefore, before laying it, it should lie down in the room and get used to the microclimate of the room. This usually takes 2-3 days (the manufacturer indicates the exact value on the pack). It is better to open the packages and remove the protective film.
If you bring material that has been lying in a cold store warehouse to a warm room and immediately begin installation, this will lead to swelling of the panels and destruction of the locks. Even 15 mm gaps along the walls will not be enough to compensate for the expansion of the material.
Recommendations from experts
Laminate for heated floors
If you need to put finishing material around heating pipes , first make markings on the board. Afterwards, holes are made 2 cm larger than the diameter of the pipe. Then a cut is made at a 45 degree angle, which is joined back to the board.
At the junction of the laminate and parquet boards with the wall surface, it is necessary to leave a gap of 1-1.5 cm so that the boards can expand. For clearance , wedges made from timber are used. When laying on a concrete floor, a gap is left every 10 m, and the gaps themselves are covered with planks that match the color of the rest of the coating.
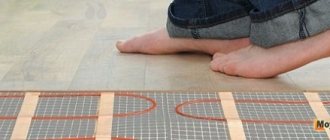
When installing heated floors, it is necessary to choose a laminate that can withstand high temperatures.
Before laying out, you need to make sure that after placing the boards on the floor, the door will open unhindered . If there are difficulties, the door leaf is slightly filed from below.
Accommodation
Each coating helps to visually correct the shortcomings of the room and change the design. The slats can be placed:
- vertical;
- horizontally;
- diagonally.
The horizontal arrangement visually expands the walls, changes the configuration of the room, and eliminates the disadvantages of the layout. The laminate flooring in the living room looks interesting on the wall in a diagonal direction. But this installation requires skills. It is better to trust the repair to a professional to avoid irreparable mistakes and incur unnecessary expenses.
Horizontally
Optimal for small rooms. Thanks to this arrangement method, the usable area visually increases. But the height will not change; it only works for visual expansion. In order to visually increase the height a little in this case, the panels are placed 1-2 rows below the ceiling.
Horizontal arrangement
You can experiment with the location. For example, move the lamellas slightly, similar to brick laying. Some experienced designers even use the technique of complete chaos - eclecticism. Not every owner will like this solution.
Vertical
Vertically laminate flooring is often secured with glue. To create an interesting design, you can combine different shades and colors. This arrangement works well in low rooms, but is not suitable for small spaces. A laminate laid in this way will emphasize the tightness and evenness of the room, but only if the area is large enough. Otherwise, the result does not look so impressive.
Diagonally
To lay panels in this way, you need to be prepared for a large consumption of materials. Installation is not easy, but the end result is an effective and eye-catching finish. Diagonal laying helps to show the exquisite original taste of the owners and goes well with all modern styles.
Diagonal placement
Combined method
A combination of several directions at once may not be used everywhere, but it has great opportunities for stylistic interior design. It is quite difficult to mount panels in different directions on the same wall.
Combined placement
More often than others, diagonal and horizontal masonry are combined - it looks chic and stylish, a win-win option to show the ideal taste of the owners.
9th mistake. Using damaged lamellas
Before installing the laminate, it is necessary to inspect each panel. If a defect in the protective coating or lock is found, it is better not to use it. Damaged laminate panels will become a big problem later on. Sooner or later they will have to be changed, but this is not so easy. Without special tools and skills, it will not be possible to replace just one damaged lamella. It is easier to remove all the coating, but this is a very labor-intensive method.