The question of how to hide pipes in the bathroom without installing them into the wall worries almost every property owner who has encountered the “delights” of old-style domestic apartment construction. Yes, in most new modern apartment buildings this problem has been largely solved by pre-planned closed installation. In this case, the appearance of the bathroom is not spoiled by ugly pipes, the overall aesthetics of the room is preserved, you can make beautiful and expensive renovations - and it is quite reasonable to count on an impressive result. But what about the opposite case? Don’t throw ashes on your head - the task is much easier to solve than you think, and you won’t need to rearrange the family budget or learn any new skills.
- What you need to know before installation;
- All methods of masking pipes;
- Features of installation of a plasterboard box;
- Conclusion.
What you need to know before installation
Each part in any mechanism has its own purpose. In this regard, pipes can also be perceived as elements of a single and well-functioning system. A system that sooner or later may fail, which means that prompt access to pipes is not a wish, but a necessity. There are a number of comments from specialists that you should listen to carefully if you want to handle the operation correctly:
- if there are any threaded connections, taps, etc. on the pipes, then with any chosen type of masking of communications, quick access to them should be provided;
- when installing a mandatory decorative box or covering pipes with plastic panels, provide for the creation of an inspection hatch;
- communications made of metal-plastic have connections - so-called fittings - that are regulated by keys; these areas require constant monitoring on your part and the possibility of prompt intervention in case of leakage;
- do not place pipe inspection hatches in places where there are no connections - the chance of a leak in these areas is so minimal that it should not even be taken into account;
- immediately before installation, you should carefully check all communications - and correct any noticed defects before installing a false wall or box;
- To prevent condensation, it is recommended to insulate water and sewer pipes.
Remember that the functionality of well-established engineering communications in the bathroom should not be sacrificed for decorativeness. A reasonable balance is always somewhere in the middle, and following the simple rules outlined above will help you not only deal with the problem of visible pipes beautifully, but also maintain confidence in their reliable functioning.
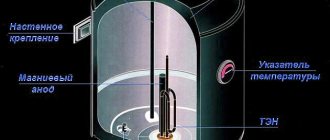
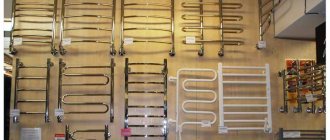
Stage 1: preparing the heated towel rail
Before painting this device, it is necessary to carry out a number of preparatory work. It is absolutely clear that if you immediately cover it with enamel, the surface will be far from ideal. Therefore, you need to arm yourself with sandpaper and carefully go over the entire heated towel rail. Here, special attention must be paid to those places where the old coating has chipped or become cracked. Here you need to perform more thorough cleaning to level the surface.
Ideally, the entire protective layer should be removed. After all, then the new coating will lie smoothly and last for many years.
First of all, before painting, you need to remove the protective layer from the heated towel rail using sandpaper.
Related article: How to replace tiles in the bathroom - an alternative to tiles
Of course, such work is quite labor-intensive. However, all this more than pays off, so it is recommended to do it. It is especially important to do this if the heated towel rail in the bathroom has a chrome coating, since enamel adheres very poorly to it.
When the heated towel rail is prepared, it must be thoroughly washed with a cloth and cleaning agent. This will degrease its surface and remove all large and small particles that remained on it during cleaning.
Next, the heated towel rail is primed. Here you need to be very careful. Use only a primer that can withstand high temperatures. Alkyd made in Germany is excellent. It must be applied in a thin and even layer. After which you will need to leave it to dry.
Features of installing a plasterboard box
The bathroom is a room in which there is constantly high air humidity. This means that the drywall for creating the box should be selected as moisture-resistant. It is generally available commercially in green sheet format. Drywall itself has many advantages as a reliable and environmentally friendly finishing material:
- easy to cut;
- forms an aesthetically attractive and durable surface;
- allows you to create a reliable and safe false wall or partition;
- goes well with plaster or ceramic tiles.
What will you need?
- profiles;
- moisture-resistant drywall;
- silicone sealant;
- screws;
- dowels;
- knife;
- hammer drill
What is the secret to successfully installing a plasterboard masking box in the bathroom? Strictly following the detailed installation diagram presented below will help you quickly and efficiently hide pipes in the bathroom without installing them into the wall:
- think in advance about how the box will look, make sketches on paper, give your notes the appearance of a clear and well-thought-out diagram;
- take the necessary measurements to find out how much material you will need;
- calculations are made to determine the required amount of materials;
- in the places where the pipes come into contact with the wall, use a hammer drill and dowels with screws to secure the guide profiles - this way you will establish the boundaries of the frame of your future structure;
- attach the same profiles to the floor and ceiling - for perfect fixation of the upper and lower parts of the box;
- install the corner outer profile and secure it with stiffening ribs for stability, they can be made from the same guide profiles, connecting the corner profile with the resulting fragments to what is fixed on the wall;
- cover the frame with plasterboard, cutting out the necessary fragments with a knife and inserting them between the profiles;
- After covering, treat all joints with sealant;
- All that remains is to finish the surface of the box - paint, plaster, cover with ceramic tiles.
By the way, plasterboard sheets in the bathroom can be successfully replaced with plastic panels
. True, the strength of the material speaks in favor of the former. Plastic, for all its advantages, is still a much more fragile material.
It seems that this method of hiding pipes in the bathroom is the most difficult, but if you look into it, there is nothing complicated about it:
sequential implementation of all installation points will lead you to a good result
.
For better clarity, here are several videos from professionals.
And a small selection of photos with drywall boxes in the bathroom.
Decorating with improvised means: cheap and unusual ↑
Resourceful owners manage to decorate an unsightly heated towel rail in original ways. Here's what the three simplest, most effective solutions look like:
- Wrap with twine
Many women know the technique of weaving macrame, so it will not be difficult for them to braid a coil in this way. The advantage of decoration is that the pipe retains its thermal characteristics, because hot air passes freely into the room through the threads.
Instead of twine, you can use satin ribbon in decoration
- Hide under a cardboard tube
When you buy any cling film or self-adhesive film, after using it, you are left with a thin cardboard tube. It must be cut along its entire length and carefully, so that the cardboard bursts, put on the horizontal part of the heated towel rail. The tubes almost completely cover it and become a “cover”. All you have to do is color the resulting masterpiece.
- Make a curtain
A worn-out pipe can be hidden behind a regular fabric curtain. To do this you need:
- drive two large nails along the edges (or screw in self-tapping screws);
- cut a piece of curtain or tulle to fit the coil;
- make loops at the top of the fabric or simply fold the edge, stitch it on a machine or sew it on by hand, insert twine or ribbon inside;
- All that remains is to tie the edges of the ribbon to the nails with beautiful bows.
Instead of fabric, you can use decorative film, which is used to fence off the shower or bathtub to protect the room from splashes during water procedures.
Preparatory work
The effectiveness of the entire work will depend on the quality of preparation: if the product is not given ideal smoothness, the paint will not be able to adhere to its surface.
Cleaning the base
The old coating must be completely removed so that no paint or varnish remains. This can be done with sandpaper or a metal brush, but if you have an angle grinder or a grinder, the work will go much faster. Professionals often use sandblasting machines to remove paint from metal. A chemical remover or a hot air gun are also suitable for this purpose.
Before carrying out preparatory work, put on gloves, goggles, and a respirator. Organize good ventilation of the room or clean the heated towel rail in the open air.
A radical way to hide pipes
One of the most labor-intensive methods is to install pipes in the bathroom in a hidden way. But it makes it possible to “kill two birds with one stone”: hide unsightly communications and make the bathroom more spacious.
When choosing a radical method of hiding pipes, keep in mind that, according to building codes, it is not allowed to trench brick and thin-walled partitions of panel houses
In addition to being labor intensive, the key disadvantage of this method is the inability to quickly get to the pipes in the event of an emergency.
When implementing the method, it is very important to provide measures that minimize the risk of leaks:
- there should be no detachable connections in the wall;
- for installation, use polypropylene pipes and fittings, which are convenient to solder into one piece;
- Grooves for laying hot and cold pipes must be equipped with sleeves made of thermoflex or foam rubber.
The use of a sleeve made of insulating material will relieve cold pipes from condensation and allow hot pipes to expand under the influence of temperature.
Masking horizontally laid pipes
The easiest way to close horizontal communications in a toilet or bathroom is to build a box lined with chipboard, plywood or plastic. To create such a structure, markings are made on opposite sections of the wall.
When determining the length of the indentation, they are guided by the most protruding points along the entire length of the pipeline, including its farthest sections
A guide profile is attached along the marking line using self-tapping screws. Jumpers are inserted into it, maintaining an equidistant distance of 60 cm. Pre-cut blanks are attached to the assembled frame.
If desired, you can build a removable structure. To do this, according to the height and width of the pipes, boards are cut to create a vertical and horizontal plane. They are fastened together with a perpendicular “corner”. The assembled structure is simply placed above the pipe location.
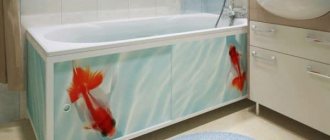
In addition to the above options for masking pipes in bathrooms, there are original options:
Image gallery
Photo from
Use of harnesses and cords
Design of risers in the form of a tree trunk
A non-trivial option for masking a pipeline
Installing a decorative casing
Painting
If you have ever held a brush in your hands, you should not have any difficulties with painting a heated towel rail. Follow the instructions and everything will be fine.
- Arm yourself with a brush, but only with natural bristles. This will allow you to apply layers more evenly and not leave pieces of lint on the surface.
- Take the above paint, some old screwdriver, for example, and mix the composition with it. The mixture should be homogeneous, so stir well. It is best to do this in several approaches in order to achieve the ideal consistency.
- Now take a brush, carefully dip it into the paint so that the composition is literally on the tip. Start painting from the top to avoid smudges. Even if the drops fall down, they can be smeared, thereby avoiding unevenness.
- The paint is applied in at least two layers, but three is best. Each new layer is applied only after the previous one has dried. Not necessarily completely, of course. Moreover, alkyd paints have the excellent property of drying quickly, so a gap of 2-3 hours between layers is quite enough.
- After finishing painting, leave the heated towel rail undisturbed for about 5 days so that the composition is completely absorbed into the surface of the device and dries completely.
Useful tips
Agree that useful advice is never superfluous. Despite the fact that we have already talked about the main nuances of painting a heated towel rail, there are a few more points that you should know about.
- It is not necessary to use brushes exclusively to apply layers of paint to the surface of the dryer. There is a great device called a spray gun. This is an effective device that can provide maximum results with minimal paint consumption. The layers are applied evenly, there are no streaks, and there is a risk of leaving brush hairs on the heated towel rails, since they are not always of good quality.
- If you purchased alkyd enamel, but it turned out to be quite thick, you should not use it in this form. Use a special solvent, which is not at all a problem to find in any hardware store. Bring the paint to the desired consistency, after which you can begin painting.
- Do not start painting while the dryer has not yet cooled down. Also, do not turn on the device if the layers have not dried properly. We have already noted that after painting is completed, you should wait about 5 days. Therefore, the optimal time to perform such work is the end of the central heating season if you use a water heated towel rail. Then you will not depend on any deadlines, which means you will complete the task efficiently and reliably.
As you can see, painting is a fairly simple job. It’s not difficult to decide what exactly to paint.
If you are dealing with plastic dryer tubes, then you are unlikely to need to paint them. As a rule, such material is not afraid of anything except ultraviolet radiation. But if you decide to paint anyway, use any water-based compounds. For example, emulsion, silicone, dispersed or acrylic paint.
Carry out painting carefully and without haste, so that dried drops, stains, smudges and other little things do not form on the surfaces that will spoil the appearance of the device, despite the fresh layer of new coating. Such work requires delicacy and caution.
Beginning of work
Modern materials from which heated towel rails (coils) are made are highly durable, reliable, and do not lose their external luster throughout their entire service life. But old plumbing fixtures, especially those that are already covered with several layers of paint, have long lost their beauty and former functionality. It is this that has to be restored by first cleaning the rough coating down to metal. If the preparation is done poorly, the new coat of paint will quickly fall behind.
It is important to know where to start working with a heated towel rail. The first step is to prepare a set of screwdrivers to remove the device from the wall. First you need to turn off the water and let the coil cool completely, because it is heated. If you apply paint directly to hot metal, it will dry out instantly and the finished coating will not be durable. In addition, the evaporation of solvents from the paint will begin to occur more intensely, which means that harm to health will increase.
It is best to plan the painting of the heated towel rail during the seasonal shutdown of hot water. This will help prevent flooding of neighbors even in a situation where the coil does not have a separate shut-off valve. Thus, all actions for painting the device are carried out after dismantling the heated towel rail and cooling it to room temperature.
Resistance to moisture and temperature changes
When it comes to the bathroom, moisture resistance is the main indicator of the viability of a material. It is better to avoid chipboard-based coatings that are not marked “moisture resistant.”
Note!
IKEA bathroom: TOP-140 photos and videos of IKEA bathroom design options. Manufacturer's advantages. Features of the collectionsPVC panels for the bathroom: TOP-180 photos and video reviews. Advantages and disadvantages of the material. Varieties of PVC panel models. Mounting methods
Bathroom faucet: types of faucets and coating materials. Shower switch mechanism. Built-in and external mixers (photo + video)
Ease
If you decide to do the repairs yourself, it is worth considering that the materials should be lightweight. This will eliminate the need to use additional labor and assemble formwork from heavy raw materials.
For example, strong steel frames are necessary for attaching mirror or marble panels.
Paint selection
The selection of a high-quality composition is very important, because it is this material that will determine the aesthetics of the result and the service life of the coating. Conventional paints and varnishes will not work: the heated towel rail regularly heats up, and they will instantly crack. When purchasing, you need to pay attention to heat resistance: the paint for the heated towel rail must withstand heating up to +120...+180 degrees.
Also, high-quality material for painting the coil should have the following properties:
- resistance to water, can be used in damp areas,
- resistance to wear, friction, mechanical stress,
- anti-corrosion properties, absence of components harmful to metal in the composition.
As for color, you should choose a tone that is suitable for a particular bathroom, corresponding to the theme and style direction. Most often, users choose paint like chrome, silver, gold, or other metallic coatings. Heated towel rails in black, dark blue, and red look original.
If desired, shades can be combined and paints mixed with each other. It is not recommended to buy only white paintwork materials - even the most resistant material will lose color and become yellowish due to temperature changes.
Oil paints
Such products are not suitable for working with heated surfaces. They quickly lag behind the base, have insufficient adhesion, are not heat-resistant, besides, they smell unpleasant and have a short service life.
Acrylic paints
Acrylic-based compositions do not emit harmful fumes, do not smell, thanks to their smooth texture they are applied easily and in a perfectly even layer, and do not leave streaks or drips. Acrylic paints dry quickly and have a high degree of adhesion to surfaces. They also have disadvantages: poor chemical and mechanical resistance, rapid abrasion.
Silicone coatings
These paints are based on rubber and other resins diluted with water or organic solvents. The material in the form of a suspension is durable, does not deteriorate from high temperatures, lasts a long time (up to 15 years), wear-resistant, and moisture-resistant. Solvent-based paints are especially reliable, but they emit a pungent odor until they dry.
Alkyd enamels
Paints based on glypthal or pentaphthalic varnish and special pigments are considered heat-resistant (withstand up to +180 degrees), therefore they are ideal for heating pipes, radiators, radiators and heated towel rails. The finished coating does not peel off for a long time, does not darken or crack.
The service life of the paintwork is at least 10 years, and the film is resistant to water, household chemicals, and mechanical factors. It is better to choose matte or silky-glossy alkyd enamels of the desired color: they look the most beautiful. These paints have only one drawback: they contain solvents, so they emit an unpleasant odor for several days.
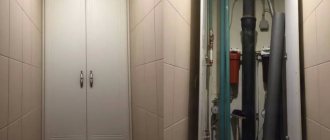
Wall cabinet
This is not the best way to hide the coil pipes, since this appliance is often used for drying things. It is usually installed in a spacious room because it takes up quite a lot of space. You can place cosmetics or household chemicals in it. However, we must not forget that the pipes are hot.
Many people install built-in cabinets made by kitchen furniture manufacturers from materials with a special coating. Cabinets are made to individual sizes. They are easy to install and dismantle. It is important that the cabinet does not have a back wall. During installation, access to threaded connections and shut-off and control valves should be maintained.
If the heated towel rail will not be used for drying, then you should choose this option.