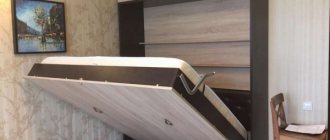
DIY floating bed
Do you want to make changes to your bedroom interior? How do you like the idea of making a floating bed with your own hands ? It's not too difficult, even if it's a big project. A floating bed can be a fresh addition to your bedroom design as it presents a minimalist modern aesthetic while adding a feeling of spaciousness to the room. Our article presents several wonderful examples of how to make a bed with a floating effect , which will allow you to acquire original furniture even on a limited budget. Here there are projects of a floating bed with lighting , on wheels, with a beautiful solid wood headboard, and even an example of a floating bedside table. You can use links to primary sources, read instructions on how to make a floating bed with your own hands with drawings and detailed master classes with step-by-step photos.
Required Tools
Most of the required tools are usually already present in every man’s home. Of these you will need:
- Screwdriver
- Tape measure and pencil
- Screwdriver (bit) for confirmations
- Iron for gluing veneer
To save time, it is better to purchase laminated material for furniture.
That's all, a do-it-yourself chipboard bed is ready, without any special difficulties.
You also cannot do without additional fasteners and some accessories:
- Metal corners
- Confirmations and stubs
- Screws
- Veneer for decorating ends.
Most of the required tools are usually already present in every man’s home.
Now that everything you need has been purchased and cut, you can begin assembly.
To understand how to make a bed from chipboard with your own hands, you need to have certain skills in sawing from chipboard.
We make the headboard of the bed ourselves
The frame can be used as a full-fledged bed, when one of the walls of the room serves as its headboard. But if the goal is to improve the product and make a headboard for it, then you should think about how to make the latter.
There are enough varieties of headboards for beds.
So, an interesting idea for DIY is a perforated panel as a headboard. You can do this yourself in just a few minutes.
Select a suitable material and wrap it around the edges with bright braid. The sawn-off end parts of the product should be sanded and varnished if the panel is adjusted to the size of the bed. Otherwise, the raw edges will snag on the bedding.
The headboard can be soft , which is especially convenient. It is always comfortable, half-sitting, leaning on a soft surface and reading a book or magazine at night, or watching a little TV in the bedroom before going to bed.
Soft headboard – special comfort
To work, schematically depict the headboard on a furniture panel. You can use different back drawings:
- oval;
- round;
- rectangular shape.
It all depends on how the design is intended.
To upholster the headboard, you should purchase thick fabric (faux leather is a suitable option) plus thin foam rubber (one layer will be enough).
They get to work. The shield is covered with foam rubber and covered with material or leather. The ends of the foam rubber and fabric are attached using a furniture sticker: using the wrong side of the base.
To imitate a tie on a material, buttons are often used. They are sewn on the back - from the front side. This is done in a checkerboard pattern.
Then the soft back is mounted on the wall.
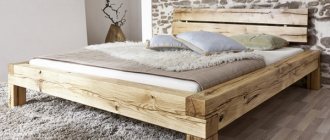
The bed also looks organic with a headboard made of timber.
This option is stylish and unusual
To make this, first prepare bars of the same size: the workpieces should be carefully measured. The length should be equal to the height of the headboard.
Then you need to decide how the bars will be attached to the wall surface. An interesting variation is to leave some distance between the blanks. Thus, structurally the bed will look more airy. Next, the bars should be coated with paint or varnish.
Another option for a “headboard” would be to draw the shape of this part of the bed with paint on the wall to which the product is adjacent. This is the simplest and most inexpensive method of “manufacturing”.
How to determine the source of a squeak?
It is not necessary to completely disassemble the furniture to determine why it creaks. In such cases, experts recommend performing several simple operations:
- Remove the mattress, lay it on the floor and remove the slatted base.
- Check the mattress. To do this, you can sit on it, lie down or stand on all fours, pressing on different areas. If there is a squeak, the springs are already worn out, it’s time to change the bedding. If the mattress does not squeak, you need to put it in the bed and rock it slightly - sometimes the sound appears due to friction against the frame.
- Check the base. By pressing on it and pumping it a little, you can determine whether you can hear the creaking of the bed slats. The sound can be caused by incorrect or loose fastenings, or cracks and chips that have appeared.
- Check the frame. When checking, it is necessary to shake the bed itself - perhaps one of the fastening units or support strips has become loose.
- Determine the creaking of the bed lift mechanism. To do this, just raise and lower the structure. If an extraneous sound appears, the lifting mechanism must be replaced, since the gas lift cannot be repaired.
- Inspect the legs. Perhaps they are not firmly on the floor due to unevenness or are poorly secured to the frame. Also, the wooden floor under the bed may squeak when the boards become loose.
Beds 140×190
We buy materials
For a double bed you will need the following materials:
- for the box and legs - pine. 15 beams 2.2 meters long, section 50x50 millimeters.
- 22 boards 2x10 centimeters thick and wide, 2 meters long.
You will also need:
- glue – carpentry and special furniture glue;
- fastening elements - self-tapping screws;
- metal corners 5 centimeters wide.
The main box (its size inside) will be (in centimeters): 210x170.
On the Internet we find drawings with the dimensions of bedroom furniture products made independently and get to work.
Types of bases: orthopedic and solid
There is a lot of controversy about which base is best to choose for a homemade bed. Many believe that ideally it is orthopedic, as it will be beneficial. Others say that it will be solid and will last longer. Let's look at this in more detail.
Frame and base made of decorated durable plywood for a one-and-a-half bed Source fdforp.com
What is laminated chipboard and what is the difference from MDF?
MDF , medium-density fiberboard, is produced by pressing small wood fibers. Natural lignin and synthetic compounds (in small quantities) are used as binding components.
MDF
Chipboard is produced by hot pressing of wood processing waste with the introduction of thermosetting adhesive resins. The result is a material that is sufficiently resistant to temperature changes, has a homogeneous structure, is easy to process and durable, which is actively used in furniture production. Requirements for slabs are regulated by GOST 10632*2014. The big advantage of chipboard over MDF is its low cost.
Chipboard
However, there are also disadvantages that need to be warned about.
- the material is not intended for fine processing;
- the slightly loose structure does not allow re-installation of the fasteners (when the screw is turned out, the material begins to crumble and for the next installation of the hardware it is necessary to either make a hole of a larger diameter or drill at another point);
- The biggest problem is the use of phenol-formaldehyde resins in production, which leads to the release of harmful substances (if the permissible concentration is exceeded) for health.
In accordance with GOST, the scope of application of chipboards with various indicators of formaldehyde emission is limited.
Scope of application of chipboards at various levels of formaldehyde emission
By the way, in many countries the production of chipboards with emission class E2 is prohibited. You can find out the exact characteristics of the material only by reading the quality certificates, which not everyone does. A clear sign of the presence of harmful impurities in the material is a strong odor.
In connection with the above, despite the fact that the standard allows the use of certain types of slabs for the manufacture of children's furniture, this is not recommended. Children's health is more valuable.
Laminated chipboards are obtained after applying a decorative coating to chipboards (lamination or lamination). As a result, furniture makers have at their disposal an inexpensive but excellent-looking material, which has also received additional strength qualities and resistance to external influences.
laminated chipboard
Important! Laminated chipboard may have additional properties: increased moisture resistance or fire resistance, which is achieved by using special impregnations.
Types of laminated chipboard
The classification of laminated particle boards is carried out in different ways. However, the following division by type is most often used.
Table. The most commonly used types of chipboard.
| Marking | Distinctive characteristics |
| B.S. | The material is mainly used for the production of office furniture |
| S.E. | The surface resembles the texture of wood with pores |
| S.M. | Smooth surface slabs |
| MAT | Boards laminated with matte film |
| PR | Material with a porous structure |
| P.E. | The laminated surface has an orange peel texture |
In furniture production, BS or PR boards are mainly used (for the production of tables, beds or cabinets) or SM, ideal for the production of partitions.
There are several types of chipboard
In addition, the choice of material is made depending on the thickness and color required for the manufacture of structures. Sheets are produced in thicknesses from 0.8 to 3.8 cm, the most common values being 1, 1.6, 1.8, 2.2, 2.5 and 2.8 cm. For furniture production, boards with a thickness of from 1.6 to 2.2 cm. The larger this figure, the more significant loads the chipboard can withstand. Accordingly, the price of products increases.
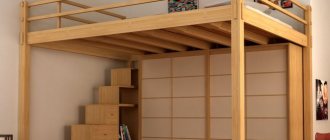
Where can I put it?
Incorrect placement of a sleeping place can lead not only to poor sleep, but also to worsen your well-being, cause bad mood and migraines. It is worth listening to some tips to ensure the correct installation of the product.
In order for the bed to meet your requirements, and its price to be minimal, you need to limit yourself only to your own efforts.
When the door is located opposite the window, a draft begins to circulate in the room. This option is categorically unacceptable. Do not place the bed with its back to the window, opposite a mirror or in a corner. The best option is diagonally to the door. It should be close to the wall, with the head facing east or north.
Despite the rules of Feng Shui, it is best to place the device in a niche, if of course there is one. Thanks to this, a person will receive a feeling of protection, security, comfort and coziness. Being near a window will bring some inconvenience: bright sun rays, noise from the street, etc. Negativity can be softened with thick curtains.
The material for furniture should be easy to process and have an affordable price.
Poor places include walking through or near a door. In this case, you won’t be able to relax, because the bustle of everyday life will constantly interfere. The optimal temperature is not maintained near the radiator, and near the window there is a risk of catching a cold due to drafts. If the wall borders the kitchen or bathroom, this option will also not lead to a comfortable stay.
From all of the above we can summarize the following:
- the best installation is with the headboard against the wall;
- corner of the room - ideal location for a single bed;
- diagonally from the front door - a pretty good option.
Do not forget about the design of the bed, because it should fit harmoniously into the room and match other furniture.
If there is a double bed, then there must be a free passage to each of its sides. It is advisable that the sleeping place be darkened, quiet and calm.
Advantages of making furniture from laminated chipboard yourself
To produce interior items, you need not only experience working with materials and their processing, but also time, effort, and a certain set of tools. Why, given the availability of a wide range of beds of different qualities and configurations on the market, do many people start making furniture with their own hands?
Making furniture yourself
There are several reasons:
- self-assembly of the bed allows you to significantly save the family budget;
- in this case there is confidence in the quality of the materials and fittings used;
- the most important thing is that you have the opportunity to bring to life your own ideas about the convenience and aesthetics of this piece of furniture, make a product of such shape and size that allows you to fit it perfectly into the interior, decorate the bed to your liking, arrange the required number of storage spaces and niches that allow you to increase it functionality.
Among other things, a person who assembles furniture with his own hands increases his self-esteem and increases the respect of others. In addition, the production of the bed is not particularly complicated. Not many details are needed. The main thing is to make a competent drawing, prepare high-quality materials and accessories, and also be patient.
Table. Depending on their size, beds are classified as follows.
| Bed type | Width, m |
| Single | 0,80…1,2 |
| One and a half | 1,2…1,4 |
| Double | 1,4…1,8 |
| Family | 1,8…2,2 |
Important! It is recommended to order cutting of chipboard sheets from specialized companies that are equipped with the necessary equipment. At home, as a rule, such wood processing is accompanied by the appearance of chips at the ends of the slabs. However, you should be aware that many large stores specializing in the sale of building materials can only offer cutting of sheets into rectangular segments and installation of edges. Often you have to turn to other companies for cutting curved elements and milling.
Basic methods of strengthening
Metal
Metal models last a long time, but over time, the structural parts are still subject to deformation.
- the body sags;
- the bolts come loose;
- grooves of different sizes appear in the fastening places.
- The deformation can be corrected - the bed can be restored to its previous shape through thermal or mechanical action.
- The creaking of a metal bed is eliminated by twisting the screws and bevelling the fasteners. The second method is to tighten the nuts. But this needs to be combined with other types of work.
Step-by-step instructions for carrying out work to increase the rigidity of the mattress
- Make a special case for the future filler. The threads must be strong, like the fabric material.
- It is necessary to take measurements: the size of the cover must correspond to the dimensions of the main mattress.
- After its manufacture, the padding of the selected material should be placed inside.
- Next, sew up the cover or fasten it if you decide to use a zipper when creating it.
- Afterwards, the homemade mattress cover needs to be laid on top of the mattress itself, secured together with elastic bands.