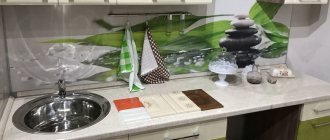
Tile has been and remains one of the most popular finishing materials, especially in certain rooms and areas. This coating impresses with its reliability, durability and high decorativeness, however, over time, even the most attractive materials become boring. And if repainting the walls or re-sticking the familiar wallpaper is not particularly difficult, the process of dismantling and replacing the tiles is complex, labor-intensive, and expensive. In a situation where you want to freshen up the room, but there is no desire to undertake a major renovation, and you can’t get by with cosmetic tiles, special stickers will help out. These beautiful tile stickers are a great opportunity to diversify your interior with minimal investment.
Renewing seams
The seams between tiles often accumulate dirt faster than ceramics, become unsightly and can cause the spread of fungus in the room. This should be avoided at all costs, so it is not recommended to delay when renewing seams.
Rules for cleaning damaged seams
Regular care will help with minor damage. For this purpose, special detergents are used to restore the surface.
It is convenient to clean the space between the tiles with an old toothbrush; homemade recipes are also used for this: a paste with soda, vinegar and ammonia.
If the contaminants are absorbed too deeply, this procedure will not give a noticeable result. In this case, it is better to completely renew the grout.
Complete seam replacement
In order for the new layer of grout to stick properly, you must first remove the old one completely or partially. To do this, it is convenient to use a stationery or construction knife, sharply sharpened and with a narrow blade.
First you need to “cut” the seam in the middle, then cut out the old grout at an angle on each side.
Important: the whole process must be carried out slowly, so as not to accidentally scratch or damage the ceramic surface.
If necessary, unusable or weakly holding squares are also removed, which still need to be replaced (fixed) during the repair work.
After the entire space between the tiles has been cleaned, it is necessary to treat the surface with an antifungal compound. This will not only ensure the durability of the coating, but is also necessary for the further safe use of the premises.
The procedure for applying the grout joint:
- The surface to be treated must be thoroughly cleaned and dried.
- Dilute the grout for joints in the required proportions (according to the manufacturer’s recommendations); you can use ready-made paste.
- Using a wide spatula, apply the mixture to the space between the tiles, pressing slightly into the surface.
- Use a narrow rubber spatula to smooth out the seams.
- Wash off any remaining grout from the tiles with a damp sponge.
The seams should dry well under natural conditions. This usually takes from one to five days, after which the missing areas are corrected and the excess layer is removed with rolled sandpaper.
Read more about replacing seams in the article - Removing grout from tile seams at home
Scope of application
Like the tiles themselves, stickers are most often used on walls in the bathroom or kitchen, although by and large they can be used to decorate any smooth surface, be it glass, plastic or metal. As for shapes and types, it is unrealistic to list everything, but you can divide stickers into universal ones, suitable for almost everything, and themed ones, for bathrooms and kitchens.
If desired, with the help of colorful stickers you can modify not only walls, but also furniture, mirrors, doors with glass inserts, old refrigerators and other appliances that have lost their attractiveness. In families with children, special anti-slip stickers are placed on the bottom of the bathtub. Those who like to joke will love the funny pictures intended for gluing on toilet lids.
Replacing tiles
If areas with severe damage or chipped slabs are identified on the surface, it is wiser to perform a partial replacement. To do this, it is necessary to select products that are suitable in size and structure and carry out installation.
You should not try to choose products of a similar color. Fundamentally new shades or designs will look much more attractive and organic.
Replacing individual tiles
Partial restoration of the tile layer is much cheaper and easier to perform. Also among the advantages is the possibility of bright accents in the interior, because it is almost impossible to choose tone-on-tone tiles.
Features of the work:
- It is better to combine the replacement of individual tiles with updates to the tile joint; in this case, it will be much easier to remove worn-out tiles, and also to strengthen, if necessary, the squares extending from the surface.
- Small cracks and chips can be covered with cement mortar. After drying, all that remains is to remove the unevenness with sandpaper, and then carefully paint it to match the tile.
- Instead of cement, you can use alabaster or other building mixtures.
The main condition is the strength of the base and the possibility of adjustment after the solution dries.
Modern tile wax will help restore damaged areas as accurately as possible. To do this, the surface is thoroughly cleaned and dried, additionally degreasing for better adhesion of materials.
The wax is applied using a special melter, which heats the mass to a plastic state.
Filling of chips and cracks occurs with a small margin, since the material shrinks after hardening.
After drying, the layer is protected and covered with a protective coating. If necessary, apply varnish to give a glossy shine to the surface.
You might also be interested in watching - How to lay tiles in the kitchen?
Gentle removal of unwanted tiles
When replacing a small number of tiles, it is more advisable to decorate the renovation in an unusual style, highlighting it with a bright accent. To do this, the new tiles are placed in a pre-designed order, which may require removing entire tiles.
It is easier to do this by removing the grout joint using the method described above, after which it is easy to pry the ceramic surface with a blade and carefully remove it.
It is not recommended to break or gouge out ceramics, as undamaged tiles can be used in another area.
Selecting and preparing glue - strictly according to the instructions
The adhesive composition must correspond to the work being carried out and the type of tile used. All this information is indicated on the packaging of each composition. Any consultant in the store can tell you what kind of glue is needed for your conditions.
To prepare the composition, it is necessary, again, to focus on the data indicated on the packaging. As a rule, cold water is poured into the container first, then glue is gradually added. The mixture must be stirred constantly until the consistency of thick sour cream is obtained. Doing this by hand is harder and of lower quality than using a drill with an attachment or a mixer directly. After cooking, you need to let it sit for a few minutes, then stir again.
Painting tiles
Another successfully used method of restoring ceramic surfaces is painting tiles. To do this, be sure to clean the surface of possible contaminants, thoroughly degrease and wipe.
Partial restoration of the coating is carried out with any building mixtures (a simple and budget option is cement laitance).
Basic rules for painting tiles
A seemingly simple process has many nuances. First of all, you need to choose a paint that is resistant to moisture and abrasion, suitable for interior work.
Application of the coating also requires preliminary preparation: cleaning, leveling and degreasing the surface. After this, you can start painting using a special tool - a spray gun, or a regular paint brush or roller.
It is equally important to insulate adjacent surfaces, paint corners and hard-to-reach places before finally applying the coating over the entire area.
Depending on the type of paint, it is necessary to allow the first layer to dry, and then apply the second.
On kitchen splashbacks, it is recommended to use a protective varnish over the paint, so the coating will last longer and withstand extreme operating conditions.
Decorating with film
A special film with an adhesive base and a protective coating is perfect for a kitchen apron.
Before application, the surface should be thoroughly leveled and degreased, and cleaned of possible dirt and greasy inclusions.
The gluing process is simple, the main thing is to prevent “bubbles” on the surface, so the glued segment must be ironed and fixed.
If voids are found, they should be pierced with a thin needle and smoothed well.
With proper care, such a coating will last for many years, and it can be replaced at any time, following the described algorithm.
Decorating with film
Today you can also find film that makes up one drawing
Film for tiles is a very inexpensive but effective solution to renewing it.
You can decorate old tiles using self-adhesive film. It has a lot of advantages:
- variety of colors and patterns;
- moisture resistance;
- resistance to chemicals;
- resistance to temperature changes.
Working with film is easy. Before decorating the tile, it must be sanded and degreased. After this, apply the film in the right places and gently smooth it over the surface of the tile. We must try not to form bubbles. If this cannot be avoided, the bubbles are pierced with a needle and smoothed out.
Changing the design of tiles
An affordable and most uncomplicated way to transform a ceramic surface can be called “masking” defects.
In addition to hiding possible damage from prying eyes, this will also allow you to change the usual interior of the room, highlighting your taste and creative abilities.
Vinyl stickers
The range of modern interior stickers will allow you to choose the right option. Before pasting, the surface is thoroughly washed and degreased, and wiped with a clean rag.
The sticker is applied gradually, leveling and pressing down each area to avoid the formation of air voids.
Over time, stickers will lose their appearance and will need to be replaced, but this method is popular, especially if you're on a budget.
Painting patterns on tiles
Plain ceramic tiles can also be refreshed by painting them with paints. If you have even minimal artistic skills, this is not difficult to do.
The main rule will be the compatibility of the design with the overall style of the interior.
To do this, it is advisable to “try on” the selected composition on paper, and only after that start working.
Pre-cut stencils will be of great help in decorating, with which interior decoration will become easier and faster.
Helpful advice: to make the drawing last longer, it is better to varnish it after drying.
Overlapping tiles with another material
If it is not possible to purchase ceramics, the areas freed from tiles can be covered with other suitable materials. Typically, plywood or chipboard of appropriate thickness is used for this.
After installation, the surface will have to be painted over, because the usual structure and color will clearly contrast with the rest of the part.
The result is at your disposal
Now you can congratulate yourself on your new achievement - laying tiles yourself. If you follow these rules, the result will definitely be successful. It is important to show attentiveness, perseverance, accuracy and responsibility. And your loved ones will definitely rejoice at the results of your diligence.
Unusual examples
A fashionable trend in kitchen interior design is the placement of inscriptions and original miniature drawings. To do this, you don’t have to be a professional artist, because on the Internet you can find and print many suitable and easy-to-make pictures.
Have ceramic tiles in your kitchen or bathroom become unusable? Complete replacement and professional installation of new squares is a serious blow to the budget.
Our article has collected simple and budget-friendly ways to update old ceramic tiles in the kitchen with your own hands quickly and without extra expenses.
Panels
Wall panels can be installed on top of old tiles. The apron area is hidden under glass (skinali), allowing you to create a bright design without dismantling the finish. A photograph or an unusual texture (plaster, limestone) is often placed under the heat-resistant coating. Under transparent protection, voluminous wallpaper or a reproduction of a painting look impressive.
Tiles under glass Source remontbp.com
You can hide all the old tiles under the panels without removing them. Small slatted components are fixed with glue or liquid nails. Large parts are mounted on a special frame, under which the dilapidated design is hidden. The design hides 5-10 cm from each wall, so it is only suitable for a large kitchen or bathroom.
Decorative panels repeat the texture of the material from which they are made. Models made of MDF are wood chips pressed under pressure, covered with laminate or veneer on top. Suitable for use in the kitchen.
How to hide old tiles Source stroy-podskazka.ru
PVC slabs imitate the surface of stone, expensive tiles and mosaics. Vinyl types are used in the bathroom and in the cooking room. To prevent the plastic near the stove from melting, the apron area is protected with thermal glass.
Overview of methods
DO YOU HAVE ANY QUESTIONS?
Ask a specialist
Colors
Apron stickers can be of any color , from bright saturated shades to black, white or gray.
- Stickers in the form of photo wallpapers that depict sea and mountain landscapes very Their bluish-blue color scheme gives the interior freshness and some coolness, which is especially important in the summer heat.
- Bright yellow, orange and red fruits or sunflowers, also often found on photo wallpaper stickers, on the contrary, will create a sunny summer atmosphere in the kitchen: their very appearance will make you feel warmer even on the most dank and slushy November day or a blizzard and frosty February day.
- Stickers in brownish-golden or beige colors help create an autumn mood and home comfort.
- Stickers made in greenish tones will create an upbeat spring mood, joyful and bright, like a clear April morning.
- Stickers in the form of dark silhouettes, pasted on a light surface, will give the kitchen a charming sophistication of retro style.
- But white stickers on the black surface of the apron will create a feeling of some mystery.
Advice! In order for the sticker to fit most organically into the overall design style of the kitchen, its color should be in harmony with the color of the apron and, if possible, be a shade close to it.
Thematic variety of stickers
Knowing how painstakingly traditional decoupage from paper fragments is performed in several stages becomes the main motive leading to the purchase of ready-made stickers, which allow you to simply and easily update the desired area. There is no need for glue, varnish, or tedious waiting for everything to dry. The owners of a renovated kitchen only need preliminary thinking, a schematic representation of color spots, which should result in an approximate image of a tile that fits organically into the established interior.
With this approach, once in the store, you won’t have to rely on momentary insight when looking at the variety of topics reflected in the stickers. Among the thematic series, the following images will be most suitable for the kitchen:
- still lifes of aesthetically attractive vegetables, herbs, and fruits;
- images stylized to resemble familiar images - a dancing samovar, a teapot with an accordion, a cook;
- realistic drawings of forks, cups, pans;
- texts, for example, an interesting recipe, a wise thought, a good wish.
The color of the stickers is selected based on existing combinations, supporting one of the dominant tones or enhancing the accent sound of an additional color. Refined graphic lines of the sticker in the style of Japanese prints will create an aura of romance, and high-speed decoupage with a bright marine accent will support the collection of Gzhel ceramics.
It will be successful to purchase a variety of geometric color patterns applied to square sticker fragments corresponding in size to the tile. All that remains is to completely cover the entire plane, alternating colors or types of images, creating a fantastically beautiful mosaic composition in patchwork style.
By creating your own canvas from stickers, you can give space to your own imagination without limiting yourself to the stingy confines of a monotonous pattern. To visually highlight the tiles, it is worth experimenting and making modern decoupage from several types of stickers in the form of a thematic collage.
Hide the old finish under the new
It is probably not as difficult to glue new ceramic tiles as to remove old ones.
To do this, you often have to work with a hammer drill, noisy and very dusty work takes several hours, you end up with several bags of heavy debris, and after that you will also have to re-level the wall, since it will be very prominent under the former tiles. Luckily, the tile itself can be a good base for new trim that's installed directly on top of it . Please note that this option is only possible if the old tile is holding up well and you don’t like it just because it’s worn out. In addition, the new finish must be light, otherwise it may fall off along with the tiles, and it’s good, if not on your feet.
Let's look at the main options for exterior decor of tiles without removing them.
- Self-adhesive foil. This way to transform the design is both the simplest and the cheapest. In the worst case, such a pleasure costs several hundred rubles for a piece of about a square meter; the glue has already been applied to its inner side - all that remains is to carefully glue it to the wall, expelling all the air bubbles out along the way. To seal old tiles with it, they never call a professional - the work is done with your own hands in 10-15 minutes. The bonus is that the new finish is then quite easy to remove or seal with a new layer. Often colorful designs are also applied to the material, so with the right approach, the result looks very beautiful.
- Photo wallpaper. No, you shouldn’t glue them directly onto the tiles, but you can nail a thin sheet of plywood to the latter, and such a finish will fit perfectly on it. You don’t even have to spend money on an expensive variety of waterproof and non-flammable wallpaper if you can purchase a piece of plexiglass of the right size. However, there is still no place for such a design in the immediate vicinity of the slab.
- Panels. It is no secret that today many consumers prefer to order a kitchen apron in the form of a whole panel made of plexiglass or some other materials. Tiles in the kitchen are usually located in the area of the apron, but even if it significantly extends beyond this area, this still does not prevent you from covering the old trim with such panels. If you ordered a product from a specialized store, there is no need to worry about its safety - such glass does not break from impact and does not melt from heat, and you can also apply bright designs to it. To properly install expensive glass, it makes sense to call a specialist, but if you are no stranger to working with profiles, you can do it yourself.
How to put
Laying tiles on a wall or floor is not that difficult.
First, the amount of material required for cladding is calculated. The optimal size of tiles for the kitchen is 100x100 mm for the work area and 15x15 cm for the walls and floor. The number of tiles is calculated by the formula (for one wall or floor) - K=S wall/Stiles, where:
- K is the amount of material.
- S— wall area (calculated: height multiplied by length).
- S tile is the area of one tile.
For convenience, meters are converted to cm. For example, the wall area is 90,000 cm2, standard tiles are 225 cm2. As a result, for a wall with an area of 9 m2 you will need 400 tiles measuring 15x15 cm. 10% is added to the quantity, that is, another 40 pieces.
Work process
The process of laying tiles is not that difficult, especially if you use all the auxiliary materials that are available in stores
Beautiful tile installation begins with preparatory work. The walls and floor are cleaned of dust and dirt. In case of severe damage, the surface is treated with a deep-penetrating primer. If necessary, sand-cement mortar is also used.
Compositions made from clay, lime and gypsum are not suitable for surface treatment. The walls are leveled with plaster and plasterboard, and the floor with a special primer.
Tiles are not placed behind wall cabinets and kitchen tables to avoid waste of material.
When laying tiles on a backsplash, first mark where the countertop will be located. A metal profile for drywall is attached along the intended strip with a margin of 4 cm. The bottom row of tiles will run here.
Wall installation process
First, the first row of tiles is laid.
A profile is used to lay it out evenly. The first row of tiles is applied to the wall and the position of the lower tile is noted along its upper edge. Using a level, a straight line is drawn along the wall border using a level and a profile is attached. Due to this, the tile will not move down.
The glue for the material is diluted according to the instructions and evenly applied to the surface with a regular or notched spatula. Since the composition dries quickly, it is applied to an area of no more than a meter. Excess mixture is removed with the same tool.
The tile is applied to the wall so that it touches the profile but is pressed. The level adjusts the horizontal and vertical position.
When laying, small cross-shaped spacers (crosses) are used to leave even gaps.
All tiles in the row are laid out in a similar manner. If necessary, the tiles are cut with a tile cutter.
After installing all rows, the profile is removed and the bottom row of tiles is laid.
At the end of the work, the joints are grouted. The event takes place 24 hours after the installation of the tiles. During this time the glue will have time to harden. The mixture is diluted and applied with a rubber spatula into the gaps of the tiles. Excess composition is removed with a damp cloth.
Review the expert's advice on laying tiles on walls:
Floor installation
The surface is being marked.
The tiles are laid on the floor (without glue) and checked for clear lines. The adhesive solution is mixed, and the mixture is applied to the locations of the first square with a notched trowel. The composition is smoothed out and the tiles are laid on it. The material is leveled. Crosses are inserted between the tiles.
After laying the first row, the rest are installed. Excess solution is removed with a damp cloth.
Grouting of joints is carried out after the glue has dried.
Video tips for laying tiles on the floor: