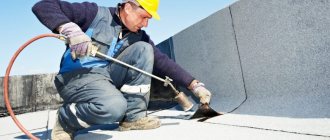
After installing the drywall, a small indentation-seam appears between the sheets. It must be sealed to improve the functional and aesthetic properties of the structure. In our article we will learn how to cover drywall seams, what materials will be needed for this and how to carry out all the necessary work.
How to seal drywall seams
Why do you need to seal seams?
Even with the highest quality and correct installation, small seams will appear between the plasterboard boards. They will be visible to the eye, so they will spoil the appearance of the plasterboard structure. But seams need to be sealed not only for aesthetic, but also for functional reasons. If the finishing is not completed, this will be fraught with the following negative effects:
- The drywall base will be uneven. Wallpaper or facing materials will not stick well to it (all bulges and irregularities will be very noticeable).
- There is a risk of cracking the edges of the drywall. Under the influence of temperature, direct sunlight, and humidity, the edges may begin to deform, which will lead to cracking.
- Increased risk of mold formation. If there is high humidity in the room, pathogenic fungus can settle in the seams, which can lead to the formation of harmful mold.
Types of putties
For plastering, various types of putty are used, designed for certain conditions. There are several groups of building mixtures.
Cement
They are in greatest demand and are available in most hardware stores or supermarkets. Their advantages:
- high strength;
- moisture resistance;
- affordable price;
- Application does not require special tools or skills.
At the same time, they shrink significantly over time and do not contribute to maintaining a favorable microclimate in the living space, so they are rarely used in houses and apartments. An exception is plastering kitchens and bathrooms.
Plaster
They are also very popular because they have high adhesion to the base. They set quickly, harden, and are easy to process. Using various additives, you can change the properties of the mixture or color, which significantly expands the possibilities of its use.
Application of gypsum plasterSource myshtukaturka.ru
Disadvantage: low resistance to dampness and humidity. Even the inclusion of hydrophobic impurities does not fundamentally change the situation, so gypsum compositions are not used when finishing kitchens, bathrooms and other similar premises.
Acrylic
Such compositions are made on the basis of polymer materials. They are noticeably more expensive than their analogues, but also have excellent performance characteristics. Like cement mixtures, they have increased strength and resistance to moisture. The relief texture of the finished surface allows you to create an attractive design.
Another advantage of acrylic putty is its high resistance to mechanical damage. The material easily retains its structure under the influence of various factors and can withstand prolonged use for several decades.
Sealing materials
Materials for sealing seams
Sealing seams can be done in various ways. The main materials are paper tape, self-adhesive sickle tape, putty, primer and plaster. Each material has its own characteristics and nuances, which the master needs to know about in advance. Below we will look at each of the materials in more detail.
Paper tape
Paper tape
It is a long paper tape collected in small rolls. The tape usually has fiberglass inserts, which makes the material very durable and reliable. The length of the tape is usually 50-100 meters, and the width is 5 centimeters (although wider/longer materials are also available). Features of using paper tape:
- Paper tape is usually mounted on a layer of putty applied to the joint and edges of plasterboard boards. There is no need to apply glue separately, since the tape itself adheres to the putty.
- It is recommended to place the tape in the middle so that it covers the seam and both sheets of drywall. This will ensure high strength and reliable installation.
Note! In terms of technical properties, serpyanka is significantly superior to paper tape. Therefore, it is recommended to take the tape only if you have a very modest budget or if serpyanka is not available in the store.
Self-adhesive serpyanka
Self-adhesive serpyanka
Serpyanka is a mesh material in the form of a long but narrow tape, which is also collected in small rolls. The width of the material is usually 5-10 centimeters, and the length is up to 50 meters (although larger rolls are also available). The serpyanka is made on the basis of durable fiberglass, which is very durable. The main feature of the material is the presence of an adhesive layer, which greatly simplifies installation.
Features of using self-adhesive serpyanka:
- An adhesive and a thin layer of paper are applied on top of the serpyanka - to use the serpyanka, you need to carefully remove the paper and bring the serpyanka to the drywall. Please note that at the time of installation the joint must be sealed with putty.
- Serpyanka is suitable for drywall with any edge. It can be used to seal not only seams, but also holes, chips, holes and many other defects on the surface of drywall. The material is universal, suitable for walls of any category.
putty
Putty
Putty is a material that is used to directly seal joints. Typically, white gypsum-based mixtures are used as putty. Gypsum is easy to use, easy to store and transport, and to obtain a finishing mixture, you just need to dilute it with water according to the instructions. Features of using gypsum putty:
- As we said earlier, to use the putty, you need to dilute it with water according to the instructions and apply it to the joint using a spatula. The average hardening time for gypsum is 2-6 hours, depending on the brand.
- When choosing a putty, pay attention to its level of shrinkage. Ideally, the lower the shrinkage, the better. If you buy putty with high shrinkage, the material will have to be applied in several layers.
Primer
Primer Primer
is a liquid composition that is used for additional finishing of joints and seams. The primer is usually completely transparent, and no glue or any additional materials are needed to apply it (a brush will be enough). The primer is usually sold in large tanks of 15-20 liters, as well as small bottles of 1-2 liters (the first option is for industrial work, the second for home use).
Features of using the primer:
- The primer must be applied to the drywall before finishing work (before sealing the seam with plaster). In addition, the primer can be used at the final stage of work - it is applied over the entire surface of the plasterboard structure (including seams) before painting or wallpapering.
- The best option would be to purchase an acrylic-based primer. This composition is inexpensive, dries quickly, and has good technical properties. It is sold in the form of a liquid composition, which should be applied with a brush. The average drying time for the primer is 1 day.
Note! Some primers contain additives that reduce drying time to 4-8 hours. Therefore, read the instructions in advance - this way you can save time.
Plaster
Plaster
Plaster is a mixture for finishing a wall. Many people do not apply the finishing layer and completely in vain, since in this case the plasterboard structure may crack over time. In addition, plaster enhances adhesion between drywall and the outer coating, which will allow paint or wallpaper to last longer. Plaster is a cement-lime mixture, which is diluted with water and applied to the wall using a spatula.
Other features of using finishing plaster:
- The plaster is applied to completely dry putty , onto which a primer has been applied and paper/sickle tape has been attached. The plaster can be applied in several layers, and each new layer is applied after the previous one has completely dried.
- After applying the plaster, it is recommended to clean it with fine sandpaper . This will result in a smoother, uniform surface without unevenness. It is recommended to cover the top of the plasterboard structure together with putty-based joints with a layer of primer.
How to seal
Sealing joints on a plasterboard surface involves 3 steps:
- Purchasing materials and assembling a set of tools.
- Preparing the seam for reinforcement.
- Step-by-step plan for completing the work.
To reinforce joints you will need a set of tools:
- brush;
- putty knife;
- a clean container for diluting the mixture;
- construction knife with a sharp blade.
- Sandpaper.
Materials needed:
- primer;
- reinforcing mixture;
- reinforcing tape, corner (aluminum corner profile PU 25x25);
- clean water at room temperature;
- mixture for joints.
All tools and containers must be clean. Working with a dirty tool is difficult and does not give the expected results.
There are several options for reinforcing tape:
- Serpyanka is similar to a medical bandage and is durable due to its composition.
- Paper - manufacturer KNAUF. When wet, it does not lose its properties.
- Non-woven - contains fiberglass.
- Tape with a metal insert - used to reinforce the corners of gypsum boards.
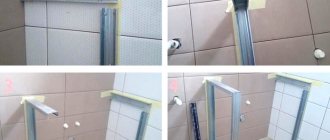
After collecting everything you need, you can begin preparatory work with the joint. It consists of several steps:
- The seams must be chamfered and clean. Use a brush to clean the border of the sheets from dust, and carefully remove small pebbles of plaster.
- Cover the seams with a clean brush and primer mixture. This must be done carefully so that the primer fits well into the seam. The corners of the plasterboard structure are also treated.
- You need to give the primer mixture time to dry.
After drying the joint, the main work begins.
To do this, dilute the mixture for reinforcing joints according to the instructions on the package. Mostly they buy Knauf Fugen.
Next, using a medium-sized spatula, apply a thin layer of the mixture to the joint. Glue the tape on top so that it lies centered along the seam. Using a clean spatula, press it slightly into the damp putty on top, thereby collecting the excess.
The next step is to cover the tape with the same mixture. Without waiting for it to dry.
The remaining putty is used to cover the fasteners. The caps of the screws are “recessed” into the drywall by 1 mm. All areas are treated with primer.
Self-adhesive sickle tape is fixed to the plasterboard surface without putty. After gluing, it is covered with a putty mixture.
How to cover seams
KNAUF Uniflot mixture is used for sealing joints without reinforcing tape. Its differences:
- The strength of putty is comparable to cement.
- It is light in weight, so it is used on plasterboard surfaces.
- The putty does not allow or absorb water.
The diluted solution is applied to the joint in one layer. If there is a gap of 2 mm between the plasterboard sheets, then apply 2 layers. Work with the mixture for 25 minutes, after which it hardens.
If you intend to hang a heavy object on a wall made of GC sheets, then the craftsmen recommend using Knauf paper tape with this putty to make the structure more durable.
Another putty mixture is JS weber vetonit. It is a polymer composition that has a strong adhesion to the plasterboard surface.
The principle of operation is the same as with KNAUF UNIFLOT. However, craftsmen do not recommend using putty mixtures without reinforcing tape.
Sizing with serpyanka in the corners of plasterboard walls
The corners of the plasterboard structure are carefully reinforced, since they bear a large load.
Internal corners may become deformed due to building subsidence.
External corners are subject to mechanical stress (impacts).
Before applying serpyanka to the inner corner, it is cleaned of dust and thoroughly treated with a primer.
Using the mixture to reinforce the joints, glue the serpyanka and cover the top with putty.
Serpyanka is used in small corners - created niches, podiums, shelves. To reinforce the internal corner from the ceiling to the floor in the room, use a tape with a metal insert.
The outer corner is best protected with a perforated corner corner. Putty is applied to the cleaned, primed corner. They put a corner on it and “sink” it in well. From above, without drying out, the corner is covered with the mixture. Everything should dry out. This will take no more than 10 hours.
Required Tools
Materials for sealing seams
So, we have figured out the materials that will be needed for high-quality sealing of seams. But what tools will the master need? Let's figure it out:
- Wide and narrow spatula.
- Plaster falcon (plate with handle).
- Container for mixture + water.
- Fine sandpaper.
- Brush and wide roller.
- Small knife.
Note! You should also take care of personal protective equipment - a respirator, goggles, overalls, gloves. It is recommended to use the respirator only during the preparation of the construction mixture - then it can be removed.
Handling uneven sheet edges
If the sheet has been cut or broken and then trimmed along the edge, it must be prepared before use. Why, how and why - we will answer further.
If you pay attention, at the edges of all gypsum sheets, you can notice a rounding, or a decrease in the thickness of the sheet. This was done for a reason, but for a very specific purpose - sealing sheet joints
Putty is applied to the recess that is created by connecting two sheets with the edges when leveling. It forms an even and strong layer if it “extends” a little over the sheet area, and is not just located at the joint itself. To make such a recess, you need to prepare cut plasterboard parts.
It's very simple - you need a drywall plane or a sharp knife. Either one or the other, you need to chamfer along the edge of the part at an angle of 45 degrees.
Now, if you place such a part against another, even with a factory edge, a recess will be formed, which will be filled with putty mixture during alignment, and as a result, the seam will be stronger.
The procedure for sealing seams
Sealing of joints is carried out in stages - preparing the surface for sealing, jointing, preparing mortar, priming, sealing and many others. Please note that the work may take several days, since the primer, putty and plaster need time to dry completely. Below we will look at each of the stages in detail.
Preparing for work
Immediately before carrying out work, it is recommended to read the instructions for the primer, putty and plaster. All work should be carried out under conditions that comply with the instructions (humidity, temperature). Before carrying out work, it is recommended to ventilate the room well, and then close the windows so that there is no draft in the room. During finishing, it is recommended to turn on overhead lighting so that you can clearly see the main seam, as well as all irregularities and surface defects.
Preparing surfaces for sealing
Now you need to prepare the working surface for sealing. To do this, do the following:
- Check the drywall working surface . If you find burrs, burrs or irregularities, remove them with a knife or fine sandpaper. After cleaning, walk along the wall with a dry cloth to remove dust and debris.
- If the drywall was fastened with screws, check the quality of their fastening . Ideally, they should be slightly recessed, but the heads should not pierce the surface of the cardboard. If the heads are not recessed well, then take a screwdriver and complete the installation. If the heads damage the cardboard, unscrew the screw a little, fill the hole with a small amount of putty, and then screw the screw back.
Note! If you are sealing a hole with putty, then the screw must be tightened immediately, without waiting for the gypsum mixture to dry. Excess putty should be removed with a dry cloth.
Joining seams
Joining is the external processing of the edges of a plasterboard board. As a result of jointing, you should get an open V-shaped recess with approximately the same location of the edges of the plasterboard boards (they should not protrude much above each other, there should be no damaged edges, and so on). Jointing is done using a knife according to the following algorithm:
- If there are damaged areas on the drywall (for example, chips, cut fragments), carefully cut them off using a knife.
- If in some places the edges of one sheet protrude over the other, then such overlaps should also be cut off with a knife, as this will make it difficult for the putty to penetrate.
The jointing should not be done vertically, but at an acute angle of 40-50 degrees. As a result, you should get a V-shaped groove into which putty can easily fall. Some companies sell drywall with already processed edges - if you use such material, you don’t have to do jointing.
Primer of seams
To ensure that the plasterboard boards adhere well to the putty, it is recommended to apply a small layer of primer. The best option would be to use acrylic mixtures with additives that dry in 5-6 hours. To prime, you need to pour a small portion of liquid into a container, and then apply it to the edge using a brush. Wait until the primer is completely dry before moving on to the next step.
Note! At this stage, the primer is applied only to the edge and not to the entire surface of the drywall. The optimal application option is 20-30 centimeters from each edge.
How to prime drywall video
Preparation of putty solution for sealing drywall joints
After the primer has completely dried, you can begin preparing the putty solution. The algorithm for preparing the solution will be simple:
- Read the instructions for the gypsum mixture, approximately calculate the amount of dry composition and water.
- Pour the dry composition into a container for preparing the solution, fill it with the required amount of water.
- Stir the mixture until smooth; If you have a drill with a mixer attachment, you can use that.
- Wait 3-5 minutes for the water to evenly dissolve the powder, and then stir the mixture again.
Sealing drywall seams with putty
The plasterboard mixture is ready - now you can start applying it. At this stage you will also need paper or sickle, so keep them with you. The sealing is done like this:
- Take a wide spatula in your left hand and apply a large layer of putty onto it in a thick layer. Take a small spatula in your right hand and smooth out the putty a little on a wide spatula.
- Using a narrow spatula, scoop small portions of putty from a large one and carefully apply them along the entire groove of the seam. Please note that there is no need to remove excess putty.
- Now take a wide spatula, place it at an angle and move it up and down with slight pressure. As a result, the plaster should spread evenly along the entire edge of the seam.
- When you form the seam, apply paper or sickle tape on top. If you use paper, treat it with boiling water and squeeze it out. To apply, simply bring the paper/sickle tape to the seam and place it on the layer of plaster.
- Apply a thin layer of plaster on top of the paper/serpyanka. Do the finishing like this - use a small spatula to apply a small layer of plaster, and then level it with a wide spatula.
How to putty drywall video
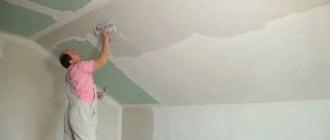
Sanding drywall seams
The gypsum mixture usually dries quickly - from 2 to 6 hours, depending on the brand of the mixture. When the plaster adheres well to the wall surface, take sandpaper and carefully clean the seam. Please note that using a sander is not recommended as this can damage the drywall. Upon completion of cleaning, you need to shake off the dust from the surface of the drywall using a dry cloth.
Main job
Now you can start applying the finishing putty. The work is carried out according to a similar algorithm:
- Pour a small portion of plaster into a container, dilute it with the required amount of water according to the instructions, mix the mixture thoroughly by hand or using a mixer.
- Take a wide spatula and evenly apply the required amount of plaster onto its surface. Using a narrow spatula, scoop out the solution and apply it in small portions to the seam, slightly extending to the edges of the drywall (15-20 centimeters).
- After applying all the plaster, take an empty wide trowel and move it up and down several times with light pressure to distribute the material in a thin layer over the surface of the drywall. The hardening time of the plaster is up to 1 day.
Caulking seams at corners
If you are working with corners, then the seams are sealed using an identical algorithm - stripping, priming, putty, a layer of paper/serpyanka, finishing plaster. The only important point is a different application of serpyanka/paper:
- To seal corners, material of increased width is used - up to 10 centimeters.
- For application, the material is folded strictly in the middle and applied to a layer of plaster.
- An additional layer of plaster must be applied on top of the material + do not forget to grout.
How to putty corners of drywall video
Grouting joints after plastering
After the final plaster has dried, you need to grout the joint. Work is also carried out manually using sandpaper, since a sanding machine can damage the cardboard. Upon completion of work, you need to remove dust and ventilate the room. Then you need to apply a layer of primer over the entire area of the drywall - the work on sealing the seams is completed.
Causes of seams bursting
If the work is carried out incorrectly, the seams may burst. The main reasons for seams bursting:
- Ignoring paper/serpyanka.
- Poor quality jointing.
- Ignoring grouting joints with sandpaper.
- Ignoring dust on the work surface.
- Using low-quality putty/plaster.
- Carrying out work in conditions of excessive humidity.
Paper tape
It is recommended to reinforce the seams with Knauf paper tape with special fiber additives that increase strength. Each leading manufacturer offers its own version of the technology with the most suitable materials. Sheetrock and NextBuild are also popular brands. The presence of a groove in the middle of the tape makes it easier to bend the paper when finishing internal corner seams.
To avoid the formation of bubbles under the paper layer if there is insufficient putty, it is better to purchase tape with micro-perforation.
The tape for sealing may be different - sealing drywall seams with sickle is also practiced, but it should be borne in mind that it is inconvenient to use when processing internal corners. In addition, it has less strength compared to paper tape and is prone to stretching, so it is also not recommended to use it for transverse joints, only for longitudinal ones. The only advantage of serpyanka over paper tape is ease of use due to the self-adhesive layer.
USEFUL INFORMATION: How to properly glue baguettes to the ceiling
Sealing seams without using serpyanka or perforated paper
Plasterboard seams can be sealed without the use of sickle tape or perforated paper. The work is carried out according to an identical algorithm, but with minor differences at the final stage of finishing:
- At first, the work algorithm will be standard - jointing, priming, putty, stripping. The procedures will be carried out in stages, and the primer and plaster must be completely dry before moving on to the next stage.
- And now a small but important difference appears - the final plaster is applied not in one, but in two or three very thin layers. Each layer is applied after the previous one has completely dried.
When drywall joints appear on the wall
You can work with GC sheets using one of the following methods:
- Frame installation of gypsum boards;
- A frameless method of fixing drywall to a surface.
The frame method is the creation of a sheathing from metal profiles and additional materials for sheathing with sheets. Wooden slats are also used, but less often, since wood is a capricious material that requires certain conditions for work and processing.
The frameless method involves gluing sheets to the base using various adhesive mixtures and more.
In both cases, after installing the HA sheets on the base, seams appear - a border between 2 sheets.
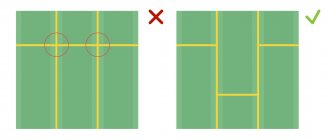
The joint must be correctly formed:
- the gap between the sheets should be no more than 2 mm;
- there should be a chamfer - a kind of groove along the entire border. The plasterboard sheet has a rounded edge, but if the sheet is cut, the edge is immediately cut at 45 degrees with a plane (milling cutter). Masters, in a hurry or because of laziness, do not create this chamfer. Then, using a construction knife, you need to make a recess yourself at the borders of the sheets.
- The joint on the gypsum board must be smooth, without cracks or deformation.
The chamfer plays an important role. It increases the rigidity of the plasterboard surface. A properly sealed joint is a guarantee of the strength of the entire structure.
Recommendations
Let's consider a few practical tips that will help you carry out the work correctly:
- Do not make the solution in large portions unless you have a mixer. Such a solution will be difficult to mix, so there will be a lot of lumps in it. It is better to make the solution in small but uniform portions - such a solution will be of high quality and reliable.
- Some people place a heating device next to the structure after applying plaster. However, this is not recommended, since the combined effect of the liquid solution and temperature changes can negatively affect the strength of the drywall.
- The prepared gypsum/plaster gradually hardens, and after 30-40 minutes the mixture becomes hard enough to make its application impossible. Therefore, do not hesitate - after preparing the mixture, immediately apply it to the seam/surface of the drywall.
Preparation of the solution
Pour water into a small container, then gradually add the dry mixture. It is added until “islands” of dry putty appear on the surface.
Then the mixture should be saturated with water, for this it is left for 5-10 minutes. The mixture must be stirred again to break up any lumps.
Elimination of mechanical damage
Cracks can appear not only at the joints of sheets. It can be broken when carrying long objects (pipes, cornices), installing an internal ceiling unit of a split system or an additional lamp. How to repair a crack if there is “emptiness” behind it and there is nothing to use to tighten the edges of the sheets at its border with self-tapping screws? In this case, the scheme has the following sequence: Prepare an embedded material 5-6 cm longer than the crack.
Mark the boundary of the area that needs to be cut out in order to insert the embedded element inside - for this it is enough if the width of the slot is slightly larger than its thickness. For a CD profile - about 35 mm, for edged boards or plywood - 3-5 mm wider than their section height. Prepare the repair fill and drill a couple of holes for screws along its longitudinal axis. Cut out the marked area in the drywall. They screw two screws into the mortgage so that it can be held, insert it into the hole, align it, tighten it and screw it with self-tapping screws along the edges to the sheathing. A patch is cut out of the plasterboard, installed in place, fixed to the mortgage and the joints are sealed, as described above.
We attach modern “stucco molding”
Let's focus on fastening polyurethane fillets, since this is the most affordable and widespread material today. First, let's calculate the materials and prepare the tool. We count the length of all the walls of the room and divide by the length of one plank. The number obtained as a result of the calculation is rounded up to the nearest whole number. It is recommended to buy fillets with a small margin. Liquid nails or acrylic sealant are ideal for fastening. By the way, acrylic sealant will also be needed to fill the seams between the baseboard, wall and ceiling.
Required tool:
- Circular saw for cutting corners. Although, an ordinary hacksaw for metal is quite suitable.
- A template, also known as a miter box, for sawing an angle of 30.45 degrees.
- Construction knife.
Seal ceiling cracks
It is most convenient to start installing the planks from the inner corners, moving along straight sections. Next, install the plinth in the miter box. Press the smooth surface against the side wall and file at an angle of 45 degrees for right angles. If the angle of the walls is different, the cutting angle is determined experimentally. Attention! For one corner or slope, the planks should be mirror-cut. After the stucco is ready, we begin gluing. To do this, apply glue to the side surfaces of the fillet and gently press it from the corner along the entire length. We continue to glue the planks end to end.
Which is better: heated floors or radiators?
Warm floorBatteries
We continue to glue the planks end-to-end
Important! If you can’t get a perfect fit, you can use thin steel wire as connecting pins.
After all the planks are glued, we seal the seams between the ceiling, baseboard and wall with a thin layer of acrylic sealant. We remove the excess with a napkin or a “universal tool” i.e. finger. Stucco molding has transformed your ceiling!
Stucco molding has transformed your ceiling
If you still find it difficult to decide on the choice of stucco, calculate its quantity or choose the color of the ceiling and walls, do not worry. Many manufacturers' websites have free online services for selecting materials, calculating their quantities, and selecting the color of the ceiling and walls. It all works very simply. You go to the online service. Indicate the dimensions of your room, select colors if necessary, and determine the number of decorative elements. Feel free to create, experiment with colors and materials, and your home will be filled with beauty and comfort!
Surface priming - is it really necessary?
It is believed that it is not necessary to prime the joints of plasterboard sheets, given the sufficient level of adhesion of the material with finishing mixtures. In fact, the primer is needed to enhance the adhesion properties and prevent the formation of cracks in the future.
To treat the surface of drywall, it is better to use acrylic-based primer mixtures. Unlike analogues, they are absorbed faster into the surface of the sheets and require minimal drying time.
Priming is considered mandatory for structures that are being prepared for final painting.
Decorative braid
Recently, a new way of decorating the contour of the ceiling using decorative cord has appeared. This element will not only hide the joint between the vertical and horizontal planes, clearly separate the canvas and the vertical surface, but will also become a bright detail that requires a special style throughout the rest of the interior.
The texture of the braid can be woven or twisted. It is installed in the same way as a plastic plinth: pressed into the groove of the profile. But at the same time, you need to control the straightness of the edging, so on straight sections they use a long rule, and on curved sections they rely on eye and patience.
Decorative cord
There are the following types of decorative cord for installation in a suspended ceiling:
As a rule, the interior always contains garlands and picturesque ornaments inherent in the classic, empire, and baroque styles.
Source
Working with fillet welds
Now all we have to do is talk about how to seal the joints between drywall located at the corners. There are a number of features here too. The main one is that you will use special metal corners, secured in the following order:
- Using an angle trowel, apply a layer of starting putty to the corner joint of the drywall;
- Place and secure the corner on it and wait for it to set with the putty;
- Apply another layer of putty on top, and strengthen it with reinforced tape folded along the corner;
- Apply the last layer of putty to the stretch.
By working in compliance with all the specified technologies, you will receive a guaranteed high-quality result.
Perfect angle or a bummer?
Don't be alarmed, everything is fine! In architecture, a bummer is a decorative element that varies in cross-section.
Many people have heard these terms:
However, professional builders usually call this element a fillet (aka a plank covering the joint between the wall and the ceiling). There are many materials from which this decorative element is made. This can be classic plaster stucco (there are workshops that still make it by hand), wood, modern plastic fillets, and even luxurious marble.
When choosing, it is important to remember that the width of the cornice affects people’s perception of the room. A wide element will visually reduce the height of the ceiling and the volume of the room. While narrow, on the contrary, increases the height of the ceiling and the volume of the room. And the choice of color should be done carefully - too contrasting a color will tear the cornice out of the interior.
Depending on the material, installation methods also differ. If plastic parts are glued, then wood, plaster stucco and other heavier materials are attached with nails or screws.
Ceiling fillet
First of all, first of all... the partitions, and then the ceiling!
For the first time, the builder is faced with the issue of interfacing the ceiling at the stage of erecting partitions. The top joint causes stress for many. In the case of a block wall, it is common to first coat the top edge of the block or brick with glue, and then press it between the wall and the ceiling. As a result, the glue or solution partially remains on the block and is partially squeezed out. A gap will form that needs to be filled with putty. And even if the putty was successful, a gap may still appear. The best, in my opinion, is to use polyurethane foam. You can use it when the partition has gained the necessary strength.
Using polyurethane foam to seal cracks
First, we insert a gun with a balloon of foam into the top seam and carefully go through the outer and outer sides of the partition. After the foam has dried, remove the excess with a regular construction knife. Ready! The result is a high-tech, durable connection unit. This pairing perfectly compensates for the movement of the ceiling and walls and provides excellent sound insulation to the room. In the case of plasterboard partitions, they try to seal the gap with putty. When installing drywall sheets, try to first leave a gap of no more than 5 millimeters at the top. And then seal the seam with acrylic sealant. The sealant, like foam, compensates for minor deformations.
Through holes up to 3 cm
For repairs you will need a minimum set of tools and materials:
- Sharp knife;
- Sealant or PVA glue;
- Any available material to fill the hole space. This could be crumpled paper or a piece of foam left over from the packaging of purchased household appliances;
- Putty;
- Sandpaper;
- Putty knife.
Before filling a hole in drywall of this size, you need to prepare the surface:
- Clean the edges so as to obtain a smooth inner surface without crumbling pieces and shreds of paper;
- Carefully prime the inner edge of the cleaned hole and the area around it at a distance of 5 - 10 cm;
- The prepared lump of paper or foam plastic is smeared along the edges with glue and the hole is closed with it. It is necessary to ensure that the edges of the homemade “plug” do not protrude above the plane of the wall;
- After the glue has dried, the sealed hole is puttied.
Further actions depend on the type of decorative wall covering: painting requires careful leveling, since the slightest flaw is noticeable on the painted surface. Therefore, another layer of putty and careful smoothing with fine-grit sandpaper may be necessary.
Eliminating systemic causes
This category should include both objective and subjective factors that are associated with non-compliance with recommendations for the selection of materials (including fasteners) and failure to implement the technology for installing the supporting frame.
If the suspended ceiling was installed correctly, but the house is new and the shrinkage is so significant that cracks still appear, then it is useless to putty them. It is necessary to wait until these processes pass their main phase, and then carry out cosmetic repairs. And in this case, the presence of a base layer of putty on the ceiling surface will play a role - you can remove the old coating from it without damaging the drywall.
The use of a thin-walled profile (less than 0.6 mm thick) or any other violation of the frame assembly technology leads to the fact that the ceiling will have to be completely dismantled and reassembled, but this time correctly - otherwise it will continue to crack after repair.
Decorative braid
Recently, a new way of decorating the contour of the ceiling using decorative cord has appeared. This element will not only hide the joint between the vertical and horizontal planes, clearly separate the canvas and the vertical surface, but will also become a bright detail that requires a special style throughout the rest of the interior.
The texture of the braid can be woven or twisted. It is installed in the same way as a plastic plinth: pressed into the groove of the profile. But at the same time, you need to control the straightness of the edging, so on straight sections they use a long rule, and on curved sections they rely on eye and patience.
Decorative cord
There are the following types of decorative cord for installation in a suspended ceiling:
As a rule, the interior always contains garlands and picturesque ornaments inherent in the classic, empire, and baroque styles.
Useful tips from professionals
And in conclusion, some useful tips from professionals, thanks to which you can prevent mistakes that may seem insignificant at first glance, but can reduce all the work done to zero.
Professionals recommend:
- Even if all the rules regarding grouting are followed, small cracks cannot be ruled out. This is due to the fact that during the puttying work there were temperature fluctuations in the room. Of course, at home it is quite difficult to achieve constant temperature conditions, but it is worth trying to at least slightly minimize the risks.
- If there are wooden floors in the room, and plasterboard structures were attached directly to them, it is possible that cracks may occur in the area of the corner seams. In this case, the seismic activity of the walls is to blame.
- Some putty mixtures have the inscription on the packaging: “intended for sealing seams without the use of reinforced tape.” Don't let this inscription mislead you. If you putty the joints without using tape, cracks may still occur. In this case, the manufacturer wanted to say that this type of putty simply could not hold it.
That's all, you can start sealing the seams on the drywall.
Everything about installing and repairing ceilings with your own hands
Regardless of what type of ceiling is installed in the apartment - suspended, plasterboard, covered with tiles or wallpaper, or simply painted, to make it look complete, it is necessary to complete the final touch - to decorate the joint.
The gap where the ceiling meets the wall looks untidy, and the structure itself looks unfinished. Therefore, it is necessary to choose a way to decorate this area so that it does not stand out from the overall composition.
The most difficult case
It is most difficult to hide joints with a gap when the edges of the panels have diverged so much that the wall is visible. To hide the unmasking seam, you need to try to move the edges and fix the canvas using proven glue. Many two-layer wallpapers react differently to moisture. Most trellises swell and become plastic when liquid glue is applied. After gluing to the wall and smoothing, the width of the canvas can increase by several millimeters, and after drying the reverse process occurs.
floor tunnel vaz 2110 lux
To hide the resulting gap, you first need to moisten the edges of the canvas using a spray bottle or spray bottle. After 10-15 minutes, the wallpaper will become soft, and you can lightly press the canvas with your hands and try to connect the edges of the panels. The seams are glued with PVA glue and rolled with a rubber roller.
If it is not possible to hide the joint in this way, for example, joints on paper wallpaper are very difficult to hide in this way, you can try to decorate the seams, as in the photo.
Colored stripes and individual fragments are suitable for decorating joints; you just need to stick them on the panel so as to hide the defect and at the same time distract attention from the problem area. Wallpapers of different patterns will help to ideally hide a frayed seam, since a brighter color always attracts the eye. Before you make a joint from different wallpapers, you need to plan an overlap transition. The glued new trellis does not even need to be cut.