When carrying out work on the installation of gas or water mains, it often becomes necessary to change the direction of the line, while the pipeline is cut and then welded at the desired angle. Most often, the direction changes by 90 degrees, and the question arises - how to cut the pipe at 45 degrees in order to accurately connect the joints when welding.
You can cope with the problem of cutting edge angles of 45 or 90 degrees if you have the appropriate knowledge and techniques that will help save not only time, but also materials during the work. At other rotation angles, it is impossible to solve the problem using a ruler and a sheet of paper; you will have to call computer technology for help.
Fig. 1 How to cut a pipe at an angle of 45 degrees
45 degree cutting
Typically, in order to rotate a pipe by 45 degrees, fittings and bends with a rotation angle of 45 degrees are used, made of the same material as the pipes themselves; if the pipes are steel, then the turns are welded from steel. For HDPE pipes, there are electric-welded or cast bends at 45 degrees (note that it is almost impossible to find compression fittings with this angle of rotation in Russia).
But, if you still need to cut a round pipe made of steel or various types of plastics, then for this you will need a pattern for cutting pipes at an angle, the shape of which is calculated manually or by machine. The task is greatly simplified if it is necessary to cut a square metal profile at an angle of forty-five degrees.
For quick cutting, you can use a regular sheet of paper folded diagonally to mark the surface for future cutting. When using folded paper, proceed as follows:
- carry out on a straight surface of the profile in the place where the cut is made, strictly perpendicular to the line;
- apply a sheet of paper folded diagonally to the side surface with the sharp end to the line so that the upper edge of the paper triangle is flush with the top side of the metal profile.
Rice. 2 Homemade template for cutting pipes at 45 degrees
- draw a line with a pencil along the side of the sheet at an angle of 45 degrees, after which the paper corner is applied to the other side and traced with a pencil (it is better to use a thin marker).
For sawing, you can use a grinder with a metal disc, first drawing a thin line along the marking, and then gradually deepening it until the edges are completely separated.
When working with an angle grinder, the following factor must be taken into account: if the edges are completely cut, the disk may be damaged by a sharp corner, which will lead to its failure, and in the absence of protection on the angle grinder, even to injury to the worker. Therefore, it is advisable not to cut the corner edges to the end, but to leave a narrow groove and then break them off, subsequently grinding the protrusion.
Making a template for cutting metal profiles
If you need to cut a large number of pipes, you can make a template from a metal profile of a larger diameter using a paper sheet using the above method. The angle of inclination is checked with a protractor or a construction square - in this case, the two edges of the cut parts of the template are connected.
When working, a template is placed on the part to be cut in the right place and pressed tightly, the markings are applied with a sharply sharpened scriber while tracing the template outline. The part is cut in several passes with a gradual deepening of the groove.
Rice. 3 Cutting a metal profile using a miter box
DIY miter box for cutting pipes
Using a template is not very convenient - you have to make a cut along the line, holding the grinder in weight, which leads to large errors. If you have a welding machine, you can make a simple miter box - guides for the grinder disk, preventing it from moving to the side.
To do this, use a previously made template, drill a hole in the side of which and weld a nut. When working, a homemade miter box is placed on the profile, a bolt is screwed into its nut and the device is pressed against the profile surface. A grinder with a metal disc is used to make a cut, lightly pressing the disc against the side surface of the device. It is clear that with prolonged use, the edges in the miter box are gradually ground down, and although the process occurs simultaneously on all edges, some errors will appear over time. Therefore, it is better to make the device from hard, wear-resistant metal in order to increase its service life and obtain a more accurate instrument.
Principle and rules of working with the device
For many owners of an apartment or house who carry out renovations on their own, it is news that there are special devices for cutting the corners of a baguette. Therefore, they are poorly versed in how to use a miter box for baseboards.
The very principle of using the device is extremely simple. Take a baguette and fasten it in a miter box opposite the 45o slot in the same position as it will be glued to the wall. At the same time, it should protrude 1-2 cm beyond the boundaries of the zone in which the corner will be cut, which will make it possible to obtain a smooth, chip-free end. The workpiece is fixed with clamps, and in their absence, it is pressed to the base of the device by hand. There is a little trick here: it is more convenient to cut if the saw is located on the side of the working hand (the grooves in the tool allow this to be done) .
Knowledge of the operating principle does not guarantee accurate and beautiful connection of the baguette in the corners. You also need to know the basic rules of how to cut a ceiling plinth using a miter box.
- The cutting tool must match the material of the fillet. It is best to cut polystyrene foam with a knife with a replaceable blade. Plastic - with a knife, a hacksaw or a grinder with a diamond-coated cutting wheel. Wooden fillet - using a fine-tooth wood saw.
- Baguettes with relief or ornament must be combined according to the pattern.
- To avoid mistakes when determining the direction of the cut, you need to mark in advance with a pencil the line along which the saw will go. There is no need for special precision here: the main thing is to correctly indicate the chosen direction.
- You need to start cutting after checking the quality of fixation of the plinth in the tool: whether it is installed correctly; How securely is it fixed?
90 degree cutting
To cut a round pipeline or metal profile of rectangular cross-section evenly across, use a sheet of plain paper. They wrap the workpiece so that the edges of the paper sheet coincide, after which it is fixed to the part using tape or glue. Using a grinder, a thin line is drawn near the edge of the paper sheet, after which it is gradually deepened until it is completely cut out.
A metal profile or round pipe can be cut using a template by placing an evenly cut element with a large internal diameter on it.
Collar insert
To obtain branches of metal pipeline lines in the form of tees, a collar insert is used, for which it is necessary to cut the edge of a round pipe adjacent to the walls of another at a right angle. To implement the method proceed as follows:
- cut the edges of the workpiece at right angles using the previously described method.
- On the round end surface, a marker marks four equidistant points located at angles of 90 and 180 degrees to each other.
- The size of the circle is measured, the resulting diameter is divided by 3. The resulting distance is plotted from two diametrically located points, after which these points are connected to two others by a smooth arc, drawing a line with a marker.
Fig.5 Example of a collar section of a pipe
- According to the markings, a cut is made with a grinder and semicircular segments are separated, after which the part is ready for welding. If there are minor inaccuracies in the mating, it can be compacted with a sledgehammer, placing it against the round surface of another element.
Do-it-yourself door frame - step-by-step assembly and installation process
The complete door set includes the door leaf, frame and hinges. It can be difficult to purchase a ready-made complete set, so there is nothing left to do but make a door frame with your own hands from profiled timber or entrust this task to specialists. The box, most often, has to be selected separately, and it is not a structure ready for installation, but several elements that need to be adjusted in accordance with the size of the opening, the necessary cuts made and assembled. It is not so easy to assemble a door frame with your own hands, so in addition to tools, it would be nice to have at least a little carpentry skill.
Techniques for cutting round pipes at an angle
Round pipes of different diameters are cut at an angle when changing the direction of the pipeline, but it should be taken into account that a straight cut at the desired angle, unlike a rectangular section, will not lead to a tight connection of the edges. Therefore, special patterns are used in which the marked edge has a curved shape, which makes it possible to obtain a high joint density.
Paper pattern for pipe
One of the common ways to make a pattern for pipes with a round surface is a method for which you will need a lined sheet of paper, a ruler and a pencil. To obtain a paper pattern proceed as follows:
- Draw a circle on a piece of paper with the diameter of the pipe being cut, divide the circle into 16 equal segments, each time dividing large segments into two equal ones.
Rice. 6 How to cut a pipe at 45 degrees - paper pattern
- Measure the length of the circle by multiplying its diameter by the number Pi equal to 3.14. Lay this dimension on both sides of the axis of the circle in equal segments, each of which is divided into 8 equal parts.
- Draw vertical lines upward from segments on a straight line and horizontal lines from points placed on the circle.
- The places where they intersect are connected by a smooth line and, as a result, a template is printed on paper, which is cut out and glued to the surface to be trimmed. For trimming, it is better to use a grinder with a disk of small diameter - the surface will be curved and when using a large disk, the error will increase.
Is there a difference in technology for floor and ceiling plinths?
At first glance, there is no difference in cutting corners for ceiling and floor plinths. Indeed, there are none if we are only talking about how to make a corner with a miter box - the sawing technology is the same.
Otherwise, there are and they concern methods for determining the length of scraps for joining in corners. So, at the top, when cutting the end, the upper part of the bar is shortened, at the bottom, on the contrary, the lower part. When joining the plinth at the outer corner, the ceiling plinth increases in size at the top, and the floor plinth at the base.
Tools used
There are several ways to cut a pipe; for this, construction and industrial tools for metal processing are used. Of all the types, only the grinder allows you to obtain curved surfaces without further processing with the closest arrangement of edges.
For individual use
The following tool is used for cutting steel pipes at home:
Manual pipe cutters. Allows you to cut round parts with an even, right angle of cut due to the cutting edges of the rollers. There are several varieties of products of this type, consisting of single rollers or a series of rollers attached to a chain. In everyday life, such devices are quite rare and are more suitable for professional work.
Step-by-step installation process
To secure the assembled frame in the opening and install the doors yourself, you must perform the following steps:
- Install the frame into the opening. To keep it in place, insert temporary spacers made of cardboard or foam plastic between the box and the wall.
- Prepare wedges that will be necessary for final installation and alignment of gaps. For them, you can use waste beams sawn at different angles.
- We begin to wedge the product. First, place the wedges directly under the hinges. They will prevent deformation of the beam when we screw it to the wall. Drive one wedge into each upper corner. To prevent the structure from moving, two wedges will be required from each corner. They are inserted from opposite sides so that the narrow parts intersect.
- Next, we check the position of the frame and each of its elements with a level. The box should be flush with the wall.
- We fasten the sidewall.
- We carry out the final installation of the cover part after we hang the canvas on the hinges. To ensure that the frame holds firmly while we screw the hinges and install the sash, we can partially foam the gap along the fixed side and in two or three places on the hinged part.
Tip: Before foaming, you need to clean the surface from dust and moisten it with water from a spray bottle. These measures can significantly increase adhesion.
- While the foam dries, we install hinges and other fittings on the canvas, then put it in place.
- We wedge the hinged part of the door when the door is in the closed position. Then we secure it and foam the cracks around the perimeter.
Another important condition in order not to disturb the geometry of the frame during the installation process is the use of spacer wedges that correspond to the width of the box and are inserted across it.
The final stage of installation of the frame and door is the decorative design of the opening with platbands.
How to cut a cast iron pipe
The main difference between cast iron and ordinary steel is its high fragility and large wall thickness; its precise cutting must be performed in the following sequence:
- The marking angle is drawn according to the template using a scriber, for
supports under the part are placed on a wooden board or board.
- Use a grinder to make a shallow cut of the surface around the entire perimeter.
- Next, the groove is deepened in several passes until the two parts are completely separated.
Characteristics of miter saws.
Power. One of the main parameters that determines the maximum diameter of the installed disk and, accordingly, the depth and width of the cut. It makes sense to choose power based on the intended tasks. So, for trimming interior trims and skirting boards, a power of 1000-1400 W will be quite sufficient. If you also plan to trim wide moldings and cut parts at an angle to the vertical (this increases the depth of cut), a power of 1400-1800 W will be optimal. The same power range will be most suitable for a universal tool. And finally, a construction tool will require a maximum disk diameter and a maximum engine power - from 2000 W or more.
Some tips for cutting pipes
Sometimes households need to cut to connect a pipeline at different angles or along an axis. The main tool for performing these works is a universal grinder and metal discs.
Rice. 9 Pipeline slitting
Making a longitudinal cut
To make a high-quality, even longitudinal cut, you can use a simple device in the form of a metal corner. It is securely fixed to a flat wooden surface with screws and the pipe is pressed against it with a heavy weight. Using an angle grinder, make a longitudinal cut in the pipe top, lightly resting the disc on the surface of the angle.
The corner can be attached to the pipe with clamps and a slot can be made along the upper wall of the corner in a similar way.
Magnetic modification
A device with wooden or plastic guides with built-in magnets. Thanks to their presence, the canvas is attracted and fixed in the slots.
This is a compact device that provides cutting at a given angle with a minimum step. Compared to rotary designs, productivity and quality of work are still lower.
Oblique cut
When changing the direction of the pipeline at an angle greater than 90 degrees, manual methods for making templates become too complex. Using a special program for calculating and creating patterns on a computer for any angles can come to the rescue. The good thing about this method is that it has high accuracy in creating paper templates and is easy to implement if you have a printer.
To obtain a paper pattern, the necessary data on bending angles and pipe diameter is entered into the program, after which a template is obtained, which is printed on a printer in full size. All that remains is to cut it out, stick it on the element to be cut and mark its outline.
Further cutting is done using a grinder in the standard way. An important advantage of machine templates is the ability to cut them in unlimited quantities with the same accuracy.
Rice. 10 Example of a calculation program
For high-quality connection of cylindrical pipeline elements, their precise cutting at angles of 45 and 90 degrees is required. To perform these works, special patterns are used, the shape of the bends of which is calculated manually or constructed by computer. They are cut out on paper and glued to the pipe surface, then the element is cut along the paper contour with a grinder with a small disk. Thus, it is possible to obtain a high-precision corner connection with the edges as close as possible.
In what cases is it used?
It is a mistake to think that the device was invented solely for cutting corners on a baguette. The must, on the contrary, came from other areas of carpentry in the decoration of walls and ceilings. This construction tool is actively used for:
- production of door frames;
- installation of door and window frames;
- production of glazing beads for fastening window glass;
- preparing strips for frames for photographs and paintings;
- cutting cable ducts;
- cutting corners at floor and ceiling plinths.
Using a miter box as a device for working with fillets allows you to file down the ends so that they touch at the corners without gaps.
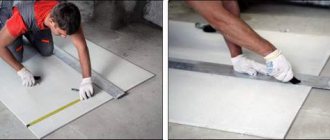
How to achieve a perfectly right angle at the joint?
If you want to create an even joint, you will have to work as carefully as possible:
- To begin with, the first tile is attached using a building level. Its edge should extend slightly beyond the plane of the corner of the base.
- After this, the second side of the corner is leveled. Each tile adhesive has its own hardening time, which is how long you are given to trim the resulting angle.
- Subsequent fragments of tiles are glued using the same principle. The main thing is that the vertical of the walls is maintained initially, otherwise it will be almost impossible to hide the defect from unsuccessful joints.
Keep in mind that at the joints after cutting, the tiles become more fragile. For this reason, this installation is usually not used on surfaces subject to high impact loads. It is especially rarely used when facing steps. So, when designing street stairs, builders most often use metal corners, and sometimes they overlap the tiles so that the top module protrudes slightly above the side one.
Another way to create a bias edge:
If you want to trim a piece of ceramic with your own hands in an easier way, then there is another option. To do this, draw a line on the decorative side of the tile with a glass cutter. After this, turn it over with the wrong side facing you, and then use a grinder to make a V-shaped cut across the entire width of the tile. Now you can break off the excess and also fine-tune it using sandpaper.