Tiles are the optimal covering for cable underfloor heating systems, because... its high thermal conductivity ensures good and uniform heat transfer from the surface, which significantly increases heating efficiency, while minimizing energy consumption. The main criterion for choosing a porcelain stoneware heating option is the ability to raise the floor level. That is, the choice consists of two options - it can be raised (laying a cable-heated floor in a layer of 35-50mm screed), or it is impossible to raise it (without a screed, the floor level rises by 3mm).
Variations in laying porcelain tiles
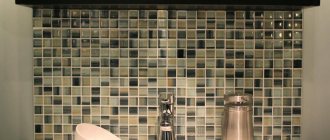
Taking into account the fact that such a slab for a heated floor has a wide variety of colors, shapes and sizes, there are also a huge number of layout options for such material, some of them are presented in the images below:
At the same time, in any of the options it is possible to use either single-color tiles or create a variety of designs and patterns. This way you can get an incredibly beautiful image. But it is also necessary to take into account the fact that rooms do not always have a strictly rectangular shape, and therefore in some cases you will need to know the layout for the wrong rooms, which will look something like this:
And finally, before we begin to directly analyze the algorithm for laying porcelain tiles on the floor, it is necessary to consider some of the nuances associated with it. In particular, we will talk about the perception of the pattern image:
- It is very important to consider that tiles have a significant impact on the visual perception of space. More specifically, by using large tiles, you will achieve the effect of reducing space, and the opposite perception when laying small tiles.
- Also, using a pattern, you can visually increase the length or width of the room. Thus, it is necessary to lay out the pattern lengthwise or crosswise for appropriate enlargement.
- Another one is the division into zones and their unification. Here, to connect several zones, you should combine them with an end-to-end pattern; for zoning, on the contrary, use single patterns.
- And the last visual effect is the use of light colors, which also help to visually enlarge the space.
That’s all, and it’s time to move directly to the question of how to lay porcelain tiles. Let's start in order, with a list of tools that will be needed for the job. Porcelain tiles are stronger than regular tiles, so it is better to use an electric tile cutter, this will significantly speed up and make the work easier.
What type of flooring for porcelain tiles is better to choose?
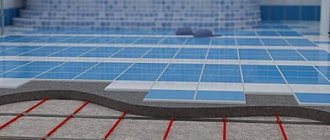
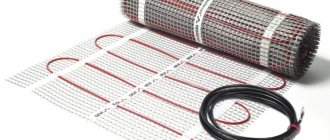
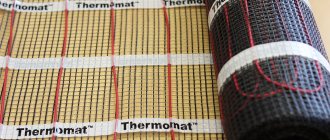
Comparing all the heated floors and their compatibility with porcelain tiles, we can conclude that the most optimal solution would be the installation of electric cable heating mats under the porcelain tiles (two-core) .
Such a floor can provide efficient and uniform heating of the tiles, thereby creating comfortable living conditions in the room.
In addition, it should be noted that the installation of thermomats does not require much preparatory work. And as already mentioned, the heating elements are placed directly into the adhesive solution.
Necessary tool
To carry out the work of laying porcelain tiles on a heated floor, we will need the following tools:
- Measuring instruments (ruler or tape measure) as well as a building level.
- Grinder and tile cutter.
- A container for water and also for mixing glue.
- Rubber trowel.
- Set of spatulas for working with tiles.
- Marker.
- Construction mixer or drill with appropriate attachment.
Preparing to start work
Before the preparation and installation of porcelain tiles on the heated floor begins, it is necessary to prepare a total layout plan. Make sketch drawings, calculate the thickness of the adhesive mixture layer, and, accordingly, the consumption of the tile itself. The possibility of laying porcelain tiles on the floor without seams is also being considered. Taking into account a number of disadvantages of this method, it is often abandoned, but sometimes it is worth considering as an option.
Among the advantages of this variation are the obtaining of a full, uniform surface, as well as savings in materials. But considering, along with this, the disadvantages that manifest themselves in the following:
- It is allowed to use tiles of exactly the same size.
- Inability to ensure the same length of seams and uniform filling.
- In addition, it is difficult to ensure uniform distribution of the adhesive mixture.
Therefore, when laying tiles on warm floors, it is better to resort to the standard option and install them with seams. Also, you should prepare the tile itself; in hot weather, the tile can be moistened with water.
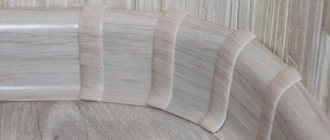
Choosing a design – beautiful and non-staining
It should also be taken into account that porcelain tiles are available in a variety of design solutions. Here, the appropriate option must be chosen taking into account the overall style of the room. Traditional design options include:
Wood-look porcelain tiles for the kitchen are chosen so that the floor appears traditionally massive, but at the same time is practical. And this is a very reasonable decision, because today you can find very naturalistic tiles that look as much like wood as possible. In addition, such a floor will be organically combined with laminate or parquet boards in other rooms and the hallway.
In addition, porcelain stoneware may differ in texture. Thus, the natural (matte) coating is not processed after firing, so it has increased wear resistance.
And when glazed floor tiles are made, the matte surface of the porcelain stoneware is cut off and lightened in a special way.
Porcelain tiles for floors are not much inferior to ceramic ones in terms of standard size variations. The most popular formats are: 30x30 cm, 40x40 cm and 60x60 cm. But you can choose both very large tiles (120x80 cm) and very small ones (5x5 cm).
Preparing the base
And starting directly to the progress of the work, you can notice in the first place the preparation of the coating. First of all, you should check the evenness of the coating, and if there are any defects, they must be eliminated.
In addition, the surface must be free of oil stains, dry, and free of dust and dirt. If laying porcelain tiles on the floor with your own hands requires screeding, it is necessary to take into account the load-bearing capacities of structures, including floors. Because it may not withstand the load.
We also note that all work is carried out at room temperature. It can also be carried out at an average temperature of 5 degrees to 25-30. In heated rooms, when the heating is on, or the heating field is on, installation is strictly prohibited.
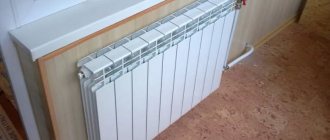
Option 1. The floor level is raised by 35-50 mm, heating cable into the screed
If it is possible to fill a screed with a thickness of 35-50mm, you can use a heating cable as a warm floor. Its main advantage is that by changing the laying step, you can set any capacity per square meter. heated area, so it can be used both as a comfortable floor heating system and as additional or complete heating of the room. And the use of special thermal insulation under the heating cable will reduce heat loss to a minimum, reducing energy costs and increasing the efficiency of the floor heating system.
Required conditions:
- If the thickness of the screed is more than 50 mm, there will be weak heating of the surface and increased energy consumption; if less than 30 mm, there will be an alternation of warm and cold zones (thermal “zebra”).
- The cement-sand screed should not have sharp stones or air pockets, so as not to damage the heating cable and prevent it from overheating.
- The heating cable must be securely fastened and the cable turns must not move when pouring the cement screed. Displacement of cable turns can lead to uneven heating of the surface - “thermal zebra”, and in some cases, even to overheating and failure of the cable if the minimum distance between turns is not observed (less than 40 mm).
This is interesting: The technology of laying warm electric floors - we tell you in detail
Choosing tile adhesive
Among the features of such a material as porcelain stoneware, one can note the complete absence of water absorption, which plays a big role in the choice of tile adhesive for heated floors. Due to this feature, the selected adhesive should provide an increased level of adhesion. Therefore, it is extremely undesirable to use a standard cement composition.
In addition, before choosing an adhesive for laying a heated floor, you need to familiarize yourself with its characteristics, in addition, carefully analyze future operating conditions. Accordingly, in the presence of large loads, a composition with a high level of stability is needed. It is also necessary to take into account the temperature regime, which is acceptable for certain types of glue.
Video:
Well, now let’s move on directly to how to lay porcelain tiles on tiles or floors.
We lay a warm floor under porcelain tiles
Before you start making a heated floor, you should decide whether it will be the main or additional source of heating. This will help you choose the right power of the device; standardly it is 140 - 180 W.
Calculate the number of mats - this must be done, because if you cut them, the cable will be damaged. It is not recommended to place them under furniture, although in the case of mats this is not critical.
Let's consider the installation of heated floors under porcelain stoneware using the example of electrical cable mats:
- The base is prepared - the subfloor is thoroughly cleaned of debris, and cracks and irregularities are repaired. Then the primer is applied.
- The installation location of the thermostat is determined - it should be located on the wall, at a distance of at least 3 cm from the floor. A groove is made in the wall for laying the cable.
- The mats are laid - rolled out on the surface, with a distance of 10 cm from the wall. The mesh is cut where the cable turns. The washcloths are fixed to the floor with adhesive, pointwise. When the glue dries, the entire surface of the structure is filled with a thin layer of glue, this will protect it from external influences.
Advice! The glue should be heat-resistant, made on the basis of epoxy resin.
- The wire is connected to the temperature sensor.
- It is checked as follows: the floor should be turned on for the first time after the glue has completely dried to make sure that all parts of the structure are working.
- Porcelain tiles are laid directly on the mats with glue; there is no need for a concrete screed.
It’s up to you to decide which warm floor to choose for porcelain tiles. Each has positive aspects, and may well create an excellent microclimate in the room. The main thing is to correctly take into account the characteristics of the room and carry out installation in compliance with the required rules.
Laying technology
Laying porcelain tiles on an electric heated floor
An important factor when laying porcelain tiles on the floor is the correct choice of tools. The quality of the coating upon completion of the work depends on this. In particular, the most important tool is a notched trowel; it is important to choose it depending on the size of the tile. Thus, the larger the tile, the larger the trowel teeth should be.
Immediately before installation, you need to find the center of the room, i.e. the middle of the floor. Accordingly, it is necessary to make markings to find it, for which a cord is pulled, in particular, the diagonal of the room is drawn, as well as the intersection from the middle of each of the walls.
The laying itself begins in such a way that either the center of the first tile or the intersection of the seams passes through the intersection of the guide threads. The masonry itself is carried out symmetrically, which is why it begins clearly from the center of the room, in this way it is possible to achieve complete symmetry of the room. As a result, the edges of the covering, at each wall, are finished in identical or whole pieces or trimmed.
There is also a second installation option, which involves the symmetrical placement of the cut pieces in the center of the room, but note that such laying requires incredibly accurate calculations regarding the entire room of materials and slabs.
Do not turn on the electric floor heating after laying the tiles; be sure to give it a week to dry.
Peculiarities
Most often, a warm electric floor is installed under floor coverings such as tiles and similar ones, since they are considered “cold”. Under a wooden or fabric covering, installation of a heated floor is rarely carried out, this is due to the fact that these materials have poor thermal conductivity.
In addition, wooden elements under the influence of heat can dry out and lose their appearance, and synthetic coatings can release harmful substances when heated.
Laying cable heated floors
Infrared heated flooring has appeared relatively recently; its advantage is that it is installed dry, so it can be installed under floor coverings such as carpet, laminate or parquet.
The main advantages of electric heated floors:
- there is no possibility of leaks;
- silent operation, since there is no boiler or pump;
- takes up little free space;
- uniform heating of the floor;
- simple control, just set the temperature on the thermostat;
- long service life.
Laying core heated floors under tiles
Despite the presence of a large number of advantages, warm electric floors also have their disadvantages:
- energy consumption, in large rooms it is better to install a water floor;
- emits electromagnetic waves, although manufacturers claim that they are completely safe for health.
Step-by-step instruction
So, let's start with the installation itself.
- First of all, mix the adhesive mixture and then apply it to the surface. First we level it with an even spatula, then with a notched spatula.
- Next, lay the tiles on edge and level them. Please note that it is necessary to check in all positions.
- The next step is to also adapt the subsequent tiles. But they already need to be moved a little away from the previous ones, leaving a small gap. For this purpose, special crosses or systems for laying tiles are usually used.
- Each new laid tile must be checked with a level. Within the next 10 minutes after installation, you can still correct it and adjust its position.
Important! If you take a break between installations, you should take into account that the previously laid material settles somewhat when the adhesive mixture dries. That is why, with further laying of the first part of the coating according to the level, we will end up with an uneven surface with a discrepancy in level.
In addition, controlling the voids between the seams becomes a fairly important factor, as this can lead to cracking of the tile itself. Speaking about the timing of control, we can say that the glue itself usually dries within a day, while the full strength of the coating occurs only after three days.