Faulty plumbing causes a lot of inconvenience and is often a source of conflict with neighbors. If a toilet leaks, it spreads an unpleasant odor not only in the toilet, but throughout the entire apartment; furniture, household items, and clothes are saturated with it. Due to increased humidity in the bathroom, the floor and wall coverings are destroyed, and the ceilings of residents on the floor below are also leaking. Often the cause of a leak is poor-quality or incorrectly installed corrugation. This can happen due to the use of unskilled workers who use the cheapest materials.
In order to prevent the corrugation from leaking, it is necessary to ensure that it does not become clogged or filled with water.
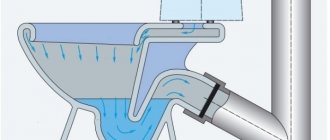
Scheme of the corrugation device.
The corrugation is an accordion pipe that connects the neck of the toilet to the sewer hole. To make sure that it is not the toilet bowl (or tank) itself that is leaking, but its outlet, you just need to drain the water and see exactly where it is leaking. If the cause is, after all, corrugation, then the problem can be eliminated by repairing the tube or by replacing it. Before starting repairs, you need to find the place where the water was flowing from. There can be 2 options:
- the pipe has a rupture (or crack) and therefore flows;
- The connection of the corrugation with the sewer (or with the toilet bowl) is leaking.
Here's how to fix a folded sleeve:
- dry the crack with a hairdryer and seal it with a piece of rubber using waterproof glue;
- wrap the hole with a rag soaked in epoxy resin, having previously degreased the contact area;
- put an improvised plaster of bandage and cement mixture on the pipe;
- wrap the outlet tightly with a bandage coated with sanitary silicone.
All of the above methods will only help you forget about a leaking toilet for a while, since the corrugation is practically beyond repair.
The best solution would still be to replace the tube.
Installing corrugation on a toilet - subtleties and nuances
The process of installing a corrugation is very closely related to the installation of a toilet - you cannot install a toilet and then connect it to the sewer with a corrugation. Everything will have to be combined and done in a strictly defined sequence.
- To begin with, the corrugation must be pulled over the toilet outlet. It is very easy to put on, but nevertheless, careless movements can lead to damage to the product. If you smear the sealing rubber in the socket with soap, the corrugation will fit onto the socket easily, with minimal effort - in any case, you need to tighten it with a twist.
- Next, we move the toilet to the sewer socket and insert the corrugation into it, after which we position the pot in the desired position and mark its attachment points.
- We remove the corrugation from the sewer socket. We drill holes for fasteners in the floor and return everything to its place, inserting the corrugation into the sewer.
- Now, after a test flush, when you are convinced that there are no leaks, the toilet bowl can be thoroughly fixed to the floor. In principle, that’s all, but there is one subtlety - in order for the rubber to properly seal the connection between the corrugation and the old cast iron sewer, the socket of the latter must be very well cleaned of rust and old seal. There are no other nuances here, and you will not need any additional sealing of the seams with silicone. It is not needed here - silicone spoils the rubber over time, so you should completely forget about it.
To conclude the topic about why a toilet corrugation is needed and how it is installed, I will say a few words about replacing the old, leaky corrugation with a new one. Such repairs are carried out very simply, without even having to remove the toilet. First, squeezing the corrugation like a spring, the liner must be disconnected from the toilet. Then, accordingly, pull it out of the socket. The new corrugation is installed in the reverse order - first it is inserted into the socket, then it is compressed and pulled onto the toilet. This is where the superiority of corrugated pipes over rigid toilet connections lies. Yes, I completely forgot - such a trick is only possible if in the established position the corrugation is stretched and not compressed to the limit. This point should not be overlooked during the initial installation of a plumbing fixture.
Tools needed to replace the part yourself
To perform installation work you should prepare :
- additional fasteners that prevent sagging of the corrugation (for short and slightly stretched connections will not be needed );
- plumbing sealant - silicone sealant - for lubricating mating surfaces ;
- a knife or similar tool for cleaning the pipes from dirt ;
- rags.
Corrugation for toilet: advantages and disadvantages
If we compare the corrugation for a toilet flush with the old technology for connecting this plumbing fixture to the sewer system, then we can highlight at least a couple of global advantages.
- First of all, this is the speed of installation. If previously you had to wait for the sealant to harden, then in the case of a flexible outlet the toilet can be used immediately after connecting to the sewer.
- Versatility. The flexible corrugated outlet allows you to rotate the toilet bowl relative to the drain hole at almost 90 degrees in any direction. There is only one limitation for it - the outlet does not allow the toilet to be brought closer to the wall when installed directly. Well, there are other products of this type for this purpose.
- Reliability. It is ensured by a well-thought-out system of rubber seals. At such a connection, the joint leaks only in two cases - when the corrugation is installed incorrectly and when the sealing rubber dries out over time.
You can see what a corrugation for connecting a toilet is in this video.
This product also has disadvantages, which are caused not by the idea of the product itself, but by the quality of its manufacture - cheap products of this type can burst even before installation. This happens in the inept hands of a master, but it also happens due to the quality of the plastic. In general, you don’t need to buy cheap products, and everything will be fine.
Tighten loose bolts
Another reason when a toilet leaks at the junction is the loosening of the tank mounting bolts. They are usually metal or plastic. While the former can rust and break, the latter simply burst over time due to static load or if someone rests on the tank.
The problem is solved by replacing the bolts with new ones, and to do this you need to proceed as follows:
- turn off the water supply to the tank and empty it;
- unscrew the flexible supply hose;
- remove the bolts (if they are rusty, this will not be easy, but be careful not to damage the fragile tank);
- insert new bolts with spacers into the holes and tighten (just do not overdo it).
If it is still leaking at the joint, you will need to tighten the bolts a little more to seal the toilet. The main thing is not to squeeze it so that nothing bursts or cracks.
Corrugation for toilet installation technology
Author Anna Kmeta July 16, 2013
Few people remember that previously the entire sewer system was a cast iron structure, the main advantages of which were strength and reliability. Despite this, it had to be abandoned due to frequent pipe blockages, which could only be removed by cutting. Over time, toilets and their components have undergone many modernizations, which entailed changes in the cross-section of pipes, their length, and so on. All this led to the impossibility of using standard cast iron networks. In the modern world, not only new toilets have come to the aid of plumbers, but also their components, which are now made of plastic or rubber without sacrificing quality. One such device is a toilet corrugation. Let's consider the features of installing corrugations and their main characteristics.
What is a toilet corrugation?
A toilet corrugation is a flexible corrugated pipe that is attached to the base of the toilet flush hole and the socket of the sewer riser. It has the following features:
- inside the corrugation has an absolutely smooth surface, which prevents the accumulation of debris and, as a result, blockages;
- to increase the density of the pipe and prevent its breakthrough or cracking during casting, steel threads are used;
- high-quality corrugation for a toilet cannot cost a penny, so it is better not to skimp on this plumbing item in order to avoid unforeseen situations and frequent repairs;
- This type of plumbing pipes is perhaps the only plumbing fixture that allows you to place the toilet in the planned position, which does not always meet established standards. It often has a curved shape.
Installing a toilet corrugation
The development of a corrugated pipe has made the installation of a toilet much easier, since now there is no need to remember the dimensions of its socket and the diameter of the riser. The toilet corrugation is equipped with sealing rings that are easy to tighten to avoid leaks. So, let's look at the procedure for installing the corrugation:
- One end of the pipe must be placed on the toilet drain hole, which must first be cleared of debris. To make the connection more tight and prevent the appearance of unpleasant odors, it is recommended to lubricate it with plumbing sealant, preferably silicone. It is imperative to ensure that the pipe is evenly fixed around the entire circumference. Then you need to wait a little for the sealing solution to dry.
- Place the toilet in the place where it is planned to be placed so that it does not rock.
- The second end of the toilet corrugation must be pushed into the sewer socket until it stops, having first cleaned the pipe of dirt and coated it with sealant.
- After the silicone has dried, you need to pour several buckets of water into the toilet to control the strength of the installed corrugation. If it does not leak, there are no cracks or sagging on it, you can use the toilet.
The toilet corrugation can only be replaced if it leaks or is damaged. On average, its service life reaches 15 years.
Tips and recommendations for further care
Successful operation of sewerage in an apartment building depends on the choice of pipes. Care is related to the characteristics of the material used. Plastic is sensitive to high temperatures. For normal work at home, it is recommended that the drain temperature be 40 degrees, short-term - up to 60 degrees, otherwise the material loses its properties and the pipe may leak.
Deposits also form on smooth surfaces of PVC products. Together with the drainage of hot water, they turn the cross-section of the pipes into an ellipse, which leads to a loss of throughput. Polyvinyl chloride is a flammable material, so fire safety rules must be followed. Aggressive substances corrode the connections and walls of the corrugation; it is not recommended to drain them into the sewer.
Types of corrugations for toilet bowls, their features and purpose
Apart from variations in size, the corrugation for a toilet bowl can be classified according to only three criteria.
- According to the degree of reliability. In this regard, we can distinguish between reinforced and non-reinforced corrugation for the toilet. What is the difference between them? In short, the reinforced corrugation (in its folds) additionally contains metal wire. In more detail, this wire prevents the corrugation from bending more than necessary, and at the same time breaking in the folds. This corrugation lasts several times longer and at the same time costs only slightly more than its non-reinforced counterpart.
- According to the degree of rigidity - based on the thickness of the plastic used to make the corrugation. Despite the fact that hard corrugation is reliable and durable, soft corrugation is still widely used, since working with it is much easier and more convenient.
- According to the direction of the bell. In this regard, three more variants of products of this type can be distinguished - corrugation with a straight bell, bent at 90 and 45 degrees. The first is considered universal. The second allows you to connect a direct-outlet toilet to a drain coming out of the floor. And the third is mainly used to connect the toilet to a horizontal sewer pipe located low above the floor. In general, these varieties are designed for various situations and none of them are completely universal, no matter how much one would like it.
All these points, or rather varieties, must certainly be taken into account when choosing corrugation - or rather, they must be correlated with local circumstances, on the basis of which the choice of one or another variety of corrugation is made
Particular attention should be paid to the length of the product - in the sense that you should not purchase a short corrugation in the hope that it will stretch. It may stretch, but then it can just as easily shrink back, forming a leak.
Everything should be in moderation.
Forms of release in the drain system
You can change the location of the bell, but you should remember that this will take up some space. And, as you know, many rooms of this type are very small in area. If you change the location of the drain in a small room, there will be very little free space left. This is especially true for toilets that are combined with a bathroom. To do this, it is not necessary to call specialists, since you can replace the drain mold yourself.
First you need to note the release forms, there are only three of them:
- Horizontal;
- Oblique;
- Vertical.
Toilet with direct release
The horizontal release came to us from Europe. Sealing here is complicated, and there are no special advantages. It can allow you to place the toilet as close to the riser as possible. It is precisely because of this single advantage that buyers choose toilets with this particular form of release. More often, these are those buyers whose toilet space is very small, and this type of toilet can save some space, leaving more free space than other types of toilets.
Toilets with an oblique release form are the most popular type of plumbing fixtures. It should be noted that a toilet with a horizontal outlet can be easily connected to an inclined socket. There are corrugations specifically for this purpose.
The vertical type of drain is ideal for those houses in which the sewer pipe runs above the ceiling of the lower apartment.
As a rule, here you cannot choose the form of release that you like. Toilets are selected based on the location of the sewer pipe and the socket that goes into it. If it is located under the floor, then you need to take a toilet with a vertical outlet. If the bell is located horizontally, then a horizontal outlet is ideal.
Toilet leaking causes and solutions
If water is leaking in the toilet, then the problem needs to be fixed as soon as possible, since constantly leaking water can cause flooding of your apartment and the apartment of your neighbors living below. All repair work can be done independently.
Plumbing product malfunctions
The main causes of leakage
If water appears on the floor of the toilet room, the reasons may be:
- wear of the gasket installed between the toilet bowl and the flush cistern;
- worn gaskets on the fastening elements of the tank;
- loosening of the threaded connection between the inlet and the float valve located in the drain tank;
- rupture or displacement of the corrugated hose connecting the toilet outlet to the sewer pipe.
Methods for eliminating leaks
How to fix a toilet leak? First of all, it is necessary to find out what caused the puddle to form. To do this, simply drain the water in the toilet and visually determine the location of the leak. If you can’t determine it visually, you can feel each element of the system with your hands. Moisture will appear at the leak site.
Replacing the gasket between the bowl and the tank
If the toilet runs, but no chips or cracks are found on the flush cistern during a visual inspection, then the reason lies in the wear of the gasket located between the toilet bowl and the cistern. Troubleshooting occurs according to the following scheme:
- the water supply to the toilet is cut off;
- The water is completely drained from the cistern. It is recommended to remove any remaining water with a cloth;
- the hose supplying water to the tank is disconnected;
Disconnecting the line from the toilet tank
- the bolts securing the tank are loosened;
Leak prevention
Prevention is the key to avoiding failures in the sewer system. Regular inspection of pipes and their timely replacement if the operating period is coming to an end will become a reliable means of preventing sewer leaks.
Old sewer pipes greatly increase the risk of leaks. In order not to pay for repairs to the neighbors below, it is better to replace in advance the suspicious section of the structure installed many years ago.
Before buying an apartment on the secondary market, one of the main points that you should pay attention to is checking the condition of sewer pipes and risers. Nothing costs more in the future than a neglected sewer system. It often leads to sad consequences.
Also, after constructing the system, metal clamps with multilayer rubber gaskets, tightly secured with screws, are installed at the joints. This will serve as an additional means of preventing leaks.
Requirements for a ventilated valve (aerator)
The installation of ventilated valves to allow air into the system (Figure 5), which guarantees normal operation of the sewer system, is carried out on the basis of appropriate calculations. The throughput of the aerator must correspond to the specified design parameters for the throughput of the riser. In turn, the fluid flow through the riser depends on its diameter, type (ventilated/non-ventilated) and height. The calculations also take into account the diameter of the dictating floor drain (with the highest waste flow), the angle of liquid entry through it, the height of the water seals and other initial data.
Figure 5. Operating principle of an aerator - air valve for sewerage: 1. In the operating position, the valve is closed - air from the sewer does not enter the room.2. When a vacuum occurs in the sewer riser, the aerator valve opens, the missing amount of air comes from the room, preventing the water seal from breaking.
In a simplified form, you can coordinate the flow parameters of the aerator and ventilated riser using tabular selections. Initially, you should refer to Appendix “B” of SP 40-107-2003 for the installation of internal sewerage from polypropylene pipes. It is to this that SP 30.13330.2012 refers to determine the characteristics of the aerator.
Table 1. Capacity of a riser made of polypropylene pipes ∅110 mm, equipped with a ventilation valve with a clear cross-sectional area of the air flow of 3170 mm2 and 1650 mm2.
| Diameter of floor outlet, mm | Angle of liquid entry into the riser, ° | Riser capacity, l/s | |
| 1650 mm2 | 3170 mm2 | ||
| 50 | 45.0 60.0 87.5 | 5.85 5.10 3.75 | 7.7 6.8 4.54 |
| 110 | 45.0 60.0 87.5 | 4.14 3.64 2.53 | 5.44 4.8 3.2 |
Next, you should find out the flow parameters of the sewerage system with similar initial data. For ventilated risers, they can be gleaned from tables 6-9 (SP 30.13330.2012).
Table 2. Capacity of ventilated risers made of polyvinyl chloride (PVC) pipes (SP 30.13330.2012 (Table 7)).
| Outer diameter of floor bends, mm | Angle of connection of floor branches to the riser, ° | Throughput, l/s, risers with pipe diameter, mm | |
| 50 | 110 | ||
| 50 | 45 60 87.5 | 1,10 1.03 0.69 | 8.22 7.24 4.83 |
| 110 | 45 60 87.5 | 1,10 1.03 0.69 | 5,85 5.37 3.58 |
This also takes into account the diameter of the floor outlet and the angle of its connection. From the tables it becomes clear that, for example, for some of the most popular PVC pipes today, Ø 110 mm with an outlet Ø 110mm/45 (outlet for connecting a toilet), the second throughput of the riser will be 5.85 l/s. This figure turns out to be slightly higher than with similar geometric parameters of a sewer system with an air valve (5.44 l/s (Table 1)).
Drain mechanism malfunctions
As a rule, the drain mechanism is made of plastic. On expensive toilet models it is durable, but on cheap ones it sometimes fails. Often it cannot be repaired. Given the low cost of this design, in most cases it is easier to replace.
Since the mechanism consists of several parts, it is first advisable to figure out which part is faulty, and only then purchase the necessary element for replacement. In some cases, the mechanism itself can be repaired.
Depending on the symptom of the problem, repairs are performed in different ways. Therefore, it is advisable to divide the procedure and methods of repair depending on the type of malfunction.
The toilet tank is constantly filling
This sign clearly indicates that the filling mechanism is faulty. A common cause of such a malfunction is the skew or displacement of the float relative to the tap. To eliminate the malfunction, set the float to working condition.
Water leaks into the toilet from the cistern
There may be two reasons: the water supply to the tank is not shut off, which is why excess water is discharged through the drainage on the drain mechanism, and the plug does not fit tightly to the outlet hole. In the first case, the tank filling mechanism is to blame, and in the second, the draining mechanism.
A problem with the drain mechanism often occurs when the seal on the plug wears out or cracks. Of course, you can patch it up or find a suitable replacement. However, it would be more correct to replace the entire mechanism.
The drain button does not work/is stuck
This sign indicates wear or damage to the drain mechanism. Some part of the mechanism, usually where the key contacts the mechanism, experiences wear and tear. As a temporary measure, you can fuse plastic at the wear site using a soldering iron. However, such repairs will not last long. You must be prepared to replace the mechanism.
Preventative work
If you don't want your toilet to break down frequently, you need to constantly take certain preventive measures.
The toilet tank and bowl should be cleaned once every six months.
Constantly review the condition of fittings and related fittings.
Any toilet does not “like” mechanical damage; it does not tolerate temperature fluctuations.
Timely prevention will extend the service life of the entire system.
When a leak appears, the simplest breakdowns are corrected first and only then begin to solve more serious problems.
You can fix a cistern leak with your own hands. The design of the tank is so simple that it does not require any special tools. Having completed such repairs yourself, you will definitely get great pleasure.
Pipe location
The most suitable place for the pipe outlet is the ridge.
It is necessary to determine the location of the furnace at the construction stage. In addition to having a well-fortified foundation underneath, it should be remembered that it is better not to place a large number of beams and rafters above the location. After all, the presence of a chimney, which is a very heavy element, requires the location of good supports for it. It is also worth remembering that the longer the section of the straight chimney pipe, the higher the draft level. But this also reduces the efficiency of the boiler or furnace
It is important to find the best ratio between heat transfer and thrust
Also, the quality and strength of traction depends on the wind, so it is best to install the pipe in the area where the ridge is located. The presence of a cap (an extension at the top of the chimney) also helps to improve draft. Good thermal insulation avoids condensation, and the pipe is best made from materials that heat up quickly.
What to do if the toilet is leaking at the junction with the sewer
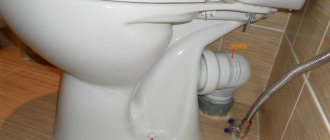
If the toilet bowl leaks or drips, you can also deal with this problem yourself. Most often the reason is a dried out seal. Over the years, the rubber membrane loses its elasticity and may crack, resulting in gaps through which water leaks from the drain hole onto the floor.
If possible, you should remove the toilet to provide more room for action, but this is not necessary. Your task is to remove the worn-out corrugation and clean the seats: the fan pipe and the outlet on the bowl.
Coat the surfaces with plumbing silicone and install a new corrugation. It should fit quite tightly. Allow the silicone to set by waiting at least 1-2 hours, after which you can check that the toilet bellows at the joint are no longer leaking.
In the case when it is impossible to dismantle the toilet or this has its own difficulties, and the corrugation cannot be removed without this, you can resort to one trick:
- try not to flush the toilet for at least one day;
- crawl under it, picking up a screwdriver (it is better to use a plastic or wooden stick);
- carefully pry up the corrugation at the junction with the toilet that is leaking;
- having protruded it, squeeze out a small portion of silicone inside;
- bending the corrugation in a circle, fill the entire cavity with silicone sealant.
This method may not be the most productive, but it is quite effective. With its help, you can urgently eliminate a leak with minimal labor costs.
As a rule, we don’t even think about plumbing in everyday life. It stands and stands, works and works. But as soon as a leak appears, rust appears, puddles accumulate, or in the case of continuous noise of water - that’s when we grab our heads. We immediately remember about the plumbing and understand that it requires repair.
There are only a few reasons why a leak may form at the sewer connection points:
- A skewed or damaged gasket is the most common cause of a leaking toilet joint. If it is new and the joint is leaking, most likely you have assembled it incorrectly or there is a defective gasket.
- The toilet bowl can often leak. This nuisance can easily be eliminated on your own. The reason for this is a dried out seal. Over time, the rubber from which it is made ceases to be elastic and cracks. The result is gaps that allow water to enter.
- Loose cistern mounting bolts. They are usually made of metal or plastic. Metal rusts over time, and plastic can burst.
- Another cause of leakage is the drain pipe.
The procedure depends on the area and cause of the leak.
If your plumbing has been working for some time, then most likely the leak was caused by a cracked gasket or a skewed drain tank. What to do if water oozes out because the gasket has served its purpose is clear without much explanation. It needs to be replaced.
- turn off the water and empty the drain tank;
- wipe the inside of the tank dry so that not a drop of moisture remains there;
- disconnect the supply hose;
- unscrew the fastening screws holding the tank and remove it;
- remove the lock nut on the drain;
- remove the old gasket and replace it with a new one - it is better to immediately place the gasket on the sealant, it should not differ in shape and size from the old one;
- We reassemble in reverse order.
We suggest you familiarize yourself with the installation height of the washbasin in the bathroom from the floor, what are the installation standards
We supply water to the tank and admire the result of our labors.
The corrugation is leaking
To troubleshoot the problem, ideally it is better to remove the toilet to have more room to work, but you can do without it. What is necessary is to remove the corrugation, which has served its purpose, and clean the landing sites.
The surface of the corrugation and the seats must be treated with silicone sealant. The fit should be tight. After two hours, when the sealant has set, you can check for leaks.
In cases where dismantling the toilet is impossible or there are difficulties, and the corrugation cannot be removed, there is one trick:
- You must not use the toilet for at least a day;
- Having climbed under the device, use a stick made of wood or plastic;
- at the place where the corrugation connects to the toilet, pry it off;
- squeezing out the corrugation, apply silicone sealant inside;
- Gradually walking around the entire perimeter, treat with sealant.
The bolts are loose
Loose bolts simply need to be replaced with new ones. Everything is done very simply:
- The water is shut off and the drain tank is drained.
- The supply hose is unscrewed.
- The bolts are dismantled - you need to act with extreme caution, since they have rusted over time and are difficult to move.
- New bolts are installed, the main thing is not to forget about the gaskets - the bolts need to be tightened tightly, but not too zealously.
Attention! If the leak continues, the bolts are tightened a little additionally. The main thing is not to overtighten, otherwise it might burst somewhere.
Pipe leak
Very often, pipe leaks occur where the toilet sits on cement mortar. Such installation was very often used, and is still used in old houses where there has not been a major renovation for a long time. The technique is simple and reliable, but over time the pipes leak. The fact is that the coating gradually crumbles and falls off. This leads to leaks. The remaining solution enters the sewer, and the leak expands more and more.
What is the right thing to do in such cases? You must proceed as follows:
- arm yourself with a chisel with a narrow tip or a flat screwdriver and a hammer;
- beat off all the old putty - don’t hit it too hard, otherwise you’ll break the toilet outlet;
- clean everything from dirt and debris;
- fill in the remaining voids.
You can also use cement mortar to seal. Just dilute one part sand and one part cement with water. But this is already the last century. Silicone sealant is much more convenient and effective. Yes, and it is available in all hardware stores.
Before purchasing, consult with the seller which sealant is most suitable. Sanitary sealants are usually used, since they have better adhesion to the sanitary ware from which the toilet is made.
If everything is done accurately, but the leak has not been eliminated, the best option would be to invite specialists. They will be able to quickly and efficiently fix all problems. If the pipes in your house, like the plumbing, have long outlived their usefulness, then it would be wiser to update them.
The rubber gasket became less elastic over time and cracked. To fix the problem, you need to remove the toilet from the base. Remove the old cuff. Install a new cuff on the sealant. If it is not possible to buy a new gasket, then the old gasket is bent upward around the circumference and sealant is thickly applied into the resulting space.
Once a leak is discovered, something needs to be done. On the one hand, you can turn to specialists for help who, having the necessary knowledge and experience, will quickly determine the cause of the leak and eliminate it. But they will demand money for the work. On the other hand, if you don't want to pay, then roll up your sleeves and get to work. This article was written for you, adherents of independent repair work.
And remember! The work of a professional plumber today costs almost as much as the toilet itself.
First of all, turn off the water. Make sure to do this, because otherwise additional difficulties may arise. The water enters the tank under pressure, and if something breaks, don't be surprised when it starts gushing out in the middle of the room. Your next step will be to find the faulty toilet part. This will require patience and several working tools.
There are only a few reasons why a leak may form at the sewer connection points:
- A skewed or damaged gasket is the most common cause of a leaking toilet joint. If it is new and the joint is leaking, most likely you have assembled it incorrectly or there is a defective gasket.
- The toilet bowl can often leak. This nuisance can easily be eliminated on your own. The reason for this is a dried out seal. Over time, the rubber from which it is made ceases to be elastic and cracks. The result is gaps that allow water to enter.
- Loose cistern mounting bolts. They are usually made of metal or plastic. Metal rusts over time, and plastic can burst.
- Another cause of leakage is the drain pipe.
How to prevent the problem
Preventative measures will help avoid plumbing leaks after draining. Professionals advise monitoring the condition of the devices and following the operating rules. It is forbidden to place heavy objects on the seat and pour boiling water into the earthenware bowl.
How to prevent the problem Source zen.yandex.com
A small leak in the tank mechanism increases the daily fluid consumption by 50 liters. Regular inspection will help prevent the problem:
- fittings;
- fasteners;
- valves
Damaged or deformed parts must be replaced and the nuts periodically tightened. The internal walls of the tank and mechanisms are cleaned of dirt, corrosion and limescale once every 6 months. In the toilet, sudden temperature changes and condensation should be avoided.
Cleaning the walls of the tank Source youtube.com