The internal structure of the cisterns of many modern toilets, at first glance, is completely different from what was used 30-40 years ago. Therefore, when many questions arise related to the maintenance of sanitary fittings, for example, how to adjust the float in the toilet or adjust the outlet valve, apartment owners sometimes have uncertainty - should they solve the problem themselves or invite a third-party specialist? However, the functionality of current devices is based on the same principles as before. Their understanding, as well as knowledge of plumbing maintenance algorithms, makes it possible to maintain it in working condition on your own.
Picture 1
Possible malfunctions and their causes
The following situations indicate a breakdown in the water supply system:
- No water flows into the drain tank.
- Liquid flows in, but its supply does not stop even when the maximum level is reached. The cause of such problems may be the float itself.
- Failure of the culvert valve membrane. The quality of the material plays a decisive role. The higher it is, the longer the device will last.
- Clogged valve holes. During operation, contaminants naturally accumulate in the holes. Water quality plays an important role in this process. As a result, a blockage may occur that prevents water from entering the cistern.
Kinds
Float structures come in two types:
Ball attached to lever
This design is located at the top of the cistern.
This type of device is gradually fading into the background due to two significant disadvantages:
- Due to the nature of the device, the ball begins to fill with water over time, which prevents further normal functioning.
- During operation, the system makes significant noise.
Glass float
Moving along a vertical axis, acting on the piston through a rod rather than a lever.
Typically, this design is located at the bottom of the toilet cistern. Users find it more convenient to adjust the water volume and also less noisy.
How to troubleshoot compact toilets
Constant leakage into the toilet
If water flows into the bowl in a thin stream all the time, it means that the fill or drain valve is not working. If the first one breaks after filling the tank, the water does not shut off, but if the second one is faulty, the collected water is not retained by the valve.
To determine which valve is not working, you need to press the drain and observe:
- If there is no leakage when you fill the water, but a trickle appears after the tank is filled, it means that the filler fittings are faulty.
- If water starts flowing immediately after pressing the flush button, the reason is the drain valve.
In very rare cases, both mechanisms do not work simultaneously. Overflow can also occur due to incorrect setting of the fill valve - how to adjust it is described at the end of the article.
What to do if the fill valve breaks down
To troubleshoot the problem, you need to remove the tank cap and remove the filling mechanism. Next, you need to unscrew the valve nut and carefully remove the rubber membrane from it. Remove rust and scale deposits from it, as well as from the valve seat, with a toothbrush, then rinse well with water. If the channel inside is clogged, clean it with a thin wire.
In old-style tanks, remove the cap from the valve, pull out the rocker arm axle and remove the problematic part. Use a thin knitting needle or wire to clean the channel and then rinse with water.
After cleaning and reassembling everything should work. If this does not happen, you will have to replace the membrane or the entire fill valve assembly.
Gaskets for this mechanism are rarely sold separately. Therefore, try simply turning the old one over: it will still serve for some time. Alternatively, you can sand it with sandpaper and then glue a circle of bicycle inner tube or other thin rubber on top.
What to do if the drain valve breaks down
First of all, you need to turn off the water, drain the liquid from the tank and, after removing the residue with a sponge or rag, remove the drain fitting. Next, you need to remove the gasket and clean it of rust. If possible, it is better to replace the gasket with a new one.
If you can’t find the same one, try turning it the other way or putting some kind of weight on top of the valve, like a large nut, so that the membrane is better pressed against the seat. If all else fails, you will have to replace the entire drain mechanism.
The tank is not filled enough
Sometimes, in filling mechanisms with a float inside the glass, the valve plug gets jammed due to rust. This leads to the fact that when filling the tank, water enters the glass from below, rather than overflowing over its edge. As a result, the valve closes prematurely and the tank does not fill to the required level.
To solve the problem, you need to turn off the water, wash off the residue and remove the filling mechanism. Next, remove the bracket and remove the valve plug from the glass. Then you need to clean the part and its seat from plaque, and also make sure that the plug fits well to the glass and moves freely.
Leaking from under the tank
Water leakage from the bottom of the tank can occur if the cone gaskets of the mounting bolts or the large rubber ring between the toilet shelf and the tank have failed.
In both cases, you need to turn off the water and press the flush, then remove the lid and remove the filler and drain fittings. After removing any remaining water, unscrew the mounting bolts and carefully inspect all seals for cracks.
It is advisable to replace the gaskets with new ones. If you can’t find the same ones, you can thoroughly clean them, dry them and install them in place, after lubricating all joints with silicone sealant.
The button gets stuck or stuck
A problem with the flush button is usually caused by the fact that when pressed fully, the stem catches on the valve mechanism and jams. However, often replacing the button itself does not give anything. There are several solutions.
The simplest thing is to unscrew the button, press it a little, pushing it down a couple of millimeters, and then put it in place, holding it in this lightly pressed position. This way the part looks a little recessed, but thanks to the reduced stroke it will not jam at the extreme point.
For the same purpose, you can cut a ring 2–3 mm high from a plastic bottle cap and place it under the button. To do this, use a screwdriver to press the latches on the sides of the mechanism and pull the button out of the housing.
What to do
If you believe the clog is in the trap or outlet, you can try using a plunger or plumbing cable to remove it.
plunger
For use in a toilet, you need a plunger of a larger diameter than for sinks, since the cross-section of the pipe is much wider. If you don’t have a plunger and are just planning to buy one, you can choose a model with replaceable nozzles or an automatic device, where the pneumatic shock is created not with the help of your force, but mechanically.
How to use a classic plunger:
- Place the plunger against the toilet drain hole and make sure that it fits snugly against the surface; the device should create a vacuum inside the pipe.
- Make several back-and-forth movements.
- Pull the plunger towards you.
- Repeat.
Ideally, after the first flush in the toilet water, you will see pieces of dirt that have clogged the drain. They need to be pulled out with gloved hands and thrown into a pre-prepared garbage bag.
Plumbing cable
The plumbing cable is suitable for cleaning any sewer pipes in the house, including toilets.
Unwind the cable completely. Start immersing it in the water and carefully push it inside the pipe, changing direction. Once you have pushed the cable deep enough, slowly pull it out. Remove any dirt remaining on it and throw it into a pre-prepared trash bag.
These steps must be repeated 3–5 times until the cable begins to come out clean, without large pieces of dirt.
After using the plunger and/or cable, drain the water to check its current and, if everything is in order, use a special pipe cleaner, such as:
- Domestos for blockages
- Sanfor
- Mole
- Tiret
- Deboucher
They will help dissolve and remove remaining contaminants on the pipe walls.
Due to the large diameter of the pipes, cables with a brush at the end are well suited for toilets.
Carefully!
If there is a blockage in the siphon area, you can try to disassemble it, but this should only be done if you understand the technology and are sure that you will not flood your neighbors. You cannot unscrew the siphon without shutting off and pumping out the water. What to do if all these measures do not work and the water still does not go away? In this case, the blockage is most likely located in the general sewer system and it is impossible to remove it except by seeking help from specialists.
Frequent problems in the operation of drain tanks
Before you start repairing the cistern with your own hands, you need to thoroughly familiarize yourself with its structure and the method of attaching the lid. Very often you can encounter a problem even at the stage of removing the cover, and if it is damaged or broken, you will have to purchase a new analogue. The most common problems are constant filling and spontaneous draining of water, which are caused by the following reasons:
- misalignment of the float mechanism;
- water enters the float through the shut-off valve;
- loss of tightness of the float;
- badly worn float membrane.
If problems are detected with the stop valve of the drain tank, it is necessary to completely replace it , which is done in a certain order.
- The water supply is cut off.
- All liquid is drained from the tank.
- The valve is unscrewed from the water supply pipe.
- The lever is dismantled by unscrewing the fixing nut.
- The damaged valve is removed.
- A new device is mounted and secured with a nut.
- The water supply is restored.
- The float is being adjusted.
If the float for the toilet tank is damaged and water penetrates into it, then it stops floating . In this case, to eliminate the problem, you can repair or completely replace the float. But before any work, it is important to turn off the water supply.
Using an adjustable wrench, the water pipe is disconnected and the broken float is removed. A new analogue is installed in place of the broken part and the water supply is restored. After this, the water level is adjusted. In turn, to repair the float, the hole is sealed with liquid plastic.
If the membrane is severely worn , it is completely replaced, but before that the water from the tank is completely drained. To replace the membrane, the float lever is tied to the jumper and the nut holding the toilet flush pipe is unscrewed. After this, the siphon is disconnected by loosening the fastening nut. The old membrane is replaced with a new analogue and the tank is assembled in the reverse order.
To adjust the float depending on the material of the lever, perform the following measures. In the case of a brass lever, it is simply bent. If the lever is made of plastic, then it is equipped with a special adjusting screw, thanks to which you can change the bend of the structure and set the float in the desired position so that it shuts off the water supply to the drain tank in time.
Chemical cleaning
The chemical method is recommended for use when plumbing fixtures are clogged with biological deposits. The essence of the method is simple: under the influence of a chemical substance, the mud plug dissolves and gradually disappears. Acid or alkali based compounds are used to clean drains. Their form does not matter - it can be liquid, granules, gel, or powder.
Choose a chemical that suits your type of pipes
Before using the product, be sure to read the instructions - pay attention to the dosage of the product and the duration of its “working”. After that, start cleaning:
- pour or pour the required amount of “chemicals” into the sewer hole of the plumbing fixture being serviced;
- close the toilet lid or bathtub opening;
- wait the indicated time until the composition eats away the blockage;
- rinse off the “chemistry” and check how the water flows - if the problem is not eliminated, repeat the procedure.
Important! When purchasing a chemical, pay attention to what type of pipeline it is intended for: if your sewer pipes are plastic or cast iron, a universal “chemistry” will be suitable for them, but for steel pipes you should choose special compounds - those that will not react with the steel surface
How to choose a float valve?
If the float valve is not selected correctly, then it is useless to repair it: after a few days, water from the barrel will begin to leak again. What should you consider when choosing a mechanism? You need to know the pressure indicators in the water supply. Depending on them, this detail is selected. There are four types of float valves:
- for low water pressure;
- for medium water pressure;
- for strong water pressure;
- stabilizing valve.
Experts recommend the latter to owners of those houses and apartments that are located in areas with variable pressure in the water supply.
To avoid having to frequently repair mechanisms or change them altogether, you need to take preventative measures. It is enough to carry out an inspection several times a year for damage. This way you will save not only yourself, but also your neighbors from unplanned expenses and repairs.
The main components and mechanism of operation of the toilet cistern
Modern toilets may differ in the filling of the tank, but the main parts and the principle of their operation are in most cases similar. The design of almost all tanks is not complete without the following components.
- Locking mechanism. This is a tap that automatically turns off the water supply when the tank is filled. The degree of fullness of the tank, which is a signal for the shut-off valve to operate, is the responsibility of the float, which is constantly kept on the surface of the water.
- Reset system. This mechanism is a valve that blocks the drain hole. The valve is controlled using a button or lever. Modern models of flush cisterns are equipped with one or two flush buttons.
- Overflow system. During an unexpected breakdown of the locking mechanism, it ensures that water is drained into the toilet.
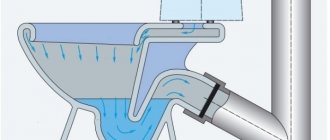
Often new models of toilets with a tank are mounted to the water supply with a bottom connection. The main distinguishing feature of such a tank is the presence of a diaphragm valve. Under the influence of water pressure, it opens slightly and lets water inside.
With optimal water filling, the float exerts force on the piston rod, which gradually closes the central valve. When the correct water level is established, the valve is completely closed.
Main types of drainage equipment designs
First of all, they depend on the type of filling and drainage mechanisms. The water drainage functions are performed by lever, push-button and automatic products.
Lever
The float (1) controls the inlet valve (3) through the lever (2). The water level depends on the adjustment of the float lever on the valve lever (4). The water pressure during filling is adjusted at the valve using a set screw.
Lever models were the main models installed on toilets of the last century. They are still used in some places today. Lever devices are distinguished by their simplicity. The first products drained only at the moment of pressing, while the shut-off valve was manually held (by the “pull” - a chain or fishing line). Then came systems that use the siphon effect, which themselves control the flow after activation. But both the first and subsequent models are characterized by increased unregulated water consumption. In addition, such plumbing does not meet current aesthetic requirements.
Push-button
The toilet flush mechanism, made in a push-button version, is installed on most modern plumbing products. The predominant location of the button is at the top, on the covers of compact systems, and can also be on the wall for products installed in building structures. Their advantages, in addition to good aesthetics, lie in the ability to adjust the drain and overflow parameters. Push-button mechanisms also, once activated, hold the shut-off valve open without human intervention. And models with paired buttons allow full or partial discharge of liquid into the toilet.
Automatic
Today, there are rare and expensive products for draining water, which justify themselves when installed in luxury products or used in public places. Their work is controlled by infrared sensors.
Shut-off valves for the toilet, represented by filling mechanisms, work, as many years ago, using the principle of a refill valve, opened and closed by a float. In the classic version, the float transmits force to the valve of a faucet with a side connection through a horizontal rocker arm.
Floats that shut off the water supply through a system of levers.
However, now more often floats are installed that move along a vertical guide, cutting off the water supply through a system of levers for both the side supply and the bottom.
Important! Modern filling valves, due to their design features, allow you to collect water much faster than systems with a rocker arm.
Purpose of the float
A separate float mechanism is a simple, small-sized device. But, working together with other elements, it performs a significant function - it regulates flushing. He is a kind of intermediary between two systems - draining and collecting water.
To understand the function performed by this element, it is necessary to understand the structure of the cistern.
It is usually made of earthenware (cisterns are made of porcelain or plastic). It is a container with a lid on which a reset button is installed. In addition to the hole for the button, there are two more technological holes in the tank. The underwater hose is connected through one, and the drain is carried out through the other.
In addition, there are fittings inside the tank. It consists of several elements assembled into a single structure. The fittings can be of various shapes and sizes. All this depends on the manufacturer.
Despite the differences, the principle of their operation is the same. Water is drawn into the tank through the supply hose. As water fills the tank, it raises the float. Once the required level is reached, the set is closed. It continues to remain in this state until the release button is pressed.
After pressing it, other parts begin to work. The button starts the rod with the membrane attached to it. This opens the drain valve and empties the tank.
This way the float regulates the volume in the tank. When the mechanism fails, dialing continues continuously. But an overflow system will help prevent your neighbors from flooding.
Recommendations
So, if problems arise with the water supply to the cistern, you need to remember the following:
- Most often, the cause of this is a malfunction of the float, the membrane of the permeability valve or its holes.
- Having figured out the reason, you can try to repair the failed part. In some cases, repair is not possible and replacement is necessary.
- When purchasing a new float design, you need to have an idea about the type of flush system in your toilet. This determines what type of part is needed.
- Anyone can install a new float. The main thing is not to forget to temporarily block the water supply system, correctly dismantle the broken part and install a new one at the required level.
- If you are not confident that you will be able to successfully carry out the required plumbing manipulations, the best solution would be to contact a specialized specialist.
Rating of the best wall-hung toilets
| Nomination | place | Name of product | price |
| The best inexpensive wall-hung toilets - budget up to 5,000 rubles | 1 | 4 260 ₽ | |
| 2 | 5 460 ₽ | ||
| 3 | 3 920 ₽ | ||
| The best wall-hung toilets in terms of price/quality ratio | 1 | 10 590 ₽ | |
| 2 | 9 850 ₽ | ||
| 3 | 41 920 ₽ | ||
| 4 | 8 650 ₽ | ||
| 5 | 11 900 ₽ | ||
| The best wall-hung toilets with installation | 1 | 6 490 ₽ | |
| 2 | 17 100 ₽ | ||
| 3 | 23 040 ₽ | ||
| 4 | 10 499 ₽ |
Troubleshooting a flush tank with a push-button mechanism
The tank button is responsible for draining water into the bowl itself. After the draining process is completed, the float remains at the bottom of the device. The shut-off valve also comes to this position, opening a hole for water to enter. As water enters the tank, it raises the float. Under this action, the lever also begins to move.
Rising to the desired level, the lever and the float device occupy a certain position. In this case, the shut-off valve tightly covers the through hole of the pipe and water stops flowing.
If a toilet tank with a flush button on the lid is leaking, then you need to do the following:
- Find the retaining ring located around the drain button.
- Press the button all the way and unscrew the plastic stopper.
- Remove the cover and begin repairs.
The button locking devices are made of plastic. Excessive mechanical stress on this element can lead to damage to the device.
Water can flow in a continuous stream and constantly flows from the installed tank onto the toilet step with a button. In this case, you need to check the position of the float. To do this, open the tank lid and level the floating element.
In another case, water may constantly leak into the bowl due to an open hole in the drain pipe. You can check the version by clicking on the pear. If the jet stops, the reason has been clarified. The problem is solved by weighing the pear - by hanging additional weight.
If the rubber bulb in the shut-off valve device fails, the tightness of the entire tank structure is compromised. The solution to the problem is to replace the damaged element. To do this, the float is brought to the upper position and fixed in this state. Unscrew the connecting nut from the container and remove the mechanism. Remove the worn bulb from the valve and install a new one.
The new pear should be chosen as softly as possible. In this case, the dimensions of the products must match.
Check the fixing bolts for the bulb.
If they also become unusable, then you should purchase new ones and install:
- water is completely removed from the tank;
- between the valve near the float and the liner there is a union nut that needs to be unscrewed and removed;
- the ear-shaped clamps of the tank to the toilet shelf are unscrewed;
- slightly tilting the tank back, carefully remove the rubber connecting layer between the container and the installed toilet bowl;
- damaged bolts are removed;
- the area of earthenware under the pear is well cleaned of accumulated plaque and dirt; the shelf and top of the tank are also washed;
- if an old pear is installed back, then silicone must be applied to its surface for a tighter connection with the hole;
- all elements of the tank are installed in their place, and fixed with bolts;
- the connecting cuff is installed in its place;
- water is pumped into the tank several times in a row to fully check the result of the work.
If only one fixing bolt has become unusable, then you still need to buy both. These elements must be the same in structure and length.
Common problems with improper filling of the tank
If one of the above cases occurs, then you can remove the toilet lid and identify the problem.
They may be as follows:
- Low water level. The reason is early closing of the valve. To fix this, you need to set up the locking.
- Water flows into the overflow. This may be due to incorrect initial adjustment or subsequent misadjustment. Solved by adjusting the float. The second reason is worn out gasket. Solved by replacement.
- Presence of debris and sediment. Solved by removal.
- Breakage of plastic parts and components. Most often the only solution is replacement.
- Float seal failure. Solved by sealing.
- Deviation of the standard plane of movement of the float. Solved by aligning the valve.
- Reduced position of the upper edge of the pipe. To solve this, you need to install the overflow 3-4 cm lower.
After solving this problem, you can proceed to adjustment.
How does an elevator work?
Recently, elevators have appeared in the public utilities sector. Why did you choose this particular equipment? The answer is simple: elevators remain stable even when changes in hydraulic and thermal conditions occur in the networks. The elevator consists of several parts - a vacuum chamber, a jet device and a nozzle. You can also hear about “elevator piping” - we are talking about shut-off valves, as well as measuring instruments that allow you to maintain the normal operation of the entire system.
As mentioned above, elevators equipped with electric drives are used today. Due to the electric drive, the mechanism automatically controls the diameter of the nozzle, as a result, the temperature is maintained in the system. The use of such elevators helps reduce energy bills.
The image shows all the elements of the elevator.
The design is equipped with a mechanism that rotates due to an electric drive. Older versions use a toothed roller. The mechanism is designed so that the throttle needle can be moved in the longitudinal direction. In this way, the diameter of the nozzle changes, after which the coolant flow can be changed. Due to this mechanism, the consumption of network fluid can be reduced to a minimum or increased by 10-20%.