For finishing work, gypsum fiber sheet, or gypsum fiber sheet, is often used. This material was created much later than drywall, so it did not gain such widespread popularity as gypsum board. However, thanks to the special composition, these boards have outstanding strength and fire protection characteristics with indicators much higher than those of plasterboard. Therefore, GVL is indispensable for the construction of bulk floors, rough finishing of walls and ceilings, as well as for the construction of all kinds of boxes. The only question that arises when working with this building material is how to cut gypsum fiber boards from Knauf.
Description of material
They produce products that create a hard coating only in dry rooms and materials that work in humid conditions.
In both cases, the panels are not destroyed by sunlight or atmospheric chemicals. Types of gypsum fiber boards produced :
- GVL is a common material, not resistant to water;
- GVLV - sheets have moisture-proof qualities.
The moisture-resistant option is installed in production workshops where processes involving the release of wet vapors take place, while sanitary treatment is allowed. The introduction of hydrophobic additives into the gypsum mass allows its use in bathrooms, residential and public kitchens.
Pros and cons of GVL
When heated, it does not emit harmful components into the atmosphere, therefore it is safe for humans
Quick to install, no curing required, no debris during installation
Provides a comfortable indoor climate because it “breathes” (passes steam and air)
Provides additional protection from external noise
Does not require mandatory surface finishing with putty and reinforcing mesh
Does not burn, because there is no cardboard shell on the surface
Heavy weight compared to drywall, so a reliable frame is required
When installing without a frame, high-quality gypsum glue or dry cement-based adhesive mixtures are required
The difference between GVL and GKL
The finishing material was created later than drywall, so it is devoid of its disadvantages, but has acquired many advantages. The first advantage, compared to gypsum plasterboard, is increased strength and longer service life as a leveling layer.
Differences in installation and design:
- Drywall has many types of bevels that are designed to seal seams, but do not allow straight sides. GVL has varieties: PC - straight edges and FC - a type of folded edge.
- Sheets of plasterboard are placed on the frame without gaps between them, and gypsum plasterboard panels are placed with a gap of 5 - 7 mm (for ease of sealing the seam).
- Racks under gypsum boards are mounted with a gap of 600 mm, and vertical elements of the sheathing under gypsum fiber boards - with a gap of 603 mm, so that it is possible to form a gap between the sheets.
- When installing a two-layer coating of partitions, plasterboard boards of the first and second tiers are secured to the profile with self-tapping screws. GVL allows you to fix self-tapping screws not only in racks, but also in the panels of the previous layer.
- Drywall is not used on floors as a rough layer, because it does not have enough strength, and gypsum fiber board can withstand operational loads in the room.
When installing moisture-resistant fiber boards, leave an installation gap of 5 mm between the ceiling and wall. They are joined to the floor with a gap of 10 - 12 mm. The screws are twisted at an angle of 90°, they go to a depth of 1 cm in the profile.
Install the material with the front side facing out; it can be identified by a flat surface without rough protrusions. A marking consisting of letters and numbers is applied to the reverse side. There are markings on the face for drilling with self-tapping screws in the form of dots.
Types of fasteners
The sheets are fixed to the sheathing with special screws designed for working with gypsum fiber boards. They are attached so that they enter at an angle of 90°, and are recessed into the profile by at least 10 mm. The heads are recessed 2 mm into the body of the panel.
Types of glue for frameless GVL installation technology:
- On a gypsum basis. Standard solution for fiber sheets. It is sold in the form of a dry mixture, which is mixed with water before use. The composition contains lime, gypsum, plasticizers, and strength additives.
- Based on cement binder. Such compositions are intended for tiles, but hold well on 12.5 mm thick fiber panels. Used in rooms where there are damp walls, for example, on the first floor, in the basement.
Tools required for working with gypsum fiber boards
The panels have high compressive strength, but low bending strength , so the material is classified as fragile. You need to know exactly the cutting rules and how to cut the gypsum fiber sheet.
Mark the parts using a tape measure and pencil.
Tool options used for cutting :
- construction knife or cutter;
- special hacksaw;
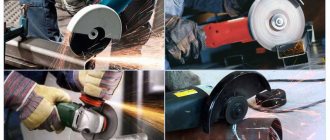
- Bulgarian;
- a circular saw;
- jigsaw
knife , so you will have to frequently change the removable 12 mm wide blades, as they will become dull on the plaster base. The tool is used if a perfectly smooth edge is not needed or the end will be located at an angle. The GVL hacksaw has the correct angle of teeth and original sharpening; almost no dust is emitted during operation.
A stone disc is installed on the grinder When cutting, the tool generates a lot of dust, so it is necessary to use protective respirators. A circular saw will also cope with the cut quickly, but it is better to work with such power tools outside or in a well-ventilated area.
At home, an electric jigsaw with a vacuum cleaner function , which can be used to cut off gypsum fiber boards without dust and quickly. A wood saw with wide teeth of 4 mm is placed in it. The good thing about a jigsaw is that you can make not only rectangular cuts, but also cut out curly lines and cut holes in panels.
The cut ends are cleaned with a plane , on the surface of which there is a grater with sharp metal protrusions. When they fail, such graters are replaced with spare elements.
How to cut gypsum fiber sheets at home: cutting gypsum fiber (video)
How to cut gypsum fiber sheets at home: cutting gypsum fiber (video)
Working with any finishing material requires knowledge of its proper processing. This avoids serious problems that can delay cladding processes and lead to product damage. Due to its increasing popularity, it is necessary to take into account the features of gypsum fiber boards. The greatest difficulties can be caused by trimming sheets; the procedure has its own nuances.
Rules for cutting slabs without chipping
A knife is used to cut the panel in several passes.
Successive cuts are made along the intended line until the slab is cut through 2/3 of the thickness. After this, the sheet is broken so that it is divided into two parts. Before work, select the surface where the cutting will take place. This should be a platform with a flat plane. A wooden strip with a thickness of 20–25 mm is placed under the intended line along the entire length of the cut. The blade of the disk is guided evenly, without moving from the line; it is not recommended to rush when working.
Universal
Due to its design, a universal knife or a mounting knife allows you to work with gypsum boards at any stage. Its handle is ergonomic, it fits easily and comfortably in the hand, and the rubberized plastic body makes using the knife comfortable. Manufacturers present two options for fixing the blade: screw and using a spring. The blade blade is made of high quality steel and has no sectional cuts. This increases the reliability and durability of the knife.
The mounting knife package may include additional elements:
- spare blades;
- a latch for attaching to a trouser belt or trouser belt;
- built-in compartment with spare parts.
All these factors make the use of a universal knife convenient, comfortable and suitable for daily work.
Sawing gypsum fiber supersheet from Knauf
The cutting option using hand tools, such as a knife or cutter, is most often used. The power tool will generate dust. For a small amount of work, you can get by with simple devices.
Sequence of work:
- lay the sheet on a flat plane, you can cut the top sheet on the package without removing it;
- markings are applied to the panels, a rule is applied along the line, and it is pressed well;
- cut along the line with force several times, trying to immerse the blade evenly;
- a block is placed under the cutting line;
- The edge of the slab is lifted, broken along the line, dividing it into parts.
If you need to make a fold on a straight edge, use a cutter knife or chisel. For large volumes they work with a router with a 4 mm groove cutter. To fit pieces of gypsum fiber board in place, a roughing plane is used.
The structure and purpose of drywall
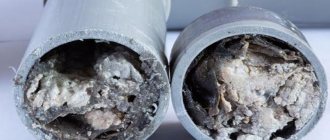
Plasterboard sheets are a layer-by-layer combination of two types of materials - gypsum (internal contents) and sheets of thick cardboard glued to it on both sides. It is clear that if the cardboard layers are damaged, sawing the rest is not difficult.
Therefore, in order to be able to quickly cut a sheet of plasterboard, it is not enough to know what is the best way to cut drywall
It is important to know the basic principle of this action: after continuous smooth cutting of drywall is carried out, the second step immediately follows - breaking the sheet
Sawing drywall, like any hard, porous material, is not difficult. It also lends itself well to drilling.
The functions of the material make it possible to distinguish it into varieties: moisture-resistant, fire-resistant, standard, high-strength (for example, plasterboard or gypsum board made using KNAUF technology), acoustic plasterboard, etc.
Despite the large assortment of GCs, panels of any variety lend themselves well to being divided into parts using available material at hand.
Niche from GVL. How to make a niche from plasterboard - description of the technological process
A niche is a recess in the wall that serves as decoration or furniture - for placing a cabinet, shelf, flowerpot, sculpture. It is convenient to equip it when covering the wall with panel materials. For example, assemble it from gypsum board sheets on a frame, followed by painting and plastering the wall. How to make a niche out of plasterboard with your own hands, and what kind of finished wall decor might it look like?
Why do they make niches in the walls?
Modern decoration uses niches as functional elements. You can not only place cabinets and shelves in them, but also install various equipment - television screens, sound speakers, electronic items. You can also arrange a night light in them.
Niches are often used to disguise protruding objects - for example, heating radiators. Or to visually enlarge a small space. Narrow vertical recesses in the wall “raise” the ceilings, and horizontally directed recesses “expand” the rooms.
Therefore, their arrangement is often used in small spaces, one-room apartments, and Khrushchev-era apartment buildings. Also, recesses in the walls are often made in those rooms where there should be a minimum of furniture - corridors.
Note: in the same room you can successfully combine different options for plasterboard finishing - niches, arches and columns made of plasterboard.
↑
Shapes and sizes
A niche is a recess that can have different shapes, sizes and additional decor. What it might look like:
- Shape - can be rectangular, square, with an arched vault. It can be located vertically or horizontally. An unusual shape is possible - rounded, with curved lines.
- The shape of the recess can be a step with a right angle between the side surface and the wall. Or you can make a round recess in the wall.
- It is possible to have lighting in the form of built-in lamps - LED spotlights.
- It is possible to have other electrical equipment - sockets, switches, if you plan to install a TV, home theater, stereo system, or sound speakers in the niche.
- There may be doors on the sides - such recesses in the wall are called closed niches. Recesses without doors are called open.
↑
Tools and materials
To create a niche in the wall using gypsum board sheets, you will need the following materials and tools:
- Sheets of plasterboard - for living rooms use regular plasterboard, for the kitchen - moisture-resistant plasterboard boards. Moisture-resistant panels do not dampen, and for visual distinction they are produced painted green.
- Aluminum profile - sold in various section sizes, with a length of up to 4 m. For arranging plasterboard walls, a profile with a section of 27x60 mm is often used.
- Fastening elements: plastic dowels with metal screws or dowel-nails - for attaching profiles to the wall. If the wall is brick or concrete, use self-tapping screws 40 mm long. Self-tapping screws for attaching profiles to each other - so-called “bugs” with a threaded drill bit 9 mm long are often used. Self-tapping screws for fastening gypsum boards - a length of 25 mm is sufficient if 1 layer of drywall is used.
- A drywall knife or grinder, a jigsaw, a hacksaw for cutting plasterboard sheets, metal scissors for cutting profiles.
- Screwdriver, drill and screwdriver - for tightening screws and self-tapping screws.
- Level or plumb line - for measuring horizontal and vertical lines.
- Ruler, pencil, tape measure - for determining sizes.
- Serpyanka tape is a reinforcing tape for sealing seams and joints.
- Corners - to strengthen the outer corners and give them a perfect smooth shape.
- Spatula – for applying and leveling putty.
- Putty for drywall – “Start” and “Finish”.
Adding beauty to the walls - finishing the surface
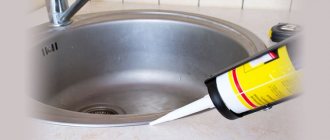
Before finishing, the surface is prepared with the main purpose of sealing the joints. They, as well as the internal corners, are reinforced with special paper tape. Some craftsmen do not recommend reinforcement. A little universal putty is applied to the seams, tape is applied on top and pressed in a little.
After drying, the seam is covered with a layer of putty and leveled with the base. The heads of the screws must be puttied too. Aluminum perforated corners are attached to the outer corners with putty. Then this place is also leveled and reduced to the level of the main plane.
Now the putty is prepared in a plastic bucket with a mixer and applied to the surface. A day later, when the putty has dried, they begin to grout the walls with an abrasive mesh or sandpaper. The abrasive material is fixed in special graters. Its grain size depends on the finishing material. For painting, an abrasive of at least size 240 is suitable; for thick wallpaper, 60 is sufficient.
Remove dust with a damp cloth and prime with a roller. The walls are ready for finishing. You can cover it with wallpaper - from paper to textile or tile it. All paints are acceptable except those made with lime, which contain silicates.
Many people believe that gypsum board is some kind of gypsum board and try to cut it using ordinary household knives. It is unlikely to be possible to do this in the case of GVL for completely objective reasons.