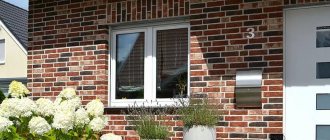
Preparing walls for plastering is an intermediate procedure between leveling the walls and applying a decorative layer. This stage is considered one of the most important, since the quality of the work determines the future appearance of the surfaces, their service life, as well as strength and resistance to moisture, temperature changes, and so on. Most decorative plasters do not require perfectly smooth walls, but their surface must be clean.
It should be immediately noted that preparing walls for decorative plaster is practically no different from preparing for painting or wallpapering. With the clarification that such a plastic material as decorative plaster can smooth out some unevenness and close cracks or small potholes. Before you begin preparing the surface for plastering, you need to stock up on the necessary tools and materials.
What is needed for preparation
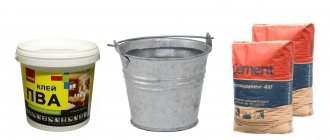
Preparing walls for decorative plaster requires the following tools and consumables:
Tools necessary for preparing walls for decorative plaster
- spatulas;
- building level and plumb line;
- sandpaper, sanding machine with polishing and cutting wheels;
- paint brush;
- drill with impact function (the hammer drill is too heavy and powerful for this work);
- plastic film, masking tape or tape;
- sponges and rags;
- screwdrivers;
- mixer attachment;
- mixing container;
- putty;
- solvent;
- primer.
A spray bottle may also be required. If the walls were previously covered with wallpaper, then they may have to be soaked using this product.
Tools
We already know which primer is better. In addition, we found out what is the best way to prime a brick or block wall before applying plaster. The amount of material has been determined, all that remains is to prepare the tools that will be needed in the work:
- To perform cleaning you will need a dustpan and a broom; you can use an industrial vacuum cleaner;
- when working at height you will have to use a stepladder;
- gloves, a cap, and goggles will be needed as protective equipment;
- To remove drips from the walls, prepare a damp cloth;
- To remove defective areas, you should have a hammer, chisel, and sandpaper at hand;
- roller - selected taking into account the material from which the wall is built. For example, priming a brick wall is best done with a roller that has a long or medium pile. Concrete walls are easier to handle with foam or velor rollers;
- to work in hard-to-reach places you will need a paint brush;
- cuvette for rolling and squeezing the roller.
It is more convenient to work with a brush in small areas. With its help, you will treat even small cracks and small recesses with primer as much as possible. The roller is used on large, flat surfaces because it has a certain contact area.
There is another option for applying primer - a sprayer. Its use is justified over large areas. In addition, in the accompanying instructions, the manufacturer always indicates how this or that primer is applied.
How the preparatory work is carried out
It should be said right away that this work should be one of the last to be carried out. That is, at the time they begin, double-glazed windows and door frames must be installed in the apartment, the flooring must be laid and ready for use. In general, all work has been completed that may directly or indirectly appear on the surfaces of the walls.
The room must be completely ready for decorative finishing
Preparing walls for decorative plaster includes the following steps:
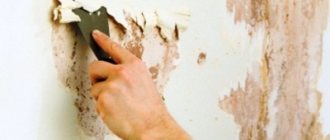
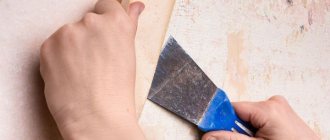
- The first step is to remove the remnants of the old coating, such as wallpaper, paint or putty. The wallpaper is removed with a spatula after preliminary soaking, the paint is washed off with a solvent, and the putty is beaten off with an impact drill. Then you should remove all fasteners from the wall. Self-tapping screws and dowels are removed with a screwdriver, nails with a nail puller. Also, after removing the old coating, reinforcement elements may appear; they must be cut off with a grinder.
Removing old covering from a wall
- After this, you should tap the wall with a hammer to identify weak spots. If potholes and cracks appear, they are sealed with putty. If they are deep and wide, then they are sealed in several stages.
- The next step is to apply a primer with strengthening properties, after which you need to wait about 4 hours for it to dry. If we are talking about bathrooms, kitchens or other rooms with high humidity, you need to treat them with a special antifungal substance and wait again for about 4 hours.
Applying primer to the wall with a roller
- After the primer has dried, they begin to putty the surface. This procedure is carried out using wide and narrow spatulas. After applying the putty, it is necessary to check the evenness of the surface with a building level and plumb line. The putty layer is the basis for decorative plaster, so it should be carefully leveled. At the end, it is necessary to sand the surface using sandpaper or a grinding machine, and its surface should be fine-grained.
A layer of putty is the basis for applying decorative plaster
- Next, you need to apply a layer of deep penetrating primer. A paint brush is used for this. Most decorative plasters do not have a high level of adhesion, so over time the material may simply fall off. To ensure tight contact, a primer is needed. It is required to apply 2 layers with an interval of 3-4 hours to allow them to dry.
Now that the preparation of the surface for plastering is complete, you can begin decorating the walls.
On a note! If you plan to apply a thick layer of textured or textured plaster, then finishing the surfaces with putty is optional. But for thin layers of the above types of finishing materials or for “Venetian”, puttying is mandatory. The fact is that a small layer will not be able to fill cracks and potholes, which will appear after the decorative material dries, which will affect the appearance of the walls and their service life.
Some types of decorative plaster require the walls to be puttied
Selection of formulations
Manufacturers offer a wide range of plaster mixtures. Some of them are intended for exterior use, others for interior decoration. Moisture-repellent putties are used to level the walls in the bathroom. By understanding their differences, everyone can save money and ensure the durability of the finish coating.
Cement putty is gray in color and difficult to paint. Source stroidomsait.ru
So, experts conditionally divide all existing proposals into three large groups. Available for sale:
- gypsum putties;
- cement compositions;
- polymer mixtures.
The former have high plasticity, fit well on any base, but do not tolerate high humidity. Therefore, gypsum putties cannot be used for bathroom renovations.
The second ones are more durable. They withstand weather conditions well, making them ideal for façade work. They are expensive, which is why their use indoors is considered inappropriate from an economic point of view.
The color of the gypsum putty is slightly pink Source remont-book.com
Expert advice
Preparing walls for plastering should be carried out taking into account the following nuances.
Before starting work, it is recommended to cover the floor surface, windows and furniture with plastic film. The ceiling area near the wall and baseboards must be sealed with masking tape. For each layer of putty, it is necessary to allow at least 48 hours for complete drying, and it is forbidden to use heaters or hair dryers to speed up the process. Otherwise, the surface may crack.
Removing whitewash from the ceiling
Not only the walls need high-quality treatment, so the preparation of the ceiling is also necessary.
- The surface is moistened with water using a roller or spray. Before the liquid evaporates, the ceiling is cleaned with a scraper.
- If water-based paint was used, then instead of water, prepare a solution of laundry soap and soda (1/2 piece plus 5 teaspoons per bucket of water). In this case, wait until the paint gets wet, then scrape it off with a spatula.
Another interesting way is to use a paste made from flour. This “jelly” is spread on the ceiling with a roller, then wait until it dries. The whitewash and paste are cleaned off with the same scraper.
Test application of plaster
Professionals with many years of experience can skip this step, but inexperienced people are strongly advised to do a trial application. To do this, you need to select a small section of the wall closer to the corners or use a sheet of plasterboard that has been previously finished in the same way as the surface of the walls. After the test layer has dried, you need to evaluate the quality of the resulting surface, its texture and color. If everything suits you, you can safely start plastering.
Test application of decorative plaster allows you to evaluate its texture and color
Some useful tips for those who doubt whether plaster can be applied to putty
Some thinkers believe that the desire for beauty fundamentally distinguishes Homo sapiens from his lesser brothers. Primitive people also took care of the beauty of their own homes by painting pictures on the walls of their caves. Contemporaries, having stepped forward intellectually and technologically, have not lost this traction to this day. One of the manifestations of such aspirations is the desire to make your home comfortable and beautiful. And really, who would want to live in an apartment whose walls are poorly made brickwork or an unevenly cast concrete slab? The few who answer yes to this question will likely not need further information. For others, it will be useful to find out how to correct the situation and realize the genetic desire for beauty.
Preparation of material and its consumption
The modern construction market offers customers ready-made mixtures in plastic containers and dry powdery substances that must be diluted with water. In the first case, it is enough to simply open the container and mix the composition with improvised means (a long screwdriver, a wooden plank, and so on). In the second, you must first study the instructions provided by the manufacturer, and then prepare the solution in the required proportions. To do this, you will need a mixing container and an electric drill with a mixer attachment.
Preparing a solution of decorative plaster with a mixer
Consumption of main types of decorative plaster:
- Structural compositions - approximately 3 kg of material per square meter of surface.
- Textured plasters - on average 1.5 kg per square meter.
- Venetian plaster - about 150 g per square meter. meter for one layer, the total consumption must be calculated based on the number of layers.
The above data is approximate. Actual consumption depends on application method and desired result.
Preparatory work is both a simple and important part of finishing. In order for the stage of preparing the surface for plastering to be successful, and for the coating to last for many years, it is necessary to follow the above instructions and the recommendations of the manufacturers.
Primer during plastering
After priming, begin plastering. First, make the first filling cast, which covers the entire space. The layer is leveled, allowed to dry and also covered with an impregnating liquid. This is done in order to bind the components and strengthen the plaster on the surface.
Many professionals prefer to add primer directly to the plaster mixture. This gives it additional beneficial properties.
Preliminary treatment of the wall with soil liquid is mandatory if the goal is to obtain a good finishing result. Surfaces are primed before plastering, puttying, painting and even whitewashing. During multi-layer application of the solution, each layer is also impregnated with soil. This allows you to significantly strengthen the dried plaster, reduce finishing material and achieve those qualities of the finished surface that will satisfy the owner of the room.
What is it for?
The multi-stage preparatory process is designed to solve several problems. Here are some of them:
- increasing base adhesion;
- leveling the wall;
- avoiding the appearance of mold on new plaster;
- increasing the aesthetic qualities of the layer;
- suppression of the separation of individual sections;
- protection against the appearance of rust traces on the plaster.
The last defect manifests itself when beacons are not used quite correctly. Ideally, they should be removed after the layer has dried.
Wall repair
Every centimeter of surface should be inspected for defects. They may have cracks of different diameters, chips, or damage to masonry joints. Problem areas must be eliminated. Loose bricks in the masonry must be removed, and all the cement on top and sides must be carefully beaten off. Re-fixation is carried out using polyurethane foam or cement-sand mortar.
Small cracks should be expanded, and large cracks should be reinforced with self-tapping screws. At the next stage, treatment is carried out with multifunctional “cement laitance”. During standard priming, the edges of the cracks are fixed, which prevents their further destruction and also ensures adhesion. At the final stage, a repair solution is applied.
Creating a perfectly level base
Ensuring maximum adhesion
The master needs to resolve all issues about creating optimal conditions for excellent adhesion of the plaster solution to a certain surface. Each wall has its own adhesive properties, which is why certain technological standards must be observed. A metal mesh is attached to concrete structures, which provides optimal adhesion. To do this, using a hammer and chisel, you should make small notches 6 mm deep and 8 cm long. After this, apply a primer with a small brush or textured roller. Due to this, several important issues can be resolved at once:
- After hardening, a film is formed, which is a specific adhesive element between the plaster and concrete.
- The wall is saturated with moisture as much as possible and does not draw it out of the finishing coating.
Important! If the structure is built from different materials, then it is imperative to fix the plaster mesh. Fastening to wood is carried out with nails; for concrete, stone and brick, dowels with self-tapping screws are chosen.
Primer coating
Removing paint marks
Professionals actively use a chemical method, which involves applying a special remover to the base. The technology itself is quite simple and is described in detail in the attached instructions. The master only needs to apply a thin layer of the solution to the paint. After a few hours, the chemical will begin to take effect. At the final stage, you just need to carefully tear off the semi-soft substance. But even this method has its own characteristic disadvantages:
- The product has an unpleasant odor.
- High price.
- If the paintwork was applied in several layers, then the washing process will have to be repeated many times.
All manipulations with chemicals should be performed only with full equipment: glasses, respirator, gloves.
Removing paint from a concrete structure
The mechanical method is safer for health. The first step is to apply sharpening marks with an ax onto the previously painted surface. After which the wall is generously moistened with water. The moisture should saturate the base within 5 minutes. You can easily remove all the paint with a chisel or spatula. It is advisable to have sandpaper on hand, which can be used to quickly and efficiently sharpen a dull unit.
Illustrative examples are presented in the video:
Main stages
The master must follow some recommendations in order to ultimately achieve maximum adhesion of the prepared solution to the base. The durability of the plastered wall, as well as the aesthetic appeal of the final finish, depends on the quality of preparation. The structure must be perfectly level at any angle.
The specificity of the work depends on what material the structure is built from. You must be prepared for the fact that you will have to check the plane of the wall with a special level. Beacons must be installed before applying plaster. All equipment and mixtures should be prepared in advance.
Preparation process
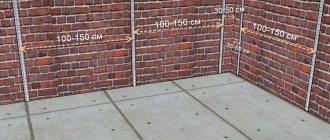
Installation of beacons
Previous measures to prepare walls for plastering may be ineffective if this stage is not performed correctly. Key notes and tips on the issue:
- Beacon pitch recommended for beginners: 0.8-1.3 m;
- distance from door and window openings: 0.1-0.15 m;
- metal beacons are removed after the composition has set, all others remain;
- wooden ones are not recommended in rooms with high humidity;
- plastic ones are easily deformed, so they are relatively difficult to install.
Algorithm of actions when placing beacons:
- Perform markup.
- Set guidelines for the outer beacons.
- Create an auxiliary strictly vertical plane using laces and a level.
- Determine the level of deviation of the wall from the auxiliary plane.
- Correct the auxiliary plane.
- Set the extreme profiles.
- Install intermediate beacons.
To perform installation, you may need metal scissors, a plumb bob, a marker, a hammer drill, a screwdriver, and pliers.
Remove the previous layer, clean, degrease, install reinforcing tape and beacons - this is how you need to prepare the walls for plastering. Additional steps will be required for some types of partitions. The metal structure is roughened, and notches are made on the brick or concrete structure.
An effective method for removing unwanted wallpaper
If the walls were taped more than seven years ago, then tools with a sharp blade will do. Old canvases often separate on their own due to time and dampness. It is necessary to find swollen areas in order to pry them off with the edge of a spatula or a sharp knife. It is better not to pull paper wallpaper, as it becomes dilapidated. Fragments that have become embedded in the plaster are pryed off with a wide-based spatula. For more effective cleaning, you can use a water spray bottle and a sander.
Attention! It doesn't take much effort to remove the old finish. The base crumbles badly, leaving dents and holes. For this reason, the master has to spend additional time and solution to level the walls.
Wallpaper glue can be steamed with an iron. To work, you need to prepare a thin towel or sheet and a bucket of clean water. The action diagram looks like this:
- The towel is generously moistened with liquid, carefully twisted and applied to the wall.
- Turn on the iron at maximum power.
- Iron the towel several times with a hot iron.
- Quickly remove the fabric and remove sticky residue with a spatula.
You can soften the paper web using a steam cleaner. This device does an excellent job of removing wallpaper residues. Use a steam cleaner to iron problem areas, after placing a clean and dry sheet. If you do not use a cloth, then dust and dirt will get into the internal compartment of the unit, which can cause breakdown.
Since the hot layer penetrates into the deep pores of the putty, the cleaned surfaces must be dried naturally for several days. Only after this can primer and paint be applied. Otherwise, spots of black mold will form on the wall.
Efficiency of regular water
Base requirements
- Any coating that is to be plastered must be leveled. It must be strong and solid. There should not be any peeling or defects on it. All defects must be plastered over with a base mortar compound.
- There should be no frost. It is advisable to carry out work at a constant temperature with optimal humidity. The recommended temperature for work and for the hardening process of the material is from 5 to 30 degrees Celsius.
- Humidity should be low. While the composition is hardening, there should be no drafts in the room; it is best to dry the air to a certain temperature in advance.
- All surface dust must be removed, and broken elements must be sealed with completely dried construction mixture.
- It is necessary to prime the surface several times before plastering, depending on the degree of initial adhesion.
Attention Rough walls require less primer, since due to small inclusions they accept the plaster solution well and do not require additional processing.