Do you want to seriously renovate and update your apartment? Then it will not hurt to know that one of the most basic stages of major home renovation is replacing old plumbing and pipes with new ones. In addition, this is the most impressive item of expenditure in the budget allocated for this work.
Reducing already impressive costs is a normal desire of every prudent owner. Do you agree? It’s quite possible to reduce them: installing plumbing fixtures yourself will help. We will tell you how to do the wiring, how to move and connect plumbing equipment, and what tools and materials are needed.
You will learn how to change the pipes in the bathroom and connect plumbing fixtures yourself. And in order to make it easier to understand the repair issue, the article provides thematic photo guides and video instructions.
Do-it-yourself plumbing installation in the bathroom: features
Before laying communications in the bathrooms of a private house, it is necessary to accurately and finally decide on the choice of models of all plumbing fixtures: bathtub, shower cabin, toilet, washbasin, heated towel rail, etc.
Technik-san
Find a factory technical map with installation dimensions on the Internet, or take it from the seller, and only then start laying routes for water supply and sewerage.
Here is a striking example: this picture shows that the same toilet model can have four types of water connections (bottom, left, right or middle) - it all depends on what kind of drainage mechanism the tank is equipped with.
Here are some standard connection diagrams for installing toilets:
And photos of their implementation from Technik-san:
To successfully install corner bathtubs with a load-bearing frame, you need to take a frame diagram from the seller - it is not always possible to “untie” the bathroom drain according to the usual diagram. And only if you are 100% sure that you will definitely buy completely ordinary, run-of-the-mill plumbing fixtures, you can follow the standard sizes from our table.
| Plumbing fixture | Level of entry of a 50mm sewer pipe from the wall (from the level of the finished floor) |
| Bath or shower with tray | 60 mm (from the level of the floor tiles to the axis of this pipe). If the output of the channel is higher than this value, you will have to make a podium. |
| Wash basin | 530-550 mm. |
| Attached toilet | 180-190 mm. |
| Wall-hung toilet | 220-240 mm. |
| Washing machine | 600 – 700 mm. |
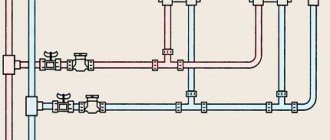
Communications layout: main types
There are two types of pipe routing: serial or tee and manifold. The serial connection method is popular in old houses and apartments. All two options have advantages and disadvantages, so let's analyze them in more detail.
Serial wiring type
The sequential pipe routing scheme is simple and economical. A tee is installed near each consumer, to which the next plumbing fixture is connected. It is rational to use such a scheme if there are a small number of consumers installed in the bathroom (toilet, bathtub and washbasin).
The disadvantage of such a pipe layout in the bathroom is that the pressure decreases when the taps are opened at each consumer. If several people live in a house, then such a scheme would be the best option. If the house is two-story, then such a scheme will not be able to ensure the normal functioning of the water supply system.
If you need to repair one consumer in a sequential circuit, you will need to shut off the water supply from the common valve.
Otherwise, this method is easy to install, economical and does not require the purchase of additional equipment.
Collector wiring option
Water supply can be installed using a collector method if there are a large number of consumers in the house. This scheme is implemented by placing a special device called a collector. With its help, there is an even distribution of water flow to each consumer.
Installation of pipes using a collector-type system has the following advantages:
- There are no differences in water pressure, even if you open all the taps in the house.
- The ability to increase water pressure by limiting its supply to other consumers.
- Disconnection of one consumer from the water supply for repair work, while the rest will be supplied with water as normal.
- Reliability of the system, since each consumer has its own separate pipeline.
Among the disadvantages of the collector system, it should be noted only that it requires high costs and also increases the volume of work. However, all these expenses pay off, so given the appropriate factors, it is recommended to choose this option.
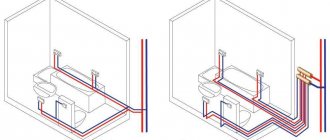
Sequence of placement of plumbing fixtures
The toilet is installed first from the riser. A large distance between the toilet and the riser (especially when there are turns in the pipeline) provokes blockages. Shower, washbasin, etc. It is advisable to plan so that the water from them is drained through the toilet.
It is also better to make a bathtub and shower with a low drain closer to the sewer; this will help avoid many problems with slope.
And, as already mentioned, the technical documentation for plumbing fixtures must be studied before the installation of communications begins. It is good if a single-level arrangement of the pipeline and the axis of the sewer outlet is provided; but you may encounter an atypical connection, and this must be taken into account.
Having chosen the models and determined exactly where they will stand, you can begin installing the pipelines.
Laying methods: hidden and open
For laying water pipes, two types of pipes are often used: polypropylene or metal-plastic. The disadvantage of polypropylene is the soldering process, which requires a special apparatus. Metal-plastic pipes are installed using special fittings, but the cost of the pipes themselves is 3 times higher than propylene pipes.
Open laying of plastic pipes is appropriate if a sequential connection scheme is chosen. When the owner prefers the collector type of wiring, then it is acceptable to carry out hidden installation.
The advantages of the open method of laying plumbing pipes include the ability to monitor the health of the water supply system. If a leak occurs, such a defect is detected immediately. When constructing open wiring, you will not need to make a groove in the wall to hide the pipeline.
Hidden pipe laying is popular when it is planned to lay two or more pipelines. As a secret place for laying pipes, a groove of the required size is cut out in the walls. After laying the pipeline in the groove, a screed is performed. As a result, the pipeline ends up in the thickness of the wall, which has a positive effect on the design of the bathroom and toilet.
The advantage of this option is aesthetics, but there is a big drawback that manifests itself in performing large volumes of work. Another disadvantage of this scheme is the inability to control damage. Laying polypropylene pipes in the bathroom and toilet with your own hands in a hidden way is done by using a special tool called a wall chaser. However, a good alternative to a wall chaser is an ordinary grinder with a disc for concrete.
When installing a hidden pipeline, wall screeding should be done after all the pipes have been routed through the bathroom and toilet. If, instead of hidden installation, you decide to build an open one, you will need to use a drill and special fasteners. If, when installing a hidden gasket, a deviation from the level of several degrees is allowed, then the installation of an open pipeline requires special control over the even placement of the pipes.
When installing a hidden pipeline, condensation may form, which will soon lead to the destruction of the wall and the appearance of mold. To prevent the occurrence of condensation, the pipes must be wrapped in thermal insulation materials, and the cold water pipeline must be placed under the hot one.
Which pipes to choose for sewerage
| Pipe type | Peculiarities |
| bays | There are no sockets, so connections are made with couplings. But there are no scraps or waste left. |
| In pieces | A piece of pipe is inserted into the socket of the previous one; fittings are used only when it is necessary to change the direction of drains, when combining horizontal lines, etc. |
Horizontal lines are mounted from 50 mm pipes, risers - from 100 mm.
For stable operation of the system after each bath, sink, washing machine, etc. (except for the toilet and shower) you need to install a gyroscope siphon. Siphons are installed by default in toilets and showers.
On curved sections, standard fittings without threads are used. It is recommended to install assemblies from pipe fittings rather than using ready-made ones.
Toilet installation
The installation of the toilet is planned depending on the location system of the drain receiver. The latter comes in 3 types: vertical or inclined (in the floor), horizontal (in the wall). Suitable plumbing models are produced for each type.
In a small bathroom, a toilet with installation is convenient. This hanging product is compact, and the floor covering underneath remains free, making it easy to clean.
The location of the toilet, like the bathtub, is determined in advance. During installation, the location and fastening points of the product are marked. Then they mount it, check the level of installation and the strength of the connection to the surface. There should be no leaks at the connections to the water supply system.
Recommended pipe diameters for sewage drainage
| Device | Diameter |
| Wash basin | From 40 mm |
| shower drain | 50-75 mm (depending on throughput) |
| Bath and shower | From 50 mm |
| Washing machine | Separate drain route - from 32 mm (open siphon), 40 mm (hidden siphon) |
| Toilet | 110 mm. |
An air valve is installed at the top point of the vertical riser, or a drain pipe is installed - after this, the sewerage installation in the bathroom is considered complete.
Water heated floor
It is possible to connect the circuits of a water heated floor to the central heating line only in one case - if the apartment has only one riser for this purpose, from which the supply and return lines are extended to all registers in the premises. In other options, for a warm water floor, either a separate boiler is installed, or a heat exchanger is used that heats the water using the thermal energy of the centralized heating system.
For TP circuits, a collector wiring diagram is always used. Pipes are installed before pouring the screed, only in walk-through areas of the bathroom. They have no effect under the bathtub, cabinets, shower stall, or washing machine.
Heat exchanger for water TP.
Due to the bulkiness of collector units with heat exchangers, most users use electric-type heated floors (IR, heating cable, cassette modifications).
Necessary tool
Plumbing installation tool
If the surface of the room is already finished with ceramic tiles and the plumbing in the bathroom is routed to the installation locations of consumers, then before starting work you need to prepare the necessary tools. From the tool we need:
- hammer drill or impact drill;
- laser or water level;
- drill for ceramic tiles;
- concrete drill of the required diameter;
- dowels for fastening plumbing elements to the wall;
- hammer;
- Phillips screwdriver or screwdriver with the required attachment;
- marker;
- masking tape;
- construction knife.
Before placing plumbing fixtures in the bathroom, you need to study all the fastening elements and the installation sequence, which is usually indicated in the instructions for each product. All consumables are usually included with each product, and only after studying them and preparing the necessary tools can you begin plumbing work in the bathroom.
Video description
Video example of how to install a septic tank for sewerage and calculate its volume:
The situation is different with a collector. Its volume must meet three parameters:
- Average water consumption over a certain period.
- The number of pumping procedures within a specified period.
- Possibilities of sewage disposal equipment.
An example of matching conditions is the volume of wastewater per month is 6 cubic meters, the frequency of planned pumping is once every 2 weeks, the capacity of a sewage truck is 3 m3.
Installation of the tank, laying of the external pipeline
The septic tank is installed according to the following algorithm:
- Digging a pit in the required location.
- Creation of a trench along which the external laying of sewer pipes in a private house will take place.
- Installing the container.
- Mains connection.
- Leading the pipe into the house to the riser.
- Ventilation arrangement.
If necessary, the septic tank/collector and pipe are insulated, then the pit and trench are buried with soil.
Features of internal wiring, nuances of pipe connections
When the external part of the system is equipped and the riser is brought into the house, the direct laying of sewer pipes in a private house begins. In this case, the wiring occurs in full accordance with the pre-developed project and taking into account all its features.
Organizational issue when replacing a riser
Installation of new equipment is impossible without dismantling the old one. In this case, the difficulty arises in replacing the riser in the bathroom, since it affects the neighbors above and below.
It is not enough to change a piece of pipe in one apartment; it is also important to carry out work in the ceilings, where there are also structural elements. They pose a considerable threat: cement damages pipes over time, which can lead to leaks, which are quite difficult to identify and eliminate.
To resolve the issue with your neighbors, you can do the following:
- Get written confirmation from the neighbors below that in the event of a leak in the old riser, they will not make claims. For residents living above, try having them sign a document guaranteeing payment for possible damage caused by a break in old communications. Very often this approach brings results, and neighbors agree to joint repair work.
- You can contact the Housing Office with an offer to make full payment for replacing the riser. In this case, the mission of persuading uncooperative neighbors is assigned to representatives of the management company.
It should be remembered that even in a privatized apartment, all central communications located in it belong to public utilities.
Sink connection
Washbasins are available in different types: hanging, on a pedestal ("tulip" type), on a cabinet ("moidodyr").
The first type is supported on brackets, the second is attached to the wall with screws. The pedestal column is combined with the lower part of the second washbasin, decorating the drainage system.
The third type is a sink built into a cabinet with legs. It is placed against the wall and secured with metal corners.
Hanging items are compatible with horizontal drains, others can be attached to vertical floor outlets. Before starting work, you need to read the instructions.
The procedure for installing the sink on the brackets is as follows:
- determine the height of the object (about 80 cm);
- from this level, the thickness of the rear wall of the product is laid down;
- place the brackets in the standard grooves, measure the distance between them and determine the attachment points to the wall;
- drill holes, install dowels and fix the washbasin;
- screw the mixer to it and check the correct location of the entire structure using a building level;
- install a drain and a siphon, connect the latter to the sewer outlet;
- flexible hoses connect the mixer to the hot and cold water outlets;
- The gap between the wall and the sink is filled with a sealing agent.
Installation on a pedestal is carried out according to the same principle, only the sink is attached not with brackets, but with screws. In order for the washbasin to look harmonious, all work must be carried out carefully, strictly observing the dimensions: the drain should be exactly in the center of the column, and its upper edge should be correctly aligned with the bowl.
During any installation, communication units (valves, connections) must remain accessible for repair and maintenance.