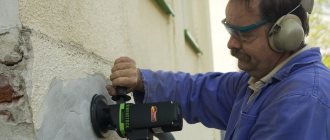
Which putty is best for walls to be painted?
During the Soviet era, painting walls with various paints was widespread.
Painted walls could be found in government offices, hospitals, kindergartens and schools, as well as in the apartments of city residents - mainly in kitchens and bathrooms. Their quality left much to be desired. Later, wallpaper and tiles replaced paint. Today, the fashion for painted walls is returning, but the requirements for appearance and, accordingly, the technology for preparing the surface for painting have changed. When finishing, before applying paint to the walls, it is necessary to carry out putty (putty) work. They will help smooth out all defects and level the surface to perfection. During subsequent painting, this is even more important than when wallpapering, since thick wallpaper can more or less hide minor flaws, but paint cannot. Paint adheres better to a smooth surface, and no defects of the pre-applied plaster appear even in bright, oblique lighting. In addition, a flat surface allows you to use paint more economically.
Differences between start and finish
The finishing putty forms a hard, smooth and perfectly flat surface on the wall for laying tiles, subsequent painting, or, for example, marble finishing. The optimal layer thickness is 2–3 mm; for leveling, up to 5 mm of the composition can be applied to areas. After applying the first layer of finish, a serpyanka mesh is laid in the corners and pulled through with a spatula.
To pre-level the walls, use starting putty. Its composition is more granular and pliable, which makes it possible to apply it with a wide tool and even as a rule along beacons. The starting putty has less hardness and responds better to the shrinkage of the building; it serves as a damper pad between the load-bearing surface and the finishing layer.
The layer of starting putty is strengthened with a fiberglass mesh laid on the freshly applied compound and pressed down with a spatula. After the first layer has dried, the remaining mesh must be cut off and the surface leveled with a second one. The perforated profile is also applied to a thin “start” layer, then the corner is leveled along the edge with a wide spatula.
How to choose putty for painting
It doesn’t really matter how much it costs to putty walls for painting; all compositions for leveling surfaces are conditionally intended for:
In addition, both types of putty are divided into three main groups according to their physical and mechanical properties and method of application:
Advice: When answering the question: what putty to choose for walls for painting, for beginners, preference should be given to a universal mixture that does not require independent preparation, and dries to form a smooth and fairly even surface of good quality.
Depending on the degree of readiness, the types of wall putty for painting are:
In order to knead it correctly, the instructions must be strictly followed. Advantages of this product:
Advice: The prepared mixture should be used for a limited time so that it does not have time to lose its properties.
The components have the required proportions and are ready for work. The finished solution remains usable for a long time, without changing its characteristics. During breaks in work, close the container tightly with a lid.
Depending on the type of main ingredient taken in their manufacture, the materials can be:
Such materials are used in dry rooms, and their use outside the house is not recommended. After drying, the surface becomes white, which is especially important for the bedroom and living room.
Start or finish?
For high-quality finishing of a plasterboard surface, one type of putty is not enough. For sealing seams and continuous puttying, different mixtures are used:
- For joints and seams, a mixture specially designed for these purposes is used - “Knauf Uniflott”, “Knauf Fugen”, “Volma Shov” - or, at worst, a regular starting putty of good quality.
- To putty the entire surface of the gypsum board, use a starting and then a finishing mixture or a universal one, which can replace these two types.
Therefore, if you are wondering which putty to choose for drywall, the best solution would be to buy a universal mixture and a special mixture for joints.
How to properly putty with your own hands: step-by-step instructions
Any puttying begins with preparing the working surface:
Starting layer
You can distinguish the starting putty from the finishing putty by its coarse fraction. The work is also simplified if you use a universal mixture that is suitable for both start and finish.
Initial puttying is carried out to eliminate visual defects of the walls, such as cracks, gouges or other irregularities. This may require laying several layers, each of which is applied after the previous one has dried.
To ensure that at the end of the work the mixture does not shrink after drying, and therefore does not crack, it is advisable to use a painting mesh that is attached to the wall.
If the deviation of the surface is large, then it is leveled and puttied along the beacons. However, almost no one does this, since it is difficult to imagine how much time and money it will take to apply a few centimeter layer of putty.
After drying, it is necessary to smooth out small irregularities with sandpaper and prime them for further work.
Finishing putty
The finishing putty is applied in a thin layer (up to 2 mm) to the leveled surface to achieve ideal smoothness due to its finest fraction. After drying, the wall is brought to perfection by mechanical sanding with fine-grained sandpaper, and then primed again for painting or wallpaper.
Reinforcement of seams or the entire surface with web
Reinforcement with cobwebs or painting mesh is required. It is carried out in order to avoid peeling of the putty or plaster from the wall, and also to prevent cracks from occurring or the composition falling out of the seams due to shrinkage of the mixture after drying.
The mesh sticks to the surface with a small adhesive layer, and then is simply covered on top. In some cases, it can be further strengthened with a construction stapler.
If it is necessary to putty with plaster, then the web is laid only on the seams between the sheets, but in cases where a starting layer is required, it is applied to the entire surface of the wall.
Grinding: the right technology
Sanding after puttying is done to remove unwanted grain and perfectly align the joints of the mixture.
It is best to carry out sanding by hand using regular fine sandpaper or a special block on which it is attached. In this case, the result will be more ideal, and the risk of accidentally rubbing the hole is minimal.
Grinding should be carried out in good lighting, constantly assessing the result from four sides. What kind of rubbing movements: circular or longitudinal is not so important, but the pressure should be controlled so that pits do not form, otherwise the finishing layer will have to be applied again.
In addition to the sandpaper, a special mesh is sold for grouting putty, which leaves less dust and does not clog longer, which increases its service life.
Final putty “clean” for painting or gluing
Finishing putty “clean” for wallpaper or painting is carried out with a very thin layer of any finishing or universal mixture, depending on the room, followed by sanding. No matter how thin the applied layer is, before and after its application it is necessary to prime the surface well
Stages of puttying
The procedure for plastering walls is as follows:
1. Starter or putty in the first layer. For this type of work, a coarse mixture is suitable, which is called starting putty. Suitable for covering large differences, you can hide holes and grooves, putty walls partially or completely, depending on the evenness of the walls. The thickness of the starting layer can reach up to 1.5-2 cm, and to give the surface strength, after covering deep cracks and holes, you need to use a painting mesh.
And don’t forget that before applying the next layer, you need to let the previous one dry thoroughly!
2. Putty for the second layer or lighthouse. The mixture is no different from the mixture for the starting layer. A beacon is a straight, even strip made of wood or a metal profile. Using this rail we will align the walls horizontally and vertically. You need to fix the beacons on the wall and start the second layer of putty. Using a level, we carefully check the quality of our secondary finishing.
3. Finishing or putty in the third layer. Whether or not you decide on the second layer, you will have to do the finishing putty. Why do you need putty if the walls are already perfectly smooth? It is this that will give the surface ideal smoothness and eliminate the smallest cracks that could form during the drying of a thick layer. The last finishing layer should be thin, almost transparent, like a primer, which you, of course, did not forget to apply under the first, starting layer.
Since finishing putty is akin to a primer, it is not difficult to make such a primer-putty for walls with your own hands: just dilute the remaining mixture liquid-liquidly. Often this method of priming (liquid putty) is used before applying the first starting layer, but this is wrong! A real primer will adhere better, penetrate deeper, and prevent the appearance of mold. Use the right primers, there is one for each type of putty!
Universal putties are very convenient in all respects and for all layers; working with them is a real pleasure, and the most unprepared novice master who does not know how to hold a spatula correctly can handle it.
Wall sanding tools to help with large areas
Special grinding machines have been developed for grinding large areas. In this case, for walls, surface grinders are used, which have a large working surface, and for ceilings, machines with special attachments are used that create a vacuum and thereby stick, which greatly facilitates physical labor.
Based on the principle of operation, they are distinguished:
When choosing a model, you need to pay attention to the fact that orbital ones cannot be processed in corners, and tape ones are better suited for removing thick layers.
It is not recommended for non-professionals to use grinders, since when finishing leveling the main thing is not to remove excess.
Brief summary of the above
So, having examined the general characteristics of putty compositions used in finishing premises, we can come to the conclusion that special attention should be paid to the purpose of the material.
- For interior work in dry rooms, putty mixtures on almost any base are suitable.
- For rooms with high humidity, it is recommended to choose cement-, polymer-, adhesive- and oil-based putties.
- For finishing façade surfaces, finishing materials are also selected that are cement-, adhesive-, polymer- and oil-based, but with the obligatory indication that they are weather-resistant and frost-resistant.
At the same time, when purchasing a mixture, it is necessary to pay attention to clarifying information on the scope of application of this material. For example, if the packaging indicates that the putty is intended for interior work, you should not try to level the walls of the facade with it. It is not adapted to external conditions, and the finished finish will not last very long.
But “in the other direction” – as much as you like. This means that mixtures positioned as façade or universal (meaning universality in terms of application) can be used both for interior decoration of premises with any level of humidity, and for exterior work.
Important points in work
When applying putty yourself, it is very important to follow the following rules:
You should also note that dry putty is cheaper, but sets much faster, which is important when planning the scope of work.
When puttying, it is necessary to take into account the characteristics of the selected mixture depending on the purpose, and carefully follow the manufacturer's recommendations. It is also worth using putty only for the final coating of walls before painting or wallpaper, and they must be leveled with plaster. This will significantly save time and money
Where to buy quality putty?
In the Remonstr online store you will find a wide selection of putties for wallpaper, painting and other finishing at the lowest prices in Samara. Our assortment includes putties from Russian and foreign manufacturers, the quality of their products is always high: Berg, Forman, Makroflex, Knauf, NOVBYTHIM, Isover, Henkel, Quelyd EK Dry Construction Mixes, Dufa, Belcolor, Ursa, Prestige ", Penosil, "Rogneda", Tikkurila, etc.
Our qualified and friendly staff will always help you choose the right putty for painting or wallpaper, and calculate how much it will be needed for work in your home. If you wish, you can perform this calculation yourself using the convenient calculator on our website.
How does the finishing location influence the choice?
The choice of putty depends on the properties of the surface being treated
Putty is an integral process of leveling and processing walls. What putty is best to use on drywall? The construction market offers a wide range of putty materials.
Choosing which putty is best to putty on walls is not always easy. This material will help you understand and make the right decision.
With the concept of “European-quality renovation” a lot of new construction terms and materials have appeared in our lives, one of which is putty. In this case, it’s not so much about the name, but about a completely new level of its quality and a huge selection. Which putty is best for walls and ceilings – let’s look into it in detail!
Cement plus lime mortar - this was the recipe used to knead putty using a homemade method during Soviet times. The level of cement-based mortars for wall finishing has increased today. Cement is now available in different qualities. And, the higher the class of the raw material, the thinner the layer of putty you can apply to the surface.
Some manufacturers add antifreeze to cement, which ultimately makes the material frost-resistant. The negative side of this type is the high degree of shrinkage. Over time, cracks may appear.
Cement-based mortar should not be used to work with wood and plastic textures.
Basically, specialized putty is produced for a specific type of finish. Thus, in order to know which one is right for you, you need to choose the type of renovation finish. The finishing is done using two types of putty, dry or ready-made.
Many experts prefer to putty with this type of material.
Source
Range
Today on the construction market you can purchase putties from different manufacturers. Rough and finishing putties are represented by such brands as:
- Glims;
- Pufas;
- Knauf;
- Weber;
- Vetonit;
- Prospectors;
- Shitrock;
- Promaster et al.
The material is sold in paper bags (dry mixes) and plastic buckets (ready-made putties). The price difference is due not only to the variety of manufacturers, but also to the quality of the material, as well as the fillers they contain (varnishes, drying oils, polymers, coloring pigments).
The most common and popular type of wallpaper putty is the product of Knauf.
Bedroom design in Provence style: is putty relevant here?
What paint to paint the walls after puttying
It is almost impossible to imagine a house without walls, so we can safely say that it is extremely important that they have a well-groomed appearance; this effect can be achieved in two ways:
- using decorative painting of walls.
Before you start painting the walls with your own hands, it is imperative to study all the options for painting the walls, how to prepare the walls for painting and what exactly to guide the selection of paints for painting the walls.
Preparing walls for painting
The question of how to prepare walls for painting is incredibly important, due to the fact that it is this stage that affects the quality of the entire work. Wall finishing for painting occurs as follows:
- first of all, it is necessary to clean the surface from traces of the old coating;
- level the walls for painting, all types of defects are eliminated: small cracks are sealed with putty, if the cracks are large, then you cannot do without a solution. Do not ignore when pieces of plaster fall off; make sure that the remaining coating is firmly attached to the wall. Sometimes it is necessary to plaster walls before painting;
— having leveled the walls for painting, you need to treat the entire surface with a special solution against fungus;
- priming walls for painting. It is advisable to use an acrylic primer. Make sure that absolutely all areas are treated evenly;
— it is necessary to glue a special fiberglass. It will give strength to the entire surface;
— putty walls for painting;
— the final stage in the question of how to prepare walls for painting is the final priming of the walls before painting.
Methods of painting walls
The technology for painting walls primarily depends on the type and quality of the surface being treated and, naturally, on the room where the walls and ceilings are painted.
Painting the walls in the bathroom
. Applicable only if there is a good ventilation system in the room. The walls are painted with water-based paint, and avoid drafts, steam, and high humidity until the paint layer is completely dry.
Remember that painting the walls in the bathroom requires a special approach, due to the fact that this room has high humidity.
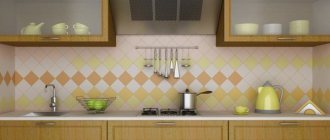
Painting the walls in the kitchen
. It is extremely important to choose a durable paint that is sufficiently resistant to constant cooking conditions. Do I need to prime the walls after the starting putty before the finishing putty?
Proper painting of the walls in the kitchen requires that tiles be laid in the work area, since they are much easier to clean and are more wear-resistant.
Painting the walls in the nursery
. When it comes to the health of our children, there cannot be a word about saving. Therefore, for such premises it is necessary to choose only the highest quality building materials.
It is not recommended to paint the walls in different colors; it is better to choose one tone. But to prevent the room from looking too dull, you can decorate it with a special border.
Painting the walls in the bedroom
.
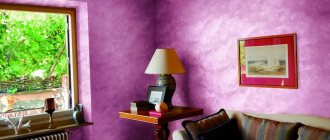
A well-chosen color scheme in the bedroom is the key to your quality rest, so you should not give preference to very bright and aggressive colors, and the room should not be gloomy. It is quite appropriate to paint the walls with decorative paints .
Painting the walls in the room
. Textured wall painting is also quite suitable. Moreover, due to the structure of these types of paints, the walls may not be very level.
Moreover, in this room your flight of imagination is completely unlimited; here you can bring to life all your most daring design decisions. If you wish, you can paint the walls in different shades; by the way, today such solutions are incredibly popular. Is it possible to paint concrete walls without putty?
You can also use a special roller to apply a design to the surface, or paint a thematic picture on the entire wall.
Wall painting technique
The painting of the walls in the apartment also depends on the type of surface.
Painting wooden walls
. Preparing such walls for painting with your own hands is not so easy; for this you need:
— primary painting of the walls in the house;
— in order to protect the pulp from moisture, it is necessary to do intermediate grinding;
— apply the last layer of paint;
It is very important to monitor the condition of the end surfaces and for more reliable protection from moisture, you can treat them with a sealant.
Painting plasterboard walls
.
First of all, it is necessary to seal the seams so that they do not stand out later. This is done either with the help of a sealant or by putting putty on the walls for painting .
In general, drywall can be painted without pre-treatment, but in this case you risk getting a not very good result. The color may not be uniform, and all surface defects will be very noticeable, so don’t be lazy, but still apply a primer to the sheets first.
As for the paint itself, its choice should also be taken quite seriously, and remember that on a glossy surface all flaws will be more noticeable than on a matte one.
Painting a brick wall
. If we are talking about interior work, then painting the walls with acrylic paint is perfect. Mold, dust, and salt deposits must be removed from the surface of the brickwork.
Moreover, it is very important to pay due attention to the preliminary work, otherwise the applied coating will not last very long. In addition, make sure your brick wall is not damp; if you notice even the slightest signs of moisture, it is better to try to eliminate the causes of its appearance before you start painting.
Also, the walls should not have any defects, chips, cracks, poorly sealed seams, etc.
Painting concrete walls
. It is forbidden to treat a concrete surface if a month has not passed since the date of its manufacture, otherwise high humidity will be detrimental to the applied coating. Surface preparation is as follows:
— old coating is removed;
- clean the surface from dust and traces of dirt;
— the question of how to putty walls for painting is also relevant, since this procedure must be done at least twice;
- finally painting the walls with color.
In addition, you can stick special wallpaper for walls to be painted. And thus, create a unique room design.
Also, it is recommended to putty most surfaces before painting, so, to some extent, this option can be called the most common.
If you decide to resort to painting the wallpaper, then you should clean it thoroughly, remove any glue residue, dust, dirt, etc. from the surface. Then the surface must be treated with fine-grained putty and primer. If the wallpaper is highly absorbent, then the priming process is of particular importance for it.
By avoiding this procedure, you can get an uneven color, and the result, instead of positive and joyful emotions, will only bring disappointment, and you may even have to redo the whole job again, and this is a waste of time and material resources.
An important step before putting putty on the walls for painting is preparing the putty mixture itself. This is not as difficult as it might seem at first glance. Pour water into a wide bucket, a little - it is difficult to quickly work out a large amount of putty, it will simply thicken, and it will be very difficult to work with it.
Here it is worth pointing out one nuance - you should not re-dilute the putty, as the builders say, it will form in small lumps and begin to “paint.”
Preparing the putty is quite simple; instructions can be found on the packaging. If there is none, then follow the following instructions: take 1-2 liters of water into any bucket-type container, or into the bucket itself, but then it will be white on the inside. Add putty to the water, about 1-1.5 kilograms. When adding this mixture, stir the mixture thoroughly with a spatula until a homogeneous thick composition is formed that can be applied to the spatula and applied to the wall.
Do not prepare a lot of putty at once, because... It dries quickly, it is better to dilute it several times and little by little.
From personal experience I can say that the better the quality of the paint , the lower its consumption, and despite the apparent high cost, the costs ultimately turn out to be even lower than if you paint the walls with cheap paint. High-quality paint adheres well, does not run down the walls, and does not drip from a brush or roller. In a word, painting with it is a pleasure.
To carry out puttying, the ceiling must be cleared of the previous putty. Do I need to prime the walls before painting after puttying? Since this work is labor-intensive and dusty, you should dress appropriately, not forgetting about a mask or respirator. Using a sprayer, part of the ceiling is wetted, and after that, when the water is absorbed into the plaster, it is cleaned using a spatula.
The ceiling should be wetted as much as possible, then it can be cleaned faster.
Source
Putty technology
The puttying process can be divided into four stages:
Stages of preparing walls for wallpapering
Next, we will take a step-by-step look at this procedure from start to finish.
Preparation of materials
First of all, let's look at what you need to putty the walls. So, you will need:
- White starting putty, it is best to use gypsum mixture as it is inexpensive and easy to work with;
- Acrylic universal primer (if the base is loose, deep penetration primer should be used, but if the surface, on the contrary, has poor adhesion, an adhesive primer should be used);
To prepare the base you will need an acrylic primer
- Abrasive mesh P80-P120;
- Set of spatulas;
- Paint roller with cuvette;
- Clean plastic bucket;
- Electric drill and special mixer attachment.
It is also advisable to have a long rule to control differences in the surface of the walls.
Preparing the base
Before you putty the walls, you need to prepare them as follows:
| Illustrations | Actions |
| Cleaning from dirt. The surface must be cleaned of dust and dirt, if any. To do this, the walls can be vacuumed or wiped with a damp cloth. | |
Padding:
| |
Joint reinforcement:
|
Now you can start puttingty.
Puttying
The putty technology is as follows:
| Illustrations | Actions |
Preparation of putty:
| |
Puttying seams:
| |
Puttying walls:
|
This completes the puttying. Many beginners are interested in how many layers of putty should be applied to properly prepare the surface? It all depends on the condition of the base and the putty itself. If, for example, the differences are a centimeter, and the composition can be applied in a layer no thicker than 7 mm, then, accordingly, two layers will be needed.
Therefore, you need to inspect the walls in advance and apply a rule to know how many times you will have to putty them.
Sanding and preparation for gluing
Now the final stage remains - sanding and preparing for wallpapering. This work is done as follows:
| Illustrations | Actions |
Grinding.
| |
| Padding. Before gluing wallpaper after puttying, be sure to prime the surface of the walls. |
Beginners often doubt whether they need to prime the putty before wallpapering. The primer will improve adhesion, ensure uniform absorption of the glue and slightly reduce its consumption.
Therefore, it is highly advisable to apply a primer to putty walls. After they dry, you can start gluing wallpaper.
How and with what can you paint surfaces after puttying?
Painting of putty surfaces is done with oil or some types of water-based paint. The preparation of walls for painting must be done efficiently to ensure an even coating with the dye.
Polymer compositions
Polymer putty is optimal for the finishing layer before painting. The composition is intended for interior work. Using the solution, the surface is smoothed, making it easier to paint the walls. The thin structure of the product helps eliminate minor deformations. This type of putty has high adhesion to the surface and does not peel off during use. It is necessary to take into account the high cost of polymer materials.
Plaster
Gypsum solutions are used for interior work; the product is suitable for eliminating cracks, small defects, and joints. Gypsum putty is painted with acrylic or polyvinyl acetate water-based paint.
The advantage of putty is its affordable cost, economical use, environmental friendliness of components, and ease of sanding. Gypsum putty hardens quickly, so work is carried out in small areas. The mass is not used for concrete bases and for finishing rooms with high levels of air humidity and building facades.
Cement
Cement mixtures for puttying before painting are strong, durable, resistant to temperature changes and air humidity. In addition to cement powder, the putty contains lime, which increases the plasticity of the mass. The putty mixture is affordable and easy to apply. The structure of cement putty is coarse-grained. Surfaces are painted with water-based and powder paints.
Useful tips
Additional tips for high-quality painting on putty:
- It is unacceptable to paint wall panels damaged by mold and fungi. You will need to clean the base and treat it with antiseptic agents and moisture-resistant impregnation. Damaged areas are thoroughly dried before finishing.
- For comfortable painting, paint is poured into special paint trays with compartments. The roller is thoroughly washed between finishing works.
- Water-based paint can be used to finish a bathroom only if there is forced ventilation. In the absence of equipment from high humidity and steam, the painted surface will be short-lived.
- To decorate the kitchen, dyes that are resistant to mechanical damage and dirt are used. To increase durability, the painted layer is coated with a transparent water-based varnish. Experts recommend not painting areas of work areas (near the sink, electric stove), but laying them out with tiles.
- When choosing paint, the area of the room is taken into account. To visually reduce spacious rooms, you can choose dark and rich shades; light colors will visually expand compact spaces.
Whether it is worth using dye over putty and plaster depends on the design project. Design solutions are being developed with tint building mixtures, inserts of tiles, wood, stone, etc. Surface tinting is a more budget-friendly option and allows you to implement standard and custom projects.
Types of paints
You can determine which paint to use for putty by color, composition, texture, purpose, characteristics of water resistance, strength, layer density (hiding power), and wear resistance. Products must be environmentally friendly and safe for people. Paints for putty substrates are produced for interior and exterior (facade) work.
These coatings are durable and resistant to precipitation due to the presence of a film layer on the surface. Many compositions have a white tone, which can be changed through tinting. Several coloring pigments are added to the material to obtain the required tone. The mass is mixed using a construction mixer.
Coloring agents differ in the type of base.
Epoxy putty NOVOL THERMO, pack. 0.4 kg
627 rub.
- Description
- Characteristics
TERMO - EPOXY PUTTY
Termo putty is a two-component epoxy putty for powder paints, designed for repairing minor damage and unevenness of metal surfaces. It is characterized by a short curing period, similar to epoxies, and a very high level of mechanical strength. It also has excellent adhesion and high temperature resistance. The curing process can take place either outdoors or in an oven.
| vendor code | 31521 |
| Type of tool/material | polyester 2K |
| Product type | Putties |
| Product code | 11706 |
| Size/Diameter/Volume | 0.4 kg |
recommended products
S68 Automotive polyester elastic putty Sprint Export (gray), pack. 0.5l/0.915 kg
Putty S68 (EXPORT GRAY) gray color. Universal polyester elastic putty withstands.
Body 211 SOFT polyester putty 2 kg
Two-component polyester putty suitable for metal, wood and polyester surfaces.
Universal automotive putty NOVOL, pack. 4.5 kg
NOVOL UNI – UNIVERSAL PUTTY UNI is the main filling putty. Relatively hard and not.
Body 250 FIBER putty with fiberglass 750 g
Two-component polyester filler with glass fiber for filling large depressions and through-holes.
2K polyester universal putty Multi Light beige Carsystem, pack 1.3 kg (light)
CHARACTERISTICS Multi Light is a low specific gravity polyester putty. Guaranteed.
Automotive polyester putty with fiberglass BODY 250 Fiber, pack. 1.5 kg
Polyester putty with glass fiber BODYFIBER Two-component polyester putty with glass fiber.
Carsystem plastic repair kit, pack 0.25 kg
Set including polyester resin with hardener and fiberglass. Designed for sealing through holes.
Automotive polyester putty with glass fiber NOVOL Fiber, pack. 0.2 kg
NOVOL FIBER – PUTTY WITH FIBERGLASS FIBER – putty with the addition of glass fibers. Thanks to .
Free shipping
We deliver goods purchased in our online store throughout Russia. In most major cities of Russia, our courier delivery or pickup from order receiving points is available. We carry out delivery to other settlements with the help of Transport Companies: Business Lines, SDEK, Transport and Forwarding Network, PEK and any others. We can also send your order by cash on delivery by Russian Post.
.
How to putty walls for painting
In this article we will tell you how to get a perfectly flat and smooth surface for painting, and we will give tips that will help even an inexperienced craftsman do everything efficiently and beautifully.
It should be noted that not all surfaces are suitable for puttying. These can be plastered and plasterboard bases, walls and ceilings in monolithic and panel houses, provided that they are installed level and do not require leveling. But it will not work to putty on bare brickwork, since the finishing putty is applied in a layer of up to 15 mm, and leveling such a wall may require a much larger layer.
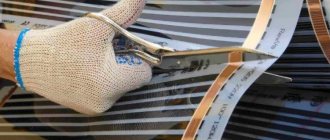
Scope of application of metal putties
Metal putties can be used for surfaces made of ferrous and non-ferrous metals, as well as galvanized products. Some types are also suitable for galvanized surfaces. Putties are used for the following operations:
- leveling: the composition fills dents, cracks and scratches;
- strengthening surfaces by increasing the thickness of the product;
- sealing holes;
- anti-corrosion treatment of surfaces, including those already affected by rust.
Metal putties are wear-resistant and can withstand weathering, moisture, frost and other adverse influences. They are usually applied before painting.
Metal putty is purchased for repair and protection against corrosion of metal building structures and elements: fences, railings, stairs, metal garages and gates, door hinges, etc. Such putties are also useful for processing metal pipelines.
Metal putties are in demand not only in construction. Thus, they are actively used in the repair of cars, water transport, industrial equipment, and restoration of the surface of various metal products.
Types of putties
There is a huge selection of putties on the building materials market, which differ in different parameters.
Depending on the degree of readiness, dry and ready-made mixtures are distinguished. Dry mixtures are attractive due to their low price, and the finished compositions have an ideal homogeneous consistency, do not take time to mix, and do not require additional tools and containers.
All these parameters rather determine the ease of use of the putty in each specific case, and the main thing when choosing a material remains the scope of its application. This could be a kitchen, a bathroom, or even a wall in an open gazebo, that is, a surface in conditions of high humidity and temperature changes. Or you need to paint the walls in a children's room, where the harmlessness and hypoallergenicity of finishing materials is especially important.
The scope of application of the mixture is determined by the binder in its composition ( cement, gypsum or polymer ). Let's take a closer look at each of them.
Gypsum putties have a number of advantages: low cost, huge range, vapor permeability, hypoallergenic, good adhesion to paints, wallpaper and other finishing materials, ease of application, no shrinkage. This putty sets quickly, so it requires some skill in application. Despite all its advantages, the scope of application of gypsum putty is limited to heated rooms with normal humidity levels. So, it is ideal for bedrooms, children's rooms and living rooms.
In polymer mixtures, the binder is acrylic resins or latex. Only this type of putty is sold both dry and ready-made. The range includes models that can be used in both dry and wet areas. For example, dry polymer putties Starateli Finishnaya Plus and Osnovit Ekonsilk PP38W are for rooms with any level of humidity, and ready-made polymer putty Danogips SuperFinish is only for dry rooms. Polymer putties fit well on plasterboard bases and can be applied in an ultra-thin layer, reducing material consumption. The mixtures are supplied in sealed plastic buckets, which can be stored for a long time even in a humid environment, unlike plaster and cement ones, the paper packaging of which easily gets wet. The price of polymer putties is much higher than gypsum and cement putties. But the wide range of choice, ease of use and guaranteed high quality of the putty surface will justify the investment.
So, we figured out the scope of application. We found out that only cement putties are used in exterior work. For wet rooms you need to choose from cement and polymer compositions. And for dry rooms, any putty is suitable, but gypsum or polymer are considered the best option.
1.1. Starting putty
1.2. Finishing putty
The finishing putty for painting can be ready-made polymer (such as Starateli Superfinish Paste, 15 kg with an application thickness of 0 to 2 mm), dry cement ( Weber.Vetonit VH, 20 kg with a layer thickness of 1 to 3 mm) or dry polymer ( Knauf Polymer Finish, 20 kg with layer thickness from 0.2 to 4 mm).
1.3. Universal putty
Using two types of putty can be a difficult task for a novice craftsman: you need to choose the right materials to combine, correctly calculate the required amount, spend twice the time drying each layer, and also financial costs. To simplify the task, universal putties are designed, which have a medium grind and have absorbed the best properties of starting and finishing mixtures. With their help, it is easy to make the surface for painting smooth (though you have to sand more), and a layer can be applied, if necessary, up to 1 cm.
Universal putty is suitable for both types of work, but more often it is used to close joints of sheet materials (gypsum plasterboard, gypsum board, gypsum board, chipboard and others) or to seal cracks and holes.
Gypsum compositions are universal (for example, Knauf Fugen, 25 kg with a layer thickness from 1 to 5 mm) and polymer ( Starateli PoliArt superwhite, 20 kg with a layer thickness from 0.2 to 5 mm).
Lay down the corners
For better results and faster work, first carefully paint all the corners and contours of the junctions, and then the main surface. There are two main options for performing layering.
Illustration: Artyom Kozoriz / Lifehacker
First: using a small brush, slowly paint 5-7 cm wide stripes along the ceiling moldings, in corners, at baseboards, and around radiators, sockets and switches. To protect the ceiling, you can seal the spatula blade with masking tape and, placing it in a corner, calmly paint with a brush.
Second option: cover the junctions with the ceiling and other surfaces with masking tape, smoothing the joint well with a spatula so that paint does not flow there. There is no need to smooth the entire surface of the tape, otherwise the tape will be difficult to remove later.
The adhesive tape on the ceiling can additionally be painted along the edge with white paint: this way it will immediately fall into the gap and after painting the wall with a different color the border will be perfect.
What you need to know about preparation
So, we figured out the types of putties and chose the appropriate material. All that remains is to prepare the tools necessary for the work and prime the walls.
2.1. Working tools and materials
A properly selected tool plays an important role in obtaining a quality result. To prime and putty the walls you will need the following tools:
2.2. Preparing walls before puttying
Before puttying, first of all, we clean the plastered walls with a hard spatula from deposits of plaster and particles of debris, after which we brush off the dust from the walls with a brush or broom. This will provide better soil adhesion to the surface.
To strengthen the corners, we install metal or plastic perforated corner profiles (corners) on them. We attach them to the same putty, screws or a construction stapler.
In plasterboard structures, we cover the joints between sheets, screw heads, cracks and dents Knauf Fugen
After the first layer has dried, a second one is made, which aligns the seams in the same plane with the drywall, after which the walls are cleaned.
Next, apply the primer evenly with a roller or brush. For wet rooms, soil with antiseptic additives is used to prevent the appearance of mold and fungi.
After the primer has completely dried, it is recommended to apply it with a second layer. In this case, the walls will draw less moisture from the putty. This way the finishing putty will harden more slowly, which will leave more time for its distribution and leveling on the surface.
Remove or protect anything that gets in the way
Before starting work, you need to remove everything unnecessary from the room and protect surfaces that will not be painted from splashes.
Take out the furniture and all other items, and place what cannot be removed in the middle of the room and cover it with film. Wrap the heating radiators with it or remove them. Cover the floors with thick film or several layers of newspapers.
Illustration: Artyom Kozoriz / Lifehacker
Turn off the power to sockets and switches, remove their covers and cover them with masking tape. Also cover the baseboards, platbands, edges of slopes and other adjacent surfaces so as not to splash them.
Technology of puttying walls for painting
The walls have been prepared. We begin to putty. The putty is applied in several stages: basic leveling, finishing and final sanding. This process takes a long time, since you will have to apply at least three layers and let each of them dry completely.
3.1. Starting layer of putty
The initial stage of putty levels out surface defects up to 12-15 mm deep, so the starting composition is applied in a thick layer.
Putty is applied to deep spot surface defects (for example, joints of drywall sheets, places where self-tapping screws are screwed into drywall, cracks and dents), on top of which a fiberglass mesh or paper reinforcing tape is laid. Press it down a little, but so that folds and bubbles do not form. Leave to dry.
If there are deep unevenness throughout the entire area, then you will have to level it using beacons. Beacons can be installed in several ways. The quickest and easiest way is to attach them to special clips (galvanized Knauf Kremmer Clips or plastic Fasteners for AriyaStroy beacons ). For this, in addition to beacons and clips, you need a hammer drill, dowels and screws, as well as marking tools. First of all, drill several holes on the applied markings with an equal space between them. Place the dowels in them and tighten the screws so that their heads are in the same plane as the marking threads. Place the clips on the screws and secure the beacon itself in them.
We prepare the solution only after installing the beacons. Use a construction mixer or a drill with a special attachment for this. Remember that gypsum putty has a short pot life of the solution, so you should not dilute a large volume. In addition, if the puttying process is new to you, then regardless of the type of mixture, it should be diluted in small portions to get used to it. It is necessary to have time to use up the entire solution before it hardens in the bucket.
Important! After each batch, you need to thoroughly wash the bucket and clean it with a brush from hardened particles of the solution so that they do not get into the next batch of fresh solution and damage the coating.
When using beacons, simply add the first layer of putty between the beacons and smooth it out from the bottom up. As a result, air bubbles form on the surface. Break them apart with a spatula, sprinkle some putty on them and run the rule over the beacons again.
Let's reveal the secret of an ideal result: 30-40 minutes after leveling one span, apply the rule from top to bottom. This action will straighten the beacons that sag a little during puttying.
After leveling, leave the surface to dry for several hours.
3.2. Finishing putty
Wash the tool thoroughly before using the finishing putty. We will continue to work with them. The technique of finishing putty does not differ from the starting one, it is simply laid in a layer of no more than 3 mm. Hold the putty knife at a 90-degree angle to the wall and apply firm pressure while applying the mortar. The result is an ultra-thin layer that will fill the smallest grooves.
We continue to putty until we get the most even surface for painting, after which we leave it to dry.
The procedure for performing putty work
Cleaning the walls
The old coating (wallpaper, paint, peeling plaster) is removed from the surface. The dried walls are inspected, removing small residues using a mounting knife or spatula. The walls are coated with a primer, which will ensure better adhesion of the materials.
Leveling the surface
Putty, like plastering walls, is carried out in stages.
- The technology of wall putty involves applying the mixture from top to bottom. Take the mixture out of the container with a narrow spatula and level it along the blade of a wide spatula. First, moving from left to right, the mixture must be applied to the surface, and then move in the opposite direction without putty, leveling the solution over the surface. Each subsequent layer should overlap slightly with the previous one. You need to take a small area of land.
- The thickness of the layer can be adjusted by the angle of the spatula. A large angle of inclination will provide a thin layer of putty. The thicker the layer, the more likely it is to fall off.
- The wall must dry, but in the meantime, it is better to add mortar to places with a thin layer. To speed up drying, do not use a hair dryer, drafts, direct sunlight, etc.
- Sanding with sandpaper will help make the wall smooth. To do this, the sandpaper is properly secured to a special block and the surface is treated with smooth circular movements. It is necessary to constantly monitor the pressure force so as not to remove a large layer of the mixture. At the final stage, you should choose abrasive paper with a small fraction so as not to make deep scratches.
- It is better to remove all generated dust.
- The surface is coated with a primer.
- Finishing putty must be applied to the dry surface. The principle of operation is the same as when working with leveling type putty. The final coat will cover the remaining cracks. Puttying the surface for painting is carried out carefully, since the paint will not hide small pores and irregularities.
- After applying the finishing putty and drying, the surface is treated with sandpaper and primed.
- Finishing work begins after drying.
Puttying walls for wallpaper is not significantly different from puttingtying a surface for painting. Applying the mixture is not difficult, but not everyone can do it correctly.
Puttying cracks
Special gypsum mixtures are used to treat cracks in walls. According to the recommendations of experts, the crack is slightly widened and deepened, roughened, treated with a primer, and only then they begin to work with putty. For this purpose, you can use the material “Santegypsum”. Puttying the surface for painting is carried out in several layers until the walls acquire a perfectly smooth appearance.
The nuances of puttying slopes
The corners of the slopes are processed using an angle spatula, and the sagging is removed with an abrasive material. There are no serious differences between puttying walls and corners, however, this work is more painstaking, even specialists need at least a couple of approaches.
You can putty walls for painting or wallpapering yourself, although you must be careful when working. All defects can be easily eliminated. Such experience will help the novice home craftsman acquire construction skills. Puttying walls is a necessary repair process if you want to get a truly high-quality repair.