Without a switch, it is impossible to operate lighting fixtures, so ease of use depends on the correct installation of this simple device. If there are usually no problems with a single switch, then the connection diagram for a triple switch sometimes causes difficulties - then a multi-arm chandelier or combined lighting will not be able to fully work. Without basic knowledge of electrical circuit diagrams, it is difficult to correctly connect a triple pass-through switch or other electrical devices, and it is important to understand this in more detail.
Controlling lighting fixtures in the home
The switch is one of the simplest devices for regulating lighting in the house. However, when independently installing electrical wiring in the house, it is important to eliminate all possible errors in connecting the switch in order to ensure efficient power supply to lighting fixtures and other devices powered by the network. Today, several types of switches have been developed - automatic, walk-through, single-key and multi-key. In order for each of them to work correctly, it is important to know the connection diagram and operating principle.
Main types of switching modules:
- switch with presence or motion sensor;
- single or single-key pass-through switch or switch;
- switch with indicator;
- double or two-key pass-through switch;
- single-key switch;
- two-key or double switch;
- three-key or triple switch;
- circuit breaker;
- switch with night lighting;
- dimmer or dimmer.
Each type of switch has its own specifics. It is difficult to give definite advice when choosing a type of switch, but they are all designed for certain functions. For example, if the lighting control device has 3 keys, then it is intended for a multi-light chandelier, which is turned on in 3 stages - for 1 light bulb, for 2-3, or lights up entirely. This is very economical and convenient so as not to unscrew unnecessary light bulbs. And the pass-through switch is designed for long corridors and stairs, so that you can use one module to turn on the lighting at the beginning of a long passage of the corridor, and at the other end the second module will turn off the light.
Most switches are very simple devices in design and have:
- the outer part of the box with a switch key;
- internal, where the network is closed.
If you don’t delve into the details of how the switches work, then visually they differ in the number of keys for switching the lighting;
- single;
- double;
- triples.
Triple switches are used:
1. To control one complex lighting fixture (ceiling chandelier).
2. To control different types of lighting from one point, for example, LED strip and sconces in the bedroom.
3. To turn off the lights in different rooms from one point, such as the bathroom, corridor and toilet.
4. For advanced lighting control, when a triple pass-through switch is included in the control system for different types of lighting fixtures.
A single switch is installed at the entrance to a room or house, and sometimes it is mounted in another room. For example, it is very convenient to include the pantry and kitchen from the hallway or corridor. Such a switch is enough to control one light bulb or low-power lamp.
The simplest connection diagram for a simple switch:
The double switch is also used to control the lighting of 1-2 moderate power fixtures in a small room. It is usually used in living rooms - children's room, bedroom, living room, kitchen. This switch is very convenient for a divided bathroom - the bathroom and toilet are turned on in the middle. Such a switch can control 2 groups of lighting fixtures - a double-on ceiling chandelier, a lampshade and sconces, a chandelier and a floor lamp, etc.
The simplest connection diagram for a two-key switch:
The triple switch is the most convenient and multifunctional, since it can be used to regulate the operation of a triple switch chandelier or the operation of 3 different groups of lighting fixtures. It is most convenient for turning off 3 different rooms from one point. In complex lighting design, such a switch can operate according to the “floor-wall-ceiling” diode lighting scheme. In addition to houses and apartments, three-key switch boxes are used to regulate lighting:
- in production premises;
- in warehouses;
- in office premises.
Triple switch connection diagram:
How to choose the right switch
Once upon a time, switches were push-button and only single, but today the most common are 1-, 2-, and 3-key switches. In Europe, to combine a larger number of keys into a common frame, I combine several 2-key switches. On the American continent they produce boxes with more than 3 switches, in South Korea they followed their example - there are modules with 6 keys, and each has its own color indicator, so as not to confuse the switches. European switches do not always have backlighting, most often only the 1-key box has it, but this is very convenient when searching for it at night.
1. Pass-through switches differ from simple switches in their circuit diagram - the same closed circuit can be opened in different parts of the corridor. Thanks to this, you can come into the house at night, turn on the light on the stairs, go up to the top floor and from there turn off the switches on any floor behind you. The switches are no different from ordinary switches in any other way. However, when purchasing, it is important to know this so that you do not inadvertently purchase a triple switch instead of a three-key switch, although visually they are different. It is for this purpose that a connection diagram must be printed on the packaging of imported goods or explanations must be made on the inside of the switch box.
2. Dimmers (light controllers) have a specific function - they not only turn on the light, but also regulate its brightness. When there is no point in bright, blinding lighting, then leave a small percentage of the backlight. When choosing a dimmer, it is important to take into account the total load of the switch, so it is customary to buy them with a power reserve. For example, for a three-armed ceiling-mounted chandelier with arms of 75-100 Watt wave, a dimmer marked with the number 300 W is sufficient.
3. Sometimes a switch with LED backlight and a control switch with an indicator are confused. They are similar in appearance, but they have different purposes and operating patterns. A diode light bulb at night will indicate the location of the switch in a dark room or when going down the stairs. But the indicator has a different functionality - a glowing light at the control switch indicates whether the device is turned on. Such switches are used to find out whether the light is on in a remote room - in the garage, basement or summer kitchen. The indicator is not turned on when the auxiliary room is dark - there is no need to go outside at night in winter to make sure.
4. Switches with a protective casing are used for:
- swimming pools (indoor and outdoor;
- bathrooms;
- combined bathrooms;
- saunas or steam rooms;
- for controlling external lighting devices.
Everything in them is thought out to counteract the increased load in terms of air humidity. They are not afraid of a stream of water that blows off a water tap, or the splashes of swimmers in the pool. For this purpose, inside the box the working elements are protected by rubber or plastic protection. Of course, you shouldn’t specifically water such a switch with water pressure from a flexible shower to check reliability, but in case of accidental splashes you can completely rely on their work.
5. An interesting device is an anti-vandal switch for public places, which is made of impact-resistant plastic or alloy. This is a regular switch with a "reinforced" box, and when installed correctly, it is difficult to break, break, burn, or knock over with a heavy object. This is intended for large shopping centers and banks to prevent attackers from taking advantage of the fragility of the structure for criminal purposes.
Attention: But not only anti-vandal switch boxes are made of metal and especially durable plastic, but also control devices for lighting devices of exclusive series. They are designed in such a way that they cannot short out and cause a fire even in an emergency, for example, if a door explodes.
How to choose the best quality switch
Reasons for breakage of the switch:
- poor contact on the contact plates - sparks and heats up;
- unreliability of the box and wiring connections;
- slight deformations in the plastic box may cause cracks;
- defective key fastening - the plate may fall off or become stuck.
Advice: Carefully inspect the purchased product, check:
- complete set according to the instructions;
- markings, physical quantities (voltage and current);
- compliance with the required purpose (dimmer, switch, indicator, backlight);
- presence of instructions with a diagram and a receipt (defective goods can be exchanged).
Only after this can you leave the store with a new switch and begin installing and connecting the switch. You will also need the following tool:
- pliers and wire cutters;
- voltage indicator;
- Phillips and flat screwdrivers;
- screwdriver
The simplest way to install a triple switch
Before you begin installing the triple switch, prepare your tools, turn off the breaker and understand the wiring on the wall where the 3-button switch box will be located.
A bundle of 2 wires with 3 cores and 1 three-core wire - it is important not to confuse where the phase is and where the zero phase is. These 2 wires are phase, but there may be other options that differ from this standard. The purpose of the wires must be determined using a voltage indicator - a phase wire is placed on the switch if it is not yet clear how to connect the triple switch. Remember that installation of a socket box is also necessary if it is missing.
The zero phase is supplied to the lighting fixture, and the switch itself provides a phase break. But even when it is connected at the zero phase break, the circuit also works. After checking with an indicator, it is better to mark the phase leads. The operation of phase beams can also be checked using a conventional incandescent lamp when there is no indicator. It is enough to take the cartridge with the wires out and close it to an obvious result.
When the lamp glows at full intensity, this is a phase break; the pure glow of the lamp is a zero-phase. When the lamp does not turn on at all - it hits 2 phases or 2 zeros. If in doubt, check everything again. 2-wire wires are fed to the lamp, and a 3-wire wire is fed into the distribution box, where the phase and zero are, and the ends with the zero-phase are brought together under a screw on the switch body box. Next comes the connection of 3-phase wires leading to the lighting device.
How to connect a triple switch: connection diagram
Attention: Remember that the triple switch controls the operation of lighting fixtures or lamps in different rooms. It is important not to confuse anything, otherwise the rightmost key will have to turn on the room on the left or vice versa!
Installation should only be carried out according to the triple switch connection diagram. Zero - directly to the lamp, phase - to the switch.
Tip: When connecting yourself, you can save on calling a specialist, installing a switch box, a lamp and an indoor socket box. But if you have difficulties installing the socket box, grounding and the connection diagram of the triple switch itself, use the electrician’s hint. It is also worth installing a special transparent shield around the switch so that the wallpaper does not get dirty from hands.
A triple switch is used to separately control the on/off of three groups of lamps or lighting fixtures. This is much more convenient than installing several separate switches for each light source, and besides, one switch looks much more aesthetically pleasing in the interior.
Design and operation of a triple switch
This product combines 3 switches housed in one compact housing. There are three load outputs and one common contact. Each of the three circuits is controlled by one of three keys - when one key is pressed, the lighting devices connected to it will turn on, when all three are pressed, all consumers connected to the switch will turn on.
Installing this device allows you to simplify the process of controlling lighting fixtures in a room, adjusting the intensity of lighting and saving energy. In addition, the triple switch is designed for connecting high power consumers. If for one- and two-key products the maximum permissible power value is up to 2200 W, then for a three-key product this value can reach 3500-3700 W. This allows it to be connected to several lighting fixtures or multiple groups of fixtures.
Product Application Options
- Adjusting the lighting intensity of a chandelier with 5-8 lamps.
- Controls three wall lights.
- Creation of separate light zones when connected to suspended ceiling lighting.
- Connecting lighting fixtures in several rooms, for example, a bathroom, hallway, kitchen.
- Separate switching on/off of the fan and lighting fixtures in the toilet and bathroom.
- Control of three rows of lighting fixtures, for example, between racks in warehouses, libraries and other delimited areas.
Important Features
Installation type. Most three-key switches are designed for hidden installation, so to install them in the room there must be hidden wiring, and you will have to make a recess in the wall for installing the switch. Keys and an elegant decorative frame will remain on the wall surface.
Material of manufacture. Keys are usually made of ABS plastic, which is resistant to mechanical stress and fading, and is also easy to clean.
In our online store you can buy a three-key switch in classic white color or in oak, pine, alder, etc. color. You will find detailed descriptions and characteristics of each product in the product card, where you can also place an order by clicking the “Buy in 1 click” button.
The advantage of a three-key switch is that it can be used to regulate the intensity of lighting in the room. Such a switch is used in long corridors, in rooms with several levels of lamps, and also in cases where lighting in several separate places is controlled from one point. For example, in the bathroom, toilet and kitchen. In order for the switch to work properly, you need to know how to properly connect it to the power supply. This is what we will talk about.
Why are pass-through switches needed?
Turning on the lights in a long, dark hallway can be quite inconvenient if there is only one switch located at the end of the room.
The most rational way is to install pass-through switches (another name is cross switches) on different sides of the room. This way you can turn the light on and off immediately after entering the corridor. This is especially true in the entrance of a building, where apartments are located in one line along a long landing, on stairwells, in offices, and industrial premises.
Another option for using this control scheme is a large bedroom with several beds. If you install pass-through switches at each bed, you can turn on the light bulb without getting up. Installation of such devices is justified in dachas, garden plots, and courtyards of private houses. You can turn on the light when leaving the house - after finishing your work, there is no need to walk in the dark.
Types of 3 point switch
Switches from three places are represented by two types of products: pass-through and cross. The latter cannot be used without the former. According to the principle of operation, crossovers are divided into:
- Keyboards.
- Rotary. A rotary mechanism is used to close the contacts. They come in a variety of designs and are more expensive than usual.
Taking into account installation, crossbars are divided into:
- Invoices. Installation is carried out on top of the wall; it does not require creating a recess in the wall to install the block. If finishing the room is not planned, then this option is ideal. But such models are not reliable enough, because they are susceptible to external factors;
- Built-in. Installed in the wall, suitable for wiring work in all types of buildings. A hole in the wall is pre-prepared to the size of the switch box.
Passage
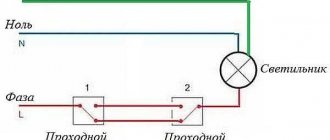
Pass-through switch circuit
In a pass-through switch, unlike the classic model, three contacts and a mechanism are built in that combines their operation. The main advantage of the product is the ability to turn it on or off from two, three or more points. The second name for such a switch is “changeover” or “redundant”.
The design of a pass-through switch with two keys resembles two single-key switches independent of each other, but with six contacts. Externally, a walk-through switch cannot be distinguished from a regular switch if not for a special designation on it.
Connection diagram for the pass-through switch wires in the distribution box
Circuit without grounding conductor. Now the most important thing is to correctly assemble the circuit in the junction box. Four 3-core cables should go into it:
- power cable from lighting circuit breaker
- cable to switch No. 1
- cable to switch No. 2
- cable for lamp or chandelier
When connecting wires, it is most convenient to orient them by color. If you use a three-core VVG cable, then it has two most common color markings:
- white (gray) – phase
- blue – zero
- yellow green – earth
or second option:
- White gray)
- brown
- black
To choose a more correct phasing in the second case, follow the tips from the article “Color marking of wires. GOSTs and rules.”
- The assembly begins with neutral conductors. Connect the neutral conductor from the cable of the input machine and the neutral going to the lamp at one point using the terminals of the car.
- Next, you need to connect all the grounding conductors, if you have a grounding conductor. Similar to the neutral wires, you combine the “ground” from the input cable with the “ground” of the outgoing cable for lighting.
This wire is connected to the lamp body. - All that remains is to connect the phase conductors correctly and without errors. The phase from the input cable must be connected to the phase of the outgoing wire to the common terminal of the pass-through switch No. 1.
And connect the common wire from pass-through switch No. 2 with a separate wago clamp to the phase conductor of the lighting cable.
Having completed all these connections, all that remains is to connect the secondary (outgoing) conductors from switch No. 1 and No. 2 to each other. And it doesn’t matter at all how you connect them.
You can even mix up the colors. But it’s better to stick to the colors so as not to get confused in the future. At this point, you can consider the circuit fully assembled, apply voltage and check the lighting.
12-1107-01 ERA Triple switch, 10AX-250V, IP20, Era12, white
We deliver throughout Minsk
Various payment methods
They will pleasantly surprise you!
All products are certified
- Description
- Characteristics
- Reviews 0
- Question - Answer 0
Triple switch, 10AX-250V, Era12, white
Contact group material
Brass, silver alloy
Material
Brass, silver alloy
Service life or expiration date
Terminal type
| vendor code | 12-1107-01 |
| Type of installation | hidden |
| Height | 75 |
| Warranty period, months | 24 |
| Guarantee | 2 years |
| Number of cables connected to the terminal | 2 |
| Number of keys | 3 |
| Multiplicity of packaging | 10 |
| Main material | Polycarbonate |
| Model | 12-1107-01 |
| Rated voltage of household network, V | 250 |
| Rated current, A | 10 |
| Backlight | No |
| Series | Era 12 |
| EAC Certificate of Conformity | + |
| Shell protection degree | 20 |
| Country of Origin | China |
| Product type | Switch |
| Storage conditions | Dry room |
| Color | white |
| Current frequency, Hz | 50/60 |
| Width, mm | 75 |
So far there have been no questions.
- Information
- Shipping and payment
- Guarantee
- Contacts
- Privacy Policy
- Stock
- Office hours
Mon-Thu: from 09:00 to 18:00
Fri: from 09:00 to 17:00
Saturday: closed Sunday: closed
Our company offers a wide range of electrical goods and lighting equipment.
We work with both wholesale and retail customers. We also offer our clients such services as the supply of equipment to order.
We look forward to collaborating. We value every client!
Design and features of pass-through switches
The external pass-through device does not differ from the standard one. The difference can only be noticed when examining the product from below - manufacturers apply triangles on the body, directed horizontally downwards. The second difference is 3 terminals with copper contacts. One is located on top, and two are located below. Also, the pass-through device is switched through a three-core VVG-ng or NYM cable with a cross-section of 1.5 mm².
Depending on the number of buttons, there are two-key, one-key and three-key modifications.
The difference between a pass-through and a regular switch.
In comparison with classic two-pole models, you need to connect the adapter according to the following principle:
- serial connection of switches;
- the phase does not open, but switches to the second line;
- There are more output contacts than input contacts.
The paired poles of the switches are located opposite each other.
Nuances of choice
Before purchasing a pass-through switch, you need to consider:
- Mounting method depends on the type of wiring. Overlays are installed on the surface using self-tapping dowels. Built-in - in socket boxes on spacer legs.
- Degree of protection - models with IP03 are suitable for a bedroom or corridor, for a bathroom - with IP04-IP05, for the street - with IP55.
- Type of contact terminals. Screws with pressure plates are reliable. Screwless spring ones are easier to install.
- Terminal markings - N (zero), L (phase) and ground (ground) are used. The letters I and O indicate the position of the buttons when turned on and off.
According to the type of control, the adapters can be keyboard, touch, or with remote control.
Connecting a pass-through switch
First of all, you need to correctly connect the switch itself in the socket box. Remove the key and the overhead frames.
When disassembled, you can easily see the three contact terminals.
The most important thing is to find the common one. On high-quality products, a diagram should be drawn on the reverse side. If you understand them, you can easily navigate through it.
If you have a budget model, or any electrical circuits are a bit of a mystery to you, then an ordinary Chinese tester in circuit continuity mode, or an indicator screwdriver with a battery, will come to the rescue.
Using the tester's probes, alternately touch all the contacts and look for the one on which the tester will “squeak” or show “0” at any position of the ON or OFF key. It's even easier to do this with an indicator screwdriver.
After you have found the common terminal, you need to connect the phase from the power cable to it. Connect the remaining two wires to the remaining terminals.
Moreover, which one goes where does not make a significant difference. The switch is assembled and secured in the socket box.
Do the same operation with the second switch:
- look for the common terminal
- connect the phase conductor to it, which will go to the light bulb
- connect two other wires to the remaining ones
Era / Two-key switch hidden installation mechanism 10A 250V Era 12 white 12-1104-01
Article: Art: 10990073
Product does not ship to your region
Product out of stock Selected size is out of stock
Your savings 74 ₽
0 && priceSummary()^priceWithCouponAndDiscount Min. amount to order this product?
All sizes
Added to favorites
The e-book will be available for download in your Personal Account immediately after purchase
- Free shipping
- Fitting
- 21 days for return
- Free lift to the floor
Reason for markdown
Compound
Description
2-key switch series Era 12 hidden installation mechanism white color 12-1104-01. Ratings 10A 250V. Made of polycarbonate, equipped with automatic clamps for quick and reliable fixation of cable cores in the mechanism. Pair terminals provide daisy chain connection. Installation in the socket box is carried out using both claws and screws. Frames are purchased separately. Frames Era 12: 1 post 12-5001-xx, 2 posts 12-5002-xx, 3 posts 12-5003-xx, 4 posts 12-5004-xx, 5 posts 12-5005-xx. Frames Era 12 Satin: 1 post 12-5101-xx, 2 posts 12-5102-xx, 3 posts 12-5103-xx, 4 posts 12-5104-xx, 5 posts - 12-5105-xx (xx is color code : 01-white, 02-ivory, 03-aluminum, 04-champagne, 05-anthracite, 06-black, 07-alder (bleached oak-satin), 08-cherry, 09-oak, 10-wenge, 11- pine, 21-yellow, 22-orange, 23-red, 24-ochre, 25-bordeaux, 26-lime, 27-green, 28-blue, 29-blue). You can find other devices by searching for Era 12. More information on the website www.eraworld.ru.
Changeover switches - lighting control circuit from 3 places
But what if you want to control one lighting from three or more points. That is, there will be 3, 4, etc. switches in the circuit. It would seem that you need to take another pass-through switch and that’s it.
However, a switch with three terminals will no longer work here. Since there will be four connected wires in the junction box.
Here a changeover switch, or as it is also called a cross, cross, or intermediate switch, will come to your aid. Its key difference is that it has four exits - two from below and two from above.
And it is installed precisely in the gap between two passageways. Find in the junction box two secondary (not main) wires from the first and second pass-through switch.
Comments:
Igor
Whatever one may say, three keys in one regular place is too much. Inconvenient to use, inconvenient to connect. One big inconvenience
Kolyan
Igor, I agree. Such a switch can only be used as a temporary measure, and even then I can’t imagine cases where it might be needed. Chandelier with 7 lights? Or when?
Oleg
Someone uses them, since they are sold. And the article is good. Everything is explained clearly and in detail what is connected and why and how to use it. And chandeliers with 7 lamps are really a thing of the past...
Uri
Is it possible to connect a switch with a socket in the same housing so that when you press one of the keys, the electricity supply to the socket is turned off?
Kolyan
Uri, no, if everything is done in one case, then everything is already wired there. Needs to be soldered.
Igor
Uri, it is not advisable to do this, especially if you are going to connect a powerful consumer to the outlet. for example a water heater. The switch is not designed for such a load and will soon fail
Mikhalych
Where to use? My hallway turns into an L-shaped corridor and there are two lamps (in the hallway and corridor). Everything is turned on with one switch, and the third switch connects the diode to the lamp in the corridor. All lamps are LED (homemade), so turning them on via a diode makes a wonderful night light in a crooked corridor at night.
Leave a comment Cancel reply
An outdoor waterproof socket is an important attribute of your site
How to connect a Lezard pass-through switch and what circuit to use.
Retro sockets - design element or functional detail?
DIY triple socket installation. How to carry out the work.
Application of the scheme
In long corridors, pass-through switches are often used. Pass-through models are designed for the convenience of supplying or removing voltage from lighting fixtures from different ends of the room. Most often this scheme is used:
- In a long corridor with exits from different rooms. One switch is placed at the exit, a second one in the middle, and a third one at the end.
- In the courtyards of country and private houses, dachas. Switching devices are installed at the exit from the house and outbuildings.
- In three-story apartment buildings. A device is placed on the ground floor to turn it on. You can turn off the lighting on the second and third floors.
- In a children's room with several beds. The solution provides for one device at the entrance and two next to the sleeping areas.
- Flights of stairs and landings of cottages outside the city. One device is mounted at the beginning of the stairs, switching off is carried out from the second floor or near the attic.
By using a pass-through switch, energy savings are ensured.
Safety Tips
The power supply is turned off on the panel when operating any lighting devices.
- Use an indicator screwdriver to check the presence of current in the network.
- If the panel is on the landing, post a notice that work is underway and before manipulating the wire, check for the presence of current.
- Wear protective insulated gloves that will protect against electric shock.
- When chipping, protective clothing is used.
Pass-through and cross models are the best solution for organizing lighting in the house. A thoughtful and well-planned layout will ensure maximum comfort in the house. When choosing such devices, you should not save on existing models. Adjusting the light from several independent points means comfort and energy savings. Moreover, such devices will work longer than any motion sensors and cotton switches.
Disadvantages of pass-through switches
One of the disadvantages of walk-through switches is the need to drill walls under them. Organizing a power line with a pass-through switch has several disadvantages:
- time and effort spent on wall slitting for hidden wiring;
- the need to connect the remote control via a regular key for models with motion sensors;
- unprofitability for an apartment due to cable grooves and installation of a DIN rail;
- difficulties with identifying terminals;
- lack of clarity of the “ON” and “OFF” positions.
Experts note that the devices are more suitable for country cottages, dachas, and the private sector than for an apartment.
A pass-through switch is convenient to use in rooms with several groups of lighting fixtures. The device provides comfortable light control and safe movement of people. Currently, the pass-through light switch circuit, controlled from three places, is not tied to the layout of a residential property.
Modular LED lighting systems era: installation and use in the home
Modern people have many options when it comes to creating lighting in their home. The lighting system can include a wide variety of lamps. One good option is modular lighting systems.
Of all the variety that is presented on the lighting market today, LED products from ERA are very popular. Such lamps will be an excellent replacement for LED strip and can be installed in the same places as it. Our article will tell you what features are inherent in ERA modular systems.
Features of the models
The LED modular system is a design consisting of linear LED modules/luminaires. All components are connected to each other using special connections.
Note! The connection of lamps can be carried out at different angles. As a result, you can create a variety of geometric shapes on the wall or ceiling, creating your own unique illumination.
All modular lighting systems, including ERA products, consist of the following parts:
- lamps;
- connecting elements;
- end caps;
- pendants;
- power kit.
All these components are needed so that the LED lighting system can function normally wherever it is installed, and also be convenient for turning on/off and controlling the light.
Product Description
The modular LED lighting system of the ERA LM series for turning on/off and controlling the light is made from a high-quality aluminum housing. The LED part of the lamp is covered with a lampshade, which is made of transparent plastic. This structure prevents moisture and various types of pollution from entering the lighting fixture. Thanks to this, the ERA system can be used even in the kitchen, for example, to control additional lighting on the work surface of the countertop.
The ERA system, designed to control light, can be made in two versions:
- corner profile. It is used to mount the lamp on a flat surface or at an angle;
- flat profile. For use on flat surfaces only.
In addition, the ERA system, which is sold in a hermetically sealed blister, contains the following additional components in its design:
- power supply 9 W;
Note! This element is not included in the set of modular structures of the brands LM-8-840-A1-addl, LM-5-840-A1-addl, LM-8-840-C1-addl and LM-5-840-C1-addl.
- double sided tape;
- screws;
- connecting wire. With its help, additional modules can be connected to the structure at different angles;
- protective plugs. They are installed in the places where the screws are attached;
- a connecting connector that has two plugs. Used to create a strip of sequential lighting fixtures. This gives the impression that there is one lamp installed on the ceiling or wall, and not a whole structure of several lamps.
Connection errors
Many people make a mistake at the stage of searching and connecting the common terminal in the pass-through switch. Without checking the circuit, they naively believe that the common terminal is the one with only one contact.
They assemble a circuit in this way, and then for some reason the switches do not work correctly (they depend on each other).
Remember that on different switches the common contact can be anywhere!
And it is best to call it, what is called “live”, with a tester or an indicator screwdriver.
Most often, this problem is encountered when installing or replacing pass-through switches from different companies. If everything worked before, but after replacing one circuit the circuit stopped working, it means the wires were mixed up. But there may also be an option that the new switch is not pass-through at all. Also remember that the lighting inside the product cannot in any way affect the switching principle itself.
Another common mistake is incorrectly connecting crossovers. When both wires are placed from pass-through No. 1 to the upper contacts, and from No. 2 to the lower ones. Meanwhile, the cross switch has a completely different circuit and switching mechanism. And you need to connect the wires crosswise.
How to formulate a question correctly
Don't make flowery sentences. The simpler the question sounds, the more accurate the answer of the Book of Changes.
When you ask when something will happen, you risk getting a vague answer. The Book has no concept of time intervals. The result of fortune telling will be a description of events depending on the steps taken.
Don't ask questions about the future. Formulate it in such a way as to find out how to turn the situation in the right direction.
- what will happen if I do...
- what to do to...
- Should I do the following...
- what will help solve the problem...
- what is the situation leading to...
- what should I do in a situation...
- how to deal with...
- what should I do for my relationship with...
After awakening, ask the Book of Changes for advice for the coming day. Don't ask more than 3 times about the same situation. The book will not give the answer you are looking for. Let things go, perhaps the time for significant events has not come.
Example of lighting operation
- When you turn on key No. 1, the lamp lights up, electricity flows through the phase wire and is indicated by the letter L, and the flow of current is shown by the red line.
- Press the key back and the light goes out.
- We switch the adapter disconnector, the lamp lights up.
- Press the key again and the lamp turns off.
- When device No. 3 is turned on, the lamp lights up.
- Pressing again turns off the lamp.
Recommendation: if it is necessary to increase the number of control points for the luminaire, add the desired number of cross switches between the staircase switches.
Necessary equipment and materials
- Switches
- Mounting box
- Electrical insulating tape
- Terminals
- Phillips and regular screwdrivers
- Installation knife
- Side cutters
- Pliers
- Wrenches
- Electric cable
If the room has already been wired and you need to install redundant switches, then you need to make grooves or open installation of cables. In order to make grooves you will need a hammer drill and a wall chaser. You also need alabaster. He will secure the corrugated pipe. In case of open installation, a distribution box is required; it is attached to the wall using a corrugated pipe.
Step-by-step installation instructions
- Disconnect power to the room.
- Determine where the wires are so as not to damage them.
- Designate the future location of the junction box.
- Install the mounting box.
- Laying electrical cables. It is better to take a 3 or 4 core cable. For changeover devices, a three-wire cable is required. Using one core, a phase supply or a lamp will be connected. Two cores are connected to intermediate wires. For a crossover device, you need a four-core cable - two wires for each switch. Two will lead to the first, and the remaining two will lead to the second.
The ends of all cables are led into the installation box and connected with terminals. And the zero goes to the lamp. To equip a pass-through switch with control from 3 places, you must have skills and an accurate connection diagram. Its presence makes it possible to install a correct and high-quality lighting system. And on its basis you can easily create more complex illumination schemes.
Advantages
From installing such a triple switch you will receive the following advantages:
- Externally, one switch with three keys looks more compact and more aesthetically pleasing than three single ones.
- Laying electrical wires to the connection point will be less expensive in terms of labor and money.
- You will need to make one technological niche in the wall for the mounting box instead of three.
- Economic effect. For example, if your chandelier has 3-4 light bulbs, then turning on a single-key switch ensures that all of them work at once, while consuming maximum electricity. But such illumination is not always necessary; dim light is sufficient. If you install a 3-key household switch for such a chandelier, then, if necessary, one or two lamps are turned on, thereby saving almost half of the electricity.