Connecting a backlit mirror is not difficult if you understand the design features. There are different lighting options, you need to know the details in order to carry out the work correctly. In addition, it is worth studying the installation instructions, which always come with the product.
Illumination makes the mirror original.
Features and Benefits
Illumination devices produce bright, diffused light, directing it not at the surface of the mirror, but at the space in front of it.
The number and location of light sources are determined taking into account the characteristics of the room and the purpose of the mirror. The use of local mirror illumination provides the following advantages:
- Light elements are distributed along the perimeter of the reflective sheet, illuminating the space in front of it evenly.
- Strict directionality of light sources eliminates glare.
- The lamps sum up the luminous flux and produce bright light.
- Lighting devices with natural color rendering provide an analogue of daylight.
- Frosted diffusers eliminate glare effects.
A backlit mirror does not distort the reflection with shadows or unnatural shades, but shows the real appearance of a person.
For the corridor
If you need to illuminate a mirror that is placed in the corridor, you don’t need to invent anything special: the best solution is wall sconces. Installation of these lighting devices is carried out according to the standard scheme.
This number of sconces is quite enough to illuminate the mirror in the hallway
As for their location, a completely acceptable option is on the sides or on top. Depends on how much space there is on each side.
Procedure:
- Turn off the machines on the dashboard.
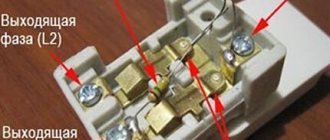
- Stretch the wires if there are none. Before starting work, check where the phase is and where the zero is.
- Draw conclusions for mounting each lighting fixture.
- Mark their location on the wall.
- Hang the sconce and connect it to de-energized wires.
- Screw in the light bulbs.
- Turn on the machines on the dashboard.
- Check functionality.
- Enjoy using it.
Play of light in mirror surfaces and sconce elements
This is interesting: Popular types of milkweed (video)
Wall mounting methods
The main requirement for fastening is strength. Massive metal and wooden frames weigh the most, so their fixation should be approached with special responsibility. Before you make a backlit mirror with your own hands, you need to keep the following in mind:
- Special holders, construction adhesive, liquid nails and mounting tape are only suitable for products with LED backlighting and a plastic frame.
- If the mirror is particularly heavy and large, the ideal option is mounting plates with holes into which screws are screwed.
- One of the most reliable methods of fixation is using a dowel: it is fixed in the wall, and loops are installed for hanging.
- If the floors in the house are concrete, you will need an electric drill to drill holes.
Design and types of mirrors, how to make a product with your own hands
As for the make-up model, there are no problems with fastening at all. This type of mirror is usually portable and small in size. It is placed on the table at which a woman applies makeup and combs her hair, in any room
If you need to rearrange the furniture, the glass in the frame, along with the shelves for toiletries, is carefully removed and then placed in a new place in the apartment. This is very convenient, especially when moving
To make a backlit mirror more stable with your own hands (especially if the floor in the room is uneven), you should install a small wooden plank at the top of the back side of the base. It serves as a spacer that protects the interior item from falling and swinging. For safety reasons, if the glass is in a child's room, it is preferable to use wall mounts. The product in the frame is slightly tilted. The fittings are placed at a height of approximately 15 cm. They are screwed into the concrete using dowel nails.
If the master decides to use construction dowels to fix the mirrors with his own hands, he will additionally need small oval (round) plastic spacers and metal brackets. Screws must have flat heads. This fixation scheme is convenient and durable, with increased resistance to vibrations. It is ideal for thick, massive concrete walls.
The substrate must support the weight of the mirror. Most often it is made from plywood or chipboard. This material does not look very attractive, but is durable and therefore ideal for backdrops.
Construction adhesive, liquid nails and mounting tape can only be used for products with a plastic frame.
Large, heavy mirrors are secured with special plates with holes that are fixed with self-tapping screws
One of the most reliable methods of fixation is using a dowel fixed in the wall
If your house has concrete walls, you will need an electric drill to drill the holes.
A dressing room mirror is usually portable and small in size; if necessary, it can be installed in any room
How to properly install a mirror surface
Installation of a mirror or mirror cabinet begins with markings. First, determine the place where the interior item will hang. If the purpose is utilitarian, pay attention to the height. It must satisfy the requirements of all family members.
Installation steps:
- the product is applied to the wall, markings are applied around the perimeter;
- holes are drilled at the fastening points;
- insert dowels;
- screw in the screws;
- hang a cabinet (mirror).
Rules for connecting a cabinet with lighting in the bathroom
When figuring out how to connect lighting in a bathroom cabinet, take note of the following rules:
- All distribution boxes are placed outside the bathroom;
- Any connection is made with a whole piece of cable from the box to the device. Even well-insulated strands can cause breakdowns;
- The cables in the switchboard are installed on RCDs or automatic DIFs. These are devices for breaking the circuit when leaks are detected. This way you are guaranteed not to get an electric shock;
- To connect, use only cables with three cores. The third will go to grounding. If the wiring is old (with two wires), then you will have to lay an additional ground wire;
- Each device from the washing machine to the outlet has its own cable;
- When attaching the cable over the wall, “dress” it in a soft corrugation;
- Sockets must not be placed close to the floor. Condensation regularly accumulates along the bottom of the walls. This arrangement of the outlet is fraught with serious troubles. In Soviet times, such an element was generally prohibited from being placed in the bathroom.
Source
Types of backlight
Bathroom mirror lighting can be external or internal (built-in). Let's consider both types.
External lighting consists of one or more lamps that are built into the mirror frame, or fixed to it from above or to the side using special brackets. The result is scattered light. For lighting, it is better to choose white lamps, since colored lamps may interfere with certain procedures (for example, applying makeup). It is also not recommended to take lamps that are too large, as they create unnecessary shadows.
Built-in or internal lighting are lamps that are installed on the back of the mirror. Such lighting can be located on the side, on top or along the entire perimeter. Aluminum profiles of golden or silver color are often used for framing. The profiles allow you to hide the cable, which makes the bathroom mirror more aesthetically pleasing and makes the use of lighting safer.
Which type is best to choose depends on the interior of the bathroom and the personal preferences of the owner.
How to make lighting yourself?
A dressing room mirror with light bulbs is not too difficult to make with your own hands. For this we need:
- a screwdriver or a not too powerful hand drill with an adjustable speed;
- electric jigsaw. In principle, a small circular saw can replace it;
- flat and Phillips screwdrivers;
- self-tapping screws or self-tapping screws;
- ruler and tape measure;
- metal corners;
- universal glue;
- electrical equipment: wires, light bulbs, sockets;
- plywood, the thickness of which should be at least 10 mm. Instead, you can use a treated board - it can be thicker, for example 15-18 mm;
- the mirror itself. You don’t have to buy it, you can find a suitable “donor”.
To make a dressing room mirror, it is necessary to perform a certain sequence of work:
- According to the size of the mirror glass, a frame is assembled from a board or plywood on which all the parts will be installed. The end parts of the frame are sawn at an angle of 45 degrees and connected to each other using metal corners, glue and self-tapping screws. If the screws are longer compared to the thickness of the plywood, then the parts protruding from the other side should be cut down using a grinder or other similar tool at hand. As a result, the mirror should fit freely into this frame, and there should be enough space around the edges for the subsequent installation of light bulbs.
- Holes are drilled in the side parts of the frame, the diameter of which must match the dimensions of the cartridges. They are inserted into the frame and secured with special glue.
- Now they take any decorative material such as laminated chipboard or MDF. Exactly the same frame is assembled from it to hide the wires and cartridges under it. The mirror needs to be fixed in the main frame. To do this, you need to use special fasteners.
- Next we deal with the electrical part of the structure. The cartridges are connected to each other using wires, the connection is made parallel. With a serial connection, if at least one bulb burns out, not all of them will light up, and finding a burnt-out element to replace will not be so easy. When all the elements are connected to each other in the correct order, they are connected to the power cord and brought outside the mirror.
- At the last stage, they check how correctly the entire structure works. To do this, all the light bulbs are installed in their places. If everything turned out well, the back wall, which will not have a very neat appearance, can be covered with a regular sheet of plywood. That's it, our illuminated makeup mirror is ready.
Visually, such a design will make the room more spacious and attractive. The room will look new. In principle, such a mirror with light bulbs around the perimeter will fit well into any room, but most often it is installed either in the bathroom or in the hallway.
Common Mistakes
Beginners who independently install illuminated mirror structures often make the same mistakes.
- The mirror is not placed correctly. The height from the floor surface should not be less than 0.3 m, and from the ceiling less than 17 cm.
- The wires are not insulated. All contacts must be protected from moisture, and the material used to make shelves and cabinets must have water-repellent properties.
- Halogen lamps are touched or shaken. Installation of this type of light sources must be carried out in compliance with all technical requirements.
If you have minimal experience in installing mirrors and knowledge of basic electrical installations, you should turn to the services of professionals.
DIY installation and connection
You can only use the bathroom calmly and safely if the lighting fixtures are installed correctly. The electrical wire that will be used during installation must be moisture-resistant, double insulated and must be grounded. To install the mirror, make marks, drill holes with a drill, screw in self-tapping screws and hang it on the wall.
Then the backlight and grounding are connected, everything is checked. If there is a shelf or cabinet, they are installed last. Installing a diode lamp on a mirror is performed as follows:
- Purchase a waterproof RGB LED strip. If the length is more than five meters, it is necessary to prepare connectors for connection.
- It is glued to the selected surface, previously degreased with alcohol. If the glue does not hold, then the material can be glued directly to the tile under the mirror.
- The backlight is connected according to the following scheme: LED - controller - power supply - 220 volt network.
- The finished kit is turned on and its readiness for operation is checked.
This work takes only an hour. In conclusion, it is worth pointing out such an important detail as the device switch. Today, preference is given to touch sensors that turn on the lighting fixture with one touch or movement of the hand. Remote controls are used mainly in backlights with various types of glow.
We bought a mirror with lighting and a cabinet. There is an open shelf, we put perfumes, shampoos, and various small things there. Very interesting design, socket on the side
When we turn on the light, it’s just like in the boudoir of an important lady. One thing they didn’t calculate was that they hung it too low, the splashes get on the mirror, and the manufacturers could have made some kind of protection, because if I hang it higher, I simply can’t reach it
And so all is well.
I finally bought myself a mirror with light and at a good price. I’m very glad, because now it’s easier for me to apply makeup and massage my face. There is a switch button on the frame. From the outside everything looks nice. True, I wished it was a little bigger. But nothing, everything is great as it is. There is a protective film on the back side, and if the device breaks, the fragments will not fly away, and it is impossible to get hurt. There is also no lead in the glass. In any case, I'm happy.
Wiring Requirements
To ensure high-quality installation and the design to serve you for many years, follow a number of simple rules:
- The equipment must be connected only in compliance with fire safety standards and safety regulations.
- Electrical products should be installed as far as possible from water.
- Before starting the installation process, find a suitable place in advance where you can hide the wiring.
- When mounting a mirror on a wall, be sure to leave a gap for air circulation. It must be at least 60 mm. If the size of the reflective surface is more than 1 meter, the gap should be at least 1-1.5 cm.
What lamp power to choose
There are no clear requirements in this regard; it is important to provide light that will provide good visibility, but will not dazzle or create visual discomfort. Typically, for small structures the norm is a lamp power of 3.5 W, and for larger options - 5 W
Light sources are most often selected within these limits.
As for the LED strip, you should use only single-color options; they provide better quality light. Choose products with the number of diodes per linear meter of 60 or more, this is the only way to achieve a good result.
Examples of placement of LEDs with different densities and number of rows.
To avoid changing light bulbs, you should use a little trick. For illumination, install LED lamps or strips and equip the system with a dimmer - it allows you to adjust the brightness. In this case, setting up the light is easy, since it can be controlled in real time.
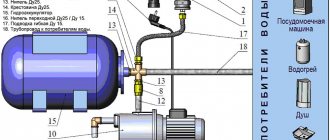
power unit
LED strips require a separate power supply. They are connected to their own power supply, which converts alternating mains voltage 220 V 50 Hz into direct current 12 V. The choice of power supply is made according to the power indicator of the tape.
Here you will have to make some calculation - the power per linear meter (indicated in the technical specifications) should be multiplied by the total length. The power supply is selected with a margin of 15-25%, but not more than 50%, so as not to overload the LEDs. This is dangerous for them and can put them out of action ahead of time.
How to install an illuminated mirror in the bathroom - work order and nuances
The procedure and specifics for connecting mirrored cabinets and illuminated shelves depends on the type of lighting fixtures used in assembling the device. If the presence of lighting fixtures is provided by the manufacturer, you will not need a wiring diagram for the bathroom mirror lighting. You just need to follow the instructions included in the product packaging.
In the case of independent actions to supply a piece of furniture with lighting, you will have to work hard, but even this is quite within the capabilities of an attentive person who likes to make things for the home with his own hands.
Glowing cord or LED strip with electrical connection
If the backlight is already provided in the model, then all contacts and existing elements are protected from moisture. If you are installing your own mirror lighting, you should take care of this in advance. When installing with your own hands, ordinary tape is often used - it holds the LED strip well. But it is better to use self-adhesive models to avoid peeling under the influence of moisture.
To connect an LED strip or lighting cord to a 220 V power source, you will need a special unit that adapts the voltage and other indicators for adequate operation of light-emitting semiconductors. If you connect directly without a transformer, the LEDs will not withstand the voltage and will fail. If you do everything in accordance with the manufacturer’s recommendations, LED lamps will last much longer than fluorescent light sources or conventional incandescent lamps. The service life of semiconductor devices is 50 thousand hours or more.
Options for connecting the mirror directly and without a transformer
Battery-powered LED lights
Battery-powered LED lights
One of the simplest options in terms of connection. The manufacturer has already done everything for you; you just need to install the LED-illuminated mirror in place and insert the batteries into the compartment intended for them.
Among the rules are only the basic provisions for working with battery-powered devices:
- do not use batteries of different capacities in the same compartment;
- do not try to restore the functionality of batteries by heating, shock, etc.;
- Place only batteries with the parameters specified by the manufacturer in the compartment.
All electrical wiring is already installed in the correct places, the lights will receive power as soon as the batteries are inserted and the power button is pressed. The LEDs themselves are a very advantageous option. Low power consumption, long service life and the ability to connect dimmers to a network are attractive aspects of devices based on light-emitting semiconductors. But battery-powered lighting is an intermediate solution, more suitable for decorative purposes or orientation lighting at night. If you need a more intense luminous flux rather than illumination, it is better to choose options powered from the mains.
Mains powered lamp
Fluorescent lamps
Fluorescent lamps
A feature of the wiring diagram for a backlit mirror in a bathroom when using fluorescent lamps is the presence of a starter in the circuit. This device directly affects the operation and service life of the lamps. Otherwise, it’s no more difficult than connecting conventional incandescent lamps.
Today, such lamps have become less popular due to the advent of a new generation of LED lamps, but they still find their consumers. The bright neon light, trouble-free operation for many years, resistance to power surges and the presence of UV rays in the light stream of such a lamp make it quite popular even now, when there are alternatives.
This light source is quite easy to make yourself. Ready-made lamps of various sizes, designs and lighting intensity are sold in specialized stores; you can buy them at a more than affordable price. You can also find starters there. You just need to install it in the right place and the backlight is ready. But it is worth remembering that the glow of fluorescent lamps is quite bright and has a pulsating effect, so it is better to hide the light source behind a diffuser - frosted glass.
How to connect a backlit mirror from lamps of this type can be read in the instructions for the lighting device or finished product.
In general, installing mirrors is not the most difficult operation in decorating a bathroom. If you do everything according to the recommendations of the furniture manufacturer and be careful, the result will definitely be worthy.
Types of lamps
For mirror products in bathrooms, they most often use:
Spots (rotating lamps with the ability to adjust the direction of light)
LED strips, cords
Point light sources built into the design of shelves or cabinets
Elongated fluorescent lamps
The type of lamp sets the tone of the overall composition and is directly involved in the design, but the functional side of the issue cannot be ignored. One of the most convenient options is a combination of several spots (from 2 to 8) located on the sides and a contour LED cord. The soft light of semiconductor sources is sufficient to illuminate the product itself and creates a pleasant, dim lighting in the bathroom. Spots allow you to direct a bright beam in the desired direction.
Whatever type of lighting you choose, installing an illuminated mirror in the bathroom will be easier if you buy a completely finished product that only requires installation of the structure and connection to an electrical source. An independent backlight device will require at least minimal skills in electrical installation.
Illuminated mirror Monaco from Alavann
How to properly place lamps on a mirror
The lamps on the mirror can be positioned differently based on the function they should serve. For example, when shaving, doing hair styling or applying makeup, the lighting should be frontal.
Illuminated mirrors provide good visibility of a person's reflection in the mirror, which will reduce eye strain.
If the lamps are located above the mirror, this option will save space. Positioning on the sides will provide natural light. The brightness emanating from LEDs reduces eye strain, as there is no need to peer into your reflection to carefully examine it. The light should not blind a person, but at the same time it must illuminate the working surface well.
The backlight is not intended to sharpen the image, but to convey it qualitatively and eliminate blur.
When arranging lamps, it is worth considering the shape and size of the mirror surface:
- If it is small in size, then a pair of sconces is perfect. Their location must be symmetrical relative to the frame of the product. They are able to highlight the contours of the face and eliminate possible shadows.
- If you have a wide surface, it is advised to opt for several lamps located a couple of meters from the floor. They can be wall-mounted or hanging from the ceiling.
- On a medium-sized mirror, it is best to place light bulbs around the perimeter of its frame. If a fluorescent option is used, the lamp should be located in the top center.
Backlight options
Lighting can be internal, external and decorative.
Outdoor
Can be used:
- Separate remote lamps.
- Small sconces that eliminate harsh shadows on the face.
- Point mounted sources. This option well illuminates not only the mirror and what is reflected in it, but also the room.
Internal
In this case, the LED strip is built directly into the surface of the mirror. On top, in order to ensure dispersion, it is covered with white frosted glass. As a result, the lighting and mirror look like one. LED modules can be located on the sides, on top of the contour or along the perimeter of the mirror. The location is determined by the dimensions of the reflective surface. In some cases, the backlight is framed with an aluminum profile coated with gold or silver. This makes it possible to hide parts of the wiring and give the product completeness.
Decorative
The tape can be attached both to the mirror and to the wall where it is located. Minimum power LEDs are used here. Sometimes multi-colored ribbons are used, but in this case caution is important, as they can distort the image. The backlight can be supplemented with heating. In this case, films with an infrared heater are used.
Illuminated mirrors in the bathroom - 50 photo ideas:
How to fix a mirror in the house with your own hands
A mirror is a mysterious object. It seems that it reads thoughts, evaluates actions. Mystical properties are attributed to him. It is not recommended to look at it when you are in a bad mood or during illness. Quite a lot...
How to cut a mirror at home
Sometimes you want to buy a mirror of some intricate shape, but it is quite difficult to find non-standard items in stores. Of course, you can use the help of a specialist, but...
Mirror-sun: the advantages of creating a product with your own hands
The sun mirror has not lost its decorative function among its counterparts, despite the fact that this design was popular back in the fifteenth century. This is an excellent decoration for an interior in baroque, eclectic style...
How to glue a mirror to a cabinet door yourself
There comes a time when the usual surroundings become boring. I want to change something, update the old interior, add some detail or make a good repair. The best way to update a room is…
Mirror reflection of our desires in the bedroom
When thinking through the design of a room for rest and sleep, designers prefer to visually expand the spatial perception of the room and give it solemnity. A beautifully designed mirror in a general style…
Is it possible to hang a mirror opposite the front door?
A mirror is a distinctive part of any interior. Without it, we cannot imagine modern busy life. We approach him several times every day. With its help you can visually enlarge…
Choosing a bathroom mirror
A mirror in the bathroom is definitely necessary. Men must use a mirror when shaving. Women often use the bathroom not only for hygiene procedures, but also for grooming. In the bathroom, cosmetics are applied and washed off, healing masks are applied, and self-massage is performed. All these actions are performed, as a rule, in front of a mirror. Therefore, the mirror in the bathroom should be large enough, well lit, and conveniently located.
Depending on the intended use, you should select the size of the mirror. The main parameter in this case is the length of the mirror plate.
The appropriate length will help to get the reflection:
- to the chest line - 40 cm;
- to the waist line - 60 cm;
- to the line of the kneecaps - 120 cm.
A small round mirror usually allows you to see the reflection of only the face and neck.
A mirror is an important decorative element. Its shape should emphasize the overall line of the interior. The size of the mirror should correspond to the dimensions of the bathroom. A small round mirror in a large hygienic room will simply be lost as a decorative element. A huge mirror in a small room will look bulky. A correctly selected mirror will help visually expand a small bathroom and emphasize the advantages of its layout and decoration.
Taking into account these points, the lighting for the mirror is also selected. If it is intended to be used only for decorating the bathroom and general inspection, you can use the built-in or located behind the mirror plate backlight. Lighting above the mirror in the bathroom will help you get a clear reflection, for example, while applying cosmetics, and will serve as an additional source of light. It needs to be placed so that the lighting area includes not only the mirror itself, but also the mirror area: shelves, table, sink.
Soul Spheres
In most cases, the primary color of the aura reveals sufficient information about a person. Although, it happens - in general, a spiritual person, at a moment of emotional excitement, is able to actively produce hot shades, which will be perceived by a clairvoyant as the predominant tone of the subtle structure.
On the other hand, there are also negative aspects of every color vibration. For example, blue in a negative manifestation reduces tone, suppresses emotions, puts you to sleep, and plunges you into despondency and melancholy. Therefore, its presence in excess in a person’s aura can reflect not so much the height of thoughts as sadness and detachment.
To this end, for deeper information, practitioners turn to different levels of the energy cocoon, obtaining a separate picture for each layer: physical, emotional, mental and spiritual.
And completely different color emissions will be considered normal for each of these spheres. At the same time, the vision of the aura will acquire a more detailed character: in addition to the main color that characterizes the state at the moment, other vibrations will appear before the inner gaze, revealing the essence of each individual dimension of the incarnation. Material sphere
The health and energetic fullness of the bodily shell is indicated by the presence of red shades of the spectrum in a person’s energy halo. In a healthy body, fiery tones are localized in the region of the lower energy center - the Muladhara root chakra. And the purer the color, the better shape the body is.
The absence of red in the emitted spectrum of this level or the faded tones indicates a lack of energy of action, isolation from the earthly world, and inability to adapt to the environment and circumstances. Cold blue in the glow of the physical plane indicates energy blocks that literally freeze the active forces of the body.
Astral sphere
In the bioenergetic system of the body, the astral world correlates with the center of the solar plexus, where, according to seers, the channel of vital force is located. Therefore, the localization of yellow and orange radiation in this area is considered the norm in the human biofield.
Admixtures of brown indicate laziness and passivity, as well as greed and impurity of motives. Another possible reason for such inclusions may be disharmonious functioning of the liver and kidneys.
Mental sphere
The radiation of the mental layer of consciousness is colored in shades of blue. Pale tones indicate instability of views, uncertainty and confusion. Rich and even sapphire color is usually found in individuals with extraordinary intellectual abilities, prone to abstract thinking and a philosophical mindset. Dark blue or indigo is emitted by people with the gift of subtle vision, bringing a great mission to the world.
The presence of crimson colors at the level of higher dimensions of the human biofield may indicate inflammatory processes. The low-frequency spectrum in the head region indicates emotional immaturity, a revolutionary attitude, and a destructive way of thinking.
Spiritual realm
The higher layers of the biological system emit a glow from blue to violet. A pure heavenly tone is found in people in a state of goodness and acceptance. Such people are not necessarily religious, but harmony and peace reign in their souls. Such radiation of a subtle structure indicates inner freedom, nobility, sincere faith and purity of thoughts.
More saturated backgrounds - sapphire and violet - emit those following the mystical path of searching for deep truths. These are people of high ideals: esotericists, magicians, keepers of metaphysical knowledge and spiritual teachers.
Lilac color, that is, violet with a high fiery content, indicates that this is a mystic with an inflated sense of self-importance. Such vibrations are emitted by people who are vain, proud, ambitious and arrogant.
Dirty tones indicate depression and possible depression.
Every person has an aura. With its help, you can learn about illnesses, emotional states, as well as thoughts and feelings.
The energy cocoon shimmers in different colors, but for each person one color predominates, by which one can determine how emotionally stable he is, at what level of development he is, and many other facts.
Those who have astral vision can see the color of the aura. You can see the aura and determine its color yourself. To do this, you need to know what certain shades mean, and also focus on your feelings.
Red color
indicates that a person has the qualities of a leader, he has enormous energy potential and unspent love. The predominance of red indicates financial success, the ability to achieve your goals and make independent decisions.
Dark red
indicates that a person cannot control emotions, is hot-tempered and even despotic. This shade indicates a desire to dominate, survive at the expense of others and manipulate people for one's own purposes.
Red with shades of brown
indicates a cunning nature, an insufficient level of vital energy, which is most often replenished through energy vampirism.
This shade may indicate a disease of certain organs if it is localized near them. If the aura consists entirely of red-brown
, then with a high degree of probability the person is prone to cruelty.
Scarlet aura
often indicates selfish and proud people who are characterized by arrogance and a disregard for their surroundings, including their relatives.
Lilac color
is responsible for generosity and enthusiasm. People with such an aura are selfless and ready to perform feats for the benefit of others.
Pink aura
speaks of the ability to maintain communication, give love and care. People with such an aura most often occupy positions where help and support are required for people with all sorts of limitations.
Orange color
symbolizes vitality, humanity and respect for others. People with this aura are confident in themselves, but will never put their interests in opposition to others. Orange color can also indicate problems with internal organs, especially the liver.
Orange with a hint of green
indicates people with difficult characters who often provoke quarrels and scandals, feeding on the emotions of their opponents.
Yellow aura
indicates friendly personalities with good health and love of life. They are endowed with the ability to quickly absorb knowledge, are naturally optimistic and have creative potential.
Yellow aura mixed with red
indicates timid people who, as a rule, have complexes and try to stay in the shadows. They are dependent on the opinions of others and rarely make independent decisions. The easiest way for them to become dependent on manipulators.
Yellow aura with shades of brown
speaks of laziness and unwillingness to think about the consequences of accomplished deeds. The carelessness of such people often turns into trouble. Due to their own shortsightedness, they are capable of stepping on the same “rake” over and over again.
Bright green aura
indicates that a positive attitude prevails in people, they are capable of caring and helping others, but they often show too strong emotions, perceiving someone else’s grief as a personal tragedy.
Green aura with emerald tint
indicates that this is an honest and open person, somewhat childishly naive. Also, this shade speaks of enormous potential and the opportunity to master any profession, especially if it is related to creativity.
Aura of yellow-green hue
indicates traitors and cunning people who should not be trusted. This aura is usually acquired by two-faced people who are capable of “going over their heads” for the sake of their own well-being.
Blue aura
- an indicator of a gentle character, a desire for peace and care. Typically, people with this aura are in good health, open to communication, and work hard to achieve their goals. With due persistence and skill, they can achieve success, but do not strive for leadership.
Pale blue aura
speaks of indecisive and suspicious people. They find it difficult to make responsible decisions, they strive to imitate more successful people and rarely achieve success on their own.
Purple aura
indicates people who strive for new knowledge and are also looking for themselves. They are characterized not only by intellectuality, but also by spirituality, purity of thoughts and friendliness. Most often, such people avoid large companies, preferring to search for their place in the sun.
Blue aura
indicates people who value family values. As a rule, people with such an aura have innate intuition and, with due diligence, can develop extrasensory abilities. They are excellent empaths who strive to support during mental anguish and ease the pain, literally passing it through themselves.
Gray aura
talks about problems with physical and emotional health. This shade speaks of weak personalities who have not decided on the direction of the path. Often such people are selfish and secretive, capable of deception and do not have pronounced abilities.
Silver Aura
indicates dreamers with well-developed imagination and intuition. They are creatively gifted, but overly trusting. People with this aura color tend to see the good in everything, often making mistakes in their choice of friends and trusting the wrong people.
Golden aura
speaks of stubbornness and the desire to become pioneers. People with this aura color are hardworking and do not give up on assigned tasks. The color gold indicates success and good fortune, as well as the ability to share your vitality with loved ones.
White aura
speaks of individuals who are accustomed to smoothing out conflicts, have a calm character and most often act as defenders of the weak with complete dedication. They are always in search of truth and are drawn to new knowledge.
Black aura
indicates severe health problems, as well as an unbalanced psyche. Such people are quite rare and usually criminals “shine” black. It is generally believed that they do not have a divine spark.
The aura is an energy field, which means
The green color of the aura brings energy with it. Even just looking at it you can feel the beneficial effects. But what else can be said about a person with such a halo and how does the meaning change depending on the shade?
In the article:
Rules for connecting the backlight
The type of illumination determines the order of further work. If the lighting fixtures come with a mirror (cabinet), then there are assembly instructions. Otherwise, the work plan is drawn up independently.
LED Strip Light
To install an LED strip, you need an aluminum profile and 1-2 12V power supplies. The profile removes excess heat, which extends service life. Without a profile, you can install SMD 3528 tape. It is low-power. The tape is sold in coils. The length of the segments is determined during installation. The lighting scheme includes:
- Dimmer;
- Remote Control;
- power unit;
- ribbon.
To connect the circuit elements you need: PuGV - installation wire, VVGng-Ls (1.5 mm²).
LED lights
Power to the high-power fixtures is supplied from a distribution box located outside the bathroom. The wires are connected with self-clamping terminals. For designer lighting of mirrors, less powerful LED lamps are used. There are enough batteries to power them.
Product operating instructions:
- insert batteries of the same capacity into the compartment;
- the battery cannot be revived by heating;
- Install batteries with the parameters specified in the operating instructions for the mirror (cabinet).
Fluorescent lamps
Power must be supplied to the installation location of the lamp. Installation of the product begins with assembly. The kit comes with detailed instructions. It lists all structural elements, provides a connection diagram, and provides detailed assembly instructions. The housings of modern lamps are universal. They can be mounted on any surface (vertical, horizontal). Marking of attachment points is done using a laser level or level. The fasteners are fixed with a dowel and a self-tapping screw with a press washer, and the body is fixed to them. The input cable is inserted in the required places. To control fluorescent lamps, a switch is provided in the circuit; for 2 groups of lamps, two-key models are used; for a single lamp (group), a single-key switch is sufficient.
With motion sensor
For convenience, motion sensors are included in the lighting circuit. Products with degree of protection IP65 are suitable for bathrooms. Mini sensors fit better into the interior. PD9-V-1C-SDB-IP65-GH is installed on the ceiling. This model has small dimensions - 36 * 52 mm. Using spring clips, the sensor is mounted in a lamp or suspended ceiling. It can be placed in the first humidity zone. During installation, high-quality insulation of the wires is performed and the operation of the sensor is adjusted. If there is no movement, the lights turn off after a certain period of time. When a moving object appears in the bathroom, light sources connected in the same circuit with the sensor turn on.
Motion sensors save energy by 40-80%. Increases comfort level. Classic switches are not needed. The lights light up when a person enters the motion sensor area. Installation instructions included:
- choose an installation location in the area where the mirror is located (cabinet);
- the lamp is attached to the wall or ceiling;
- connect the device wires to the electrical network wires;
- The twisted areas are wrapped with electrical tape.
This is interesting: Is grounding necessary if there is an RCD on the water heater?
What you need to install LED backlighting
Installation of mirror illumination with LED strip requires care and strict adherence to the sequence of actions when preparing individual elements for installation.
What you should pay attention to before installing lighting in the interior:
- The power supply must have a power supply of at least 25%. At the same time, it is unacceptable to increase the power consumption of a standard length strip by soldering additional sections to it. Moreover, it is recommended to artificially reduce the power consumption of the tape by cutting off small sections of it - this way you will increase the safety and durability of its operation.
- Initially, the mirror was not designed to be illuminated from the “wrong side”. Therefore, the mounting brackets in it provide, as a rule, a tight fit of the mirror plane to the load-bearing surface. But if you attach an LED strip to the back of the mirror for illumination, then most likely it will be impossible to install the mirror with the previous mounts. To make a backlit mirror using tape, you will need to install new brackets. To do this, it is suggested to use:
- aluminum profiles that must be attached to the back of the mirror, directly to the layer of mirror amalgam;
- neutral polymer waterproof adhesive, which should be applied directly over the entire contact area of the profile surface with the amalgam layer.
- The surface on which the profile is glued should be degreased with an alcohol-containing liquid so that the glue sets tightly and holds in conditions of high humidity. Carefully read the composition of the degreaser so that it does not damage the amalgam layer. The power supply of the tape will also need to be placed on glue, so the area under it should also be degreased.
- To prepare the LED strip for illuminating the mirror, you will need scissors and a soldering iron. The LED strip can be bent with a minimum radius of 2 cm. That is, using the entire strip is not always convenient. Therefore, it is usually cut into separate straight sections and soldered together with single-core copper wires, each with a cross-section of at least 0.75 mm.
Materials and tools
Self-production of a mirror structure with built-in lighting has a number of advantages:
- the ability to create an ideal model for a specific interior;
- significant savings, since funds will only be needed to purchase materials.
To create any type of backlit mirror structure, you need to prepare the following:
- screwdriver;
- scissors;
- Phillips and straight screwdrivers, including a device for assessing the presence of a voltage phase;
- insulation tenant;
- jigsaw for working with wooden surfaces;
- ruler;
- pencil;
- hacksaw;
- roulette;
- wire cutters;
- building level.
The materials you will need are:
- a mirror with a suitable shape and size;
- self-tapping screws, screws, dowels;
- sandpaper;
- frame: wooden, metal or plastic;
- glue;
- varnishes, paints;
- lighting;
- metal corners (for wooden frames).
Illuminated mirror: options
Outdoor lighting continues to be the most popular. This can be achieved using spots, small sconces or adjustable modern lamps. They are placed in close proximity to the mirror or cut into its area. Using remote lighting, you can illuminate not only a round, square or other shaped wall mirror, but also a cabinet for hygiene and cosmetic supplies with mirror panels on the doors.
The next option is internal lighting. It is organized in most cases using LEDs placed on strips or in blocks. To soften the lighting and protect the eyes, LEDs are placed under frosted glass. Mirrors with this kind of illumination allow you to examine the reflection in detail. Dim light is enough to clearly see the smallest details. In addition, a mirror illuminated by LEDs becomes an important element of decor in the most intimate room in the apartment.
Another option is decorative lighting. The name speaks for itself. In this case, it will not be possible to obtain full lighting. Such lighting can be used in bathrooms to create a special coziness and romantic atmosphere. LEDs to create such illumination can be placed behind the mirror surface along the outer edge (perimeter). An interesting effect is achieved by illuminating with LEDs the patterns applied to the mirror surface by sandblasting. At the same time as such lighting, you can use a full-fledged light source in the bathroom.
Criteria for choosing wisely
Which type of illuminated mirror is best to choose depends on your personal preferences. The main thing is that it fits harmoniously into the already furnished interior.
The combination of functionality and aesthetics is the basis of a win-win option, in which the utility of the product is harmoniously combined with claims to exclusivity and originality.
Size and shape of reflective surfaces
The first thing people pay attention to when choosing a product is its dimensions. Dimensions are selected based on the area of the bathroom and the availability of free space in it
At the stage of choosing a product, you need to decide on its purpose. If the main task of the surface is to reflect a person in full height, you will need a product with a height of at least 120 cm. If it is enough for you to see your reflection from the waist up, choose a canvas with a height of 60 cm, only the head and shoulders - 40 cm is enough.
In spacious bathrooms with two sinks, it is advisable to place one large mirror with a common light source.
The shape of the mirror is also important. On sale there are: rectangular, round and oval, polygonal and asymmetrical shapes
Modern technologies make it possible to create canvases of any shape and color.
Depending on the type of reflective effect, you can find mirrors equipped with lighting in the following versions:
- Traditional - colorless surfaces, which are created by applying aluminum or silver film.
- Matte - characterized by a muted shine. The effect is achieved by matting the polished surface and applying silk-screen printing and engraving to it.
- Spy - two-sided surfaces, one of which looks like transparent glass, and the second - like a mirror that does not let the eye through.
When choosing a product, you should be guided by the rule that the thicker the canvas, the better. The optimal thickness is 4-6 mm. Thin canvases may have an uneven surface, and the reflection of such surfaces may have incorrect proportions.
High-quality mirrors are made from sheet silicate glass marked M1-M3. When choosing a mirror, you need to carefully inspect it for scratches and unevenness. The strength and durability of a mirror largely depends on how well the edges are processed. Edge finishing can be done by polishing, grinding or bevelling.
When beveling an edge, a polished chamfer is created, beveled at an angle to the canvas, which decorates the product with the play of light on its edges.
The reflective properties of the canvas depend on the quality of the protective coating applied on the reverse side. Modern mirrors are manufactured on the latest automatic lines using innovative technologies. High-quality mirrors produced for rooms with high humidity consist of three layers of coating:
- reflective - made of silver;
- protective – anti-corrosion film made of neutral metal;
- protective – shockproof and moisture-resistant polymer coating.
Silver microfilm with a thickness of 0.15 to 0.30 microns is used as a reflective coating for expensive products. Cheaper analogues use aluminum amalgam.
Common Mistakes
When installing several LED strips, home craftsmen make classic mistakes:
- connect in series;
- take ribbons longer than 5m.
These errors affect the quality of lighting and the service life of LED strips. They will fail very quickly and the glow will be uneven. At the place of the first connection it will be bright, at the end of the tape it will be dim.
When installing a motion sensor, mistakes are also made:
- the viewing angle placed in the wrong place blocks the entrance door or the door of a built-in base cabinet;
- the performance of the sensor is deteriorated due to the heater located near the installation site;
- The SENS parameter is incorrectly set when the lamps do not turn on at the slightest movement;
- the light cone of the device hits the sensor body.
Additional tips and tricks
The bathroom must be divided into zones. Everyone should have their own type of lighting. Place common lamps on the ceiling in the form of recessed or open lamps. Provide additional light sources near the sink and bathtub.
For comfortable and uniform illumination, the lamps are installed at an angle to the reflective surfaces. There are bright light sources on both sides of the mirror. Decorative lighting is installed along the perimeter of the mirror surface. To avoid shadows and reflections, lamps with frosted bulbs are installed next to the mirror. They are mounted on a composite rail fixed close to the mirror surface. To create a slight accent on the face, neutral lighting (LED strip, opaque light bulbs) is installed above the mirror. Their luminous flux is directed onto the canvas.
When installing lamps in the bathroom, it is recommended to use copper cable (ShVVP, VVG). In small rooms with low ceilings, recessed lamps are installed. In large bathrooms, combined lighting is provided - two types of lamps are installed (open, built-in).
LED lamps are considered the cheapest and safest. In combination with LED strips, they create a cozy and relaxing atmosphere in the bathroom in the evening, and in the morning they help you tune in to the rhythm of work.
Suitable interior styles
Mirrors with built-in lighting are not a universal component for all interior styles, but in some areas such products look very organic and impressive.
The Art Deco concept allows you to create oval, round or rectangular mirrors with discreet lighting.
In the loft style, where the shape of the light bulb itself is an important part of the attic concept, tall mirrors equipped with incandescent lamps for outdoor lighting are popular
Lighting is an important attribute of mirrors in high-tech rooms. The understated concept is usually emphasized by neon glows around the outlines of mirrors of different sizes.
The fusion style allows you to use round mirrors and even elements in the form of colored diode strips or decorative lighting on the mirror surface.
The retro trend welcomes the illumination of exterior side mirrors with large lamps. Most often, these rectangular mirrors can be seen on a table or dressing table.
Peculiarities
In the bathroom, the level of humidity is almost always high, the temperature often changes, and condensation forms. Therefore, you should comply with the relevant requirements not only for furniture and plumbing, but also for accessories and mirrors.
A low-quality product becomes cloudy over time and becomes covered with mold or mildew. Thanks to the development of technology, it has become possible to produce mirrors that are not susceptible to external factors. Often they are additionally equipped with a heating system.
Mirror lighting plays a practical and decorative role. In the first case, correctly installed lamps make applying cosmetics or shaving much easier.
In the second, they create an unusual atmosphere, while focusing attention on some interior detail