Modern designs for glazing houses and other buildings are characterized by durability and reliability, but they also periodically fail for a number of reasons before their stated service life. Let's look at how to remove a double-glazed window from a plastic window and install it back in compliance with the rules and recommendations from specialists. Let's get acquainted with the main reasons why this activity has to be carried out. Read to the end, and you will learn how to repair the package by replacing a separate glass with your own hands.
Factory-made double-glazed windows Source youla.io
Required set of tools
You will need the following tools:
- Gloves;
- Special suction cups;
- Set with screwdrivers;
- Thin spatula or thin knife.
Always remember safety precautions. It’s like the joke: “A milling machine operator with three fingers has two very funny incidents in his life...”. Therefore, before starting work, you need to take care of protecting your hands.
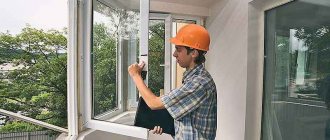
To do this, you need to wear thick gloves that will protect your hands from possible cuts. Window disassembly begins with removing the sash. The sequence of actions is as follows:
- The sash opens in a rotary rather than tilted state.
- The rod is removed. This must be done carefully, trying to prevent additional damage.
- It is necessary to monitor the retention of the glass unit. It is heavy, and the strength of one person may not be enough.
- The sash should be placed so that it is more convenient to work with it.
- The main advice is to avoid distortions so that problems do not arise later.
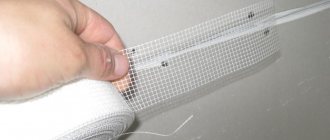
Glazing beads
Now you need to remove the glazing beads. You will not get a complete understanding of how to disassemble a plastic window without removing it from the frame. To do this, use a thin spatula or knife. You need to insert them into the gap between the frame and the bead to remove it from the groove. This should be done in the middle of the glazing bead, in no case near the corners. The longest bead should be chosen. The bead is flexible and elastic; it will pop out of the groove in the middle of the frame along with the seal
Carefully, without using excessive force, remove it from the corners. Longer it will go easier
All the rest can be removed from the free end. Watch the seals so that they do not fall out of the grooves of the glazing beads; they may not be glued.
Double-glazed window
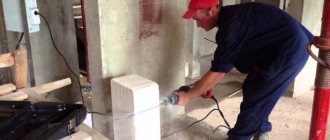
Now double glazed. This is the most difficult job in the task of disassembling a plastic window. It's good if you have rubber suction cups. The glass unit is very heavy, be careful with it
You probably noticed. That this is a warning we repeat constantly
Caution is key in this job. It's still not easy with suction cups
You need to remove the inserts that secure it to the frame. Now carefully insert the knife into the vacated slot and try to rip it out of place. It can be held in place by a sealant. It must be removed strictly in the direction of the grooves in the frame. The glass unit fits its dimensions very accurately. It won't work with skew. You deform the frame and that's it! Consider that you don't have a window. The frame itself without glass is quite light. If you were able to remove it without effort or distortion, then you can continue further.
Accessories
First you need to remove the window handle. Take it out of the lock. There is a metal strip at the end of the frame that needs to be removed. It was fastened with self-tapping screws. They must be distinguished by their heads so as not to unscrew the fittings from it. Different windows from different manufacturers do not have the same number of them. Therefore, rely on visual impressions here. If you unscrewed everything correctly. Then the bar will move freely in the groove of the frame. Try to remove it from the frame without any effort. Be careful not to hit the window valve. The fittings consist of many parts, one of them is rods. Do not try to force the mechanism out; the rods must be disconnected. Now on the other side, in the same sequence. You've sorted everything out. Window. Place all the parts in some kind of bag or container so as not to lose anything. We do not recommend disassembling the glass unit. You've got an idea of how to disassemble a plastic window - that's quite enough. The maximum you can afford is to pick out the sealant. And then - this is fraught with the fact that the glass may burst
Even if, acting very carefully, you managed to get to the fittings and remove the glass from it, I don’t want to congratulate you on your success. You killed your window
It is not possible to assemble a double-glazed window at home. In any case, you may be able to give it an external resemblance to the complex product you used to own. But you will not be able to achieve the necessary qualities that he should have. However, success! And good luck! Video on the topic:
What to do with glazing beads?
They are removed in the next step after the steps described earlier are completed. If the window is not pulled out of the frame, then the owners will not have a clear idea of how the disassembly procedure itself is carried out.
A thin spatula or knife will become indispensable assistants.
The tools are inserted into the gap between the frame and the bead itself. This is necessary for the part to come out of the groove. You need to make sure that the tools are exactly in the middle. Their location near corners is unacceptable. It is recommended to choose glazing beads with the maximum length.
The bead is a flexible, fairly elastic part. It can jump out along with the seal from the groove in the middle of the frame. It must be pulled out of the corners with the utmost care. There is no need to apply additional force to this action. After this, the work will go easier. All other parts are removed starting from the free end. Special attention should be paid to the seals; they may fall out of the grooves of the glazing beads or may not be glued.
Preparation
First you need to provide free access to the window - move the furniture away.
Dismantling a window will inevitably entail a certain amount of construction waste, so it is recommended to remove small and valuable items from the room and cover the furniture with film. Next, you need to check that you have all the tools necessary for the job:
- a set of necessary screwdrivers;
- chisel;
- screwdriver;
- hammer;
- work gloves and clothing.
If all this is available, then you can proceed directly to dismantling the plastic window.
This is the movable part of your window. It is the sash that is removed first. It is attached using a special rod. On old-style windows it is not closed with a plastic plug, as on new ones. Just pry the plug itself with a knife and remove it, after which you need to pull out the rod.
At this stage it is important to be very careful so that the sash does not fall. To do this, experts recommend performing all work together with a partner.
If you do the work yourself, then pay special attention to the fact that all movable sashes must be dismantled (sometimes there may be 2 or more of them, depending on the type of window you have). Naturally, if there are no movable sashes, then this step must be skipped
Glazing beads are a so-called rubber coating that ensures a tight fit of the window to the frame. In addition, the fastening mechanisms are closed with glazing beads, so they must be removed. In this case, a knife, chisel or spatula is used for work - any tool with a flat blade. First, the long bead is removed, then the top one, and lastly the bottom one. To avoid damaging it, it is necessary to guide the tool used from the beginning to the very end of extraction.
When all the beads have been removed, you can begin to remove the fasteners.
Removing the hardware yourself is quite simple. To do this, you need to sequentially check the perimeter of the window and remove all fasteners using a screwdriver or reverse screwdriver
Some of the elements will be publicly available, while others may be hidden under stubs - you need to pay special attention to this so as not to miss anything
If you do all the work yourself and have little experience, then experts recommend that at this stage you lay out all the fittings in the order of removal to facilitate the installation process.
We take out the double-glazed window
The double-glazed window is the most difficult part for those who dismantle plastic windows. It’s good if you have a set of rubber suction cups on hand. We must remember the large weight of this structure. It must be held in its normal position. This part of the job requires caution.
- First you need to pull out the inserts that are used for fastening.
- A knife is inserted into the vacated gap. You just have to try to tear the structure from its place.
- A situation where the part is held in place by a sealant is acceptable.
- When pulling out, adhere to the direction of the grooves in the frame.
The glass unit itself fits exactly into the groove dimensions. If there is a distortion, then further processing becomes impossible altogether. As for the frame, without a double-glazed window it is light in weight. If you didn’t have to put in too much effort, and if there were no distortions, you can continue.
In what cases is it permissible to replace glass alone?
The above recommendations do have exceptions. It is unprofitable to completely replace the glass package in three cases:
- There is stained glass in the window. Replacing one sheet is much cheaper than replacing several expensive glasses;
- A three- or four-chamber package is mounted in the frame;
- An expensive thick triplex was installed in the door from the street, and the internal glass was broken.
In these cases, the cost of repairs is cheaper than the price of a finished double-glazed window.
Trying to remove the fittings
- The first step is to remove the window handle. It needs to be pulled straight out of the lock.
- At the end of the frame there is a metal strip, which also needs to be released from its place. In this case, self-tapping screws are used for fastening.
- In order not to unscrew the fittings themselves, you need to understand where and what screws are located. They are easy to distinguish by their heads. Different manufacturers have different numbers of parts.
- If everything was unscrewed correctly, the frame begins to move freely in the groove.
The design of the fittings consists of many parts. Among them there are tractions. You just need to disconnect them, no need to try to do anything by force. On the other hand, actions are carried out in the same sequence as in the first.
Taking measurements, purchasing a new product
On the spacer frame there is a marking with the thickness, width, height of the metal profile, and information about the component parts. If there is no information, you will have to take measurements yourself by measuring the removed module.
To take measurements without dismantling the frame, you need to take measurements between the metal profile of the sashes: from one outer edge of the bead to the other on both sides. Subtract 2 cm from the received data for adjustment.
Important parameters during repairs are the ratio of the gap and glass thickness between adjacent frames. If there is no information on the product, you will have to measure it yourself. To do this you need:
- use a tape measure to measure the thickness of the metal profile;
- measure the thickness of the external and internal fastening;
- Subtract the dimensions of the glazing bead from the thickness of the metal profile to obtain the thickness of the package.
Taking into account the number of chambers, calculate the distance between the glasses (in Euro-windows, the canvas is usually installed - 4 mm).
Additional recommendations
These tips will help you prepare before you begin the process.
- It is recommended to draw up a preliminary plan that describes approximate work activities. You need to make sure that you have all the necessary tools at hand to perform dismantling.
- The sequence of actions performed must be written down literally at every stage. This is especially true for those who take long breaks from work. And then he can’t remember the reverse order to put everything back together.
- First you need to take care of safety. Cotton gloves will provide additional protection for your hands.
- It is necessary to think separately about noise and waterproofing of joints after repair work. Adhesives and sealants will become indispensable assistants in this regard.
Is it possible to change?
You can increase the number of chambers in a sheet structure if the features of the system allow and the structure can withstand the increase in load.
Single-chamber to double-chamber
This can be done if two conditions are met:
- The width of the rebate is sufficient for a double-glazed window. If a package of several glasses is similar in width to a single-chamber one, then there will be no problems with installation. If it is slightly wider, the glazing beads may need to be replaced.
- The aluminum window structure can withstand the weight of the sash. It is possible to strengthen the plates and hinges.
Double on triple
For the installation of a three-chamber double-glazed window, similar conditions must be met. However, the difference in mass is insignificant, reaching only a quarter of the total weight of the structure. Therefore, reinforcement is not necessary.
Three-chamber package
What to do if the glass structure is damaged during the operation of PVC windows? Restoration will require restoration or replacement. When one sheet is damaged, it is enough to replace only that one. However, if several layers are damaged, you should purchase a new window. You can change the design to a more powerful one if the plastic and hinges can withstand it.
Voted over 391 times, average rating 5
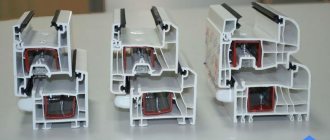
Construction of plastic windows
It is better to study the features of the product in advance, this will allow you to better understand what and how to do. And the window itself is less likely to suffer additional damage. A mandatory element of any window is the sashes. The structures may be solid. Then they cannot be opened.
The following parts are required in standard designs:
- Accessories. It is responsible for the movement of other elements.
- Glazing beads. Needed to secure the window in the frame.
- Impost. Serves as a kind of separator. Thanks to this, the window can have several sections at once.
- Sash. This is the name of the part that opens.
- Frame. It is attached to the walls of buildings and is required to firmly fix the glass unit.
Conclusion
Now you know how to disassemble and how to set up plastic windows. I am sure that the proposed instructions will be useful to you when using glazing in an apartment or country house.
Be sure to watch the video in this article, and if you have any questions, ask them in your comments.
If you want to express gratitude, add a clarification or objection, or ask the author something, add a comment or say thank you!
Today, plastic windows are an integral attribute of most apartments in both big cities and small towns. New houses are no longer built with wooden frames, but with plastic double-glazed windows - they retain heat better and protect from any bad weather. However, few people know that only timely maintenance can ensure the long service of these seemingly eternal windows. To do this, plastic windows must be periodically dismantled. You can do this yourself.
Taking the low tide
When removing the ebb, you need to be extremely careful so that other parts are not damaged. On the ebb itself, additional force must be applied to remove it. It is simply torn off from the surface and the opening. The structure is also disconnected from the sealant that is used for fastening.
Most often, this function is performed by types of polyurethane foam. If fastening involves the use of bolts or screws, you must first remove them. Only then is brute force applied to the rest of the structure.
Basic insertion rules
To install the product without errors, you must follow the established rules :
- Select installation time. The warm season is the optimal time for this process. It is best to plan it in the summer - from May to September.
If a move or an unexpected breakdown still forces you to postpone the work to another time, then it is allowed to install double-glazed windows at an ambient temperature of no lower than -5°C and no more than 28°C.- Take measurements carefully. The tightness and efficiency of the new package depends on the quality of measurements.
- Attach the glazing beads strictly to the place from which they were removed.
If the size of the product is large, then it is necessary to work only with a partner to avoid possible damage. For those who are dealing with product installation for the first time, working together will be much more useful.
Recommendations for working with a window sill
Removing old window sills is a process that can take place differently depending on what materials the bases are made of. Plastic windows usually come with the same sills and window sills. Since PVC material is not without its advantages:
- Easy care and cleaning.
- Resistant to sunlight.
- Self-extinguishing properties. The material does not support combustion.
- Long service life, up to 20 years with proper use.
- Little weight.
If the window sill is wooden, then it is sawed in several places. Why do you use hacksaws for wood? Then they simply remove it using a crowbar or use brute force.
If concrete is used, the structure is broken into pieces using several tools:
- Hammer.
- Bumper set to bumper mode.
- Manual labor. In this case, a crowbar or a chisel or a hammer become assistants.
The fastest way will be the one that involves using a grinder equipped with a special circle for processing concrete. The main thing is to remember that in this case the formation of dust in large quantities cannot be avoided.
After each working cycle, it is necessary to sweep away any debris formed earlier from the surface. When working with angle grinders, do not forget about safety and the appropriate devices to ensure it:
- Respirator for respiratory protection.
- Safety glasses that have polycarbonate glass that is resistant to any mechanical damage.
- Construction gloves.
It often happens that the owners are completely satisfied with the condition of concrete window sills. And there is no desire to deal with replacement. Changing the window sill does not always accompany the dismantling of old windows made of plastic. But we must remember that, as materials, plastic and concrete practically do not combine. And there are reasons for this:
- Compared to concrete, the heat capacity of plastic parts is much greater. They are much warmer, which causes condensation.
- An old window sill and a new window can lead to gaps between the structures. Even complete sealing at the initial stage will not completely eliminate the formation of cracks.
Concrete window sills are often covered with regular tiles to get rid of the problem. Ceramic mosaics will be an excellent decoration for those who care about appearance. It is permissible to use several shades at the same time. A good addition is decorative glass.
Aligning a PVC window in the opening
Correct installation of a plastic window is possible only after careful horizontal and vertical alignment of the polyvinyl chloride structure at the installation site. The plumbness of the frame is checked in three planes. The work is performed using a plumb line, construction or laser level. The process cannot be carried out focusing on the edges of the window opening. After all, its side walls in old and even new houses are often not in the vertical and horizontal plane.
GOST states that vertical deviation of the frame is allowed. This value cannot exceed 3 mm per 1 m. However, along the entire length of the metal-plastic structure, the maximum deviation should be less than 4.5 mm. To level the profile system in the opening, mounting wedges made of polymer material or blocks of hard wood impregnated with antiseptic compounds are used. They are placed under the bottom profile and used on all other sides of the frame.
About finishing work
Construction work is not complete without generating large amounts of waste. Especially if you use tools like a grinder. Small dust particles can simply eat into the surface of the furniture. Therefore, it is recommended that each action be accompanied by complete cleaning of the premises from any contaminants. A broom will help deal with large particles. A shoe knife and chisel will remove the foam.
If the frame was installed on a concrete or stone surface, then this surface must be sanded and cleaned of any irregularities.
Protective films made of dense polyethylene remain until the new window completely replaces the old structure.
Is it possible to increase the number of cameras?
Replacing a double-glazed window in a plastic window is a good reason to think about increasing the number of cameras in the window, but here several conditions must be met:
- The size of the rebate should allow the installation of a package of more glass.
- The quality characteristics of the fittings installed on the window block and on the profile itself must correspond to the new load: the weight of additional glass can significantly increase the pressure on the frame.
These conditions are important both when installing a two-chamber package instead of a single-chamber one, and when changing a two-chamber package to a three-chamber one. Taking into account the degree of strength of the profile and fittings in the first case is much more important than in the second, since the weight of a package with three chambers is only a quarter greater than the weight of a two-chamber package, and the weight of a two-chamber package is almost twice that of a single-chamber package.
The discrepancy between the width of the rebate and the width of the new package can be eliminated by selecting a narrower bead, and internal reinforcing aluminum plates can be used to strengthen the frame profile.
You won't be able to do all the calculations yourself. Therefore, when a window breaks and the owner has a desire to improve the package when replacing it, it is better to trust the professionals and order this service from the company.
Tips for dismantling double-glazed windows
It is not necessary to replace the entire sash, even if the glass is damaged. Sellers are not interested in selling only double-glazed windows. But a separate replacement is possible in principle.
In addition, sometimes buyers want to replace the part itself with another one that has better properties in terms of operation.
The stages of work can be divided into the following actions:
- The glazing beads are first removed from the window sash. In this case, gaskets made of plastic or any other material at hand are simultaneously inserted into the damaged cracks. First you need to get rid of the long side beads. Then they move on to the short lower one, and at the last stage - to the upper one. Compliance with this sequence will protect against premature damage to the glass.
- A marker marks the places where the beads were previously secured. Then there will be no problems with returning them to their place later.
- The glass unit must be removed from the glass. It is best to call an assistant to help support the product.
- The new double-glazed window is placed in its original place. After which the position of the structure is fixed.
- Then they proceed to installing beads using the reverse sequence. The top one comes first, then the one below. Finish the work with the side parts. Glazing beads are needed to ensure the proper level of sound insulation. Therefore, in the future there is no need for additional sealing.
Kinds
Glass packages for windows can be of many different types and types. In residential premises, two-chamber options are mainly used.
But other types can also be used.
- Packages containing the most common glass. Such structures are installed quite often, especially in industrial buildings. Moreover, its popularity is explained by its low cost.
- Low emission. They let in a lot of light, but at the same time effectively retain heat inside the room. Constructions of this type are popular if the windows face the shady side of the building.
- Highly durable. In this case we are talking about triplex glass. They are manufactured using special technologies. For example, with a strong impact, glass will not shatter into small fragments, but will retain its shape, but in the form of a web.
- Soundproofing. Such glass is also of the triplex type and does not allow extraneous noise to enter the room.
- Self-cleaning. Under the influence of ultraviolet rays and rain, all organic compounds that appear on the surface of the window as a result of operation are simply eliminated. For production, a special technology is used that allows the introduction of this property.
- Sun protection. In some cases, on one side, the glass does not allow the sun to pass through and hides everything that happens inside from prying eyes, while the room can be viewed outside.
Also, window packages may differ in the number of air chambers between the glass surfaces.
Several ways to solve the problem
There are two ways to solve window design problems:
- The simplest and most expensive is to call a specialist who will dismantle and replace. The disadvantage is that it requires investment.
- Cheap, but difficult - do-it-yourself repair with opening and installation. The tool also requires care, but the rest of the process is simple and does not require professional knowledge.
The most popular advice on forums: repairs should be carried out in the warm season. And this is not only due to discomfort and cold. Polyvinyl chloride is a plastic. This means that its plasticity increases at positive temperatures. In winter it becomes tan and can be damaged. For example, cracks often form at the bend.
If the work is not urgent, it is better to listen to the advice and postpone the repair to late spring and summer. But if the cold actively enters the apartment, you will have to be careful.