Click to share
more
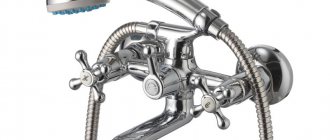
Concealed mixer taps are perfect for modern bathrooms. All pipes and valves of a concealed system are hidden in the wall, which makes the aesthetics superior to those of an exposed installation system. Practical and useful aspects also speak in favor of this solution, since there is no need to clean additional elements. Where should you install a concealed faucet? Which to choose? Let's talk!
To install a concealed faucet, you need to make holes in the wall into which all the elements of the hidden system will be placed. Due to the fact that we are talking about more serious construction work, it is worth considering the type of bathroom faucet at the stage of implementing the design of an apartment or house .
Concealed faucet - what is it?
In order to be able to choose the right type of bathroom installation, you need to familiarize yourself with the characteristics of each of the available options in advance. If you're just learning about this topic, you're probably wondering what a concealed faucet is and how it differs. So let's start by explaining the basics.
A concealed faucet is a flow-through water supply mechanism, which is distinguished by the fact that the entire installation is hidden in the wall and is invisible to the eye. Only those elements that are used to regulate the outflow of water protrude from the wall. Therefore, before laying tiles, you should consider installing a concealed faucet.
How does a built-in faucet work? Models of this type of battery may have one or two handles. They work exactly the same as surface-mounted faucets , with the difference that the entire mechanism is hidden in the wall. This increases the possibilities of arrangement, improves the appearance and simplifies cleaning of the bathroom.
Hidden faucet made easy
At first glance, it seems that a concealed faucet is a very complex device that is not for everyone. But, in fact, if you understand its details, then everything becomes simple. A built-in mixer from any manufacturer consists of three elements:
- Mounting box, so-called Box - a housing in which the hidden part of the mixer is installed.
- “Body” of the mixer with valves.
- External, wall-mounted decorative panel with regulators that control shower devices.
The control panel can be round or square.
An important component of a modern built-in mixer is the thermostat.
A thermostat is a device that maintains a comfortable water temperature specified by the user, which does not depend on changes in water pressure and temperature changes in the hot water system.
Moreover, once configured, the mode is supported all the time. Thermostats can be mechanically or electronically controlled. The latter require connection to a source of electric current, or have a built-in battery that must be periodically replaced. But, in any case, a built-in mixer with a thermostat means increased comfort when taking water procedures, as well as safety.
Ekaterina ChadayevaSpecialist at GROHE
The mechanical thermostat is equipped with a special cartridge based on synthetic wax - a thermoelement, which, thanks to its high sensitivity, ensures mixing of water to a given temperature in a split second and compensates for pressure fluctuations in the water supply system. If, in the event of an emergency, the cold water supply stops, the thermostat will immediately turn off the hot water supply. This eliminates the possibility of getting burned in the shower. The thermostat is usually equipped with a temperature limiter set to + 38 degrees Celsius, in which case it is impossible to unknowingly turn on the temperature above 38 degrees. It is also possible to set an additional limiter at + 43 °C to protect children; in this case, it is impossible to turn it on above 43 degrees in principle.
You can install a built-in mixer on walls of any structure - brick, concrete, gas and foam concrete, in wooden and frame houses. To do this, a niche is made in the solid material for the mixer body, as well as grooves for the pipes. If false walls are planned, then the box (Box) is fixed on mounting rails or on a metal bracket.
Important! The minimum depth of the built-in part of the mixer is indicated in the manufacturer's instructions. Do not forget to take into account the thickness of the final finishing coating of the wall.
Ekaterina ChadayevaSpecialist at GROHE
Modern models of built-in faucets have an installation depth of only 7.5 cm. This simplifies installation in thin walls and reduces the depth of grooves. The adjusting screws of the thermostat mechanism allow you to precisely adjust the position of the outer panel (within 6° degrees) for its optimal alignment with the decorative coating.
Let us add that the hidden faucet panel has special seals, which eliminates the possibility of water getting into the body and behind the wall. Instead of a standard control panel, using a universal built-in part, you can install a single-lever mixer with three positions to control the overhead shower, hand shower and bath spout. With the help of easily installed service plugs, if retrofitting is necessary, you can shut off the water supply to any water intake point.
Important! When laying water supply pipes to the built-in mixer, remember that cold water should be supplied to it on the right, and hot water on the left.
Practice shows that leaks of hidden faucets occur when installation rules are violated by unskilled plumbers.
Concealed faucet - where will it work?
Nowadays, concealed fittings are used above sinks, bathtubs and showers, sometimes even with bidets. There is a wide range of designs and styles available in the market, with new models being added all the time, so everyone can easily find one that perfectly matches their bathroom decor.
Concealed taps are available in a single-lever version, where hot water is mixed with cold, and in a double-lever version with two separate handles and thermostatic taps to regulate the water flow.
Concealed shower mixer
The shower can be equipped with a side or overhead shower. In addition to the shower, you can install a rain shower or a massage nozzle coming out of the wall. Nothing prevents you from combining several elements into one system. However, it is better not to limit yourself to the hidden shower faucet , but to install any shower, because this significantly increases the functionality of the shower.
The choice of system should depend primarily on individual preferences. The only thing to remember is that the concealed shower faucet should match both the shower stall and the entire bathroom decor .
Washbasin mixer
Washbasin fittings differ mainly in the type of faucet used, but also in the material used or the finishing method. Standard single-lever and two-handle faucets are available, as well as touchless and self-closing faucets.
concealed washbasin faucet has no handles, just a sensor, so it is activated without touching your hand. Designed primarily for public toilets where special hygiene must be observed. Self-closing faucets , on the other hand, are suitable for commercial and public buildings. As the name suggests, they close after a few seconds.
Concealed bath mixer
In this case, the installation method of the faucet is especially important, since it must be adapted to the position of the bathtub. It turns out that a concealed bathtub faucet not always suitable . This particular situation where it is not the best choice occurs when someone decides to have a freestanding bathtub and wants to place it in the center of the bathroom or some distance from the wall. to install a wall-mounted bathtub faucet if the bathtub is located further away.
Under normal circumstances, you can choose any hidden system. In addition to classic faucets, you can also choose from a waterfall faucet or a rain shower .
Concealed bidet mixer
A hidden faucet is a very interesting solution for a bidet, especially in terms of design. It can be mounted side by side, which is very suitable for modern bathrooms. Moreover, a concealed bidet faucet can be used even when there is no physical bidet - it is installed next to the toilet. In the case of a bidet, a concealed faucet is beneficial not only in terms of appearance, but also in practical and functional aspects.
Requirements for hidden wiring in the house
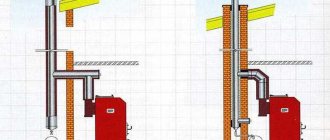
The main requirement when installing hidden wiring in a residential building is an increased level of fire safety. Therefore, if work is carried out in a wooden house, it is important to use special steel or polyvinyl chloride pipes to place the wires. In a brick or concrete building, the cable can be hidden in ordinary grooves or a corrugated pipe located behind cladding made of plasterboard and other materials.
The second important requirement is the accessibility of electrical wiring and the ability to quickly replace it. It is necessary to create a system that will make it possible to easily replace or modify the line without removing wall cladding or other damage.
However, there are often situations when, due to some unplanned circumstances, this requirement is not complied with. It is difficult to imagine a situation in which it becomes possible to punch a groove in the wall, the dimensions of which are suitable for placing a pipe. Therefore, to ensure replacement, it remains to use corrugated pipes hidden under the sheathing (and not plaster) or under the floor.
The use of corrugated pipes allows you to quickly replace wiring
The most specific requirement for the installation of hidden wiring is related to the route of the cable line. Chaotic laying of the cable in the wall is unacceptable: avoid situations where in one place the route moves parallel to the wall, and in another it unexpectedly turns diagonally.
On the one hand, this way you will save materials and time, on the other hand, you will ignore an important rule, which will complicate the task of finding wiring in the future. The cable line must be located strictly vertically or horizontally under the ceiling or at a height of 2.5 m. The wires under the floor must run parallel to a pair of walls. In the future, you may have to drill into the walls to hang a picture or shelf. If the cable is positioned as you please, the risk of an error associated with the drill hitting the wire increases. The electric drill will break, the functionality of the wiring itself will be impaired, and in rare cases you can get a serious electric shock.
When organizing hidden or open electrical wiring, you need to think about electrical safety. When arranging systems like TN-S or TN-CS, it is important to have a third conductor (PE). In situations where its switching is impossible due to the lack of a corresponding cable in the distribution panel of the entrance, it is still recommended to lay a cable line of three wires. The yellow-green conductor used for grounding will come in handy later when the wiring in the house is finally grounded. In rooms with increased danger (bathroom or kitchen), it is recommended to install residual current devices or differential circuit breakers.
Organization of wiring in a private house according to the TN-CS scheme
Concealed faucet - what are its advantages?
The popularity of concealed faucets did not arise out of nowhere. They have a lot of advantages, so they are simply worth choosing instead of conventional models. According to reviews, a concealed faucet has the following advantages:
- space saving - most of the elements of concealed faucets are hidden in the wall, and only a masking socket and a lever with a hot and cold water regulator are visible, so installation does not take up much space and is convenient even for small rooms.
- modern look - the big advantage of concealed faucets is their fashionable, designer look, thanks to which they can fit perfectly into almost any bathroom decor. They are most often chosen for modern and minimalist interiors, where elements with a simple structure predominate.
- functionality - a concealed faucet opens up wide possibilities for arrangement. Individual elements of the entire system, for example, a rain shower, can be placed anywhere at your discretion.
- practicality - the concealed faucet is very easy to clean. A simple rule of thumb: the fewer items you have to clean, the less work you have to do and the faster it gets done. This allows you to do it more often, eliminating the problem of unsightly scale deposits.
GASKETING INSIDE ELEMENTS OF FRAME STRUCTURES
In domestic and office environments, electrical wiring may be hidden in elements of frame structures (in partitions, raised floors, as well as behind suspended and suspended ceilings). When using this technology, installation will require special plastic or metal boxes attached to the structural elements of the frame.
Convenient and reliable installation of electrical wiring in pipes.
When laying on fireproof surfaces (concrete, brick, etc.), the electrical wiring is laid in plastic boxes or directly on the supporting structure and secured with staples.
Corrugated pipes, fastened inside the frames with plastic clamps or pieces of soft wire, are also suitable for this option. When laying cables over combustible and flammable surfaces (wood, plastic and similar materials), the electrical wiring is placed in steel pipes.
Hidden installation on the surface of the walls.
This technology is acceptable in rooms where concrete or brick walls are decorated with decorative panels. In this case, part of the coating can be disassembled, after which a working cable (harness) is attached to the rough surface using alabaster or small brackets.
If it is necessary to repair or replace it, part of the covering can be dismantled and returned to its place upon completion of the work.
There is also a more convenient installation option, in which the hidden wires are first pulled into a corrugation, which is then fixed on the wall.
This installation technology allows you to dismantle the bundle of conductors without opening the wall cladding. To access it, it is enough to remove the panel in one place and pull out a piece of wiring from the corrugated channel (after first disconnecting its ends from all contacts with the installation products).
Don't forget to ensure that the new wire can be pulled through.
To do this, just tie a soft wire or a strong cord to the end of the old electrical wiring. After removing the wiring from the corrugation, they will take its place.
To place the new wiring, it will be enough to attach its end to a wire or cord and pull it into a corrugated hose or pipe. The fastening must be reliable; if it gives way halfway, many problems will arise.
Obviously, if there are several 90° turns along the route, this technology may not work. The same is true in the case when the cable route is “packed to capacity.” The tighter the wiring is, the more difficult it is to remove it and replace it with a new one.
In addition, you can read about various electrical wiring installation technologies here, and the rules and regulations are described on this page.
Concealed faucet - what are its disadvantages?
Concealed faucets, despite their modern design, practicality and functionality, also have their drawbacks . The most frequently indicated are:
- complex installation - installation requires preliminary preparation of a niche in the wall, which takes a lot of time. Concealed faucets are only suitable for newly furnished bathrooms or those undergoing major renovations.
- high price - prices for concealed-mounted faucets are much higher than analogues intended for traditional wall mounting. In addition, for some models it becomes necessary to purchase additional elements, which further increases the price.
However, it cannot be said that a concealed faucet causes any installation problems. If a professional does this, there can be no talk of any difficulties.
What to pay attention to
When considering the question of how to hide wiring with your own hands, you should take into account the room in which it will be installed. If the room is warm and has a normal level of humidity (bedroom, living room), then you can use the classic installation method. The wires are twisted, laid in grooves and sealed with plaster.
However, if you need to covertly lay wires in a room with high humidity, there are several features that need to be taken into account. Preparation for installation is exactly the same; first you need to make grooves for the cables and boxes that will be installed.
- In order to protect the wires from high humidity, ordinary corrugated pipes of small diameter are used.
- They provide excellent moisture protection, are flexible and can be bent at virtually any angle.
- In addition, their cost is very low, which does not greatly increase the cost of wiring installation.
- The wires are laid in pipes, after which the pipes are laid in grooves.
Please note that the pipes must fit snugly against the walls of the grooves. Next they are covered with plaster.
When considering the question of how to find hidden wiring, you need to start your search from switch boxes and sockets. Next, you need to use a simple indicator screwdriver, using a sensor on it, the area around the socket is scanned, and in those places where the indicator lights up, the wiring is located.
Concealed faucet - what features should you pay attention to?
Interest in hidden batteries is constantly growing, so new models are constantly appearing on the market. The question arises, which is the best concealed faucet? What should you pay special attention to when choosing a concealed faucet for your bathroom?
Before purchasing, make sure that the battery you choose is equipped with a thermostat. This device provides many benefits: it increases safety of use, minimizes the risk of burns and saves on water bills. The concealed thermostatic mixer uses an innovative operating method.
If you want to set hot water to a concealed faucet using a thermostat , you don't need to turn the faucets or change the knob setting. The temperature is set using a special knob, but it should be emphasized that this is done with an accuracy of one degree Celsius.
Basics and Tips
If the wall surface is flat and the layer of plaster does not exceed about 3-4 mm, then you need to use a slightly different approach to installing hidden wiring.
- This is due to the fact that adding the missing 3-4 mm additionally significantly increases the material consumption per room, which can be very expensive, depending on the type of material used.
- In this case, it is recommended to first cover the wall with a layer of plaster, and then tap grooves and channels on the treated wall. This will reduce material consumption and somewhat simplify the installation process.
Please note that before installation it is necessary to check the wires for damage; this is done using a special electromagnetic indicator. It can be built into a specialized screwdriver or present independently.
Concealed faucet - how to match it to the style of the bathroom?
When purchasing a concealed faucet, not only additional functions are important, but, above all, appearance and especially shape . Square and rectangular models have become the most popular recently. It's hard to say which ones look better because everyone has different tastes. There is no doubt, however, that both of these options deserve attention.
After choosing the shape, all that remains is the color. A unique classic is the white concealed faucet , which is so versatile that it will suit almost any interior. However, there is nothing stopping you from going your own way when decorating your bathroom.
An interesting alternative to the white model is, of course, a black concealed faucet , which harmonizes with a modern interior. gold retro style inset faucet is perfect .
Built-in mixer - how tall should it be?
where the mixer will be installed is of great importance . So, let's start by determining at what height the concealed shower faucet should be installed . Here, first of all, the growth of household members should be taken into account. The height should be from 110 cm to 130 cm from the floor. This way, most people will have easy access to the faucet.
Built-in washbasin mixer? The standard installation height for a washbasin faucet should be 25-35 cm from the top edge of the washbasin, i.e. approximately 100-120 cm above the floor.
Concealed mixer - step-by-step installation
How to fix the mixer in the wall? Start by cutting a recess into the wall to house the hidden elements. The opening should be slightly larger than all the elements combined. The next step is to insert the battery housing into the hole and connect it to a pre-prepared installation (hot and cold water supply). Then check the installation for leaks. Once the concealed wall-mounted faucet is installed, you can move on to tiling the walls or any other wall covering .
Materials and equipment for hidden electrical wiring
You don’t need to think long about choosing a cable: a regular one, brand VVGng, will do. If budget allows, NYM wire can be used instead. Both of them are characterized by a long service life and have high strength, due to which they can withstand wet sealing in grooves.
The cable cross-section must comply with the standard:
- lines for lighting devices - 1.5 sq. mm;
- connection of sockets - 2.5 sq. mm;
- electric stove - 4 sq. mm.
Selecting the cable cross-section for open and hidden wiring
You can take any distribution boards. Even products that are formally used in arranging open wiring are suitable. The situation is similar with switches and sockets. However, special devices for hidden installation take up much less space, look miniature and do not violate the integrity of the interior. However, in this case you will have to install socket boxes and junction boxes. There are components for solid and cavity walls.
Elegant and designer bathroom with hidden fittings
Hidden installation is currently the most fashionable and best solution for modern interiors. Products of this type are ideal for minimalistic projects in which the starting premise is simplicity of form, structure and function. However, hidden fittings can also be successfully used to implement any other style. This is a great way, among other things, to metamorphose cramped and unsuccessful blocky bathrooms.
Interiors equipped with faucets of this type look modern, elegant and become more practical to use. Concealed parts that remain visible are produced in a variety of styles and have a very rich design palette. On Yandex.Market you can easily buy various single-lever faucets (with a system for mixing hot and cold water) and double-lever faucets (with separate handles). You can also buy concealed thermostatic mixers.
Concealed faucets - choose quality
Although reputable manufacturers of concealed faucets provide a fairly long guarantee of their performance and guarantee that in the event of failure you do not need to destroy the entire wall in the bathroom, life in practice is not always completely predictable. Despite the relatively low failure rate of the systems under consideration, it sometimes happens that their individual components require maintenance.
Due to difficult access to parts hidden in the wall or ceiling, the specialist will definitely demand a higher price for his services. In addition, it will not always be possible to repair it without damaging the finish of the walls and ceiling. Therefore, if you have decided on hidden fittings, you definitely need to choose only among the best on the market. Saving at the purchasing stage in this case is not the best idea; on the contrary, it can lead to serious losses.
more
Preparing for installation of hidden wiring
First, the approach that will be used during the installation of hidden wiring is determined. If the room has only rough finishing, this makes the task much easier.
- Next, regardless of which approach is chosen, you need to start marking the channels and hatches in which the cables and wires will be located.
- It is recommended to carry out marking using a building level, this will allow you to make accurate calculations and make markings as evenly as possible.
- An important aspect to consider is the distance of the wires from the floor and ceiling.
- It is also necessary to take into account subsequent work that can reduce this distance.
- These include installing skirting boards, laying laminate flooring, installing suspended ceilings, etc.
All these subsequent works must be taken into account at the stage of calculating the distance of the wires from the floor and ceiling.
If this aspect is not taken into account, then after the final construction and finishing work the wires may end up under the floor or ceiling covering. This will significantly complicate the process of emergency and repair work if such a need arises.
Cutting boxes and grooves
After the position of the boxes and grooves is drawn on the walls, taking into account all the parameters, points are marked on the lines; these are the places where the wires will be attached to the wall.
Please note that the distance between points will vary for different types of wires. For wires with flexible core this is 40 cm.
For wires with a rigid core, the distance should not exceed 20-25 cm.
- Next you need to start cutting out the grooves and boxes in the wall. To do this, you can use a large list of tools.
- The best option would be to use an electric wall chaser; it will allow you to carry out this procedure quickly and with the highest quality.
- However, this tool is quite expensive, so more affordable analogues are often used.
These analogues include a hammer drill or an angle grinder. If you don’t have these tools, you’ll have to use a chisel and a hammer. The process will be very long and labor-intensive, and there will also be a high probability of chipping the plaster, which will make additional treatment of the entire wall necessary.
Installation of hatches
After using the tools to cut out the channels in the wall, you need to start installing the hatches. They are necessary for securely fastening wires and cables in walls.
Before installation, holes are made in the hatches through which the ends of the wires are threaded.
- After this, the hatch, with a wire threaded through it, is installed in a pre-made hole.
- For reliability, it is covered with plaster. The hatches are located in those places where you plan to install a socket or light switch.
- This is why the wires are threaded through, their free ends protruding from the wall for subsequent installation of the necessary equipment.
- Next, when the electrical cable is laid, it needs to be checked for damage using a special indicator.
- If it is fully functional, it can be covered with plaster, covering the grooves with wires.
Please note that the plaster should tightly cover the cables, securely fixing them in the channels in which they are located. Once the plaster is completely dry, you can begin installing sockets and switches.