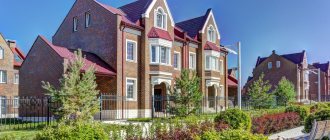
Cellular concrete is gaining more and more popularity. When choosing what to build their home from, many developers prefer cellular or aerated concrete. There are many reasons for this, the main one being the properties of the material. One of the varieties of aerated concrete is twin block. It is made in an autoclave at a temperature of 180˚C under a pressure of 12 atmospheres. This high-tech material meets all standards and modern requirements and is used in the construction of various buildings. To make a house from a twin block with your own hands, you do not need deep professional knowledge and skills in construction. One of the advantages of this building material is its ease of use. After considering the technology and studying the details of construction, you can build such a house yourself.
Advantages of building material
Twinblock
When building a house, everyone wants to build it quickly, efficiently, so that it is durable, warm and lasts for many years. All this can be achieved using a twinblock. Let's look at its main qualities and advantages:
- Strength. This material has a high structural density, so twin block can be safely used for the construction of load-bearing walls. They will even withstand the load of a house of 2 or 3 floors, and the ceiling can be made of heavy concrete slabs. And when plans are made to build a frame-monolithic version, the walls can be built much higher.
- Thermal insulation. Twin block has a porous structure, which allows you to retain heat in the house and allow air to pass through. And the materials that are included in the composition significantly increase the characteristics of the building. For example, in winter you will be able to save on heating, since the twin block has high thermal insulation properties, and in summer your house will be cool, because the direct rays of the sun will not warm up the house much, creating a good microclimate.
- Ideal geometric shapes. Thanks to this indicator, it will be much easier to build smooth walls.
- Easy to customize
. Easy to process. The blocks are easy to give the desired shape and process, and this can be done with a regular hacksaw. They are easy to cut and drill by hand. If during construction you plan to make complex architectural structures, then this will not be difficult. It should be noted that this property is useful not only when building a house, but also when interior work is carried out. After all, if you want to make channels for electrical wiring or pipelines, use a grinding machine with a cutting wheel. - Fire resistance and frost resistance. As part of the twin block, materials that do not burn have the first degree of fire resistance. And thanks to its resistance to sub-zero temperatures, it can be used in areas with harsh climates.
- Soundproofing and environmental friendliness. If you live in a noisy city or near a market, road or train station, then twin block walls will protect you from extraneous noise. What's even better is that they are free of chemicals and heavy metals that can have a negative impact on your health.
- Light weight. Given its dimensions, which are much larger than a brick, the weight of the twin block is not that great. This is explained by the porous structure, so it will be easy to work with the material, and to build a foundation it is not necessary to strengthen it and deepen it several meters. It is much faster and easier to build walls than with brick, especially since it is easier to move and deliver blocks to the site. Such blocks need to be connected using the tongue and groove method, due to the peculiar shape of the blocks.
- The blocks have a high absorbent surface, thanks to which the finishing materials adhere well and adhere firmly to the walls.
Walls are erected quickly.
All these advantages have made twin blocks one of the most popular materials for construction. Buildings made from it are erected quickly, they are warm and can last for more than 30 years, despite the fact that you will spend less to build such a house than to build a house made of brick.
What is the difference between a twin block and a gas block?
This material got its name thanks to the English word “twins”, which translates as “twins”. It hints that all products cannot be distinguished from each other. And it is true. This type of cellular concrete is produced by only one company - the Ural company.
The products are made using gas block technology, but there is a significant difference: when producing twin blocks, not quartz sand is added to the material, but fly ash (dry ash), which is formed when coal is burned at thermal power plants. Therefore, there is another original name for the twin block - “gas-ash block”.
The main advantages of the component are increased strength, water resistance and frost resistance. Therefore, this ash type of cellular concrete to some extent gets rid of its main drawback - great indifference to moisture, hygroscopicity.
Other differences between “twins” and gas blocks are their size, ultra-precise geometry, and the presence of tongue-and-groove locking elements. Thanks to the last two advantages, the seams resulting from laying the blocks are only 2-3 mm. Such walls look monolithic.
The length and height of the twin blocks are unchanged - 625 mm and 250 mm, respectively. The width is indicated in the product labeling: for example, TB-100, TB-200, TB-300, TB-400. The first products have the lightest weight: the TB-100 weighs only 8 kg. The heaviest material is TB-400, this block weighs 30 kg.
Necessary measures before construction
Having seen all the advantages of the material, you can begin preparatory work. It all starts with a project for the future home, which must be done in accordance with the standards. For what? Firstly, to legalize your house and register the house as your property, because without a project this will not be possible. Moreover, you will need it at the stage of applying for a building permit. Secondly, you will have accurate information on what and how to do, how much material and funds are needed and what work to carry out; without a project, the house may not be built correctly and will not last long.
A competent drawing is needed.
Such a project should include an architectural section, where there are detailed drawings and a plan of the future house: rooms, floors, basement, attic, roof. The structural section, which provides general data, the layout of the foundation, stairs, floors, truss structure, features of materials and products, as well as detailed drawings of individual components. The plan should also include sections on communications: electricity, water, sewerage, heating and gas equipment.
Project of a low-rise building
It immediately becomes clear that it is very difficult to competently do such a project on your own, without experience and knowledge. If you are a non-specialist in architecture, it is better to entrust this work to professionals who can make a high-quality project based on your wishes. All you have to do is pay for the work done. There is another option - a detailed plan can be found on the Internet. It can also be purchased or downloaded for free. The first option is more reliable, since everyone knows that free cheese only lies in a mousetrap. Such projects can be either good or poorly executed, then you will not avoid problems.
Layout options
The assembled container itself is unattractive in appearance, but with the help of a designer you can get quite attractive and beautiful houses. This also applies to the interior layout. Even with limited interior space, you can find a compromise and create a comfortable living unit. The most difficult in this regard is a house made of 1 module, but even in this case, all issues of convenience can be resolved. The photo below shows the layout of container houses:
Two 20ft modules Two 40ft containers
Layout 2 container block
Layout of a house made of 3 container containers
House layout made from 3 40ft containers
40ft Container House Layout
Preparatory work
A prepared site is required
Once your plan is ready, you can begin preparing for construction. The first step is to take care of a place to store material and tools. After all, for construction you need twin blocks, sand, cement, which must remain dry. You also need to properly equip the construction site and comply with all safety measures. It is important to install electricity in advance.
For construction you will need blocks, so you need to prepare them. If the plan does not calculate the number of blocks needed for construction, then you can do it yourself, because you don’t want to overpay for extra blocks or go for new ones. So, based on the dimensions in the project, you need to find out the area of the walls. To do this, the perimeter of all walls must be multiplied by the height. For example, the walls of your house are 13 and 10 m long, and their height is 6 m. It turns out:
13+13+10+10=46 m
6×46=276 m2
The area of the walls of the house is 276 m2. To determine how many blocks you will need, this number must be multiplied by the thickness of the blocks. Then you will know the number of cubes of the blocks. It is clear that the frame of the house will not be solid, since the house will have unblocked windows and doors, but it is better to take several more blocks, in case of an emergency.
It should be noted that the blocks must be transported very carefully so that they do not lose their geometric shapes or become damaged. All blocks must be well packed. After delivery, the material must be moved to a dry, prepared place, where it will wait in the wings. After all the preparation work, let's look at how to build a twin block house.
Portfolio
CP Sakura Park. 2022
Individual project
113 m2 Area
Aerated concrete Material
June 2022 - November 2022 Construction period
Application for calculation
checkpoint Sakura Park (Kurganovo). 2022
Individual project
200 m2 Area
- Built
Aerated concrete Material
— Construction period
Application for calculation
View all
Scope of work
Types of twin blocks
To have an idea of what you need to do to build a house, you need to briefly consider all the upcoming work. The technology for building a house from a twin block is not at all complicated, you just need to adhere to certain rules and sequence. After everything has been prepared, there is a project, the material has been purchased and placed, you need to:
- Build a foundation. As you know, no building can do without a reliable foundation, providing it with strength and durability. To build a house from lightweight aerated blocks, the foundation is most often made of strip or columnar foundations. Its depth and width depend on the type of soil, groundwater and the number of storeys of the house.
The glue is applied with a notched trowel.
Build walls. A special feature of constructing walls from twin block is that instead of ordinary cement mortar, you can use special glue, which is applied to the blocks with a notched trowel. This glue dries quickly, and the gap between the blocks will be the same everywhere, which makes it easy to build even walls.- Make lintels over windows and doorways. There are no special features in this work; you can either buy a lintel or make it yourself from timber.
- Provide reinforced belt. For the reliability of the entire building, before installing the floor and roof, it is necessary to make an armored belt. Moreover, during laying, reinforcement must be done on the 3rd or 4th row of blocks.
- Install floor slabs. If you are planning a house with several floors, you need to make an overlap between the floors. They can be made from a wooden frame, metal or concrete floor slabs. Overlapping is also mandatory before constructing the roof.
- Build a roof. The last stage of building a box house is installing the roof. Here you need to decide on its type and material for covering.
Preparation for pouring a reinforced belt
These are all the basic works that must be completed to build a house. Now we will look in detail at each of the stages of construction.
October Revolution
Soviet power did not evoke such a negative attitude from Alexander Blok as it did from many poets of the Silver Age. At a time when Anna Akhmatova, Mikhail Prishvin, Zinaida Gippius, Julius Aikhenvald, Dmitry Merezhkovsky were fully criticizing the Bolsheviks who had come to power, Blok agreed to cooperate with the new government leadership.
The name of the poet, who by that time was quite well known to the public, was actively used by the authorities for their own purposes. Among other things, Alexander Alexandrovich was constantly appointed to positions of no interest to him in various commissions and institutions.
It was during that period that the poem “Scythians” and the famous poem “The Twelve” were written. The last image - Jesus Christ, who found himself at the head of a procession of twelve Red Army soldiers - caused a real resonance in the literary world. Although this work is now considered one of the best creations of the Silver Age of Russian poetry, most of Blok’s contemporaries spoke about the poem, especially about the image of Christ, in an extremely negative way.
The basis of the house is a strip foundation
Strip foundation
As already mentioned, a strip or column foundation is suitable for building a house from a twin block. Let's take a closer look at how to do each of them. Depending on your desire, you will choose the one you consider best. Let's start with a strip foundation, which repeats all the load-bearing walls of the building.
The first thing you need to do is clear the area: remove anything that will get in the way to create a clean area. After this, it needs to be marked. Use stakes or rebar and rope. Based on the dimensions, insert reinforcement or stakes around the perimeter of the building. The markings should follow the drawings of the house on the soil. Stretch a rope between them and check with a square whether you have done everything smoothly. To make sure everything is even, measure the diagonals and compare them - they should be equal. In the same way, you need to tighten the internal markings for the base. You need to retreat 400–500 mm from the external markings (the average distance for a strip foundation) and pull the rope.
Now you can dig a trench.
First, determine the lowest point of the site. From it you need to measure the depth of the trench. It, in turn, depends on the weight of the house, the depth of freezing and the type of soil. If the house is small, 500–700 mm in depth is enough. If the house is large and the soil is loose - from 1 to 2 m. You can dig a trench manually or using special equipment. To dig it yourself, you will need a shovel, a tape measure and a plumb line. It is important that the walls and bottom of the pit are level. You can check this with a plumb line and level. Basic design of a strip foundation
To give stability to the foundation, you need to make a cushion of sand and crushed stone at the bottom of the trench. Place a 100 mm layer of sand on the bottom and compact it well. Do the same with crushed stone. For waterproofing, lay a layer of roofing material around the entire perimeter, then moisture will not penetrate from underground into the concrete. It's time to make the formwork. Its height above the ground is selected depending on climatic conditions. If the winters are cold and there is a lot of snow, the base can be made 400–500 mm high; when the climate is warmer, 300–400 mm is enough. Formwork is made of boards, plywood and similar materials, connected together with screws or nails. To know at what level to pour the concrete, stretch the fishing line along the inner perimeter.
To avoid drilling holes for sewer pipes after pouring concrete, they can be laid at this stage. Install them in the right place and fill them with sand so that they do not deform or use sleeves - pipes of larger diameter.
Foundation with ventilation holes
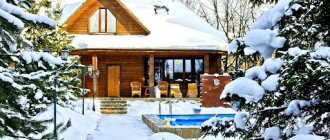
Which dacha is warmer?
At the beginning of the article, we noted that a country house is not designed for year-round living, so there is no point in buying an expensive heating boiler for a country house.
At the same time, the climate of the Ural region is quite harsh: even summers can be cool. In addition, it is customary to start the summer season early, in early May, and end in September-October. Therefore, owners usually provide simple, low-cost options for heating country houses - compact wood-burning stoves or small electric heaters. Building materials affect the rate of warming up of a country house and the time it retains heat. Therefore, we decided to compare frame technology, wood and gas block in terms of energy efficiency:
- A small frame country house warms up within 1 hour. Not bad! But there is one problem: mineral insulation, and even more so polystyrene foam or EPS, deteriorates over time in the walls. Therefore, every year the dacha will become colder and colder;
- Wood is a warm material. A country house made from it will quickly warm up and retain heat well. However, wood is a living material; it swells and shrinks during use, and gaps form between the elements. If you do not get rid of them promptly, warm air will escape through the cracks and you will “heat the street”;
- Twinblock D400 has excellent thermal conductivity - 0.106 W/m°C, so you don’t need to insulate walls from it, even if you are building a dacha in the Ural region. By the way, the thermal conductivity of coniferous wood is much worse - 0.180 W/m ºС. In terms of heat absorption, Twinblock D400 is also superior to wood. Read more about this in our article “Do-it-yourself bathhouse - wood or aerated concrete?”
Conclusion: A country house made of aerated concrete - Twin block - retains heat better, it is easier and faster to warm it up. You can live comfortably in it right up to the snow, heating costs will be low!
The basis of the house is a columnar foundation
Columnar under twin block
It is also not difficult to make a columnar foundation. First you need to prepare the surface. Mark where the posts will be installed. It is imperative to place them at the corners of the building, in the place where there is a large load and, if the walls are long, every 2–3 m. The main thing is that the weight is distributed evenly on all pillars.
- Step back 2 m from the perimeter of the future building on all sides and remove the fertile part of the soil from this part, which can be 100–300 mm. This is done to prevent various plants from growing under the house. Everything must be smooth, the depressions must be filled in, and the bumps must be broken. Everything is covered with gravel or sand on top.
- The following procedure is similar to the creation of a strip foundation:
- It is necessary to dig holes for the foundation pillars of the required depth. If the posts are round, you can use a drill. Depending on the width of the material from which the foundation is made, the width of the pit should be slightly larger.
Columnar with a concrete grillage
Compact the finished pits and pour a sand cushion into them with a layer of 100–150 mm, compacting it again. Then fill in a second layer of up to 100 mm of gravel and sand, and compact it too.- Place the finished posts in the holes and check with a level whether they are level. If necessary, they all need to be aligned. For convenience, you can pre-tension the fishing line at the desired level and align the posts along it.
- To fix them, the outside of the hole must be filled with soil, compacted and filled with concrete.
- Now make a frame from the reinforcement and place it in the pipe. The fittings should rise 100–200 mm above the pipe.
- Pour concrete inside the pipe and wait until it dries completely. In order for the concrete to be poured without bubbles and voids, it must be compacted when pouring by bayoneting.
- Install the perimeter grillage formwork and fill it with concrete.
You will also have to wait about a month for the solution to dry. And only after complete drying can you begin laying the walls.
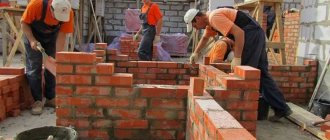
Production
Twin blocks are produced according to all standards of construction technologies. Each block must be autoclaved. It is produced at a temperature of 180°C and always under a pressure of 12 atmospheres. Thanks to such processes, the material acquires high strength due to stabilization of the pore structure.
Construction of walls from twin block
Laying begins from the corners
Before starting laying, 1-2 layers of waterproofing material must be laid on the foundation. Now you can lay the first row of blocks. This is the most important work, since the appearance of the entire future building depends on how correctly and evenly the first row is installed.
Any masonry starts from the corners. Please note that the first row must be laid on cement-sand mortar. It may take longer to dry, but it will make it easy to fit the blocks and align them.
Stretch the line.
For work you will need the following tools:
- building level;
- rubber mallet;
- cord or fishing line;
- manual or electric wall chaser;
- a brush to remove dust from the grooves;
- Master OK;
- corner;
- hacksaw;
- notched trowel or trowel;
- fittings Ø8 or 10 mm;
- planer for aerated concrete.
Applying adhesive
Apply a 10–15 mm solution to the waterproofing layer and lay the blocks at all corners. They must be perfectly level. To do this, use a rubber mallet and a level. Stretch a cord or fishing line between the blocks to serve as a guide. It should not sag, so tighten it well and check it with a level. If the length of the wall is more than 10 m, place an additional block in the middle. Focusing on the fishing line, lay out the first row of blocks. Tap them with a mallet to lay them flat. Be sure to check the entire masonry with a level. Since the wall is often not equal to the number of blocks, some of them need to be adjusted to fit. Use a hacksaw and a corner to control the cutting. After the first row is ready, you need to wait until the solution sets (2-3 hours).
The second and third rows are made in a similar way, only with a bunch, the blocks are moved at least 80 mm or half. Now you can apply glue instead of mortar. But before that, treat the surface of the first row with a plane to give it roughness. Now the glue will adhere better and lie more evenly. Apply the adhesive to the blocks using a notched trowel. The thickness of the adhesive layer, which is applied to the entire surface and end, should be 20–40 mm. Remember not to lay blocks in places where there will be doors and windows. Once you have made rows 2 and 3, row 4 needs to be further reinforced with reinforcement. Lay this row using the same principle. Then, using a wall chaser, make two parallel grooves in the blocks. Clean them with a brush and install Ø8 or 10 mm fittings there. Remember that the ends of the reinforcement should not end at corners or joints. All that remains is to fill everything with mortar or glue. After which the masonry continues, as before, until the 8th row, which will also have to be reinforced. And so every 4th row.
How is aerated concrete finished?
Since, despite all the advantages, twin blocks still remain aerated concrete products, their finishing is practically no different.
Interior finishing options
The first operation for “moisture-loving” twin blocks is to reduce their hygroscopicity. Plaster is not the best material, since aerated concrete will quickly draw all the moisture out of it and will simply crumble onto the layer. Therefore, the walls are first cleaned of dust, then treated with a deep penetration primer. Minimum - 2 layers, the first of them should dry for about a day. Further operations are as follows:
- Tile adhesive is applied to the dried surface, its layer is 3-4 mm;
- the walls are reinforced with fiberglass mesh, mesh size is 3 mm, the material is pressed into fresh glue;
- the horizontal relief is formed with a notched trowel, then the walls are left alone for several days;
- plaster is applied to the dried glue.
For wall finishing, choose plasterboard or gypsum fiber board (with installation on a sheathing made of a profile or timber), lining, plastic panels, and vapor-permeable paints. Film-forming compounds are used in the kitchen and bathroom. Plastering is not required for painted walls. Dents, protrusions or chips are removed with the same adhesive that was used to build the walls. Seams and deep defects are rubbed with glue mixed with sawdust remaining after cutting the blocks.
External cladding methods
The number of options may puzzle the owners of a future aerated concrete house. If you follow the application technology and coating requirements, you can get an attractive and reliable design.
- Plaster intended for aerated concrete. It must be vapor permeable. A reinforcing fiberglass mesh is also pressed into its first layer. Then the next layer is applied and it is immediately leveled. After the material has set, the surfaces are sanded and painted.
- Brick. The process is complex and time-consuming as the brickwork is attached to the main wall, leaving a gap for air circulation. Its minimum width is 30 mm. Vents are left in the lower part of the brick wall, and they are covered with ventilation grilles.
- Curtain facades - lining, panels, siding. These finishing materials are mounted on the sheathing (timber, profile), and a gap of 30-50 mm is also left between them and the walls. In this case, holes in the finishing are made both from below and from above.
Sand-cement plaster and film-forming paints are not suitable for exterior work. Foam plastic and expanded polystyrene cannot be used as insulation. If necessary, use only mineral wool.
Arrangement of windows, window sills and installation of lintels
Reinforcement of masonry
Places where window openings will be made need to be additionally reinforced. To do this, cut 2 lines on the blocks under the future window frame and place the reinforcement there. The length of the grooves must be greater than the length of the frame, 300 mm on each side. The grooves with reinforcement need to be filled with glue and masonry continues. Then you can strengthen the space under the windows.
Installing a window lintel
When the window and doors have been laid out to the top, it is necessary to make lintels so that the structure does not collapse. To do this, you can buy special U-shaped blocks or make the formwork yourself. Place a board above the window on which the blocks will rest. Place U-shaped blocks on it, lay reinforcement and fill everything with concrete. But you can do without them. Just lay blocks 150 mm thick on the outside edge of the same board (cut a regular block). Lay 100 mm thick blocks inside along the edge. Thus, you have made something like U-shaped blocks. Then everything is the same: install a frame made of reinforcement and fill the space with concrete.
Let's privatize the territory
Once the territory is allocated, there is very little left for it to become completely yours. In chat you need to enter the command
/rg claim name
Name – this is the name of the site, you can choose any one.
And that’s it, the territory is secured. Each territory has its own owner and members who have access to it and their actions are limited. If you created a region, then you automatically become its owner and can add new members to it.
For example, you created a region and want to build something in it. And your friends want to help with this . In order for them to perform actions, you need to enter a command in the chat;
/region addowner “territory name” “friend1 name” “friend2 name”
Only all names and titles are written without quotation marks. There is also no need to separate them with commas or periods, just a space.
After construction is over and you want to live in peace and quiet, you can prohibit other participants from performing any actions as a team;
/region removeowner “territory name” “friend1 name” “friend2 name”
We also write all names without quotes.
Reinforced belt
Reinforcement belt
Armopoyas is similar to the lintels that were made over windows and doors, only the blocks are installed around the entire perimeter. This must be done before constructing the floor and roof. Place blocks cut in half onto the finished row of blocks so that they form a kind of formwork. Place a frame of reinforcement bars in it and fill everything with concrete.
Revolution of 1905–1907
Revolutionary events in Russia became for Alexander Alexandrovich the personification of the spontaneous, disordered nature of existence and quite significantly influenced his creative views. The Beautiful Lady in his thoughts and poems was replaced by images of blizzards, blizzards and vagrancy, bold and ambiguous Faina, Snow Mask and Stranger. The works “A Girl Sang in the Church Choir” and “Rus” became exemplary for this period. Poems about love have practically faded into the background.
Drama and interaction with the theater at this time also fascinated the poet. The first play written by Alexander Alexandrovich was called “Balaganchik” and was composed by Vsevolod Meyerhold at the Vera Komissarzhevskaya Theater in 1906.
At the end of the 1900s, the main theme of Blok’s works was the problem of the relationship between the people and the intelligentsia in Russian society. In the poems of this period one can trace a vivid crisis of individualism and attempts to determine the place of the creator in the real world. At the same time, Alexander Alexandrovich associated the Motherland with the image of his beloved wife, which is why his patriotic poems acquired a special individuality.
Floor installation
Overlapping should be done in cases where the house is being built with several floors and before installing the roof. There are several ways to make a ceiling: from wooden beams, a metal frame, or from ready-made concrete slabs that are installed on an armored belt. It is clear that such slabs cannot be lifted manually, so you cannot do it without the help of a crane. If you make a ceiling from beams, their ends need to be cut at an angle of 60–80˚, treated with an antiseptic, wrapped in roofing material and installed in niches to a depth of 150 mm. Install the beams in increments of 1–1.5 m. After that, the sheathing is knocked down from the boards and the flooring is laid.
Overlapping with beams
Overlapping can be divided into the following types:
- basement floor separating the basement and first floor;
- interfloor ceiling that separates the floors;
- attic floor separating the floor and the attic;
- attic floor separating the floor from the attic.
Types of floors
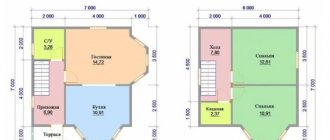
Blueprints
The construction of any house begins with a competent design and a detailed drawing indicating all the components of the future building. It is when designing a home that its layout is developed. Let's consider several attractive projects of one-story foam block houses.
If you want to build a small house in the country, then you will like the project of a neat 7x9 m structure:
- it can be built on a strip-monolithic foundation;
- for external walls it is permissible to use a combination of foam blocks and gas blocks;
- floors are made of reinforced concrete;
- For a simple gable roof, metal tiles are suitable.
Conventionally, such a building can be divided into two halves. On the left side there is space for a small bedroom of 9 square meters. m. Directly in front of it, it is worth placing a more spacious hall, combined with a kitchen located on the right side of the home (this area will occupy 23.7 sq. m.). Behind the kitchen on the right you need to allocate a small space for the boiler room (2.5 sq. m).
The last room on this side will be a combined bathroom of 2.9 square meters. m. The areas near the front door and the door leading to the backyard should be continued with small hallways of 4.1 and 3.1 sq. m. m (for the back door). In such conditions, it is quite possible to equip an attic.
Also today, many people order projects for foam block houses, the dimensions of which are 8x8 m. As a rule, two-story buildings have such parameters, but this does not mean that they cannot be used for one-story houses.
So, in a building measuring 8x8 m there is room for the following rooms:
- most of it should be allocated to a spacious living room combined with a kitchen (28.60 sq. m);
- Opposite the living room and kitchen, allocate space for a hall running from the front door to the back door (15.4 sq. m.) to divide the building into two halves;
- on the right side of the hall there is space for a bedroom or guest room (13 sq. m), a small bathroom (5.8 sq. m), as well as a dressing room (7.20 sq. m), located in the corner of the building.
A foam block house measuring 8 by 10 m can be successful.
Let us consider in detail which rooms (and what area) can be located in such conditions:
- at the entrance to the house you can organize a neat terrace;
- the first room next to the terrace will be a vestibule (2.7 sq. m), which turns into a hall (3.42 sq. m);
- on the left side of the vestibule and hall, place a bathroom (6.3 sq. m);
- on the right side, organize a comfortable living room (20.56 sq. m);
- right behind the living room you can arrange a small kitchen (11.2 sq. m);
- Opposite the kitchen (on the opposite side - on the left) allocate an area for a bedroom (10.6 sq. m).
If you are planning to build a small block house measuring 6x8 m, then you should consider the following project.
- such a house can have the simplest possible shape;
- place the hall in the right corner of the home;
- in front of the hall, equip a small bathroom that will conditionally separate the entrance part of the house and the bedroom located in the corner on the right side;
- Opposite these rooms, place a large living room, separated by a partition from the kitchen.
A block house measuring 9x9 m will be more spacious.
Below we will consider how to arrange all the necessary rooms in such a structure:
- divide a small hall between the kitchen on the right (8.9 sq. m) and the bathroom on the left (toilet - 2.8 sq. m, bathroom - 3.6 sq. m);
- allocate the remaining space to a spacious hall and dining area (34.8 sq. m), install a staircase in the corner leading to the attic;
- in the attic, place a study (8 or 11 sq. m), behind the wall from it a bedroom (14 sq. m), and after the bedroom another study (12.1 sq. m), located in the corner;
- place the bathroom on the left side of the second office (8.7 sq. m);
- organize a small balcony with an exit from the first office.
A more spacious house of 9x10 or 10x10 m can be equipped in a similar way; such a structure can be supplemented with a garage, separated by a partition from the boiler room. On the remaining area it will be possible to arrange all the standard rooms.
Roof structure
Your plan should already have the roof type selected. She may be:
- single slope;
- gable;
- flat;
- attic;
- domed or conical.
Roofing system design
The most common option is a conventional gable roof. It will be relatively easy to do. A layer of waterproofing material must be laid on the reinforced belt. A mauerlat is installed on top - a beam that will bear the main load of the rafter system. To secure it, even when pouring concrete into the reinforced belt, you need to weld metal studs with 12 mm threads to the reinforcement in increments of 500–600 mm. They should rise above the reinforced belt by 450 mm at the same level. Holes are cut in the Mauerlat in the right places, it is placed on studs and clamped with two nuts through a washer. For better fastening, you can additionally secure the beam with anchors.
The outer rafters, the rear end and the front are attached to the Mauerlat. To keep them firmly in place during installation, install racks with braces in the center, which are secured from below to a reinforced corner. The posts will support the rafters during installation, after which they must be removed. Two crossbars and additional vertical posts on the sides will help strengthen the rafters.
Then the ridge and the remaining rafters with crossbars are installed, which are connected to the Mauerlat. To lay all the rafters in one plane, you can pull a thread along which you will navigate when securing the rafter legs. It’s up to you to decide what the roof overhang will be beyond the walls; usually it is at least 500–600 mm.
Now it’s time to lay a layer of vapor barrier with an overlap of 150 mm with the outlet outward, then the moisture will roll down from the roof and not inward. Don't forget to install insulation as well. Now all that remains is to make the sheathing, gables and cover the roof with roofing material.
Soft roof installation
Before finishing the roof, you need to remove all the pipes: the chimney and ventilation pipes.
The sheathing is made of boards, bars or planks. If the roofing material is a soft roll roofing, then the sheathing should be done with a minimum gap or, preferably, continuous. When the roof needs to be made of tiles or slate, the pitch can be 250–400 mm, depending on the pitch of the metal tile wave.
Both soft and hard coverings can serve as roofing materials. Among them:
- metal tiles;
- ceramic tiles;
- corrugated sheeting;
- bitumen shingles;
- slate;
- composite tiles.
Installation of metal tiles
After you lay the roofing material, the main work will be done. The twin block house is ready. But don’t rush to relax, because there is no less work waiting for you that needs to be done to move into a completely finished home. Still, if you, without any special construction skills, can make a foundation, build walls and make a roof, you can be proud of yourself and take on the rest of the work with enthusiasm.
The fourth stage – protection of foam blocks
When the walls are erected, it would seem that all that remains is to decorate them, and then the construction of the house is completed, but that was not the case. Although foam concrete is a reliable material, it requires additional protection from moisture, and if your region has harsh winters, then additional thermal insulation will not hurt.
Insulation
The best choice is standard polystyrene foam with a thickness of no more than 50 mm, which will be fixed with glue, and the decorative layer will be facade plaster.
The following instructions will tell you more about insulating foam block walls at home:
- To begin with, the surface of the walls is carefully primed to avoid unevenness and seal cracks.
- Afterwards, it is checked with a vertical level; in those places where there are deep holes, plaster is laid.
- When the leveling work is completed, you can prepare an adhesive solution for the insulation.
- The glue is applied to the surface of the heat-insulating material - along the perimeter and in small strokes in the center of the slab.
- Expanded polystyrene is pressed against the wall, lightly tapped with a mallet in those places where there is glue.
- This is how the entire façade of the house is covered.
- After that, all joints of the slab material should be sealed with a primer.
- Now you need to secure the reinforcing mesh on top of the polystyrene foam; you can even use disc nails for this.
- All that remains is to spread the decorative plaster and cover the facade with a layer of the mixture, which will hide the mesh underneath.
Workflow Features
The technology of foam block houses, like any other technology, has its own specific features that you should know about in advance:
- We have already said that it is better to use an adhesive mortar for masonry; it is thinner and more reliable, but it can only be used for blocks that have the correct geometry. If you purchased low-quality products that differ in size (5-10 mm), it is better to use cement mortar; its thickness allows you to hide unevenness.
- It is better to insulate the foam block from the outside, so that the wall itself warms up, and the temperature difference is on the façade of the structure. This design is less exposed to atmospheric influences and will have a longer service life before repair.
Other useful private commands
If you get tired of the private area, you can remove it. Of course, you don’t have to do this, but then a piece of the world will be inaccessible to other players, and if they stop deleting the private message, then the territory may become inaccessible. Therefore, it is better to act as an honest crafter. The private is removed from the territory by the command;
/region delete “region name”
Remember that when you delete your region, you lose all buildings and acquired property.
If you want to enlarge or move a region, then it is not at all necessary to delete it and do it anew. There are special commands for these actions. First you need to select a new area or your territory and enter;
/region redefine "region name"
/region move “region name”
/region update "region name"
The private area will be changed, but the flags will remain in place.
You can also add a co-owner, but this is highly not recommended. He will have the same rights as you. A co-owner is added by the team;
/rg addowner "region name" "player name"
You can delete it by registering it in the chat;
/rg removeowner "region name" "player name"
By the way, having become a co-owner, he will also be able to use this command and remove you from your own region. So choose your partner carefully.
If you want to add friends, but you don’t quite trust them, then the team;
/cprivate
installs protection on chests, doors, stoves, hatches, elevators, and so on.
If you need to give access to them, then write the player’s nickname after the command. You can also set a password and not have to enter a new command with the player’s name each time. It is installed if you write in the chat;
/cpassword "password"
Now you can simply share your password with the right people. If you forget it, then all password-protected chests and doors are opened using the command;
/cunlock
A removes protection;
/creamove
If you have several regions, you can view their list by typing the command in the chat;
/region list
Creating a child region
On each private territory you can create another private region. For example, if you are not playing alone and you have a house that friends have access to. And you only want to have your own personal room in it.
First as a team;
//wand
select the zone that will be a region within a region, then enter the command;
/rg claim “new region name”
without quotes. After this, you need to make this territory a child territory, to do this, write in the chat;
/region “main region name” “child region name”
All names are without quotes.
This will be useful for those who have a large territory and there are many players in it.
Restrictions
Many servers have certain restrictions regarding the privacy of the territory. It could be:
- Prohibition of allocating territory from the very bottom of the world to the sky;
- Ban on highlighting the entire world;
- Restriction on the allocation of blocks (for example, the maximum number of cubes in the territory is 30,000);
- Limit on the number of people in one region;
- On some servers it is forbidden to call the region by your nickname;
- Restriction on ownership of regions (for example, one person can only own 3 regions);
- Prohibition on the seizure of someone else's acquired territory.
When privatizing a region, be careful, find out what restrictions there are on the server and carefully check the territory. Especially the starting points, it may turn out that something completely different from what is needed will be attached. Don't add untested people, they can ruin everything you've worked so hard on. Try to create reliable protection from griefers and you won’t have to worry about your property. Sources:
- https://upmine.ru/other/doma-v-minecraft.html
- https://fotodomov.com/samye-krasivye-doma-v-maincraft.html
- https://game-roblox.ru/minecraft/recepti/dom-m/
- https://it-doc.info/kak-postroit-krasivyj-dom-v-majnkrafte/
- https://mc-monitor.ru/blog/kak-postroit-dom-v-minecraft
- https://gamai.ru/index.php?newsid=128
- https://ga-top.ru/blog/kak-privatit-territoriyu-v-minecraft