In this review, the author shows how to make homemade overhead sectional garage doors with your own hands.
The first step is to cut off a 50*50 mm corner according to the height of the gate using a grinder. Then we drill holes for attaching the corner.
Next, the author cuts blanks from a metal plate to make lugs for attaching the corner.
1
Advantages and disadvantages of this design
Advantages and disadvantages
Advantages:
- This gate design does not interfere with the exit/entry of a vehicle in a small area. Cantilever doors can significantly save space.
- The presence of the lower fastening of the console system allows you to equip the gate in any climatic conditions.
- The finishing can be made of different materials, for example, vertical lathing, corrugated board, forging and more.
- Possibility of choosing a design option, for example, from a sandwich panel or corrugated sheet.
- Compared to other types of gates (for example, swing gates), there is no such thing as sagging hinges. The existing automation and gate closing/opening mechanism provides for a long operational period.
- It is possible to choose different automation for gates.
Flaws:
- Unlike other types of gates, for example, swing gates, the installation of sliding gates requires more financial costs, approximately 10–20%.
- To attach the console part and the drive, it is necessary to make an additional foundation.
- You will need to allocate sufficient space along the fence.
conclusions
When creating sliding garage doors, you should take care of several nuances - calculating the door leaf, finishing the opening, pouring the foundation, preparing components and protecting the gate. With a detailed analysis of such operating features, it is possible to build a reliable structure.
Recommended Posts
Do-it-yourself lifting gates
Sliding gates for the home
Overhead garage doors
DIY gate automation
Sectional garage doors
Swing garage doors
Types of construction
The gate design is divided into several types, each of which differs from each other:
- Hanging. Since Soviet times, this heavy, but at the same time reliable design has gained immense popularity. In it, the canvas on roller trolleys is fixed to a beam, which is located above the passage, up to 5 m high. As a result, this height is a limitation when tall vehicles enter.
- Console. This type of gate is ideal for the climatic conditions of Russia. This design is not equipped with a beam above the driveway. Such gates will not be able to be damaged by snow drifts, wind, dust, etc. Thus, the canvas is fixed to the beam using roller carts. In this case, the entire structure is fixed on a powerful foundation, which is poured on the side of the opening.
- On screw piles. Metal piles are screwed into the ground to a depth of 1500 mm, which will support the entire structure. Their production and installation will take up to 3 days.
- Mechanical. These gates are opened/closed manually. Mechanical ones are much cheaper in cost and easier to install. They are suitable for cases where a dacha or country house is rarely used.
- Automatic. Such gates are the complete opposite of mechanical ones. They are equipped with an electric drive and remote control. The best option for regular use.
Regardless of the type of construction, sliding gates require free space along the fence on one side. In this case, it must be equal in size to the opening. As for console systems, the space should be 120–200% larger.
Step-by-step instructions for building overhead gates with your own hands
To build a gate that goes to the ceiling when opened, you will need to perform the following steps:
- First of all, you need to prepare the opening. To do this, you need to insert vertical supports into the floor base to a depth of 2 cm. You can use pieces of 80x120 mm bars as parts. The elements are fixed with anchor bolts.
- After this, the frame is assembled. At a distance corresponding to the length of the gate, you need to mount a horizontal rail so that it is parallel to the lintel of the opening.
- From 4 iron corners you will need to weld 2 slats along which the rollers that are attached to the sash will move. They are fixed with self-tapping screws and iron fittings to the slats, which are located in the upper part. Periodically it is necessary to check the reliability of fixation of parts.
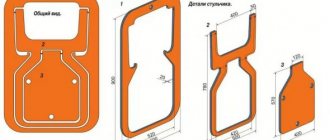
- After this, the frame of the canvas is made. To do this, you need to fasten iron profiles using a welding device, fasten them to each other and attach several diagonal strips to the finished box. The assembled frame resembles 6 squares fastened together.
The up-and-over gate frame consists of 6 squares
- At the top of the frame, the corners should be equipped with rollers.
- The gate frame must be covered with material that is protected from corrosion. Self-tapping screws should be used for fixation.
- Vertical support rails should be equipped with movable brackets. Channels must be installed on the parts.
The gate must be equipped with a mechanism for moving the leaves
- Attach springs to the installed brackets.
At the end, you will need to hang the canvas on the constructed frame. To protect the garage from thieves, the structure must be equipped with a reliable lock and latch. If desired, the gate can be insulated - for this you will need polystyrene foam.
Insulation of garage doors
You will first need to treat all the cracks between the frame and the base with polyurethane foam. This will protect the garage from heat loss through the gate. Next, you need to treat the doors with a primer or enamel, which can protect against rust. After the coating has dried, it will be possible to insulate the gate.
The gate can be insulated from the inside with foam plastic
The foam is installed on a metal base or inserted between the frame joists. If you plan to use the first option, then you only need to glue the material to the sashes. If the second method is chosen, you will first need to create a frame made of wood, and then install the material.
To ensure that the gate opens and closes without problems, the structure should be adjusted. To do this you will need to tighten the spring. This can be done by tightening the nut. If the problem is not solved, you need to change the mounting location of this part. The gate will be easy to lift if you equip it with a handle from the outside, at a maximum distance of 1 m from the ground.
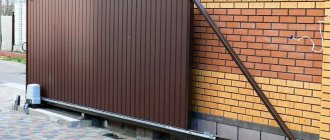
Automation question
A car alarm can be used as an automatic lifting mechanism. The drive is suitable for a reversible self-locking winch, which operates from a 220 V power supply and has a traction force of at least 120 kg.
Automation will have to lift the gate up to the ceiling. The main disadvantage of this design is its high cost. In this case, the automatic drive is mounted on the ceiling and lifts the leaf using a cable, one part of which is attached to the sash, and the other to the electric drive.
Automation layout for overhead gates
The cable is placed in a metal profile, which is fixed in a suspended state on brackets to the ceiling structure.
Another option is to use a hydraulic drive. 2 drives must be fixed on both sides from the inside of the base.
Automatic lift gates with hydraulic drive
The hydraulic pipes with which they are equipped are installed in the inside of the opening.
Video: manufacturing a lifting and rotating structure
To properly install a garage door, it is important to draw up a drawing and follow the sequence of actions. Finally, you need to make adjustments to the structure.
- Author: misaf
Rate this article:
- 5
- 4
- 3
- 2
- 1
(4 votes, average: 2.3 out of 5)
Share with your friends!
Gate calculation features
Features of independent calculation
Design calculation is one of the most important and priority stages. You should not ignore this stage, since the construction of sliding ones is much more complicated than swing ones.
The calculation process includes the following steps:
- Determining the height and width of the opening. As a result, it will be possible to select the required type of gate for free movement.
- Counterweight calculation.
- Estimation of the weight of the structure being constructed.
- Making a sketch or drawing.
The calculation of the width and height of the structure should be based on the market range. So, if a profile or pipe can be easily welded, then cutting sheets of corrugated board for the purpose of adding it is very difficult. Plus, the result will be unaesthetic.
Sliding gate calculations
Moreover, understanding what the final weight of the structure will be, appropriate mechanisms and moving parts are selected that can cope with the load.
If the canvas is supposed to be large, then be sure to take into account the wind load. Add a small margin to the existing wind force prevailing in your area.
Although the easiest option for obtaining calculations is to contact a specialized company that will provide a folder with drawings and calculations, you can do this yourself. It is worth immediately noting that all of the above calculations apply to cantilever-type sliding gates. They are more complex than all other types, so let’s look at them in more detail.
Stage 5. Verification
The main indicator of correct installation is the presence or absence of clearance when the blade is lowered. In this case, the seals will properly perform their functions of sealing and protecting the garage from precipitation. It is worth noting that the seals should be invisible from the outside. If they are visible, then the measurements were taken incorrectly.
Gates
Next, the bottom panel is inspected. The seal fixed at the bottom should fit as tightly as possible to the floor. If a gap is detected, the structure is checked by level. To eliminate defects that are not level, the position of the guides is adjusted.
The last thing to check is the balancing (balancing springs). They can be located on the sides of the profiles or on a torsion beam - it all depends on the area of the canvas. If you raise the gate by 1.5 meters, then the springs should be in place, without falling or rising.
Video - Installation of sectional doors
Sliding gate device
This type of gate has the following structural elements:
- Guide beam. Takes on all their weight.
- Trolley or roller support. You need 2 of them.
- Removable end roller. When closed, it serves as a support.
- Upper/lower catcher. When the gate is closed, the lower one takes the load, and the upper one reduces the windage.
- Bracket. It is important for keeping the sash from swinging sideways.
- Stand. A support is installed on it, which organizes the movement of the sash.
Roller supports are installed on the foundation, which take on the load of the guide beam. The rollers are placed inside the supporting console.
We are drawing up a project
Make a project
Before starting work, you will need to remind yourself of elementary concepts from mathematics and drawing.
- Take measurements of the opening that will need to be closed.
- Analyze how much space there is for the outgoing sash.
- Does the wall structure allow rails to be mounted on it?
- Will it be possible to install an additional foundation?
- Is it possible to install the gate from the inside?
- What will the frame be covered with?
- Will insulation be provided?
- Will an automatic opening system be installed?
Sash selection
Sliding gate leaf
The gate leaf is also subject to high demands. Its design must be sufficiently rigid and stable. This is important so that in the event of a strong gust of wind or ice, the sash functions well. Moreover, it must be equipped with additional stiffening ribs so that it does not sag under its own weight. All this should be taken into account when creating drawings.
Hacking protection
To protect sliding garage doors, vertical locks that are recessed into special grooves are suitable. A simple solution is to make a sliding bolt.
To create such a mechanism, you will need a piece of pipe with holes cut in it. The fittings are placed in the pipe. This type of constipation has several disadvantages. For example, it will be difficult to pull the canvas to the frame. To make the fit tighter, all operations must be done manually, which requires a lot of effort.
It is better to choose screw-type deadbolts. They attract the canvas well, and in the case of double threads they act as a locking device. When creating protective elements for gates, the only rule is followed - the mechanism should not interfere with the functioning of the structure.
Selection of components
The availability of certain components directly depends on the height and width of the sash, as well as its weight. So, today on the market you can find a number of companies that provide high-quality equipment, namely:
- Combi Arialdo and Flatelli Comunello from Italy.
- Roltek and Doorhan from Russia.
- Alutech from Belarus.
Installation work
Installation of sliding gates
The movement of the door leaf should be carried out from the inside of the site, namely along the fence. Based on this, it is necessary to prepare a place for the gate so that absolutely nothing interferes with this process.
The installation process includes 4 steps:
- Making the foundation.
- Electrical wiring.
- Installation of a response pole.
- Automation installation.
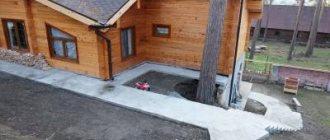
Making the foundation
Stages of foundation construction:
- First, marking is carried out. Measure 500 mm from the fence (the width of the foundation). You also measure from the edge of the gate a distance equal to the rollback (the length of the foundation). So, you will see the perimeter of the future foundation.
- It is often possible to use fence support posts. If this is not possible, then a counter post should be installed on the opposite side. It must be installed so that it is inside the area, and not in the opening itself. Otherwise, it will reduce the width of the opening.
- If the gate will operate automatically, then be sure to organize a place for laying the wiring. To do this, you can use a square metal or plastic pipe/box. The diameter of the pipes is not less than 25 mm.
- Now you can start digging a pit. The depth of the trench is up to 2 m, below the soil freezing level (different in each region).
- To make the embedded element, you can use channel 16. Its length should correspond to the length of the trench. Reinforcement Ø12 mm is laid in the foundation. The reinforcement must be welded to the channel and connected with cross braces.
- Thus, the resulting embedded element is placed with the reinforcement down. When laying, make sure that the side of the channel is adjacent to the fence support post. Also, the channel must be set strictly level and exactly parallel to the gate opening line.
The embedded element must be flush with the road surface. The minimum gap allowed between the bottom edge of the gate and the road is 10 cm. This gap can be increased using an adjustment platform. But it will be impossible to reduce this gap without breaking the fastenings.
Installation of the embedded element
If for one reason or another a gap of 100 mm is not suitable, then install the embedded element deeply.
As for concrete work, it is carried out when the installation of the embedded element is completely completed. The concrete level should be flush with the embedded element.
Installation
Gate installation
When the foundation has hardened, you can begin to install the gate. To do this, you first need to make markings. Along the line of the opening, not reaching the counter post 30 mm, pull the cord. This cord is the gate's movement path. The height of the cord tension is 200 mm. Further work looks like this:
- Determine the extreme position of the first and second roller support. From the edge of the opening, step back 15 cm along the plane of the embedded element and draw a line for the position of the outermost first trolley. Calculate the line of the second cart as follows: measure the entire length of the gate with the cantilever part and subtract 10 cm from the edge of the return post along the plane of the embedded element. As a result, you will determine the location of the second cart.
- Now insert the roller supports into the supporting profile, placing them in the center.
Afterwards it is necessary to weld the second trolley of the adjustment platform. Then roll the gate leaf into the opening and make final position adjustments. Make small tack welds by welding the second adjustment pad, the resulting action looks like this:
- Remove the canvas from the roller cart.
- Next, remove the carts from the platforms.
- Weld the platforms to the embedded element.
- Attach roller carts to them.
- Slide the canvas onto the roller supports.
- Close the gate and use a wrench to adjust its position.
How to prepare a doorway
Before installing sectional garage doors, you need to prepare the doorway. To do this, you need to correctly determine its dimensions and how well standard canvases will fit there. Using a level, you need to check that the surfaces of the opening are on the same plane. Both the vertical lines and the upper part adjacent to the ceiling must be parallel to the floor.
All this work must be done with your own hands during construction in order to avoid additional work before installation. If the parameters are correctly determined, subsequent adjustments after installation will be minimal.
You can find out the dimensions of the depth of the room that is needed to install sectional doors based on the height of the doorway. You need to add 50 cm to it. When installing a gate with a drive, 100 cm is added to the height parameter. When building a garage, you need to use very durable materials, otherwise it will be very difficult to reliably install a sectional gate structure with your own hands.
When drawing up a garage construction project, you need to remember that the optimal lintel dimensions are 25-50 cm. Reviews from experienced garage owners will confirm this. If this is not taken into account, the design will be much more complicated and, as a result, significantly more expensive. To create a good fit of the garage door parts, as well as to improve thermal insulation, the doorway must be leveled and plastered with your own hands.
Coloring
Painting the gate
All metal elements of the gate must be painted. Pre-degrease the surface. To do this, clean the surface and sand it with a sanding disc on a grinder. Wipe some areas, such as protected areas, with acetone. Now you can start priming. It is applied evenly. Moreover, the primer must be applied so that there are no drops or streaks. Thanks to such preparatory work, the paint will lie evenly. As a result, the entire gate structure will be completely protected from corrosion.
The paint should be applied in two layers and only after the first has completely dried.
Necessary tools for work
To carry out all the work, you will need to have the following tool:
- Inverter welding material. Such a unit will not damage the metal.
- Bulgarian.
- Air compressor for painting.
- Pliers.
- Drill.
- Roulette.
- Level.
- Riveter.
Common Mistakes
If you do not have sufficient experience in performing such work, then there is a high risk of making some mistakes:
- Insufficient foundation preparation.
- Incorrect installation and fastening of all components.
- Incorrect weight of the gate for the load-bearing beam.
- If you hear a creaking sound, this is evidence of sand getting into the bearings.
- Do not allow paint to drip.
- Be sure to take into account the depth of soil freezing. Otherwise, the pillars may skew in one direction.
Photo: options for finished sliding gates
Automatic wrought iron gates
Sliding gate automation
Wooden sliding gates
Forged
Beautiful gate design
Mechanical
Metal
Sliding gates at the dacha
With automatic
With built-in gate
View from the yard
Street sliding gates
Scheme
In the diagrams you can find many structural details for the manufacture of sliding gates:
4 meter gate drawing
Design
Methods for fastening sliding gates
Assembly drawing
Diagram of sliding gates and openings
Equipment
Gate base
Preparing the opening
Construction scheme
Installation of columns
Mortgage installation diagram
Did the article help you?