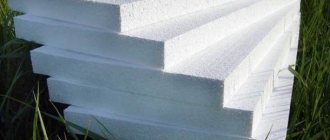
Materials with low density, excellent thermal insulation characteristics and, at the same time, quite acceptable rigidity and the ability to withstand mechanical loads, open up wide possibilities for floor insulation, including even in apartments of multi-storey buildings. A typical representative of such materials is polystyrene foam. And such floor insulation with polystyrene foam under the screed is especially important on the first floors located above unheated basements or ventilated cold plinths.
Floor insulation with polystyrene foam under screed
As we will see later, you can carry out similar work yourself. The main thing is to purchase high-quality insulation material of the required thickness and strictly follow the technological recommendations for pouring the screed.
What is Penoplex, types, scope of application
Penoplex - under this brand back in 1998, extruded polystyrene foam boards - EPS - began to be produced in the Leningrad region. A little later, factories appeared in Perm and Novosibirsk, then in Taganrog, two factories in Kazakhstan, in the Tula region. So the geography of production sites is wide.
Penoplex insulation boards are orange in color
Brands for private construction
Currently, two types of Penoplex slabs are produced - for private and professional construction. For private there are three types: Comfort, Foundation and Wall. The names reflect the scope of application of the materials. They differ in density and compressive strength.
Penoplex Comfort and foundation are used for walls. What is the difference? Strength and density
The remaining characteristics are the same - they are produced from the same raw materials, using the same equipment. But their purpose is different: Comfort - sound and heat insulation, Foundation and Wall are more aimed specifically at thermal insulation. Although, according to the manufacturer, their noise reduction indices are the same. It’s just that in the Comfort category there is a larger selection of plate thicknesses: 20 mm, 30 mm, 40 mm, 50 mm and 100 mm. The rest have only two thicknesses - 50 mm and 100 mm.
Which Penoplex for flooring under the screed can be placed from this line? Penoplex Foundation. It fits all the criteria. Recommended for laying floors on the ground and on a concrete slab, above a ventilated underground, on a loggia or balcony. The only thing I'm not happy about is the thickness - there are only two options - 50 mm and 100 mm. This is inconvenient since the required/desired thickness is often different. This limits the use of this type of material in screed.
For professionals
Line for professionals - Base, Facade, Roof, Slope, GEO and 45. There are also blocks and shaped products. The blocks are used in heavy construction and private owners have not yet adapted them. Shaped products are a useful thing for insulating wells and solving other similar problems.
Of all the above, it is recommended to use GEO and Slope for floor screeding. The difference between them is in shape: GEO has a standard type of slabs, Slope - slabs with a longitudinal difference in height. They will come in handy if you need to create a floor slope. Their density and strength are higher than those of the materials of the previous category.
Characteristics of PENOPLEX, which can be placed under a screed
Penoplex GEO is convenient to use under screed because there are slabs of this category of different thicknesses - 40 mm, 50 mm, 60 mm, 80 mm and 100 mm. It is easy to dial the desired thickness.
Sometimes they think of using Penoplex 45 for the floor under a screed, but this strength is clearly excessive. This type of material is used in road construction. In any house there will not be even close to such a load. So this type of EPS should not be used.
Parameters for choosing insulation, what we pay attention to
When purchasing floor heating from expanded polystyrene, you should take into account indicators such as: quality and variety.
Initially, the quality of polystyrene foam boards for heated floors is determined by their appearance. The following points should be taken into account:
- Color - should be bright and uniform, which indicates compliance with the technological process. Most often sold in blue or orange. The color scheme itself does not affect the characteristics of the product.
- Smell – a strong odor is unacceptable, a slight, slight specific odor may be present.
- The shape is clear geometric, and the edges are smooth and do not crumble.
- The granules are the same size without voids.
- The surface is flat, otherwise the thermal insulation qualities will be reduced.
For your information! Experts recommend especially inspecting the place of the cut or break. If the granules are intact in this area, we can talk about their poor adhesion to each other. In a high-quality slab, when broken, the granules should also be destroyed.
Penoplex thickness for screed
The question often arises not only about the density or brand of Penoplex under the screed, but also about the thickness. To say for sure, it is necessary to carry out thermal calculations. After all, the thickness of the insulation depends on the heat loss that goes through the floor. If it is a floor on the ground, it is one thing; if it is a screed on a concrete slab in a high-rise building, it is quite another, even if they are in the same climatic zone.
And the thickness of Penoplex depends on where you are going to make the screed and how you will use it. In the case of laying a heated floor, the layer is made to the maximum - there will be less heat loss, lower heating costs.
What thickness of Penoplex should be placed under the screed - table of recommendations for the first floor and unheated rooms below
However, calculations are done very rarely; usually the principle “like everyone else” is used. Here are the average thickness values of Penoplex for floor screed:
- Screed on a concrete floor with a heated room from below - 20-40 mm. If you want to achieve a soundproofing effect, it is better to lay 50 mm thick.
- For concrete preparation (on the ground) and a slab with an unheated room below - from 100 mm and more - depends on the region. The table shows the manufacturer's recommendations for the thickness of Penoplex for the first floors or higher, but with an unheated room below.
If you plan to make a heated floor (water or electric), then add another 10-20 mm to the thickness.
Brief information about the material
The technology for producing extruded polystyrene foam is quite simple. The initial mass is subjected to an extrusion process (the term “extrusion” or “extrusion” means pressing through special holes) in order to obtain such indicators as hydrophobicity, low thermal conductivity, low heat capacity and others.
Expanded polystyrene, or penoplex, as it is also called, is white and consists of individual granules.
This kind of insulation can have several classes at once:
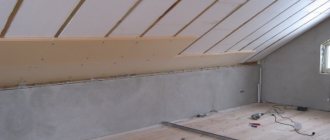
Insulating the floor under the screed
Any screed (concrete, CFRP, self-leveling compounds) on top of Penoplex is done in the same way. The presence of reinforcement also does not affect the technology of laying slabs. Let's start with the fact that the slabs have formed projections, that is, a locking connection. This eliminates the appearance of through cold bridges.
It is cut, like any EPS, with a fine-tooth hacksaw (for plastic or metal). A more serious tool is not required. You can straighten the cut or trim it a little with a sharp knife (regular or construction knife). The rules for laying on the floor are very simple:
- For better heat retention, it is better to lay two layers. Their total thickness should match or be slightly larger than the selected one.
- Before laying Penoplex on the floor under the screed, roll out the damper tape around the perimeter.
- We lay the first layer so that the seams in the rows shift and there are no intersections in the form of a cross. That is, we start the first row, for example, with a whole slab. The second is from the segment that remained after trimming the last one in the first row. If it is too narrow, it is better to cut the new one in half.
- You can glue the joints of the first layer slabs with tape, but this is not necessary, since the edges in the form of locks are sufficient fixation. But for those who like it “more reliable”, you can glue it.
It is necessary to lay penoplex under the screed with the seams offset so that they do not coincide - The slabs of the second layer are laid so that the seams do not coincide. That is, to lay the first row in the second layer, halves are needed. To do this, the slab is cut lengthwise. That is, the junction of two rows will be above the middle of the bottom sheet. And so that it does not completely coincide, you need to start the first row in the second with a quarter. In the second row it is very advisable to glue the joints. Firstly, because they will be walked on - there is no escape from this. Secondly, because it is necessary to protect the joints from leakage of the solution.
Should polystyrene foam be attached to the base? For what? Loaded with a screed and everything on it, it won't go anywhere. If this installation method seems very unreliable to you (but this is what the manufacturer recommends), you can fasten it. The first layer is a dowel-nail with a large plastic head. The second one is usually not attached, but you can attach it with glue (PVA, for example). You can secure the first one with glue or some kind of mastic, but you will have to wait until the adhesive composition dries.
Characteristics of extruded polystyrene foam and its harm
Since the material has a porous structure, it retains heat well. The thermal conductivity of extruded polystyrene foam depends on its density.
Technical characteristics make it possible to use it in harsh Russian climatic conditions. The material does not lose its properties in the temperature range from -50° to +75° C. Resistance to rot and frost resistance are not the only advantages that extruded polystyrene foam has.
- Durability. Service life is up to half a century;
- Resistance to temperature changes, which makes it possible to store the material outdoors, but not in direct sunlight and preferably in its original packaging;
- Environmentally friendly, which is important for human health and does not harm the environment;
- Easy installation;
- Reasonable price;
- By using EPP as insulation, you can do without the use of other heat and waterproofing materials;
- Compact sizes. In particular, this refers to the thickness of EPP sheets. It is about 20 cm, which is 10 mm less than polystyrene foam and 20 mm less than mineral wool.
Penoplex screed: technology
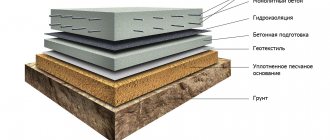
Let's consider the simplest case - Penoplex for a floor under a screed on a concrete base. This can be concrete preparation in a floor structure on the ground, or a concrete floor in a high-rise building or private house. The procedure is as follows:
- Local irregularities larger than 5 mm are leveled. The manufacturer does not specify the alignment principle. That is, it can be a leveling screed (if there are too many irregularities) or local filling of potholes and cracks with a solution. In the second option, it is necessary to trim/cut/knock down the strongly protruding fragments. Sometimes they even level it with sand. This method is also not excluded.
Standard scheme for using Penoplex under screed - Seal all cracks and crevices. Along the perimeter of the premises, around pipes and risers, communication inputs.
- Roll out the edge or damper tape.
- Lay Penoplex in one or two layers. Tape the joints with tape.
- Spread the film (another waterproofing material) with an overlap of 15-20 cm, the joints taped. We place the edges on the walls and secure them with strips higher than the planned thickness of the screed.
- The beacons are set, the screed is poured and leveled.
You can level the base with sand, but do you really have a lot of unevenness
? Actually, the whole technology. All clear. Only questions may arise regarding the minimum thickness of the Penoplex screed. The manufacturer recommends at least 40 mm. When laying floors in wet rooms, it is advisable to cover the slab with waterproofing. Choose the type of waterproofing material yourself. The rest of the technology is the same.
Why foam?
The answer to this question is clear: the material has a number of undeniable advantages. For example:
- The structure of the foam is porous, which provides the material with low thermal conductivity. Accordingly, heat will not leave the room, and cold air will not get inside.
- Due to its structure, foam is not affected by moisture. Therefore, in some cases, you can save on laying a layer of waterproofing.
- Polystyrene foam belongs to the category of fireproof materials. It burns, of course, but without the constant presence of an open source of fire it quickly goes out.
- In addition, the material is lightweight, easy to use and is not subject to rotting or destruction over time.
The method of performing foam screed has its own characteristics and nuances. It is worth noting that the technology is quite simple, so absolutely anyone can cope with the work.
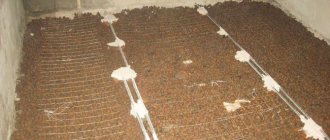
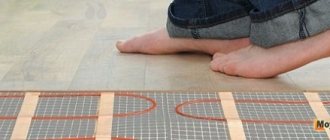
Laying heated floors on Penoplex
There are differences, but they only concern the laying of pipes or heating cables/mats. Preparation of the base, the first layers, including the waterproofing layer on Penoplex, were described above. A steel mesh is laid on the waterproofing film. It is needed to fix the cable or pipes in a given position. When using heating mats, they can be placed in a layer of tile adhesive - this is simpler and more effective, so this type of heating elements for the floor is rarely used at this stage (although no one prohibits it).
Which mesh should I use? Depends on the step at which you need to lay the pipe or cable. You can lay 50*50 mm, 100*100 mm or 150*150 mm. It is important that the chosen scheme can be implemented. What is the thickness of the wire in the mesh? Not less than 3 mm. In the case of a cable, perhaps 2 mm is possible. And before pouring the screed, the pipes will be filled with coolant and need to be held in place, so a mesh made of 3-4 mm wire is needed.
You can use Penoplex under a warm water floor without any problems
To prevent the mesh with coolant from moving when filled, it must be attached to the Penoplex. There are several options:
- Plastic clips that are driven into the insulation. But the thickness of the mesh rods is at least 4 mm.
- The metal tie is aimed at the insulation on both sides of the mesh cell.
- Special harpoon clamps.
- Special tires, but they are expensive.
- A mat with bosses is laid on top of the Penoplex. Then the grid is not needed. But these mats are also expensive.
After the mesh is secured, we attach the pipes or cable. The easiest way is with plastic ties, or knitting wire. But the wire can theoretically fray a pipe or cable as it increases or decreases in size (from heating and cooling) during operation. Therefore, if knitted with wire, it is in a plastic sheath. Manufacturers of pipes for heated floors have it.
Actually, that's all. Then they pour the screed, level it, and wait until the concrete gains strength.
Adhesive for extruded polystyrene foam
Compositions for EPP are produced in several types, each of which is used for a specific type of work (for example, for work on brick, on concrete, for work in winter). If we are talking specifically about insulation, then adhesives for Penoplex (one of the brands presented on the Russian market) are divided into three groups:
- Polyurethane. Such compositions have the form of foam, so they are applied using a mounting gun.
- Bitumen. The binder (bitumen) is excellent for reliably gluing penoplex. In addition, the composition has excellent waterproofing characteristics.
- Polymer-cement. Unlike the previous type, the adhesive properties of this glue are much better. You can glue any materials to it, not just penoplex.
Extruded polystyrene foam, despite existing myths about its dangers, is a completely safe material to use, as well as its production. That's all, if you have anything to add, write to us in the comments. And at the end, a short video on how to choose the right quality insulation:
Dry screed on Penoplex
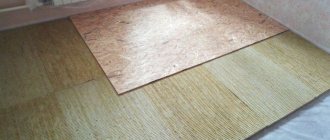
Cement-sand or concrete screed is, of course, good. And it is the best solution if you want to make a warm floor from heating. But the mass of materials amounts to tons. Raising this to any level is already a problem. You also need to wait at least 28 days for the concrete to gain strength. It's faster and easier to make a dry screed. Not in the sense that from a solution that is called dry. And using sheet materials - plywood, OSB, gypsum board. This base will be suitable for any finishing coating. Even under tiles, but with certain reservations - glue is needed for complex unstable bases.
You can make a flat floor without concrete and mortar: lay Penoplex for the floor under a screed made of gypsum plasterboard, plywood or other sheet materials
How to make a dry floor screed using Penoplex? Just:
- Level the base.
- If necessary, we lay or apply waterproofing.
- We lay out Penoplex slabs, preferably in two layers with bandaging of the seams.
- We lay one layer of sheet material. Again, we move the seams.
- The second layer of sheet material is also staggered.
- We fasten through with suitable fasteners. It depends on the material that was laid on the insulation.
- Further on the technology of laying the flooring.
The thickness of gypsum boards for laying on Penoplex on the floor is 20 mm, plywood is better to take 10-12 mm, OSB can be smaller. You can also put GVL on Penoplex. The slabs lie flat, without differences, so the base is suitable for this material. But it does not have the disadvantages of gypsum plasterboard and OSB, and the cost is approximately the same as them.
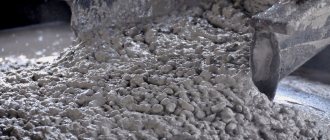
Production of concrete mixture using EPS
To increase the protective qualities of concrete, in some cases granules of extruded polystyrene foam are added to the mixture. First, dry cement is diluted in water, mixed with a mixer until smooth, gradually adding granules (in a ratio of 1:3 or 1:6). This mixture is called polystyrene concrete. The amount of granules added will determine how warm the floor will be. But under load, such a structure can collapse and the concrete will begin to crumble. Such floors must be protected from exposure to ultraviolet radiation, because it has a negative effect on EPS.
Options for semi-dry screeds
| 1. The semi-dry screed is cut off using polyethylene film. | |
| 2. The use of a heat and sound insulating layer - mineral wool board, polyethylene foam or polystyrene concrete. Separated from the screed with plastic film. | |
| 3. Screed mounted on the foundation. Heat and waterproofing are applied. The top layer (screed) is separated by film. |
Recently, when leveling indoor floors, semi-dry screeds have become increasingly used. The advantage of semi-dry screed is the reduced drying time of the mortar, which significantly reduces construction time.
Semi-dry floor screed can be applied to both concrete and wooden floors. When forming a semi-dry screed, it is important to follow the technology at all stages of work.
Most popular mistakes
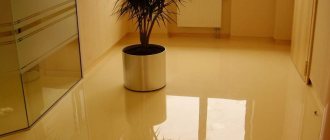
It is very important to use self-leveling floors correctly.
It was called self-leveling because it spreads perfectly over the surface, while forming an even base, but the solution must be helped to distribute evenly. If the composition does not reach the corners, then you poured it far from the corner, and now you need to pull it there with a spatula. Choose the right roller: the needles should be a couple of millimeters above the filling level. This way he won’t move the train across the floor, but on the contrary, he won’t be able to move it from its place.
Think immediately about the height of the thresholds and dampers so that the composition does not spill over the edges. You may feel that the threshold is too high to keep the solution in the room. However, the slope of the room and its unevenness can deceive you. It is better to immediately establish barriers than to hastily look for material to “plug the gap.”
Measure the height of the room before pouring the self-leveling mixture. It is possible that there will be a bump in the center of the room, completely invisible at first glance, and after the completion of the repair work it will stick out significantly. Agree, this would be an offensive omission.
Screeding floors using a self-leveling compound is an interesting and easy process that requires the participation of two or more people and the work can be completed quickly.
If you decide to make self-leveling floors with your own hands, the video will help you make sure that this is not a difficult job, although it requires minimal knowledge of technology.
Source
Preparing the base
The finished base should look clean and free of gaps and cracks. Therefore, before pouring a self-leveling floor, prepare the surface. After this, prime the floors and let the solution dry and absorb. Until the primer dries, the liquid floor cannot be poured. If you do not have a primer, then you can use a liquid solution of the same mixture for leveling - mix the powder with water until a slightly thick mass is formed.
Creating a self-leveling floor with your own hands, as evidenced by reviews from those who like to do everything themselves, is easy - it consists of a concrete base, a primer and a self-leveling solution.
Allowable maximum
The maximum thickness of a semi-dry screed depends on the need to hide communications and unevenness of the subfloor. Sometimes, with large differences and unevenness of the base, the thickness of the screed layer can reach up to 150 mm.
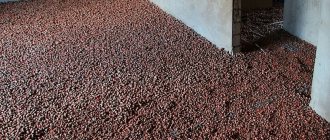
If it is necessary to make a screed of greater thickness, use expanded clay flooring, which will help reduce the specific weight of the screed and save costs on the material.
If there is a heating system inside the screed, the thickness of the screed directly depends on the diameter of the pipes.
wall panels for loggia photo
The thicker the layer of semi-dry screed, the higher the loads the floor in the room can withstand during operation.