- Briefly about the houses of the P-46 series
- Features of apartments of the P-46 series
- Redevelopment options for houses of the P-46 series
- What is not allowed when remodeling apartments of the P-46 series
- Redevelopment of a 2-room apartment of the P-46 series - first option
- Redevelopment of a 2-room apartment of the P-46 series - second option
- Redevelopment of a 3-room apartment of the P-46 series
- How much does it cost to remodel an apartment?
- Conclusion
We continue to talk about the redevelopment of apartments in houses of different series. In this article we will talk about the P-46 - a Moscow standard series, the houses of which were built in many residential areas of the capital.
You will learn:
- features of redevelopment of apartments of the P-46 series;
- all possible options;
- how much does approval cost?
If you are an interior designer and work with different types of houses, you may find our articles about the series useful: II-18, KOPE, Vulykha Tower, II-49, P-44, P-3, II-68, I-209A, and also Stalinka.
Briefly about the houses of the P-46 series
Houses have been built in residential areas of Moscow since 1971. The authors of the project are MNIITEP.
Residential buildings consist of two or more entrances, 12-14 floors each. There are several modifications - P-46/3 and P-46/5 for three- and five-story buildings.
The layout of the apartments depends on the type of section:
- 1- and 2-room apartments are designed in the entrances of four apartments;
- there are 3-room apartments in the rotating sections.
Houses of the P-46 series are presented in Maryino, Yuzhnoye Butovo, Zhulebino, Mitino, Zyuzino, Medvedkovo, Kuzminki, Kuntsevo and other areas of Moscow. Photo: Wikipedia.
shower in construction design. What's the difficulty?
Is it really that difficult to build?
Why do all craftsmen want to install only a ready-made pallet (acrylic or metal). What are the dangers of making a shower yourself and tiling it? Masters online: 334 Orders per week: 1,478 Offers per day: 679
Yes, there are no difficulties. The craftsmen just don’t want to bother, or your pallet design project is so complex that you just don’t want to waste time during the repair season, and then watch how you crawl around in it with a magnifying glass, accepting the work and telling the master everything that You were advised on this forum. Buy an apartment in St. Petersburg - I will make you such a tray according to any of your projects. Not for three kopecks, of course, and not in one day. Such a tray was made back in the USSR, when showers were made in the toilets of communal apartments. Some is still functioning.
Not difficult, but it requires some knowledge and experience and takes more time. But money masters want to earn a lot and it’s faster and easier for them to deliver three ready-made ones than to build one for the same money, that’s all the arithmetic.
Yes, it’s not the craftsmen who want to install a ready-made pallet, but it’s a matter of price. For installing a pallet, possibly pouring mortar, applying waterproofing, a good drain, sewerage, laying tiles, this requires time and decent money for the master. For example, I would love to do this, but my prices for this work are more profitable for the client to supply a ready-made pallet.
How much does it cost to order this work from you?
So this is all calculated according to location, it depends on the water supply, sewerage, walls, floor, shower size and tile size, many factors..
No, it’s nothing complicated, but it’s more expensive to build.
This will already be a design work, which means everyone has their own prices.
Ready made faster but also cheaper. Doing your own shower requires more professional skills. In a stone shower, you must first install a channel. conclusion, install the primary part of the drain, pour concrete up to the drain, lay pipes for the mixer, plaster the walls, go through the walls and floor with two layers of hydrostop, lay tiles on the walls and floor, install the drain, mixer, something like this
No problem at all. You make a side out of foam blocks and cover it with hyperdesmo type waterproofing. The main thing is to make the correct slope towards the ladder. And the masters have less hemorrhoids this way)))))
Features of apartments of the P-46 series
The main one is the presence of load-bearing walls inside the apartments. Most of them are exactly like this, and they cannot be dismantled. The only permitted option is to create a new opening reinforced with metal structures. Here's what it looks like:
In houses designed by MNIITEP, the size of the standard opening in a load-bearing wall is 90 cm. It is almost always impossible to make it larger. Openings always require permission from the authors of the house project.
Other features:
- all apartments have balconies or loggias;
- ventilation passes not only through the bathroom, but also through the kitchen using a ventilation duct. It cannot be dismantled, reduced or expanded;
- internal walls have a thickness of 140 and 180 mm, interior partitions - 80 cm;
- separate bathrooms in apartments;
- in the kitchen - electric stoves;
- all rooms are isolated.
Typical arrangement of sections in houses P-46.
1-room apartments have an area of 38–40 sq. m. m., 2-room apartments – 50–52, and 3-room apartments – 80–82. Kitchens are the same everywhere - 8-9 sq. m.
Filling the pan
Since in most cases the thickness of the pallet screed exceeds 10 centimeters, it is preferable to divide it into two layers. Make the first, rough layer as thick as possible, and the finishing layer as minimal as possible.
Although if the height of the bottom of the pan is less than 8 cm, it will be more convenient to fill it in one stage.
Through trial and error, I developed the following sequence for myself: first, a thick rough layer is poured, not reaching the design height of 4-5 cm, and then a finishing layer of screed is formed from the missing 4-5 centimeters.
Why exactly 4-5 cm? This thickness was chosen in case of poor adhesion between layers and to make it possible to safely use ordinary cement-sand mortar for finishing. Even if the top layer does not adhere well to the bottom one, it will have sufficient load-bearing capacity. Moreover, this approach will allow the use of a base layer of expanded clay concrete with a minimum amount of sand.
As you know, ordinary DSP is not recommended for screeds thinner than 3 cm. In fact, thinner layers can be formed with ordinary mortar, but a separate article is needed to cover this topic. Therefore, we will conventionally assume that cement-sand mortar without additives should not be laid in layers less than 3 centimeters.
It is recommended to reinforce both layers: the bottom one is usually very thick and by default requires reinforcement, and the top one has some chance of not sticking well to the top one and therefore must have load-bearing capacity. In fact, if everything is done correctly, the probability of the top screed peeling off is almost zero, but more on that below.
For the bottom layer, construction (masonry mesh) is used, and for the top layer, either the same mesh or fiber is used. When laying red brick as a base layer, naturally it will not be possible to use a mesh.
The metal mesh is laid approximately in the middle of the first layer. The main thing is not to pause and immediately cover the reinforcement with the top layer, then the first layer will be monolithic and reinforced.
Since there is at least a sewer drain pipe in the pan (and quite possibly other communications), it will be difficult to lay the mesh in one piece. Therefore, the mesh can be cut into many small pieces, the main thing is that these scraps overlap each other by 5-10 cm.
If you have a laser level, it is very convenient to control the base layer using a stick with a control mark. The accuracy is of course low, but for a rough layer this is enough.
The density of this particular layer of expanded clay concrete, according to approximate calculations, is 1100 kg/m³ versus the density of 1700 kg/m³ for a conventional CFRP. In this case, this made it possible to reduce the weight of the pallet by 46 kg. with a layer thickness of 8 cm and an area of 1 m² (actual weight is about 90 kg, from the DSP it would be approximately 136 kg).
Regarding the density of expanded clay concrete. I’m not sure of the absolute veracity of the information found, because unfortunately, 99% of the Internet is littered with crap... Expanded clay concrete has a density from 800 kg/m³ to 1800 kg/m³. Particularly lightweight can have a density of 600 kg/m³.
The weight is affected by both the fraction of expanded clay itself and the amount of sand. In practice, the less sand, the more difficult it is to lay the solution without voids. But we are not afraid of small local voids, because the load-bearing finishing layer will lie on top.
The photo above shows an example with expanded clay concrete with a density of approximately 1100 (calculation was carried out by the weight of the components used). I can say with confidence that the amount of sand in the batch can be reduced and the density can be reduced to at least 850-900 kg/m³. In other words, make the base layer twice as light as a regular solution.
I can’t give the exact proportions of the components, because expanded clay can be different, and you need to be guided by the sensations of the finished mixture (is it possible to lay it with a minimum amount of sand). However, I will give an approximate algorithm: cement is mixed in water, equal in weight to the weight of the introduced expanded clay, then expanded clay is mixed with water and cement, and then sand (and water, if necessary) is added in small portions. Sand is added until the mixture has a workable consistency.
As for the side, there seem to be two main options: lay it out of brick or lay it (fill it) together with a finishing layer.
The inner part of the side formwork with its lower part repeats the finishing plane with slopes. Thanks to this approach, the finishing screed and the side will be one monolithic whole.
Long self-tapping screws screwed into the rough screed will additionally strengthen the adhesion of the bead to the bottom layer. This is an additional measure and is not necessary.
For finishing screed, it is best to use the semi-dry method. I’ll explain why: the pallet will dry out faster, at least the upper part, and there’s almost zero chance of shrinkage cracks forming. This approach will allow you to quickly begin waterproofing.
As a last resort, if for some reason a semi-dry screed is not suitable, then the top layer should be poured with a minimum amount of water in the batch.
For beacons, you can use any available method. I prefer the PN profile on the screw heads. After forming the planes from the semi-dry solution, the profiles are removed, the support screws are recessed deeper and the strips are sealed. With the “wet” technology, the profiles are taken out after the screed has set and the locations of the beacons are covered.
I prefer beacons made from a couple of self-tapping screws and a piece of PN profile on top. In this particular case, the second pair of beacons is the tray flange
The extreme support points of the profile are the flange of the ladder
For good adhesion to the previous layer, there is a simple technique. Forget about primer!
If the first layer has had time to dry fairly well (the filling was done more than a few days ago), then it needs to be well moistened. As an adhesive layer, you can use a thin layer of tile adhesive or a 1:1 liquid mixture of cement and sand.
The adhesive layer is spread over the surface with a trowel, and then the mixture for the finishing layer is laid on top. In hard-to-reach places, you can use a brush to apply liquid cement.
When using “slurry” made of cement, the main thing is not to overdo it and apply layers of no more than 2-5 mm, so that the bulk of the screed does not become more liquid. This method is quite simple, but it eliminates detachment. When using a primer, there are many cases where the top layer begins to sag after 2-4 weeks. The method is relevant for the semi-dry method and for the “wet” one.
If you use too thin a mixture for the finishing layer, the adhesive layer may not help! A minimum of water in the batch is the main rule.
If there is formwork, it is better to remove it after 2-3 days.
After pouring, the next and subsequent 2-3 days it is useful to water the screed with water and cover it with plastic wrap.
Redevelopment options for houses of the P-46 series
Due to the large number of load-bearing walls, redevelopment options are limited. In apartments you can:
- combine the bathroom with the toilet;
- replace the bathtub with a shower stall, including a drain;
- move sinks and toilets in the bathroom, as well as sinks and stoves in the kitchen;
- when combining a bathroom, make a storage room in the area of the former toilet with access to it from the kitchen;
- install an installation using a plumbing box in the toilet;
- dismantle built-in wardrobes in the hallway;
- make dressing rooms in the hallways, as well as at the expense of the area of the rooms;
- demolish the partitions between the hallway and the room to visually enlarge the living room and create a living room-hall;
- expand the hallway by moving the partition between the hallway and the room in 2-room apartments;
- build piers under the base for built-in wardrobes in rooms;
- divide rooms into two rooms using partitions;
- make openings in load-bearing walls.
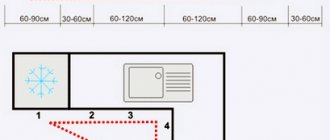
Sewer slope
and provide drainage with the following parameters:
The slope of the sewer is specified by the Code of Practice SP 30.13330.2012 Internal water supply and sewerage of buildings (Updated edition of SNiP 2.04.01-85).
Clause 8.4.4, in particular, states: The slope of the floor in public shower rooms should be 0.01-0.02 towards the tray or drain. The tray must have a width of at least 200 mm and an initial depth of at least 30 mm.
Sewerage : the slope of the pipe should not exceed 0.15 (with the exception of branches from devices up to 1.5 m long), i.e.
15cm at 1 meter. Otherwise, the water will quickly go away, but everything else will remain. The dimensions and slopes of the trays should be taken from the condition of ensuring the self-cleaning speed of wastewater, the filling of the trays is no more than 0.8 of their height, the width of the trays is not less than 0.2 m. The width of the tray is assigned depending on the results of hydraulic calculations and design data; when the tray height is over 0.5 m, its width must be at least 0.7 m.
Source
What is not allowed when remodeling apartments of the P-46 series
In apartments, balconies cannot be combined with rooms - this violates the thermal contour of the house. Also, ventilation ducts must not be demolished or reduced .
The only acceptable option for their use is to install the installation and water heater inside the box. It is prohibited to make shelves or store any things there.
Also not allowed :
- enlarge the bathroom at the expense of the living rooms and place a toilet with a bath above the living rooms and kitchen of the neighbors on the floor below;
- make a kitchen or rooms under the neighbors’ bathroom above;
- locate the kitchen above the living quarters of the neighbors below;
- block access to plumbing, risers and meters, fans and ventilation ducts;
- leave a gasified kitchen without a door.
Redevelopment of a 2-room apartment of the P-46 series - first option
Apartment before redevelopment:
In this redevelopment option, a bathroom was combined, in which, to save space, a shower stall with a drain was installed, enclosing the tray with two walls. Since 2022, showers in construction have become permitted, so there are no problems with its approval. We also installed the installation using a plumbing box.
The sink and stove in the kitchen were moved - this must be noted in the remodeling project. Built-in wardrobes were installed in the hallway and one of the rooms. The openings have been moved slightly.
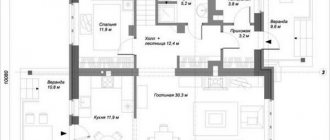
Redevelopment of a 2-room apartment of the P-46 series - second option
Before redevelopment:
The bathroom has a shower cabin and installation, the entire bathroom is combined. A sliding door was installed in the living room. Decorative panels were installed in the rooms to hide the heating pipes. We described the requirements for panels in our repair manual.
All redevelopment work in this apartment noted in the project:
Construction of the podium
How can you raise the cabin higher than 10 cm? The answer is simple - install the structure on the podium. Before its construction, the level of rise is measured, which will be sufficient for the rapid outflow of water.
The corrugated pipe is connected at one end to the sewer system, and at the other to the drain pan installed in the required location in the bathroom. The corrugation should not sag or be too tight. Water is poured into the shower tray and raised, monitoring the height at which the water will flow out at the optimal speed. A suitable height is measured and a podium is erected at its level.
There are several most commonly used materials for podium construction:
- bricks are moisture resistant and easy to use. Many design ideas are feasible with them;
- foam blocks - durable, budget-friendly and water-resistant, the height of one block is 15 cm - the optimal level of the podium in most cases;
- wood - durable and strong, to prevent the appearance of fungus, the wood is coated with antiseptics and then painted or drying oil;
- concrete is strong, durable and moisture resistant, the main drawback is that it will take more than 10 days for the podium to harden.
Redevelopment of a 3-room apartment of the P-46 series
This example shows the possibility of demolishing almost an entire wall to combine the hall and living room. Apartment before redevelopment:
The wall in room 2 was demolished and a small partition was erected in its place. The bathroom has been combined. In the kitchen, the stove was moved, the heating radiator was moved, and the window sill was removed and French doors were installed in its place. This is the only possible option for combining a kitchen and a balcony.
How much does it cost to remodel an apartment?
Project development in Pereplan for both planned and already completed redevelopment costs the same - from 25,000 rubles. Redevelopment project and turnkey approval – from 75,000 rubles. This is the most popular service with us, as it allows the customer not to be immersed in the approval process, but simply to receive ready-made documents on legalized redevelopment.
There is an additional fee for obtaining a technical report from MNIITEP - this costs from 70,000 rubles. It is necessary if load-bearing walls are affected during repairs.
Conclusion:
The most common options for remodeling an apartment in the P-46 series are combining a bathroom, as well as dismantling non-load-bearing partitions separating the hallway and living room.
Other options are also possible - you can find out about all the possibilities of the series by writing to us on WhatsApp. Attach a sketch of the redevelopment, a design project, or describe the solutions that you want to implement, and we will tell you whether this can be done.
on WhatsApp
Is it possible to expand the kitchen into a bathroom?
What not to do when remodeling? How much does it cost to remodel an apartment? Hello!