For decades, slate remained the most popular roofing material among private owners - both because there was no worthy alternative and because it itself has impressive characteristics. With the advent of modern coatings, the situation has changed dramatically: today, slate roofing on a private new building is a rarity. In fact, the biggest drawback of slate is its unpresentable appearance - dull gray color, standard dimensions, and the annoying “wave”. However, by choosing an original installation method, you can get decorativeness along with the durability and versatility of slate. Users of the FORUMHOUSE portal have seen this from their own experience.
How to style. Experience of the author of the video.
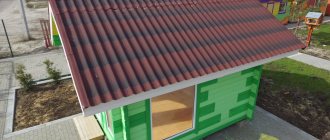
The sheets were laid out in a checkerboard pattern. From bottom to top and scattered across half a sheet. The lathing was made with 25x100 boards. The pitch of the sheathing along the centers was 43 cm, except for the first row, the overlap on each other was 15 cm. I cut it into three parts of 57 cm. The rafters are 90 cm apart, the angle is also about 30 degrees. The sheathing pitch is 35 cm, I think it will work if you only cut the sheet in half at 86.5 cm. I fastened it with 90 screws with a silicone seal.
The excess consumption of slate is 19%, and not, as the author claims, 6-8%. The sheathing pitch is 43 cm, except for the first row, thickness is 25 mm.
I see another plus in this - the sheathing can be immediately matched to the pitch of the future metal tiles, but you can lay slate on it using your own method. Consider the sheathing has already been prepared, the roof is insulated, and you can wait about eleven years with metal tiles)
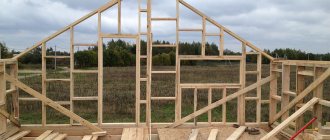
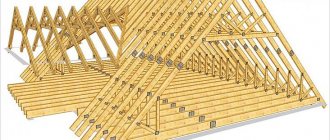
Construction of sheathing under slate
While the paint dries, you can begin making the sheathing and carrying out other preparatory steps.
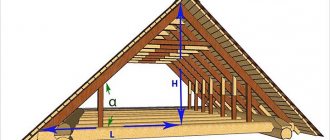
The first stage is the installation of rafters. Slate is a heavy material. Therefore, in order for it to withstand the load, you need to use a wooden beam of large cross-section - from 50?50 to 75?75 mm. The distance between the rafters should be from 1 to 2 meters, depending on the weight of the selected sheets and cross-section. If you use relatively light straight slate, the cross-section of the beams can be reduced - they can easily withstand this load.
The next stage is installation of the sheathing. First, it is better to fix the beams on the lower rafters. They are fixed with nails of sufficient length. The step can be made wide - slate can easily withstand heavy snow loads without harm to itself, and can also support an adult if he steps carefully. Three beams per sheet are enough - along the edges and in the center.
If you want to get a dry and warm attic or even an attic, you need to install additional hydro- and thermal insulation.
A vapor barrier is attached to the sheathing from the inside - it is necessary to protect the insulation from moisture rising from the living quarters. The selected thermal insulation material is placed between the rafters: it can be mineral wool, polystyrene foam or any other material that suits your needs.
Waterproofing is laid on top of the insulation. You can use roofing felt or construction polyethylene. The first option is more durable. But the second one is much cheaper and does not increase the load on the rafters.
During construction, you should pay special attention to the stove or fireplace pipe. It can heat up to high temperatures, which often leads to damage to thermal and waterproofing materials, as well as slate. Therefore, the indentation should be at least 15 cm. The outside of the gap should be reliably sheathed with galvanized iron. One of its advantages is its ability to withstand extremely high temperatures.
Questions to the author and his answers
Q: Did you make the lathing different in height? Even 60 and odd 63? A: Of course it is desirable, but I did it at the same height and have not regretted it yet.
Q: Please tell me, when cutting slate, did the waves on the cut side fit normally? Were there any irregularities? A: Slate fits well. The main thing is that the roof plane is level, without large differences. On my roof in some places there were differences of 1.5 - 2 cm, but everything went well. I laid a film under the slate, everything was fine with it, as well as with the fastening points and screws.
Q: Standard roofing 90s come with rubber washers, did you also adjust the silicone ones? A: I separately took washers with a silicone seal, and separately self-tapping screws (not standard roofing screws, but regular ones without washers).
Q: How to cut it? If you use an angle grinder, you will choke on the dust. A: Using a grinder, I cut 5-6 sheets at a time. Tape the vacuum cleaner hose to the grinder and put a respirator on your face. Everything will be clean and safe; if the vacuum cleaner is powerful, then you won’t need a respirator. A diamond disc is better, a simple one on a stone will quickly wear out, and you will have to cut one at a time, but with a diamond one you can do several at once. Everything will be faster.
Q: With this layout (with a checkerboard overlap on half a sheet), is it not necessary to trim the corners? If not, how do the cracks behave (snow, rain, etc. blowing in) A: I didn’t cut the corners. There were no problems with precipitation or wind.
Q: What is the reason for this particular choice of styling? After all, according to the classics (vertical rows and with trimming) the gaps are minimal? A: Since there were three times more sheets, I decided to simplify the work and chose a checkerboard layout without trimming.
Q: How were the skates attached? I saw a video, a metal ridge was attached to slate with self-tapping screws. A: Yes, with self-tapping screws, through slate into the sheathing.
The author is not alone. Already have at least one follower:
I cut the slate into 58 cm pieces, took a board for the sheathing 40 by 100. I will make an overlap of 100 mm. between the boards it turned out to be 380mm. The smaller the size of the slate, the stronger and more beautiful it is + when the size of the slate is shorter it does not break or crack.
Conclusion
It is quite possible to turn a tired, but one of the most durable and reliable materials into an exclusive coating with the help of cutting, painting and original styling. And in order to minimize the threat to health during work, you should not neglect protective equipment.
You can find out how to decorate the facade with flat slate in the topic “Frame thatched house”. About slate roofing, natural or from the same slate, see the article “Roofing like dragon scales.” About the roof of an unusual shape with an increased usable area - in the material “Sudeikin’s Roof...”. The video on making shingles shows another traditional roofing material.
Subscribe to our Telegram channel Exclusive posts every week
Bad experience
A bad experience surfaced in the comments:
Don’t do that, I did that and got stuck, you can’t cut slate that thin, and don’t twist it with self-tapping screws. The slate does not lie flat on the sheathing and hangs on the screws, which are then pulled out under the snow and burst in half. Self-tapping screws must have a smooth top.
I messed up with my roof. You can cut it in half, and since it can be cut in the video, the problem is that it would lie tightly on the lathing, take the slate and place it on a flat board. She pushes against two waves out of seven. The slate will then lie flat, and therefore the screws must be smooth on top, otherwise the slate will hang on them and not lie on the sheathing. This is my case, apparently my slate was folded incorrectly in the store and it was bent, and I did everything for the first time and didn’t know. If your slate lays flat on the roof, then you can cut it, but brand new slate laid evenly and intact looks great.
A little history
Translated from German, the word Schiefer means “slate” - a layered rock that has been used in construction since ancient times as roofing. Therefore, the sometimes used definition of “slate slate” is redundant. For us, slate is, first of all, a roofing material made from an asbestos-cement mixture in the form of corrugated sheets with standard dimensions. Flat sheets are also produced, but they are not used in their original form on roofs, but for household needs, sheds and fences they are in demand, although in recent years, with the advent of corrugated sheets and cellular polycarbonate, they have also lost their position. From the article about popular facade materials you can find out how to decorate a house so that the walls match the roof.
Thanks to the properties inherent in the raw material base, slate is resistant to temperature fluctuations, absorbs sound, is not subject to combustion, the effects of acids and aggressive chemicals, and has a long service life.
But the raw materials also “rewarded” it with weaknesses - asbestos dust is carcinogenic and causes lung diseases, the natural gray color is dull and monotonous, over time the coating can be “mastered” by various microorganisms, and mold and mildew can hardly be considered decor.
As for claims regarding the tightness of slate roofing, in most cases it is not the material as such that is to blame, but unscrupulous businessmen hiding behind dubious specifications instead of GOST, and violations of technology during installation. High-quality, correctly installed slate serves for decades without requiring intervention from the owners, and insufficient external attractiveness is successfully “treated” by purchasing colored slate (painting it yourself) and original installation.
Responsible manufacturers solve the issue of carcinogenicity by replacing dangerous asbestos with chrysotile, which is considered neutral - the product characteristics are similar, and chrysotile cement slate wins in terms of environmental friendliness. However, in fairness, it can be noted that slate lying on the roof does not cause significant harm, but the dust released when working with sheets can adversely affect health if protective equipment is not used.
Painting
Pros who restore slate roofs use Flagman 31k Roof and Base paint. Other brands call it paint on mineral surfaces. Facade paint is not UV resistant. Therefore, only paint for roofs.
I asked a question to the professionals: How to paint - in advance, on the ground or after installation?
Answer: If you paint covered slate, you may encounter the problem of unpainted junction points plus the difficulty of moving on the covered roof. If you cover the roof with painted slate, the only problem is the possibility of scratching it during installation.
They dilute the paint: 1 liter of water per 10 liters. So that it penetrates better into all the pores of the slate.
Stage 6. Installation of the starting strip
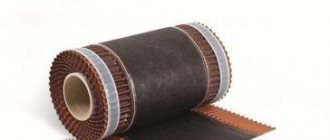
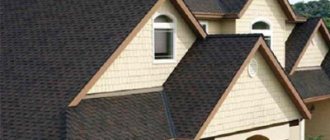
When the roof surface is ready for the installation of flexible tiles, before starting installation it is necessary to check the availability of roofing nails 30x3.5 for ordinary and 45x3.5 for ridge tiles, as well as bitumen mastic No. 23 FIXER (sold in packages of 310 ml, 3.6 kg and 12 kg).
Installation begins from the starting strip. On long slopes, it is recommended to lay the first row from the center of the slope. However, if the roof is not large, you can start from the gable. Dragon tooth tiles are installed in diagonal stripes. The second row is laid offset to the left or right by 15-85 cm (about half a petal). The third row should also be offset by 15-85 cm relative to the tiles of the second row.
Advantages
- Durability.
- Fairly quick installation.
- Slate has increased resistance to moisture.
- This coating is waterproof.
- Tolerates temperature changes well.
- This coating can withstand various loads perfectly.
- Fire resistance.
- Democratic price.
- The coating is easy to paint.
- There is no need for special tools during the installation process.
This is not the entire list of advantages of this material. However, even with many positive properties, slate also has a number of disadvantages.
Stage 7. Installation of flexible tiles
Each shingle is nailed to the base with a regular hammer or using a pneumatic nail gun. A special tool allows you to increase the installation speed several times. If the roof slope does not exceed 45%, then the tiles are nailed with 5 nails, but if it is more, nails are required. Let us remind you that flexible tiles can be mounted on roof slopes from 12 to 90 degrees.
The illustration shows the installation of two-layer flexible tiles TECHNONICOL SHINGLAS Jazz Castile series, the warranty period of which is 50 years. This tile is produced in the form of “Dragon Tooth” cutting with a shingle size of 100x33.5 cm. The material is unpretentious in installation, because there is no need to remove adhesive films from each shingle, and the starting line uses ordinary shingles rather than ridge tiles. However, it must be remembered that for this form of cutting, the nail must secure the overlap of the two components of the tile.
The arrangement of nails depends on the series and shape of the tiles (refer to the manufacturer’s instructions), but what remains unchanged is that special galvanized roofing nails with a wide head must be used to install the material. If the roof is installed with regular nails, poorly nailed shingles can fly off during strong winds. Correctly installed roofing ensures that the roof will withstand wind gusts of up to 180 km/h.