An interesting architectural solution is to build a round gazebo - in the form of a dome or rotunda. This form allows you to “dilute” the classic square and rectangular buildings that are usually found in the country.
Beautiful shape with three tiers
Round gazebos are often confused with hexagonal ones.
They are really similar, but have different wall and roof designs.
The publication will show various examples of round gazebos that can be implemented on your site.
Some advice will also be given on building such a structure on your own, in particular the foundation, frame and design of slanted rafters for the roof.
How to make supports?
At the initial stage, it is necessary to divide the site, apply markings along the entire contour of the building, and then begin excavation work.
Markings are applied to comply with all required proportions, as well as for the process of correctly determining the placement of pillars under the foundation, and therefore for the columns of the building. In order to proceed to the work described, it is necessary to determine the dimensions of the rotunda and mark the ground according to them, namely: draw a circle with the radius of the gazebo. Then you should place a rectangle in it. The generally accepted standard dimensions of a rotunda are 4 m in diameter, which corresponds to 6 columns. From this it follows that a hexagon must be applied to the ground.
Before you begin to develop the soil, you need to install small pegs at the corners of the hexagon. Then you need to make a hole in the ground 1-1.2 meters deep - this is necessary to install pillars under the foundation, after which work is done on the bottom of the holes. They are filled 20 cm deep with a mixture of sand and gravel and covered with a waterproof film. After this, the laying out of the pillars begins.
The number of bricks in one row depends on the massiveness of the structure; on average, 4 to 6 bricks are taken. The space created between the bricks and reinforcement bars should be filled with mortar.
When working with vertical surfaces, you only need to treat them with hot bitumen or use liquid glass. It is also recommended to add various types of additives, which will protect the surface from water and make it resistant to low temperatures.
Columns can be laid out from silicate or ceramic bricks
To avoid wasting time decorating columns, you should immediately pay attention to the shape of the brick. If you decide to make cylindrical columns, then it will be most convenient to use shaped bricks
It has distinctive features and therefore is used in other types of work. The construction of columns is carried out in the same way as foundation columns.
The dimensions of the rotunda usually have the following parameters: the dome has a height of 4.5 to 4.8 m, the columns have a size of 2.8 to 3 m. The rest of the rotunda is the roof. These dimensions are valid for a diameter of 4 m.
The rotunda is divided into two types:
- with columns;
- with openings in the walls.
When constructing an arch made of brick, you will have to resort to the use of a special formwork called a “circle”. It is placed with support on the walls, after which wedging is carried out. When laying the lintel, a separate type of brick is used - wedge brick.
The difference in the edges can reach from 10 to 20 mm, which makes it possible to lay out arches with different radii. If ordinary brick is used to form the arches, then the shape is achieved by thickening the seams on one side.
Sufficiently experienced builders can frame columns using formwork, or by replacing it with brickwork. It will be easier for a beginner to build it from metal.
You will also need plastic slats. They must be used when lathing under the roofing material.
When using a wooden block, it is best to resort to its polymer counterpart, as it bends much easier, which saves time. These elements must be folded in two or three rows, and then screwed, like regular shingles, with self-tapping screws.
Then it remains to find a suitable type of roofing material. The best thing for this job is roofing tiles.
The easiest way is to order a finished roof. All that remains is to install it on the prepared columns.
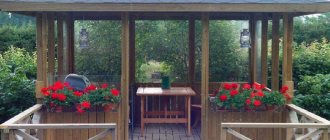
The final stage in the construction of the rotunda is the finishing and decoration of the columns. Here you can resort to plaster to give them the appearance of marble, or use many existing decors. A ratunda with a barbecue inside looks very good in the center of the site, which will decorate the landscape design.
You can watch the step-by-step assembly of a round gazebo made of timber in the video below.
First the house - then the design of the gazebo - or how to properly make gazebos
When planning, building and occupying a country house, new owners of the site are unlikely to immediately think about what design of gazebos is appropriate for their future garden . First, the house itself is built; the gazebo is still only a dream. Then the landscaping of the garden and landscaping of the site begins, and here comes the turn of such small architectural forms as gazebos, benches, swings, and so on. It is important to observe the principle of compliance here. If you have built a light, light wooden house with an airy attic, then it is clear that a low brick gazebo, more reminiscent of a warehouse at a provincial train station, is unlikely to decorate the site. Of course, if you have doubts about choosing a suitable gazebo design, then it makes sense to contact a specialist, architect or designer. But making gazebos is actually not fraught with anything particularly mysterious or difficult, so if you would like to master it yourself, without the advice of professionals, then, most likely, you can handle it yourself - however, you need to master some knowledge.
So, the first principle has already been mentioned: the house and the gazebo must be in the same style . Even if you want to show imagination and originality, a certain unity of the architectural ensemble must still be observed. It should somehow manifest itself in the same design elements or decoration, in the harmony of shapes or colors.
Made of metal and polycarbonate
As one possible example, I will give instructions for building a gazebo made of metal and polycarbonate.
It goes into more detail about the construction of each connection. Below we will provide only general recommendations and advice for this type of building.
Foundation
For a metal gazebo, a flat base is sufficient. In some situations, you can simply place the gazebo on the ground or grass. If you want a more stable position, then preference can be given to the following options:
Bricks
- Paving slabs.
- Bricks.
- Foundation blocks.
A gazebo set to the same level will definitely not go anywhere. In this regard, it is more stable than wood.
Frame
The most expensive, difficult and time-consuming process is welding the frame. The metal structure itself is solid, that is, it is connected once and disassembling it is no longer an option, since the component parts are fixed by welding.
d3010833ca3e8437264e37b0078b3751.jpe
b6ec9ca17938b386fa354c2ae1434429.jpe
The material used is profile pipe or wrought iron. In the first case, the recommended dimensions are 60 by 40 or 50 by 50 mm. In the second, everything is individual and depends on the project.
In most cases, the roof is made of a pitched roof, with a small truss. The result is a reinforced structure that will not bend under the pressure of snow in winter and spring.
Sheathing
Polycarbonate attaches well to profile pipes, which is why it is often recommended as a cladding material. A profiled sheet has the same properties, but the building turns out to be too “steel”, so it would be a good idea to dilute the gazebo with polymers.
Installation of additional stiffening elements
If your area is characterized by heavy snowfalls, we recommend that you further strengthen the roof structure. To do this, you need to install support posts in the middle of the gaps between the corner supports, just above the middle foundation posts.
We install some of the (lower) posts between the railings and the bottom beam of the gazebo base; they can be made from 40 by 50 mm timber. Select their height so that they fit tightly between the beams of the gazebo base and the gazebo railings. These lower supports can be secured with overhead metal corners and self-tapping screws.
The second part of the posts (upper) is installed above the first ones between the railing beams and the middle roof rafters; we will make them from 40 by 100 mm planks.
For them, we make five bars and fasten them with self-tapping screws from below through the railing bar, and from above - to the corresponding rafter beam and external trim. The photo shows the correct installation of the post under the rafter:
The photo shows the fastening of the support pole to the external trim:
Please note that it is necessary to select the size of the supports at the top so that they fit under the rafters very tightly, even with a slight interference. This is necessary in order to remove the load from the rafters. The photo below shows what the final design should look like after installing all the additional supports:
We build the walls and roof of the rotunda
Today we are talking about the construction of a rotunda - an open round gazebo with a domed roof. The peculiarity of such a gazebo is that its walls are either made of solid decorative latticework, which is rare, or low, leaving the veranda half-open. Its walls can be made of thin wooden slats crossed with each other, from wicker vines, from a lattice with climbing plants on it.
The roof of the wooden rotunda is made in the form of a dome, which gives the building a special style. This roof shape is good because in winter the snow does not linger on it, and the foundation does not experience additional load. The roofing material for such a gazebo can be very diverse - metal, ceramic, wood and even plastic, but it is better to select it in accordance with the entire structure. In our case, the roof will also be made of wood.
The roof itself is very easy to build. To do this, you need to find the center of the ceiling covering, at this point, fix a beam vertically with nails, the length of which will be equal to the desired height of the roof. Next, from the top point of the beam, boards are launched in a circle, forming the roof of the building, which are also fastened with nails to the ceiling along the entire perimeter. Then a sheathing is made on the roof, which is covered with roofing felt, which will prevent the roof from leaking. And finally, wooden boards are used for the roof itself, which are pre-treated with moisture impregnations, and then covered with varnish or paint.
Gazebo floor and walkways
At this stage, you can begin installing the gazebo floor. We carry out the work in the following sequence:
- We remove the fertile soil inside the gazebo (if you did not do this at the stage of pouring the foundations) to a depth of about 22 cm.
- Next, we backfill the base with fine crushed stone to a thickness of 14 cm. It would not hurt to lay geotextiles before backfilling.
- Now you can lay paving slabs with a thickness of 50 mm. We use a dry mixture of cement and sand as a solution.
As we mentioned above, our stone gazebo is provided with a barbecue area outside, so laying tiles on the platform in front of the gazebo and paths is carried out according to the same principle after first laying them out on the ground.
Separately, I would like to say about the organization of drainage on the areas around the gazebo. Since a certain amount of water flows from the roof of our structure during rain, care must be taken to ensure that this water does not get inside the gazebo. For this purpose, concrete gutters with a depth of about 25 mm are laid along the perimeter of the entrance to the gazebo. The slope of the gutters must be arranged so that the water flows onto the lawn.
How to build a rotunda?
The rotunda is one of the most expensive types of gazebos, but it can also be considered the most respectable and durable option.
The main part of such a gazebo are columns, which can be made of the following materials:
- bricks;
- stone;
- monolithic block.
To construct a column, the material is poured into the so-called split formwork, which has a special internal coating. According to the standard, such additional equipment is made from moisture-resistant plasterboard.
You can also find prefabricated columns on sale, the main component of which is cement or polymerized gypsum. An alternative to columns can be piles made of concrete and having a circular cross-section. These elements will simultaneously serve as the foundation.
This method of constructing a rotunda is used only when the soil requires it or if piles for the structure being built, for example, a house, are laid on the site along with the columns.
There are rotunda options that do not require a foundation. They are also called self-supporting rotundas. Naturally, this version of the gazebo is more expensive. This set also includes a balustrade with figured balusters and a fiberglass dome - this composition will give your rotunda a special look.
If you decide not to resort to the help of professionals and make a gazebo yourself, then the most favorable material for this will be brick.
Supports are used if necessary - they are required for good stability of the building. In a specific situation, the most practical option would be to use a columnar foundation, which is made from waste ceramic bricks.
Preparatory activities
As with any other construction work, when constructing a round gazebo, you need to perform a number of preparatory work. In this case, pay attention to:
- Location. It all depends on the preferences of the owners and the availability of free space. The best option would be to locate the gazebo next to the house. If there is a pool, pond, lake or other body of water on the site, then it is better to install the gazebo next to them. The possibility of a good overview also plays an important role.
- Materials. Most often, the main building material when constructing a gazebo is wood. Oak, larch, spruce, and fir are best suited for these purposes.
- Tool. To build a gazebo, use a standard set of tools: shovel, saw (manual or electric), screwdriver, hammer, hacksaw, self-tapping screws, twine, plane, pliers.
Preliminary calculations
At the initial stage, you need to perform drawings and preliminary calculations. The drawings display the rafter system, indicating the method of fastening, and specify the pitch between the rafters. Drawings must be made in frontal and profile projection. A separate diagram shows the foundation of the future structure (if it is provided, of course). Depending on the size of the gazebo, the distance between the pillars and the depth of their recess are indicated.
It is better to do the calculations together with specialists
When taking measurements, you need to start from the area on which the future gazebo will be built. In most cases, a regular tape measure is sufficient for this.
Considering that the strength and stability of the structure will depend on the correctness of the measurements taken, it is advisable to involve specialists in this process.
The role of the gazebo in the landscape design of the dacha
A round gazebo for a summer residence has been relevant since ancient times due to its design features and various design options. This is the most popular and functional decoration for a summer cottage. Modern models are not just light buildings for relaxation, but also real works of architectural art. Such structures make the design of the site more aesthetically pleasing and attractive.
When developing a project for an open building, it is important to take into account many nuances: from the material of manufacture to the style of execution of the country house and the design of the landscape of the local area
Even with its impressive dimensions, the round gazebo does not seem bulky
Like any architectural object, a gazebo must meet three basic requirements: functionality, reliability and beauty. The configuration of the building is determined based on the personal preferences of the dacha owners and the design features of the site. Thus, the gazebo can be spacious, compact, round or in the form of a polyhedron. The variety of shapes allows you to realize any design idea.
Depending on the type of structure, the gazebo can be used for family holidays or for parties with friends
Often gazebos are decorated with a variety of decorative elements. These can be flower plantings, shrubs or stone paths. The area near the open building is decorated with a play area, a swimming pool, a pond, a rose garden, a coniferous or rocky garden. At night, the gazebo is complemented with decorative lighting.
There are many ideas for a round gazebo.
In a large building you can organize a fireplace, fountain, barbecue or a small oriental oasis. The use of artistic skills is also relevant. A design decorated with patterns, openwork carvings, light lattices of thin planks or objects made of roots, knots and driftwood looks beautiful.
The main criterion when choosing a location for a gazebo is its functional purpose.
Roof formation
The roof of the building is made of the same materials as other elements of the gazebo. The most important thing when installing a roof is the absence of sharp corners.
- First you will have to make the frame part of the roof from the beams that form the dome.
- Then you need to lay the boards so that the number of corners is reduced to a minimum.
- After installation, you will need to decorate the roof.
Important! Only after the roof and walls are done should they be fastened together. All building elements must be made of the same material.
A round or semicircular gazebo on a summer cottage is a unique multifunctional structure that combines an unusual visual appearance and practicality. Fits well into any landscape design. A small architectural structure for relaxation, if properly decorated, will decorate any cottage or garden.
Make the floor
peredelka.tv
There are several options. The simplest is plank flooring; it is great for wooden buildings and is used most often. You can also make a regular concrete screed or lay paving slabs. These floors are good for pavilions and canopies with a metal frame and solid brick gazebos.
2592ee230721ff30d182c3195dbd1f58.jpe
a4030232d4482a7b8629cc916182c10e.php
Plank floor
It is convenient to do it immediately after tying, and only then assemble the frame on the boardwalk. To do this, install the logs level with the strapping beams in increments of 50–70 cm and lay the board on top, securing it with nails.
Concrete screed
The floor can be poured both at the start and at the end of construction. Remove the fertile layer of soil and place formwork from boards around the perimeter. Sprinkle the area with a 10–15 cm layer of sand and compact it well. Then lay out 10 cm of crushed stone in a second layer and compact it too. Prepare cement mortar and pour the screed. For strength, you can lay reinforcement mesh inside.
Paving slabs
It can be installed immediately or after completion of work. For installation, first remove the layer of soil. Next, prepare a sand cushion and compact it thoroughly. Then install borders around the perimeter and lay tiles from the corner.
Wooden frame
The basis of the frame of a round wooden gazebo is vertical support beams. Walls are subsequently attached to them. The roof also rests on them. Such elements are selected from beams with a cross section of 100x100 mm. Round logs of approximately equal diameter are suitable for this task.
Frame execution process:
- The beams are cut into 2.1 m sections. One of the posts should be 2.8 m long. It will be placed in the center.
- Use a grinder and a plane to chamfer the corners, and then process the surface of the beams until they are perfectly smooth.
- Drill the bottom end of each support 10 cm. The diameter of the hole should be 12 mm.
- After this, it is necessary to install supports on the corners of the lower beams. Then the pillars are attached to the base using metal corners.
- Using a level, give the pillars a strictly vertical position, securing them with braces.
- At the bottom of the pillars, make a strapping of 50x100 mm boards.
Advice! To prevent fungus or rot from appearing on the wooden elements of the gazebo, they should be treated with an antiseptic.
The working process
After choosing the place where the gazebo will be built, taking measurements and creating drawings, you can begin the phased implementation of the work.
Typically, round gazebos do not require a complex foundation, and in this case it is enough to use the so-called block foundation, which involves the use of blocks measuring 20x20x40 cm. The process of creating a foundation includes the following steps:
- Use a rope to mark the area. To do this, a peg is driven into the center of the site and a rope is pulled to one side of it (if the size of the future gazebo is 4x4 m, the rope is pulled 2.5 m).
- Next, a peg is attached to the other end of the rope and the area is drawn in a circle (like a compass).
- After laying the foundation, you need to make formwork. For this you can use boards, stones and other materials.
- After the foundation is ready, it is necessary to make the floor. It's best if it's boards. What material to choose for this depends solely on the financial capabilities and preferences of the owners.
- For more serious buildings, the foundation should be strip. In this case, a trench depth of 60–70 m will be sufficient.
See also: the main types of foundations for gazebos.
Frame
The installation of pillars during the construction of a round gazebo is practically no different from the classic options. They are mounted vertically on metal corners. As a rule, 6–8 pillars are enough.
The beams must be fastened together in any convenient way. To give an original look, you can use wicker wicker. The top trim does not require any special aesthetics, since it will be covered by the roof.
Roof
To construct a round roof, a circular sheathing is used, on top of which the roofing and rafters are laid. This process involves the following steps:
- The rafters are pre-cut and attached to the horizontal beams and center post.
- A wooden sheathing of boards is installed on top of the rafters, the optimal thickness of which should be 25 mm.
- The boards should be laid in such a way as to reduce the number of corners to a minimum.
- The selected roofing material is installed and secured to the sheathing.
At the final stage of construction of a round gazebo or upon its completion, it is worth paying a little attention to the decor. Flowers in flowerpots, various forged elements, and cast iron dishes will look beautiful and original. You can also equip the gazebo with one or another type of lighting, thanks to which a special atmosphere of comfort and coziness will be created in the dark.
Construction progress
Regardless of what materials the gazebo will be built from, the step-by-step work plan is as follows:
- Selection of drawing;
- Foundation construction;
- Installation of load-bearing structures;
- Roof construction;
- Filling gaps between supports.
Let's consider the listed stages in more detail.
Foundation
The construction of the foundation involves concreting columns with the obligatory installation of embedded elements
Since the supporting structure of the gazebo will consist of supports, it is preferable to make the foundation columnar - one pillar for each support. To do this, wells are drilled to a depth below the freezing level of the soil into which pipes are buried.
Reinforcement with metal mesh is installed around the pipes, after which the bounding formwork is assembled. The pipe is leveled, after which concrete is poured into the well.
Slab concrete foundation for a permanent brick building
As an alternative to a columnar foundation, you can arrange a solid slab foundation. This option is relevant if the budget for the purchase of building materials is not limited.
- Round gazebo
Brick supports
How and from what to build brick supports? Since the brick pillars under the dome will not be subject to additional finishing, we use beautiful bricks and make a clean masonry with adjusted gaps and a neat seam without sag.
To reduce the load on the foundation, I recommend using hollow bricks rather than solid ones.
| Illustrations | Step-by-step description of the construction of supports |
Foundation and embedded elements. When building a foundation for supports, a 50x50 mm profile pipe is embedded in the concrete. The length of the pipe is selected so as to extend beyond the top edge of the supports. Subsequently, it will be possible to attach the elements of the upper trim to the pipe.
| |
| Brickwork . By placing a template welded from a rod, a layer of masonry mortar is added. A brick is placed on top. After the row is laid, the template is removed and laid out on top of the completed row. The side seams are also formed using a template that is inserted into the gap. Each subsequent row is placed with an offset of half a brick relative to the previous row. | |
| Joining the brick to the pipe . There will be a gap of 25 mm between the profile pipe in the center of the support and the brick. When finishing the row, fill the gap with masonry mortar. |
Columns
Permanent disposable formwork made of composite materials allows you to simplify and speed up the process of constructing columns
How to build a column under the dome of a gazebo? There are two options:
- You can build formwork from a pipe of a suitable diameter and fill the internal volume with concrete with reinforcement;
- You can order and buy ready-made disposable formwork and pour the same concrete, but quickly and without extra effort.
How to build using permanent formwork?
Reinforcement of columns and installation of disposable formwork
The sketch shows the slab foundation of the gazebo, from which a pipe with reinforcing winding made from a chain-link mesh is brought out to the design height of the support. A lower support ring is placed around the pipe using glue, which is closed with pins and filled with concrete.
The sketch shows a group of supports of which one column is finally assembled
Next, the composite ring of the column is put on, which, after installation, is also filled with concrete. The process is repeated until the rings reach the design height of the structure. A top is installed on top of the rings filled with concrete, which will subsequently turn into the elements of the upper trim.
Walls
How and with what to fill the gaps between the supports? If columns are used as supports, the gazebo can be left open or wrought iron barriers can be installed in the openings.
Example of wall cladding for masonry
Alternatively, the opening can be filled a third or a quarter with brick or stone masonry. If you plan to install a barbecue or fireplace in the gazebo, one of the walls is made permanent.
Metal frame covered with polycarbonate - inexpensive and looks beautiful
As an alternative to solid walls, I recommend installing forged or welded fences with polycarbonate sheathing.
Roof
| Illustrations | Types of roofing for round gazebos and their descriptions |
| Hip roofs . This type of roof consists of a certain number of slopes. To create the illusion of a round roof, there must be at least five slopes. The advantages of the straight slope design are the ability to install any roofing materials. The roof is based on a conventional rafter system, in which the slanted rafters rest on the top frame with one edge, and are brought together at the ridge with the other edge. | |
| Dome roofs . Curved rafters are used as the base for the supporting frame of domed roofs. Therefore, as shown in the photo, it is preferable to assemble the frame for dome roofs from metal profiles. For covering dome structures, it is advisable to use flexible lightweight materials, for example, cellular polycarbonate. The dome can also be finished with bitumen shingles, but for this, the rafters are pre-sheathed with plywood or similar board materials. |
Spring pergola
The wooden structures of the pergola are especially emphasized by the wisteria that decorate the pergola.
Wooden pergola structure with swings and side bars that protect from prying eyes.
A simple corner pergola with a great L-shaped sofa that can accommodate a decent group of people.
A great pergola design idea with stone columns and a wooden roof, surrounded by flowers, vines, greenery.
An incredibly shaped pergola, made to order, will fit perfectly into the garden around the house.
A wooden gazebo is a corner structure that creates a secluded corner in the garden.
A simple but cute pergola is decorated with cute curtains that create an incredibly comfortable environment.
Advantages and disadvantages
Any building has its pros and cons, a gazebo is no exception.
The advantages include:
- aesthetic compliance with any type of landscape design;
- lack of external bulkiness;
- possibility of independent construction of the structure;
- lack of emphasis on one element of the garden;
- building capacity;
- there is no possibility of the roof being pressed through due to a large amount of snow in winter.
But there are also disadvantages. These include:
- design complexity;
- a large amount of waste building materials;
- significant construction costs.
Popular types of round gazebo designs
A round gazebo looks much more interesting in comparison with a rectangular structure. Common types:
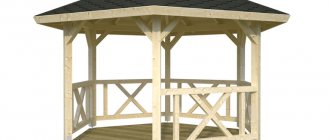
- Rotunda. This type of small architectural form consists of a dome mounted on vertical supports. Columns are placed in a circle or semicircle. Traditionally, the structure is made with an arch open at the top, but for all-season use, glazing is installed between the supports.
- Polygonal design. If it is not possible to bend the building material, you can build a structure from six or more corners. This design is also considered round.
- Geodome. The basis of the building is a supporting frame sheathed with polycarbonate or plexiglass. Due to this, the gazebo looks like a massive hemisphere.
- Yurt. The design is similar to a rotunda or pergola. It consists of a dome, vertical supports and a circle-shaped base.
Also, according to their structural type, the following types of gazebos are distinguished:
- Open. They resemble a canopy and consist only of a roof and supports. The upper part contains decorative crossbars in the form of arched grilles, giving the structure additional strength. There are no fences in this design, so the entrance is accessible from all sides.
558f6a85416b02c7cff91a1870ac9a7d.jpe 6d6daaa7c5fb2244495c895d1599a52b.jpe 41873e34a423af8a6e7a1df348ea6501.jpe - Half open. Part of the structure consists of open areas, part of solid walls. Sides or a frame are installed along the perimeter of the structure. The resulting windows are decorated with curtains, or a double-glazed window is installed.
- Closed. Almost a full-fledged house, inside of which you can install a grill, barbecue oven or summer kitchen. Such a building is equipped with doors, windows, lighting and heating appliances.
Mobile structures are provided that can be easily disassembled and transported to any place in the summer cottage. The structure is lightweight and consists of a frame and the main component – an awning.
Mobile gazebos have a tarpaulin dome, the sides can be open, closed or with a mosquito net
Park of the Usachev-Naydenov estate
Photo: Shutterstock
The “High Mountains” estate is the city estate of the Usachev-Naydenov gentlemen, built in 1829-1836 according to the design of the Swiss architect Domenico Gilardi. In the park complex here you can find two preserved beautiful rotunda gazebos: massive columns of the Doric order support a roof with an original open dome. The circumference of its base is lavishly decorated with bas-reliefs of griffins. One of these rotundas “starred” in the film “Pokrovsky Gate” directed by Mikhail Kozakov.
Do-it-yourself wooden gazebos 300 photos, drawings, diagrams
Here is a small gallery of wooden gazebos made by yourself. Of course, you can collect more photos, because there are millions of options. Each gazebo, made not according to a template, but with your own hands, even according to standard drawings, is still a work of art. Here you can find relatively simple designs that can be done by anyone with little experience. There are, of course, examples of industrial products that may be useful.
Drawings of a square gazebo
Square gazebos 150 photos
Drawings of hexagonal gazebos
DIY hexagonal gazebo 50 photos
Drawings of octagonal gazebos
DIY octagonal gazebo 100 photos
Decorative lattice for gazebo
Installing decorative sheathing is an optional step, but you may want to complement the design of the building with this element, so we decided to talk about how its installation is carried out.
For the lathing, we will need wooden blocks 40 by 30 mm, which can be cut with an electric saw from a board of the appropriate thickness. Both ends of the planks need to be cut at an angle of 45 degrees, and then their surface should be sanded to remove burrs.
The planks are attached using self-tapping screws to the railings and top trim as shown in the photo below:
Placing the planks crosswise and attaching them to the beams of the upper trim, please note that additional planks are placed where necessary; in the photo, you can see that a plank is placed in the upper left corner of the plank.
As a result, from the outside it looks like this:
In this example, we made this decorative element permanent. And perhaps you would like to install it, but at the same time be able to remove it if necessary.
If “yes,” then in the following link we looked at how to make a wooden lattice for a gazebo with your own hands, but at the same time it is made as a separate structural element that has freedom of installation/disassembly. By the way, such an element is perfect for closing the space between the surface of the soil and the bottom of the building.
Now, after installing the grille, the appearance of the gazebo from the outside began to look like this:
Required materials and tools
The construction of a domed gazebo involves the use of certain materials and tools, the use of which will make it possible to bring one or another idea to life
In other words, you need to pay attention to:
- Materials. When carrying out construction work, the most commonly used materials are wood (oak, ash, spruce, fir), metal, plastic, special connecting connectors, platbands, plywood sheets, planed bars.
- Tools. In the process of work, there will be a need to use construction tools such as a drill, screwdriver, hand router, screwdriver, mechanical or electric saw, plane, hammer, grinder, self-tapping screws, nails.
This list of tools is not exhaustive; in each specific case, everything depends on the materials used and the complexity of the work.
Based on his ideas and financial capabilities, each owner decides for himself what material is best for him to use. As practice shows, from the point of view of economy, it is best to make the frame from metal pipes rather than wood. In any case, during the work it is necessary to use connectors, thanks to which you can achieve the required dome shape.
Advantages and disadvantages
Like any other structure, a round-shaped gazebo has its advantages and disadvantages. But it is worth noting that there are much more advantages. These include:
- smooth gadflies;
- beautiful appearance;
- durability (subject to proper installation and processing of the material);
- the ability to fully use the entire area of the gazebo;
- greater rigidity compared to gazebos of other shapes;
- minimal exposure to snow and wind loads.
Among the disadvantages of round gazebos, it is worth noting the greater amount of waste and a more complex construction process.
DIY round gazebo: laying the foundation
Rocky and sandy soils are considered the most reliable for building a round gazebo, but you can build on any other reliable place. After the location for the future structure has been determined, it will be necessary to outline its future contour on the ground cleared for the foundation. For example, to build a 4x4 gazebo, you can take a rope of about 2.5 meters, fasten one end of it to a peg in the center of the future building and measure exactly 2 meters from this place using a construction ruler. At the other end of the rope you need to attach a sharp object, which, according to the principle of a compass, will need to outline a circle with a diameter of 4 meters.
This round area will serve as the basis for the future foundation, which can be made of concrete with stones or boulders. Formwork for the foundation can be made from anything: old boards, stone, metal, brick and wicker. After the foundation concrete has completely hardened, vertical posts are installed along its perimeter for the future walls of the gazebo, taking into account the location of the entrance opening and windows. The finished racks are subsequently secured using the ceiling and floor. It is better to make the floor and ceiling from log cuts, strong bars or boards. But for more practical flooring, natural stone and concrete slabs are often used.
Drawing with dimensions
Drawings of the structure, as well as its sketches and 3D models must be included in the project. When developing these diagrams and image plans, it is necessary to observe the proportions of the structural components, as well as write down their exact dimensional characteristics. Then there will be no problems with the construction of the gazebo that could lead to additional financial expenses.
Important! If you don’t want to do everything yourself, you can use the Internet and download the drawings you like.
Rotunda - distinctive features, advantages of this design
The landscape design of a personal plot is increasingly being supplemented with original elements in the form of rotunda-style gazebos. Its main purpose is to organize a suitable place for a comfortable rest.
The domed roof and supporting columns are essential elements of the rotunda.
A rotunda gazebo is a cylindrical building, the constituent elements of which are:
- a circular base on which the structure is erected;
- domed roof located in the center of the structure;
- columns (mandatory attribute of a rotunda);
- balustrades (located between columns along the entire perimeter of the structure);
- podium with steps (absent in monosyllabic buildings).
The rotunda gazebo serves as a spectacular decoration that sets the style for the entire suburban area
Different materials are used to make a round gazebo with columns and a dome, but the most popular are natural and artificial stone. Among the advantages of such a building are noted:
- durability (the stone is not afraid of temperature changes and harsh weather conditions, and therefore retains its original appearance for a long time);
- fire resistance (you can place a grill or barbecue inside the building);
- heats up slightly in the sun;
- aesthetic appearance created by smooth contours;
- a cylindrical frame is more stable compared to a square or rectangular one;
- less susceptible to wind loads;
- Can be installed on water.
When designing a rotunda, it is important to respect the general style in which the building and site are decorated. The classic style of a round gazebo involves the use of simple columns, without additional decor.
In a less strict design, climbing flowers or grapes are used as decorative elements. Also relevant are rotundas with capitals and carved ornaments on the dome, railings or columns.
f7a4e8b95e32e90fd7afa7262018091b.jpe
d460f0f1f8cceb5d18a7f8710ee636c0.jpe 070a14ab2b8475a082e74adfa578e27c.jpe 63ddff05435b4a6c3d1f6505676ea436.jpe
80538b0208e39840ee0566bfaa187571.jpe
A classically designed rotunda looks great on the shore of a pond
Variety of options
There are really a lot of ideas with a round shape. One classification stretched to as many as 7 points, each of which will have its own examples with photographs. It won’t be difficult to come up with an idea for your own construction.
All buildings vary greatly in price. Wood was and remains the cheapest material, while brick or stone buildings are noticeably more expensive. Aesthetics with complex shapes such as round are quite expensive.
Made of wood
The classic building material - wood, is the most popular and cheapest among all types and forms of gazebos (unless we are talking about debarked logs with a diameter of 300 mm).
Such buildings look very civilized, and besides, modern impregnations and antiseptics allow the wood to stand for decades without rotting. Therefore, you don’t have to worry about the reliability of such structures.
Due to the lightness of the material, the gazebo does not require a serious and capital foundation. In most cases, ordinary foundation blocks are sufficient.
Made of metal
I have seen quite a lot of both unique architectural solutions (made to order) and standard ones (ready for sale). All these gazebos are similar, but there is a huge difference in both aesthetic beauty and quality of metal.
The more massive the structure, the more expensive and better quality it is. Thick metal will last for decades if it is properly treated against corrosion and painted. Thin metal, especially profile pipes, can be seriously deformed during operation, especially if you plan to use it frequently.
The price is also affected by the presence of decorative forging and metal sheathing. Any aesthetic aspects associated with metal require additional material and welder work, and therefore are expensive. But almost any metal building will look very beautiful, regardless of the project - I cannot say the same about wooden gazebos.
Made of brick
Some of the most expensive and capital buildings are brick. To lay out a round shape, you need to show some ingenuity and skill, since you cannot fasten a brick with a self-tapping screw.
Sometimes the structure is additionally reinforced with concrete lintels and metal reinforcement to withstand all the contours of the building.
Of course, such structures are expensive. In addition, owners often ask to install a stove complex, since it is somehow not civilized to cook meat nearby on a small grill.
Before deciding to build such a large gazebo, you need to allocate a site on your site. In addition to the structure itself, it is necessary to take into account the landscape design around it, and indeed the free space in general. It makes no sense to erect such a building on a small plot.
Polycarbonate
Compared to previous photographs, polycarbonate will look simply ridiculous, but it will also cost tens or even hundreds of times less. Due to the flexibility of carbonate slabs, making a round shape at the roof or even walls will not be a serious problem.
Polycarbonate sheets must be laid out in honeycombs downwards, and not sideways - this will allow condensation to escape naturally.
It will not be possible to make a gazebo only from polycarbonate in any case, since you need a frame on which it will be attached. In most cases it is wood or metal.
You can build such structures with your own hands without any problems, and if you are interested in purchasing, then this is also not a problem - the price is quite reasonable even for high-quality slabs.
With grill (Finnish grill)
Due to its round shape, installing a barbecue inside the gazebo becomes difficult. Only Finnish grill houses, which have already been discussed in detail on our website, can boast of the ability to cook food in a round room.
The price for these buildings is relatively small - from 180 to 300 thousand rubles on average.
Example of a Finnish gazebo
Thanks to its design with a smoke exhaust and a grill in the center, you can simultaneously relax and cook meat on an open fire right inside the house. Moreover, it is safe and without heavy smoke. If you are interested in this approach to the recreation area, then you can pay special attention to the option with a Finnish grill.
With dome and columns (rotunda)
Do you know the name of a gazebo with a dome and a column of 7 letters? Rotunda! This question is often asked in scanwords and crosswords. It is a massive structure with a domed roof and columns (in budget options these are wooden, metal or stone pillars).
It is rare to see such a building on a summer cottage. Usually they stand in city parks, squares or near monuments (I saw the last one near the Victory Monument in Saransk). However, some summer residents are willing to pay for such architectural masterpieces if the land and finances allow.
Backlit
I am a little awestruck by gazebos with lighting, which can be both decorative and strictly practical. In any case, the issue of light in the room is very acute, especially when night suddenly falls around, and the vacation does not plan to end at all.
In my personal opinion, you need to think about lighting in any recreation area. This is a strategically important facility that must be ready to accept people at any time. And if everything around also shines with light, then this will also add an additional pleasant effect to your relaxation.
The subtleties of building on your own
The process of building your own gazebo should begin with the development of the project. It is enough to complete the drawing with minimal designation of parameters, which will allow you to accurately calculate the amount of material.
After creating a sketch, the owner of the site should decide on important points:
- Placement of the building. It is necessary to select the optimal location for the future gazebo, taking into account the air flow, the location of the shade and the features of the landscape.
- Foundation type. Assess the rational need for a solid foundation.
- Roof covering and type of roof.
From corrugated sheet
Before assembly, the list of necessary tools and their actual availability are also checked.
Selecting a location: separate building or annex
The placement of a gazebo in a dacha largely determines the capabilities and functionality of the future recreation area. Sheds and gazebos attached to the main building are well protected from blowing.
A warm wall allows you to spend less effort on heating the recreation area. There is no need to constantly put on shoes to walk across the site to the separate gazebo.
Often it is almost impossible to make an extension to the main building due to the specifics of the project, then the owners of the site choose a place at a relative distance from the house.
If there is dense vegetation and trees, sometimes the option of placing a separate recreation area fits better into the landscape and the overall style of the interior space of the dacha.
Installation and fastening of poles
Construction begins with the arrangement of a high-quality foundation, the purpose of which is to support the total weight of the structure. Pouring the foundation is required exclusively for stone gazebos or buildings made of other heavy materials.
Concreting pillars
The placement of the main posts for the canopy is carried out according to the following scheme:
- Holes are pre-dug, equidistant from each other. The depth of one hole is 0.25 of the length of the support itself.
- A substrate is poured onto the bottom - crushed stone, sometimes gravel is used. After which it is necessary to tamp this kind of pillow.
- By aligning the perpendicular to the hole, a stand is placed, the bottom of which is treated with protective compounds and wrapped in a special antiseptic material.
- Concrete is poured into the resulting holes.
The readiness of the columnar base occurs after 2 days.
Roof installation
The design of the roof largely determines the protective capabilities of the entire structure. The correct slope, reliable material and the absence of cracks allow you to create an impenetrable canopy.
Installation of the roof covering is carried out according to the plan:
- The rafter structure is assembled on the ground; due to its own low mass, it is easily installed without the help of construction equipment.
- The frame is tightened with fasteners and securely fastened to the poles. The supports must first be connected to each other.
- A symmetrical sheathing is created on which the main covering of the canopy is laid.
Note: special plastic washers that need to be placed under the screws will help increase the strength of the upper structure. They eliminate the possibility of loosening and resist vibration.
Studying drawings with dimensions
To optimize the gazebo installation process, it is necessary to first develop the most detailed drawing. It is possible to install gazebo canopies with minimal leftover materials only if all construction costs are correctly calculated.
At the stage of choosing a type of pergola, studying projects on the Internet allows you to correctly distribute the available funds. Only after a thorough analysis of the ideas of several options can you choose the optimal one for your own site.
Types of structures
Any gazebo consists of the same elements: base, supports or legs, side walls (sometimes only railings or partitions) and roof.
Each of these elements is varied in shape and type of construction, and which of the options to combine with each other depends on the desired functions of the building and the design idea.
There are only two types of gazebo bases - with and without a foundation. Serious preparation of the site for the gazebo is not required if the structure is portable or prefabricated. During the cold season and bad weather, you can simply remove it.
A foundation is necessary when a gazebo is being built for many years, and there is no need to remove it from its place.
There are several types of bases for such structures.
Solid. This type of foundation is also called a monolithic slab. It is suitable for structures of varying complexity made of different materials, mainly lightweight. There must be a gap between the foundation and the floor for ventilation. The slab base consists of several layers and is used on unstable soil. The lowest layer is spilled with sand, then covered with waterproofing materials, and the top is filled with cement or concrete mortar. Since the load on it is significant, the foundation is reinforced with metal mesh. This is a reliable and durable foundation.
- Tape. Designed for more complex and heavy buildings. Its design implies the presence of ready-made blocks of cement-concrete mixture along the perimeter of the foundation. They are laid out inside a small depression in the ground, sprinkled with sand and covered with waterproofing, and then filled with mortar and reinforced. The advantage of this method is that you don’t have to fill the perimeter inside the blocks under a regular wooden gazebo. They are strong in themselves.
- Columnar. The principle of operation is the same as that of the tape type, only the blocks do not form a continuous perimeter, and the space between them is filled with solution. Columns make it possible to pour the foundation for gazebos of non-trivial and complex shapes, but the materials must be relatively light, such as hollow metal, plastic, wood.
- On the beam. A solid or strip wooden base is intended exclusively for structures made of the same material. At the corners under the beam there should be columnar supports dug into the ground, made of brick or concrete.
- On stilts. This option is relevant when the gazebo needs to be raised above the ground for good ventilation. Piles are also convenient for use in areas with uneven terrain. Installation of such metal structures is simple: they are “screwed” into the ground and into the perimeter frame of the gazebo.
- From improvised means. It is important to use strong pallets or car tires. The latter are filled with crushed stone inside for stability.
Square-shaped gazebos are characterized by a hip roof with a ridge unit (has from 4 slopes converging at one point at the top). Rectangular gazebos use a hip roof type (the two long sides are trapezoidal, and the two end sides are triangular). The semicircular roof is made of sheet transparent plastic (in appearance it resembles a greenhouse).
Gazebos with a round base are often made with cone-shaped and domed roofs. Roofs covered with soft material (like soft tiles) have a complex figured shape.
An extremely rarely used type of roof in the Russian climate is the pergola. This is a roof that is not covered with sheet material on top. It looks like a wooden lattice, which is covered with fabric or PVC materials. The fabric pieces should hang down a little.
Pergola gazebos look very nice and provide shade, but are only suitable for dry days. In addition, the fabric will have to be washed often, because it is not customary to use dark colors for them.
The design of the gazebo itself can be square, rectangular, polygonal or round.
The simplest option is open, when apart from the base, roof and supporting elements, it is not complicated by anything else. This is a country option used in warm summers. Such a gazebo is blown by all the winds, and in rainy weather water gets inside.
The second type is semi-closed gazebos. These are gazebos or pavilions. As a rule, they have an overhanging roof that protects the upper part, and sides up to half the height of the structure (100-150 cm). Gazebos with lattice walls are also classified as semi-closed. Used in the warm season during the summer season.
A closed gazebo is more reminiscent of a small uninsulated country house. It is often glazed.
Sew up the walls
The final stage of construction is finishing the walls. As a rule, only the lower part is sheathed to the level of the railing, and everything above is left open. There are plenty of options here to suit every taste and budget:
- Lining, block house, OSB boards - wood looks good and additionally holds the structure together.
- Polycarbonate - protects from wind, but allows light to pass through. Easy to install.
- The corrugated sheet is a solid wall, provides shade and protects from the wind.
- Decorative grille - suitable for both the lower and upper parts of the walls.
- Climbing plants - a dense hedge will protect from the sun and rain no worse than solid walls, and at the same time it looks more pleasant.
- Leave it as is - the design will be well ventilated and look very elegant.
What colors can you use when doing Greek style architecture?
When starting to engage in architecture of a particular style, it is better to find out which colors are most common.
The distinctive colors of this particular style are cool shades of blue, green, yellow (lemon), brown and white, as well as various combinations of these tones. The most commonly used color combination is white and blue. For example, imagine a white wall with a blue window frame against it. It looks fresh, simple, and at the same time bright and memorable. There are times when it is necessary to emphasize something. Then use bright colors: red, pink. The ceilings of Greek architecture are very high. Thanks to this, the buildings seem majestic and spacious. Such ceilings in Greece are a sign of freedom and space. They are usually supported by solid columns and decorated with sculptures of mystical creatures. This gives them even greater greatness. Of course, the gazebo will not look like a giant in the middle of the yard. But it is quite possible to use the element of high ceilings. Just build it not low, but at least at the level (or slightly lower) of the main building of the site. What you can borrow from the Greeks for your gazebo is a small round or square window in the ceiling. It will become a distinctive feature of the Greek style, as well as an additional source of lighting on a cloudy day. When finishing the ceiling, textured plaster is usually used in the same tone as the color of the walls. Decide for yourself: will texture be appropriate in a summer gazebo, will you like it. What you will definitely like is the need to leave the ceiling matte. Such a decision will emphasize nobility and also pay respect to antiquity. You can apply meander patterns or frame them in a plinth with artistic modeling. When choosing how to treat the walls, forget about wallpaper (occasionally they can be found in gazebos, but not when it comes to the Greek style). To make the walls look truly Greek, choose rough plaster, which will give them texture, the charm of the creator who created the gazebo, as well as that very simplicity that is present everywhere in the Greek style. Sometimes plaster is used to achieve the effect of marble laying. This is considered ideal. If you would like to see the effect of antiquity on the walls in your gazebo, then you should use a double coating. The inner layer, which should be visible through the outer one, will give the same effect. You will have the feeling that these walls are the result of painstaking and many years of work by wind, sun and sea. If such walls are not for you, there is another option. You can cover the walls of your gazebo with simple, clear patterns. The main thing is that the ornaments and designs are the simplest, most elementary, without complexity. You can place accents with bright colors in those places that you consider necessary. Both painting and sculpting will help you with this. For particularly sophisticated natures, there are also frescoes and panels, which are always created by hand. The subject matter of such works is strictly mythological: animals, gods, battles.
Look at examples of building gazebos with your own hands
The simplest gazebo
The structure is based on pentagonal trusses, which are interconnected and serve simultaneously as a base, walls and roof. Benches are also attached to them.
Gazebo with pitched roof
A fairly simple configuration that can be easily replicated in any size. Although it looks unprepossessing, it does its job perfectly.
Small hexagonal gazebo
A beautiful building with a lower part made of a block house, decorative latticework and a metal tile roof.
Square gazebo with soft roof
A simple design with a hipped roof. The pillars are treated with dark varnish, and the lower part is treated with light block house.
Rectangular gazebo
The frame is made of wooden beams. The walls up to the railings are covered with clapboard, the roof and gables are covered with polycarbonate.
Light metal gazebo
https://youtube.com/watch?v=zBGSk8GN2TU
The appeal of this gazebo is its hexagonal shape and simple design. The roof and lower part are made of polycarbonate.
Gazebo made of profile pipe
The frame is made of a square pipe, and the lower part and roof are made of corrugated sheets. The creator placed a brick grill nearby.
Dome gazebo
Openwork gazebo made of bent profile pipe with a table and benches. The walls and roof are covered with polycarbonate.
Large gazebo for 20 people
A solid structure made of massive timber under a hipped roof made of bitumen shingles.
Living gazebo
A unique option that is literally grown. Flexible trees form green walls and a dome that protect from the sun even better than a traditional roof.
Bottom part
At the bottom of a round gazebo, a frame is usually created from 100x100 mm bars. For a standard gazebo, their number is 6. In order for the bars to be securely connected to each other, they need to be cut into half a tree.
Where the bars will connect, a hole with a diameter of 12 mm is drilled. It is designed for the reinforcing bar that protrudes from each concrete support. After this, to create the lower part of the gazebo, perform the following steps:
- Each column is covered with mastic to ensure waterproofing. To prevent concrete from coming into contact with wood, roofing felt is laid on the pillars.
- Place each base beam on support pillars. In this case, the reinforcing rods must be threaded into the holes at the ends of the wooden elements. After this, the parts of the lower part of the gazebo are connected with self-tapping screws.
- If necessary, it is worth laying floor joists. The boards will rest on them.
- A plank floor with boards 40 mm thick is laid on the finished base.
- If desired, the floor can be covered with linoleum. This will increase the service life of the boards and give the gazebo a more aesthetic appearance.
Advice! When planning to lay linoleum, it is better to leave a small gap between the boards. This will ensure the floor is ventilated and will also prevent moisture from appearing.
For garden
When designing a recreation area in the center of the garden plot, you should not worry about the possible disadvantages of this placement.
Thanks to the unique qualities of polycarbonate, almost any place becomes ideal for an intimate conversation. There is no better alternative to sheathing for gazebos on the market than polycarbonate.
A gazebo for a summer residence made of polycarbonate and metal has the following features:
Forged
- High ability to withstand physical blows. Compared to the strength of conventional glass panels, high-tech plastic is 200 times stronger than its closest competitor.
- Polycarbonate sheathing is corrosion resistant.
- With additional treatment with a protective composition, it is capable of blocking the penetration of ultraviolet radiation by 86%.
- The material is easy to process.
- Does not shatter when broken into pieces.
- The ignition temperature is quite high, which makes the material fireproof.
Any contamination of the garden gazebo cover can be easily removed by regular washing. Polycarbonate is unpretentious to various cleaning compounds. The owners may put off repairs to a recreation area once built for years.
The honeycomb lattice structure of polycarbonate does an excellent job of suppressing various noises, which only increases the comfort of staying inside.
Selection of building materials
You can create a gazebo of this type from absolutely any type of materials, but not all of them have practical benefits for this building. When designing such a gazebo, it is important to determine its main purpose.
The difference is that a beautiful domed gazebo with elegant handrails will not protect vacationers from the wind and it should be built in a place that is as protected from bad weather and drafts as possible.
For this reason, a metal frame with wrought iron patterns should not be used for a typical garden building. It is unlikely that such a structure will be suitable for a comfortable stay on a bad day.
Additional disadvantages that metal gazebos have include the complexity of installation. In this case, welding work is inevitable, which can cause a serious overrun of the budget allocated for the construction of a recreation area.
A round gazebo made of natural wood is the best option, since processing the wood will not cause difficulties, and the material itself is famous for its durability.
Features and advantages of the building
The round gazebo is a unique combination of practicality and aesthetics. The positive qualities of such buildings include the ability to look harmonious in any landscape design, as well as their versatility.
Depending on the type of gazebo, it can be used for family fun on summer evenings or fun parties with friends on windy, rainy days.
Among other advantages, several points stand out:
- High aesthetics, which is achieved thanks to smooth shapes.
- Possibility of maximum use of usable space. Even a small round gazebo can comfortably accommodate a significant number of guests.
- Increased stability due to the cylindrical shape of the frame.
- Slight exposure to wind and snow loads.
Classic gazebos for a private yard
And yet, most homeowners prefer not beautiful or original, but convenient and practical designs. In this regard, wooden buildings in the form of a tower and small forged gazebos are more popular for a private house. A large building under a gable roof can replace a terrace or a summer kitchen, but building a small structure does not make sense, because it will be a waste of money.
As for the design and decor of classic gazebos, a wooden diagonal lattice is used to enclose the side openings. Thanks to this solution, the room remains open, but at the same time shaded from the sun's rays. At the same time, everyone understands that a gazebo is a place of relaxation, where you want to spend time with family and friends and have a delicious meal. Therefore, a barbecue or stove is an indispensable element of a modern gazebo. You can complement the gazebo with a small artificial pond and a path leading to it.