When designing and installing a heating system, the question always arises: what pipeline diameter to choose. The choice of diameter, and therefore the throughput of pipes, is important, because you need to ensure the coolant speed is within 0.4 - 0.6 meters per second, which is recommended by experts. In this case, the required amount of energy (amount of coolant) must be supplied to the radiators.
It is known that if the speed is less than 0.2 m/s, then air jams will stagnate. A speed greater than 0.7 m/s should not be done for reasons of energy saving, since the resistance to fluid movement becomes significant (it is directly proportional to the square of the speed), moreover, this is the lower limit for the occurrence of noise in pipelines of small diameters.
What type of pipeline to choose
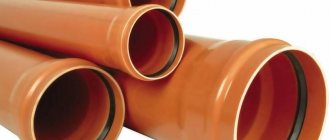
Nowadays, polypropylene pipelines are increasingly being chosen for heating; although they have disadvantages in the form of difficulty ensuring the quality of joints and significant thermal expansion, they are extremely cheap and easy to install, and these are often decisive factors.
What pipes should be used for the heating system? Polypropylene pipes are divided into several types, which have their own technical characteristics, and they are intended for different conditions. PN25 (PN30) brands are suitable for heating, which can withstand a working pressure of 2.5 atm at a liquid temperature of up to 120 degrees. WITH.
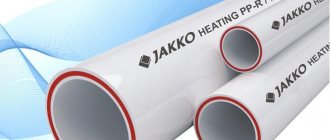
Data on wall thickness are given in the tables. For heating, polypropylene pipes are now used, which are reinforced with aluminum foil or fiberglass. The reinforcement prevents significant expansion of the material when heated.
Many experts prefer pipes with internal fiberglass reinforcement. Such a pipeline has recently become most widely used in private heating systems.
Questions about selecting the diameter of the heating pipeline
Pipes are produced in standard diameters, from which you need to make a choice. Standard solutions have been developed for selecting pipe diameters for heating a house, based on which in 99% of cases you can make the optimal correct choice of diameter without performing a hydraulic calculation.
Standard outer diameters of polypropylene pipes are 16, 20, 25, 32, 40 mm. The internal diameter of PN25 pipes corresponding to these values is 10.6, 13.2, 16.6, 21.2, 26.6 mm, respectively.
More detailed information on the outer diameters, inner diameters and wall thickness of polypropylene pipes is given in the table.
What diameters should I connect?
We need to ensure the supply of the required thermal power, which will directly depend on the amount of coolant supplied, but the fluid speed must remain within the specified limits of 0.3 - 0.7 m/s
Then the following correspondence of connections arises (for polypropylene pipes the outer diameter is indicated):
- 16 mm - for connecting one or two radiators;
- 20 mm – for connecting one radiator or a small group of radiators (radiators of “regular” power within 1 - 2 kW, maximum connected power - up to 7 kW, number of radiators up to 5 pcs.);
- 25 mm – for connecting a group of radiators (usually up to 8 pieces, power up to 11 kW) of one wing (arm of a dead-end wiring diagram);
- 32 mm – for connecting one floor or an entire house, depending on the thermal power (usually up to 12 radiators, respectively, thermal power up to 19 kW);
- 40 mm - for the main line of one house, if any (20 radiators - up to 30 kW).
Let us consider the choice of pipe diameter in more detail, based on pre-calculated tabular correspondences of energy, speed and diameter.
The relationship between pipe diameter, fluid velocity, and thermal power
Let's turn to the table of speed correspondence to the amount of thermal power.
The table shows the values of thermal power in W, and below them is the amount of coolant kg/min, with a supply temperature of 80 degrees C, a return temperature of 60 degrees C and a room temperature of 20 degrees C.
Selection of pipes by power
The table shows that at a speed of 0.4 m/s, approximately the following amount of heat will be supplied through polypropylene pipes of the following outer diameter:
- 4.1 kW - internal diameter about 13.2 mm (outer diameter 20 mm);
- 6.3 kW - 16.6 mm (25mm);
- 11.5 kW - 21.2 mm (32 mm);
- 17 kW - 26.6 mm (40 mm);
And at a speed of 0.7 m/s, the supplied power values will be approximately 70% greater, which is not difficult to find out from the table.
How much heat do we need?
How much heat should the pipeline supply?
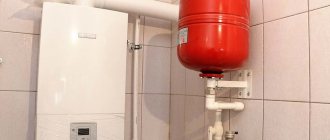
Let's take a closer look at the example of how much heat is usually supplied through pipes, and select the optimal pipeline diameters. There is a house with an area of 250 sq. m., which is well insulated (as required by the SNiP standard), so it loses heat in the winter by 1 kW per 10 sq. m. To heat the entire house, 25 kW of energy is required (maximum power). For the first floor - 15 kW. For the second floor - 10 kW.
Our heating scheme is two-pipe. One pipe supplies hot coolant, and the other pipe cools it to the boiler. Radiators are connected in parallel between the pipes.
On each floor, the pipes branch into two wings with the same thermal power, for the first floor - 7.5 kW, for the second floor - 5 kW.
So, 25 kW comes from the boiler to the interfloor branch. Therefore, we will need main pipes with an internal diameter of at least 26.6 mm so that the speed does not exceed 0.6 m/s. A 40mm polypropylene pipe is suitable.
From the interfloor branching - along the first floor to the branching on the wings - 15 kW is supplied. Here, according to the table, for a speed of less than 0.6 m/s, a diameter of 21.2 mm is suitable, therefore, we use a pipe with an outer diameter of 32 mm.
7.5 kW goes to the wing of the 1st floor - an internal diameter of 16.6 mm is suitable, - polypropylene with an outer diameter of 25 mm.
For each radiator, the power of which does not exceed 2 kW, you can make an outlet with a pipe with an outer diameter of 16 mm, but since this installation is not technologically advanced, the pipes are not popular; a 20 mm pipe with an inner diameter of 13.2 mm is more often installed.
Dismantling cast iron radiators
To dismantle such heating devices yourself, you will need the following tool:
Dimensions of cast iron battery.
- Pipe wrench number 3, for loosening the locknut and fitting.
- Pipe cutter for cutting pipes or grinder.
- Hacksaw for metal.
- Chisel.
- Hammer and sledgehammer.
- Brush for removing rust.
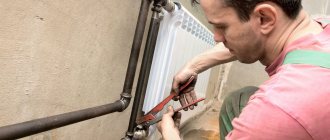
Work to dismantle such heating devices is usually carried out in the summer, when the heating system is turned off. Before starting dismantling work, it is necessary to drain the water from the heating pipelines.
Then, using a pipe wrench, the locknuts located on the water supply pipes are unscrewed, the fittings are unscrewed, and the radiator is removed from the brackets.
If the locknuts cannot be unscrewed, the coolant supply pipes are cut off and the device is dismantled.
Preparation for work, nuances
Preparing for dismantling and installation is not a difficult process, but it is very responsible, since there is a risk of ruining your renovation and your neighbor’s. First you need to make sure that there is no water in the heating system. We find out this in the housing office of your house, if there is a need to disconnect and drain the risers where the radiators will be replaced. Nuances: in the cold season, at temperatures below -10, no one will turn off the risers. And if the house has more than 15 floors, it is forbidden to cut out parts of the metal riser and replace them with polypropylene, otherwise during the heating season the iron riser will expand from heating and damage your structure.
Marking the mounting locations
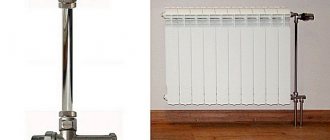
Mounting installation begins with determining where and how the heating device will be placed . The best place is a wall under a window or close to the door. In both cases, the heat that the sections will generate will become a barrier to the movement of cold air.
Installation of fastenings always begins with markings:
- The battery must be placed strictly in the center of the window . The maximum deviation of the center of the device from the center of the opening should not exceed 2 cm. The marking involves drawing a vertical line on the wall. It should be in the center of the window. Next, marks are made on the sides, retreating to a distance equal to half the assembled heating radiator.
- between the floor and the bottom of the cast iron structure .
- There should be 10-12 cm between the window sill and the top of the heating radiator . In accordance with these two rules, horizontal marks are made.
You also need to draw the marks along which the brackets will be installed. First, draw lines that will correspond to the levels of the supports. The top one needs to be drawn below the marks made near the window sill. The distance to them should be equal to the distance between the top of the heating radiator and the lower point of connection of the two sections. The bottom line is drawn above the marks made near the floor. It is raised as many centimeters as there are between the lower points of the section and the connection of the ribs. On these lines, mark with your own hands the places where the brackets should be. It is taken into account that for every 5 ribs there should be 1 fastening, both above and below.
Fittings set
Now let's find out what the set of fittings for radiators will be like in both cases.
Connection on slops
For a classic side connection in an apartment building, the radiator is equipped with the following set:
| Fitting | Quantity |
| Radiator plug blind left | 1 |
| Flushing valve with left-hand thread | 1 |
| Pass-through radiator plug right | 2 |
| Lock-nut | 2 |
On the upper floors of houses with lower filling, the equipment is supplemented with a Mayevsky tap, which is installed in the upper blind plug bored out for it. The dimensions of fittings for radiators are determined by the diameter of the connections; as a rule, it corresponds to DN20 (3/4 inch). Slings (long threads) are usually cut directly onto the liner.
Helpful: The best threaded fittings for cast iron radiators are traditionally made from the same cast iron. Radiator plugs for cast iron radiators made of steel or brass, in general, cannot be found on sale; locknuts made of brass are too fragile, and steel locknuts stick tightly to the steel rod over time and cannot be disassembled.
Cast iron locknuts manufactured in accordance with GOST 8961-75.
Connection on American
In this case, the only fittings for connecting heating radiators are the American ones themselves, two of them. One of their threads is screwed into the radiator passage plug, the second into the coupling or element of the shut-off and control valves.
To connect the valve to the radiator plug, American female threads with male-to-male threads are used.
When installing heating yourself, it is useful to know a few subtleties.
- If there are a large number of radiator sections, it is preferable not to connect from the side, but diagonally or from bottom to bottom. In this case, to connect to the fitting you will need one pass-through plug with a right-hand thread and one with a left-hand thread.
- The diameter of the threads in the plugs of aluminum and bimetallic radiators in most cases is 1/2 inch (DN15). However, when the number of sections is more than 10, it is advisable to use liners of size DN20.
- American ones are often equipped with the already mentioned elements of shut-off and control valves. Valves and throttles combined with fittings are more compact than two products separately, and their price is often lower than the total cost of the fitting and valve.
Choke with an American.
Dismantling cast iron radiators
The most common are cast iron radiators MC140. During their operation, which in some cases is 30 years or more, they have shown themselves only at their best:
- accumulates heat;
- resistant to poor quality coolant;
- ease of maintenance;
- reliable and have a long service life (from 10 years and above)
How to disassemble this grandfather? And it’s very simple, because structurally all radiators are assembled according to the same principle: using nipple nuts and gaskets for tightness. True, in those ancient times, tow with paint was screwed onto the nut and there was a rubber gasket.
Cast iron radiators in some systems last for 50 years, it is clear that disassembling them will not be easy
There are no problems disassembling the new radiator. But you’ll have to tinker with the old one:
- Over time, the joint between the sections “sticks”;
- the internal protrusions for the key are corroded by the coolant.
This is why dismantling the old “cast iron” is quite problematic.
Another difficulty in working with cast iron is its heavy weight. The weight of one “clean” section is 7.5 kg. A 10-section battery weighs 75 kg, so it’s best to carry it with two people. Before disassembling the radiator, it is best to remove and wash it. A battery that is light in weight can be washed in the bath, after laying down a rag. To do this, it is best to take a piece of hose, connect it to a cold water tap and rinse thoroughly. If you hate to dirty the bathtub, you can go out into the yard. All that matters is the presence of water, you also need a drain: there will be more than enough of any horror in the water.
Only a strong person can carry cast iron batteries alone
The place for disassembling the radiator is chosen to be level and quite spacious. If you live in a multi-story building, then this work can be done on the staircase. Tools you will need:
- radiator key;
- chisel, hammer, small sledgehammer;
- brush with metal bristles, blowtorch;
- several boards or blocks for lining under the battery;
- plumbing wrench No. 2,3 for unscrewing side plugs (footers) and plugs.
A few words about the key: you are unlikely to find something like this in a store; it’s easier to look in the market or borrow from a plumber you know.
The key is a round rod with a diameter of 18 mm. On one side it is flattened in the form of a spatula to the internal size: its width is 28x40 mm and its thickness is 6 mm. On the other hand, a ring is welded to it, into which a lever is inserted for rotation. The length of the key is defined as ½ the length of the largest radiator plus approximately 300 mm. You can make such a “miracle” from a suitable piece of half-inch pipe by flattening one end. But this option is only suitable for disassembling a new radiator.
The joint is leaking - the gasket is leaking. It is necessary to disassemble the cast iron battery and change it
To make work easier, before disassembling the joint must be heated with a hair dryer or a blowtorch. This is where you need boards: you place the radiator on them and heat it.
Such different diameters
Due to the difference in the naming system for pipes made from different materials, some confusion inevitably arises in the mind of a potential buyer. I will try to clarify this issue.
- The steel pipe is marked with a conditional bore, or DN. It is approximately equal to the internal diameter; small deviations of the actual size from the DU are due to the variation in the wall thickness of ordinary, light and reinforced water and gas pipes;
The nominal bore of a steel pipe is approximately equal to its internal diameter.
- The DN marking indicates the same DN (conditional bore). However, DN is often specified in inches. An inch is 2.54 centimeters; only markings in inches are traditionally rounded to several whole and fractional values, which aggravates the confusion. For the convenience of the reader, I will provide a table of correspondence between the sizes of steel pipes in millimeters and inches;
| DU | Size in inches |
| 15 | 1/2 |
| 20 | 3/4 |
| 25 | 1 |
| 32 | 1 1/4 |
| 40 | 1 1/2 |
| 50 | 2 |
- Pipes made of cross-linked and ordinary polyethylene, polypropylene and metal-polymer products are marked with an outer diameter . On average, their diameter is one step larger than the internal section: a pipe measuring 25 mm has the same internal cross-section as a steel pipe DN 20, 32 mm corresponds to DN 25, and so on;
Internal and external dimensions of polypropylene pipes. Different operating pressures determine the variation in wall thickness.
- All polymer products have lower hydraulic resistance than steel due to minimal wall roughness. In addition, they do not become overgrown with rust and lime deposits over time, so their diameter is selected without reserve. But it is better to buy steel pipes for a central heating system taking these factors into account, rounding the calculated pipe diameter up.
An exposed steel line in the central heating system of an apartment building.
Installation
How and with what do you tighten the plugs in heating radiators when installing them? How to seal connections? The instructions depend on the cork material.
The fitting is screwed into aluminum radiators using an adjustable or open-end wrench. Tightness is ensured by a standard paronite or silicone gasket.
The gasket under the plug is clearly visible in the photo.
The plugs for cast iron heating radiators are screwed in with gas wrenches No. 2 - 4.
The procedure is as follows:
- The carving is made with your own hands, without the use of tools.
- In the gap between the bottom of the plug and the section, a strand of plumbing flax impregnated with any quick-drying paint or silicone sealant is placed along the pipe thread.
- The fitting is tightened until excess impregnation is squeezed out.
Problems
What problems with sectional heating devices are somehow related to nipples?
Intersectional leaks
The reason for their appearance is that the gaskets between the sections tightened by the nipple gradually lose their elasticity due to prolonged heating and liming. With each heating and cooling, the linear dimensions of the sections change slightly; in this case, the gasket is deformed over and over again.
Finally, when the battery cools again, it stops completely blocking the gap between the section collectors, and moisture appears at the junction.
Leak between sections.
Nipple rupture
The consequences of a nipple rupture are much more unpleasant. If in the first case the worst thing that threatens you is a small puddle under the battery, then disconnecting one of the collectors risks flooding your and neighboring apartments with hot water with a large amount of silt and sand.
What could cause a fairly strong nipple to rupture?
- Connection overtightened during assembly . As already mentioned, the sections expand somewhat when heated; As soon as the coolant temperature rises, the barely visible crack will expand and turn into a source of serious problems.
- Water hammer . This is the name of a wave propagating in a practically incompressible medium, created by an abrupt stop in flow when the valve of a screw valve is torn off, the cheek of a valve falls, or simply the shut-off valve is suddenly closed. The pressure at the flow front during water hammer can reach 20 – 25 atmospheres.
The mechanism of water hammer occurrence.
Reference: cast iron radiators are designed for a working pressure of 9-12 atmospheres, aluminum radiators - 6-16.
Accessories for heating radiators. Installation and features
The principle of connecting different types of heating batteries is almost the same, but they differ in the equipment used for this. Accessories for radiators are offered for sale individually, as well as in sets, which contain all the products required to connect one battery.
Popular types of heating radiators
In the vast majority of apartments and houses you can find 4 types of heating batteries:
- Cast iron.
- Aluminum.
- Bimetallic.
- Steel.
There are also plastic and copper radiators, but they are practically not used. Each type of popular battery type has its own specific performance characteristics and connection method. The only exceptions are aluminum and bimetallic radiators, the connection principle of which is identical, as are the components used for this.
Cast iron batteries
Heating radiators of this type have been widely used in the past due to their high resistance to corrosion and oxidation. Despite their massiveness and high cost, they are still relevant today. The fact is that in central heating systems the circulating coolant is too contaminated, so batteries made of other materials wear out in just a couple of years.
Aluminum radiators
Such batteries have an attractive appearance. Aluminum has high thermal conductivity, which means it heats up the air in the room faster. A huge disadvantage of such batteries is their high sensitivity to the chemical composition of the coolant. In this regard, they are completely unsuitable when connected to a central water supply. They are chosen only when an autonomous heat supply is being installed, since it is possible to control the quality of the fluid circulating in the system.
Bimetallic radiators
Batteries of this type have high heat transfer because they contain aluminum. They are very durable and have a long service life. They have a higher cost, which significantly reduces the popularity of this type of radiator.
Steel radiators
Steel batteries, unlike all previous varieties, are not collapsible. They do not consist of sections that can be removed and added at will. Typically, such radiators are of a panel type. Outwardly they look like a rectangular box. They can often be found in office buildings, as well as in residential buildings and apartments. Since panel systems are not dismountable, manufacturers often install on them all the necessary components for radiators from the factory.
Accessories for connecting radiator sections
Cast iron, aluminum and bimetallic batteries consist of sections, the ribs of which can be removed or added, thus adjusting the efficiency of heating the room.
To increase the battery, the following products are used:
- Nipple.
- Pad.
The barrel nipple can have a different diameter, depending on what type of battery it will be used for. The largest connector is used when installing old-style cast iron radiators. The nipple is a short metal tube, on opposite ends of which multidirectional external threads are cut, reaching to the center. Inside the nipple there is a special groove designed to fix the key for assembling batteries.
What to consider when choosing
When purchasing a regular installation package, you should decide on the diameter of the heater’s connecting hole. Some boiler equipment manufacturers may give specific installation recommendations, which will include the type of faucet connection kit. You should pay attention to such recommendations in order to avoid damage to thermal convectors. Fittings produced by well-known manufacturers are more reliable.
If the choice falls on a universal set, which also contains fasteners, it is worth considering that for heavy cast-iron radiators you should take special long steel pins to be able to bury them into the thickness of the wall; for light models of heaters, brackets screwed with screws are sufficient.
It does not matter which unit is installed in the thermal circuit - aluminum or bimetallic - they are not adapted for conventional plumbing fittings due to the fact that on the right side, if you look at the front panel, they have holes with a right-hand thread, and on the left side, accordingly , there is a left cut. Left-sided fittings solve the issue, allowing valves, valves and plugs to be connected to them.
When buying a set, you need to carefully check the direction of the turns of the holes on the fittings; it should be different in pairs.
What is the secret of popularity
- Let's start with the fact that such units are considered perhaps the most durable . Most reputable manufacturers confidently offer a 50-year warranty. And this is quite justified, for example, in Tsarskoe Selo, a radiator installed 110 years ago is still functioning;
Important: there is an opinion that the cast iron radiator now is worse than in Soviet times. This is only partly true. It all depends on the quality of the product and the manufacturer. If the battery is cast in accordance with domestic or European GOST standards, then there is nothing to be afraid of. But when purchasing units from Chinese or Turkish “masters”, a person is essentially taking a pig in a poke.
Standard MS 140.
- Cast iron, although a brittle metal according to its characteristics, is still quite durable . The working pressure for such a battery is 8 – 12 atmospheres, plus during short-term surges or water hammer, it can withstand a load of up to 20 atmospheres. If we take into account the fact that in the urban network the pressure rarely exceeds 6 - 8 atmospheres, and the average water hammer force is 15 - 20 atmospheres, then the safety margin is obvious;
- Such batteries are present both in the budget segment of the market and in luxury goods . The fact is that the price of the classic MS-140 is perhaps the lowest. At the same time, the cost of artistic thick-walled casting can sometimes be several times higher than the price of good bimetal;
- Adherents of modern materials forget about the quality of the coolant in our urban networks . This harsh “cocktail” can destroy many newfangled models. While cast iron is completely resistant to all chemical attacks and neutral to corrosion, it simply does not rust;
Design of modern cast iron batteries.
- Thanks to the large diameter of the battery channels, any debris slips through it, practically without stopping , which is very important for urban high-rise buildings with old pipework;
- As you know, cast iron has a high heat capacity . The battery takes a long time to gain temperature, but also maintains it for a long time. In case of interruptions in heating, this unit will give off heat for several hours after switching off;
Battery connection options.
- Technically, installing a cast iron heating radiator with your own hands is not very difficult . With a tool and a couple of assistants for support, the job can be completed within a day;
- Another important advantage is the fact that components for cast iron heating radiators can be found in any hardware store and the price for them is quite reasonable;
Characteristics of modern cast iron radiators.
We seem to have figured out the reasons for the nationwide popularity.
Now let's talk about the pitfalls of these heating devices:
- The first reason why many people refuse cast iron is the serious weight of the structure. Judge for yourself, a standard section weighs about 7 kg; on average, 7 – 10 sections are installed per room. As a result, we have from 50 to 70 kg of empty structure; when filling, another 1 - 1.5 kg is added to each section. In addition to installation problems, not every wall can support such a unit;
- The minimum volume of coolant in one cell is about 1 liter. For modern competitors this figure is 3–5 times less. And as you know, the more liquid, the more energy is required to heat it and maintain temperature. Plus, it is very difficult to quickly regulate the temperature in such systems, due to their high inertia;
Data of the classic cast iron radiator MS 140.
- The area of such structures, compared to modern analogues, is somewhat smaller, and accordingly the heat transfer is lower;
- Reproaches regarding the unattractive design are unfounded; to some extent they can be addressed to the widespread MS-140. As for figured casting, their beauty leaves them far behind their modern counterparts;
Selection of coolant
How to fill bimetallic radiators in those rare cases when they are used in an autonomous heating circuit?
In the vast majority of cases, plain water is used as a coolant. In addition to the fact that the cores of the bimetallic sections are sufficiently resistant to corrosion, when the circuit is filled with water, their contact with atmospheric oxygen is completely excluded. At the same time, in an oxygen-free environment, the appearance of rust is unrealistic.
In cases where the heating circuit is likely to stop at sub-zero temperatures, it is practiced to fill bimetallic radiators with non-freezing coolants:
- An aqueous solution of propylene glycol,
- Antifreeze,
- Transformer oil.
Design of heating radiators
A standard battery is assembled from individual cast sections, without the use of external fasteners or retainers. Thus, you can build a radiator of almost unlimited length.
To properly disassemble a cast iron battery, you need to know some features of its design:
- The individual sections are assembled into one housing using internal threaded bushings or nipples. To disassemble a cast iron radiator, you need to be able to remove the end plugs and internal inserts;
- Each nipple is a cylindrical glass, on which two sections are cut with threads of two types - with left and right directions of turns.
End caps are also manufactured with two types of threads; as a rule, blind plugs are produced with a left-hand thread, and the fitting nut for connecting to a pipe is produced with a right-hand thread.
To secure a separate register into a common cast-iron body, a pair of nipples are used, which are simultaneously screwed between the two sections with a long key with a square head. In order to disassemble and avoid splitting the cast iron body, you will also need to carefully unscrew the nipples, making only 1-2 turns on each.
Briefly about the battery design
Cast iron heating devices consist of the following parts:
- heating section filled with coolant;
- connecting nipples – bushings with external threads used for joining adjacent sections;
- end caps;
- transition plugs for connecting pipes or taps;
- gaskets made of paronite or rubber - artificial rubber EPDM.
Note. The minimum number of sections (fins) in one radiator is 3 pieces. It is not customary to do less - the heat transfer is too low, and it looks ugly.
Sectional drawing of the heater, design of the nipple and key.
The heating elements are pulled together by nipples; to avoid leaks, the joints are sealed with gaskets. Paronite is used on old Soviet-made radiators; the modern analogue is EPDM sealant. The nipple shown in the drawing is tightened with a long socket wrench with a special nozzle.
The side openings of the outer sections are closed with blind or through plugs, where pipelines are connected. The manufacturing plant or the store selling the products can additionally equip the batteries with hanging brackets and a manual air release valve - a Mayevsky valve.
General recommendations
Experienced craftsmen and professionals recommend taking into account the following points:
- When using a cast iron radiator plug on heating appliances, caution should be exercised. The fact is that cast iron is easily compressible, but is considered a rather fragile material. Therefore, even a slight mechanical impact or impact on a hard surface can cause the formation of microcracks. As for steel products, they are more reliable in this regard.
- When studying materials for the assembly and installation of heating devices, there are recommendations for using ordinary paint for more airtight connections. To some extent, these statements are true, but it should be noted that such connections do not have a very attractive appearance, and when disassembling them you may encounter certain difficulties. It is important to understand that modern heating devices and their additional accessories do not require painting.
Selecting and installing radiator plugs is not difficult, but you need to approach this process quite responsibly. It is very important to select matching materials, correctly determine the type of thread and size of the plug, as well as its purpose. By following the recommendations of professional technicians, you can avoid many problems during the operation of the heating system, including batteries and radiators.
Cutting with circular knives
Only large round seals can be produced using this method. In the process of work you will need fairly cheap and high-performance equipment. Cutting is carried out with standard blades. Therefore, the production of gaskets of this type can be carried out independently and in any volume. Radiator leaks are often caused by a damaged gasket. And if you don’t know what to do if the heating battery leaks, first of all you should pay attention to the gaskets.
Causes of breakdowns
As in the case of the sleigh in the famous saying, the heating system should be prepared for the new season in the summer.
The main causes of problems are:
- Low heating of the aluminum battery when there is no air in it.
- Noises and knocking are heard in the system.
- The aluminum radiator was found to be leaking.
- Plaque appeared at the joints of system elements.
In houses with autonomous heating, these problems can be easily identified by running the system at maximum operating mode. Higher pressure will show the integrity of the structure and allow you to see possible defects in it. In houses with centralized heating, it will not be possible to carry out such work on your own, but you can submit a request to the management service that their specialists have carried out the necessary work.
If during testing the system showed its best side, but problems began at the height of the season, then emergency dismantling of the radiator is required.
To do this you need to do the following:
- The shut-off devices are closed, as is the riser (the media must first be drained from it).
- A container for draining the coolant is installed under the bottom connection.
- Unscrew the lower ball valve so that the water (antifreeze) remaining in the battery drains out.
- The top valve is also unscrewed and the battery is removed from the brackets.
If the question arises of how to repair an aluminum heating radiator if it does not heat, then you should look for the reason for this condition of the device:
- The first thing you need to do is bleed the air from the system and wait until the batteries warm up.
- If nothing has changed, then you will have to dismantle the radiator and check for the possibility of clogging . Sectional aluminum radiators do not hold much coolant. By pouring water into the removed heater, you can calculate whether its quantity corresponds to the parameter stated in the data sheet. If not, then it is not necessary to repair the aluminum heating radiator, but to flush it , for which you should pass water under high pressure through the structure until it brightens.
- If the flow of water did not “cope” with the task, then you will need knowledge of how to disassemble an aluminum heating radiator into sections and do the same work with each element separately . Sometimes, when very dirty, a brush (not metal) is required to rid the battery of thick dirt.
Sometimes the only way to return the batteries to a hot state is to replace the aluminum radiator section or extend them. With the lateral type of connection this will not be difficult, whereas with the bottom or diagonal method you will have to increase or shorten the length of the pipe.
Types of seals
Previously, there was not such a variety of seals as there is today. Some plumbers use the entire range of materials in their work, while there are conservatives who still recognize only linen. Are they right? Let's figure it out. How to seal the threads on a heating pipe:
- tape-fum;
- flax with paste;
- anaerobic adhesive sealant;
- sealing thread.
Linen was previously used in tandem with red lead, grease or oil paint. Today, a special sealing paste is used that prevents the flax from drying out and rotting.
Flax dries in systems with hot coolant, but rots in cold water. In the first and second cases, the result of the process will be the appearance of a leak. Thanks to the paste, the fitting can be loosened a little after twisting, turning back no more than 45 degrees. A universal material, suitable for connecting metal heating pipes and polymers.
Flax is suitable for all types of threads on heating pipes, regardless of diameter. It is the cheapest of the seals. It is important to wind it correctly:
- using a metal blade or a file, notches are made on the thread;
- a strand of flax is rolled into something like a thread;
- winding is carried out as the fitting is screwed in (usually clockwise);
- The protective paste is applied evenly.
When winding flax, it is important not to overdo it. First you need to make the first turn, which will secure the seal to the thread. This leaves a tail. On the second turn, the remaining tail is picked up and wound together with the common fiber. Make sure there are no twists. The material should be distributed evenly along the threads from the end to the fitting body. When working with flax, when connecting heating pipes, you need to watch your hands, as they are constantly smeared with paste. If you grasp a polypropylene pipe with such hands, an imprint will remain.
Fum tape is used for thin-walled fittings and connectors with fine threads. The material is easy to work with and your hands are always clean. At the same time, fum tape is quite expensive and is mainly used for small diameters. A significant drawback of this seal is the impossibility of adjustment. That is, if the joint of the heating pipes is twisted and needs to be loosened a little to center it, then the connection loses its tightness.
The sealing thread, like the fum tape, does not require lubrication or the use of special paste. It can be wound onto dirty or wet threads and is suitable for plastic.
According to the characteristics stated by the manufacturers, the sealing thread can be turned away (adjusted) by 180 degrees.
Sealants are applied to clean and grease-free threads (usually new ones). They are:
- dismantled;
- difficult to dismantle.
But in fact, they are all not dismantled. Before connecting heating pipes using sealant, you must be prepared for the fact that it will be possible to disassemble the connection only after heating. And only then, perhaps, will it be possible to unscrew it. But during installation, the connection points do not even need to be tightened with wrenches.
Harness
Which shut-off and control valves are mounted on the connections in front of the passage plugs?
Here are some typical options.
- Pair of ball valves. They allow you to completely turn off the device in case of repair or replacement without resetting the entire circuit.
A pair of valves completely cuts off the device from the connections.
- Throttle and ball valve. The throttle provides the ability to manually adjust heat transfer.
- A pair of chokes makes it possible to perform basic balancing of the system (limiting the passage of heating devices closest to the boiler) and subsequently regulate the heat transfer of the device.
- Finally, the combination of a throttle with a thermal head makes it possible to adjust the heat transfer completely automatically: the set temperature will be maintained in the room with acceptable accuracy.
Application of punching knives
The operating principle of this method is similar to die cutting, but in this case a simpler and less expensive tool is used. The production of seals in this way is inexpensive and quite fast. However, the pants are quite short-lived, so this technique is used for the production of small and medium-sized batches of gaskets.
Thermal molding
In this case, you will need an injection molding machine with a mold for casting products. The cost of a molding press is quite high, so in order to make production economically feasible, the production of gaskets using this method must be large-scale or even mass-produced.
The production of products in small batches using this technology is relevant only if they cannot be produced in any other way. It is noteworthy that only PVC seals are produced by thermoforming.