Unfortunately, the appearance of even the most modern heating devices does not always meet aesthetic requirements, and sometimes cannot fit perfectly into the interior of the room. The desire of the owners to eliminate this deficiency is quite natural.
Before closing the radiator, you should understand all the intricacies of the issue. Otherwise, home heating costs may increase significantly. In our material we will tell you how to do this without special financial costs and heat loss.
What to consider when masking a battery
Before you start masking, you need to know a few important nuances:
- The first thing you need to understand is that with any method there will be heat loss.
- Convection air flows should not be blocked by anything; this is the only way to maintain uniform heating of the room, and the windows will not fog up.
- For various emergencies, it is worth considering in advance free access to threaded connections and the radiator - this could be a window or a removable structure, for example, a door with hinges.
- For repairs, the faucet, thermal head and other elements of the heating system must remain in good accessibility.
How to close batteries correctly - technical rules and tips
Before closing the radiator, you need to take into account several technical nuances:
- Keep in mind that the heat transfer of a closed radiator is reduced in any case, no matter what masking method you choose. The main thing is that the change is not significant.
Ideally, the decrease in air temperature in the room should be about 1-1.5 degrees.
- Before closing the battery, put it in order: blow it out, wash it (this is done at the end of the heating season) and paint it.
- Keep in mind that the denser the grille weave, the better it masks the radiator, but the worse it conducts heat. Therefore, when choosing a screen for a battery, try to look for a middle ground or rely on heat saving.
- To minimize heat loss, the screen can be placed on legs and a groove can be cut in the center.
When closing the battery, it is very important not to block convective air flows, otherwise it will blow in the room and the windows will begin to fog up, which will ultimately lead to the appearance of mold on the walls. Ideally, the window sill visor should protrude no more than 30 mm above the radiator; the top and bottom of the radiator should be as open as possible.
- There should be a distance of at least 35-50 mm between the battery and the screen. There should be a gap of about 60-70 mm from the radiator to the floor and to the window sill.
To resolve emergency situations, it is necessary to provide free access to the radiator. For example, the box grille can be removable, folding, opening on hinges or retractable on profiles.
At a minimum, for trouble-free maintenance, the following must remain in good accessibility: pipe connections, valves, thermal head and threaded connections.
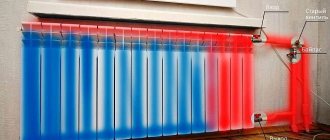
You can increase heat transfer by 20-25% by placing a heat-reflecting screen, for example, fumisol, on the wall behind the radiator. Often this is quite enough to completely compensate for the heat loss of a closed battery.
The best ways to beautifully hide radiators
There are several ways to hide batteries; in this section we will look at the most popular and effective ones.
Hinged screen
It is by far the most practical and popular method; most often this design is made of metal and has its advantages:
- simple installation;
- heat exchange remains the same;
- can be made with rounded corners, which reduces the risk of injury.
Glass screens
A screen made of glass will be an interesting and stylish solution, especially for those who choose minimalism or a modern style in interior design. Photo printing or various patterns can be applied to the glass, but this method is not a budget option. Installation is carried out on a screw holder, but you will have to drill holes in the wall. However, the heating radiator will be stylishly protected. This option will fit into any interior.
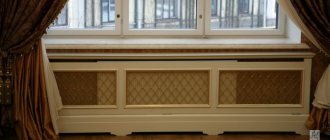
Box screens
Box screens are an excellent option for decorating radiators.
- They will help to completely hide the battery.
- The box can become a piece of furniture.
- Erans are easy to install and easy to care for.
- Protect from burns or other injuries.
The photo shows an original green wooden box in the children's interior.
Curtains to the floor
Let’s not forget about the most popular way to hide batteries - simply hang them with opaque or translucent curtains. Using this method, over time you will even forget that there are pipes and a radiator behind the curtains. The main thing is to choose curtains that will look harmonious and not show everyone that there is something behind them.
Painting the walls in color
How to hide a heating radiator on the wall if other designs are “prohibited”. There is only one way to paint it the same color as the wall.
Wood frame
Wood will create coziness and warmth in the apartment, and the disguise of the battery will be elegant and beautiful. This option is for those who are furnishing their home in eco-style using natural materials. These ways to hide batteries can be used as a stand for home decor.
In the photo, ordinary wooden blocks stylishly hide the radiator in the kitchen.
Built in furniture
Another common way to cover a radiator is custom-made furniture or built-in furniture (shelves, cabinets, folding tables, seating).
Hide the radiator with furniture
Arrange furniture, such as an armchair or desk, so that it covers the radiator. A cast iron radiator is not attractive to many, but pieces of furniture can hide it.
Replace with designer model
For those who don’t want to invent anything, unique designer ways to hide batteries have been developed that already initially have a beautiful appearance and you simply don’t want to hide them.
Original ideas
There are many creative ideas that can turn batteries into a decorative element:
- Forged products
- Hide the radiator with fabric
- Painting and decoupage of batteries
In the photo, with the help of a beautiful painting, the battery has merged with the wall.
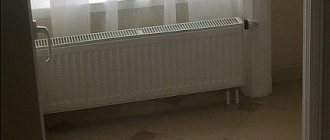
Hanging screens
A battery screen is the most affordable way to hide a radiator, although it is far from the most aesthetically pleasing. There is no need to install them specially; they can be installed simply by hanging them on the heating device. True, by closing the radiator itself, they do not solve the problem with the supply pipes. The hinged panel, allowing you to hide the radiator itself, very slightly reduces the level of convection and heat transfer, plus - they are mostly metal (although if you catch them, they do not ring very pleasantly).
Hanging screens are cheap and easy to install
Hide with drywall
Separately, I would like to talk about how you can hide batteries using drywall. It’s worth noting right away that the material has its drawbacks, but plasterboard construction is still very popular for repairs.
- The material is environmentally friendly and is not subject to combustion.
- You can find several varieties of this material on the market.
- This camouflage option is budget-friendly, and installation can be carried out in different ways, in a way that is convenient for you.
- Also, it is drywall that will allow the apartment owner to come up with any design, which will help not only to cover the pipes and radiator, but also to make additional decorative elements.
The downside is that drywall is afraid of external influences; if you do it carelessly, it is quite easy to break or pierce it. And if a breakdown or leak occurs, the entire finish will have to be replaced again, but this material is cheap.
Calculation of radiators for a room, taking into account the features of their connection and location
We must assume that since a site visitor is reading this article, he will be interested in calculating the required power of the heating radiator (number of sections - for collapsible models). Moreover, the final value also depends on the presence and type of decorative screen.
The required power of a heat exchange device installed in a room depends not only on the area of the room, but also on a number of other criteria. All this is taken into account in the calculator presented to the reader.
Below are some explanations on how to carry out the calculation.
Calculator for calculating the required power of a heating radiator
Go to calculations
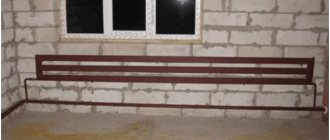
Do-it-yourself installation of a plasterboard box
In order to close the battery, you need to measure it, and then buy metal profiles and other additional products.
- What materials are needed: 12 mm plasterboard sheet, metal profiles 27x28 and 60x27, self-tapping screws for plasterboard and metal, dowel-nails 6x40 in size, construction sickle, perforated corners.
- Tools: screwdriver, hammer drill, metal scissors, stationery knife, stapler, pencil, tape measure, building level.
Attention, for the construction of a plasterboard box there is an important requirement: the window sill must extend beyond the radiator by at least 3 centimeters.
Work order:
- Installation of the frame. The profile should be mounted on three adjacent sides: floor, wall, window sill. Press the 27x28 metal profile to the base with your hand, drill a hole using a hammer drill in both the profile and the wall. Using a screwdriver, screw the dowel-nail into the hole. At the bottom of the window sill, a 27x28 metal profile is mounted on self-tapping screws; the length of the screws should not be greater than the thickness of the window sill. Next, you can install jumpers made of metal profile 60x27.
- Selecting the grid size. This hole must be made slightly smaller than the grid size. You can focus on three recommended sizes: 60x120, 60x90 or 60x60.
- Installation of drywall. Plasterboard sheets can be cut with a utility knife. Screw it in with a screwdriver.
- Installation of corners. They must be secured at the corners with a construction stapler, or attached to gypsum plaster. Serpyanka should be applied to all seams of the plasterboard box and covered with plaster. Before painting or wallpapering, the plasterboard box must be puttied, sanded and coated with primer.
Height calculation
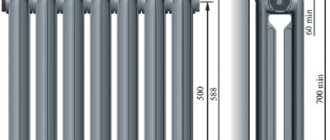
The distance between the radiator and the window sill must be at least 10 cm, regardless of what type of heating device is used. You also need to take into account the height of the battery itself. It is necessary to retreat 8 cm from the rear. The battery itself should rise above the floor by 10 cm, that is, when installing a window sill from the floor according to SNIP, you will need to retreat 70-80 cm.
An important role is also played by what the window sill protrusion will be : it can move significantly away from the wall or be invisible. If there is no radiator under the window, it is not necessary to meet any requirements, but if heating is present, the projection must be strictly regulated. The task of the window sill is to redirect heat flows. Without it, they will rise upward, and proper heating of the room will not occur, since some of the heat will evaporate and be distributed on the ceiling.
Poor convection can also be caused by a window sill that is too wide. It will not allow warm air to escape; as a result, condensation will begin to accumulate on the window, since the main air flows will go up, and some of them will get stuck under the window, heating the atmosphere. In this case, it is very important to calculate the distance from the window sill to the heating radiator, both in height and how much of a protrusion can be made. You can avoid the problem described above by using a slab that does not extend beyond the wall by more than 8 cm.
Tip: when calculating the dimensions, you need to take into account the level of the wall with decoration.
The best option is a solution in which no more than 10% of warm air will be retained in the window niche. To do this, the window sill should not protrude more than 6 cm beyond the radiator, but it should not be shorter than the heating device. If the design solution of the room requires the installation of non-standard wide structures, it is necessary to provide ventilation holes in them. Their size must be sufficient for proper air circulation.
The distance between the window sill and the heating radiator will remain standard in this case. As for the thickness of the structure, it usually does not exceed 4 cm, but this indicator is not a standard. A thinner slab has a risk of deformation caused by warm air currents. The thicker one has more mass and costs more. If such structures are not provided for by the design plan, there is no point in installing them. Detailed instructions for installing a window sill.
Masking heating pipes
It doesn’t matter whether it’s an apartment or a house, a bedroom or a kitchen, everywhere I would like to have a good renovation. Questions immediately arise: how to beautifully hide heating pipes and how can this be done with minimal cost and maximum efficiency? At the same time, the method of disguise should be truly invisible and unnoticeable, fitting into the room.
The pipe can be hidden inside the wall, or it can also be closed into the floor. Remember that the old heating system should not be hidden in this way; this option is possible after a complete update of all elements.
Box on frame
It is best made from wood, plastic or plasterboard. Do not place the heating pipes close together; there should be at least three centimeters between the box and the pipe.
Hide behind decor
Decoration of pipes in various ways, for example, wrapping them with jute rope. But remember that this reduces heat transfer. Many owners decorate pipes with flowers; this can be done using bamboo with leaves. Only imagination should work here; even an old pipe can look completely different.
Painting to match the color of the walls
The easiest and most practical method is to paint the radiators or riser in the same color as the walls, but the heat generation will not be reduced.
In the photo in the kitchen interior, the pipes are painted to match the blue walls.
Hide under the floor plinth
A good invention was the floor plinth, in which you can easily hide batteries located horizontally and low to the floor.
Plastic models
Plastic screens are the cheapest option of all the others, but also the most unsafe. When heated, plastic releases harmful substances, can smell unpleasant and even become deformed. And the decorative variety of plastic models does not differ. Therefore, if it is not possible to purchase better screens, it is better to leave the batteries open.
Important criteria when choosing screens for radiators are also the manufacturer, certification and compliance with standards. Of course, safety comes first, but external parameters are also important, because harmoniously selected screens can become a unique decoration of the room and its highlight.
Photos in the interior of the rooms
Kitchen
The kitchen is the ideal room in which all ways to hide batteries will become practical and convenient. If the room is small, then you can hide the radiator with the help of a beautiful tabletop or make a folding table, which will fold out when convenient.
Factories of metal-plastic structures offer a large selection of beautiful large-sized window sills that imitate stone, wood and other materials. A modern window sill does not break under weight, is not afraid of external factors, is easy to care for, wipe clean, is not afraid of scratches, and so on. You can hide any type of battery in this way, including cast iron.
In the photo, wooden boxes are used to disguise the radiators.
Living room
If the radiator is in a niche, then a wide window sill will help create a work area.
You can place souvenirs, vases or potted flowers on the constructed wooden box. You can also cover unsightly radiators in the living room with thick curtains.
The photo shows a modern living room. In order to hide the radiators, a wooden structure was installed, which also serves as a place for rest, storage and decoration.
Bedroom and children's room
In the interior of a bedroom and children's room, batteries can be used as another place to relax, a tabletop for decorative elements or a workplace.
Bathroom
You can hide the pipes in the bathroom using a louvered door, plastic grilles or a cabinet with opening doors.
We hide heating radiators using wooden, glass or plastic screens.
In the photo, the radiators in the bathroom are hidden using a wooden box.
Hallway
For radiators in hallways, glass screens or wooden boxes are suitable. In a small room, covering the battery is only necessary from a practicality point of view. This could be a locker for storing shoes, or the battery will become a small coffee table where keys and other necessary items will be stored.
Original ideas
There are many creative ideas that can turn batteries into a decorative element:
Forged products
Hide the radiator with fabric
Painting and decoupage of batteries
Examples in different interior styles
Modern style
For a modern style or a high-tech and minimalist style, any material made of wood, glass (glass panels) or metal is suitable.
Classic style
It is recommended to use natural materials; it is better to opt for a wooden lattice.
Provence
Wood also loves styles such as Provence, country, chalet and eco-style.
Scandinavian
Wooden grilles in light colors will look appropriate in the Scandinavian style.
Loft
In the loft style, old radiators and pipes are most often not covered; they are left on display or replaced with interesting design options.
Use the niche for storing vegetables and canning
To avoid loading the refrigerator with vegetables in the winter, you can use this niche as a cold pantry. If necessary, insulate the wall a little so that during severe frosts the vegetables do not freeze. Replace shelves and front doors with more modern and practical ones. You can even use glass ones, the only condition is that there must be order so as not to spoil the aesthetic appearance of the interior.
Connection diagrams
There are several radiator connection diagrams that comply with the requirements and standards of GOST and SNiP. They are represented by the following varieties:
- Lateral connection. Characterized by maximum heat transfer. With this connection, the input is made from the top of the battery, and the output is from the bottom on the same side. This is the most popular connection diagram.
- Diagonal connection. Produced with significant system dimensions. Water enters the radiator through the top and is discharged from the bottom on the opposite side.
- Lower connection or “Leningradka”. It is produced in small one- and two-story houses, as well as when installing pipes hidden under the floor. The efficiency of such a system is 5-15% lower than with a lateral connection.
When pipes are in a rough screed, heat loss increases due to contact with concrete and the ceiling covering of the lower floor.
conclusions
Finishing the walls behind the radiators was much easier if it was done simultaneously with other repair work. But if this was not possible, then you can always correct the situation by using modern building materials and tools. You need to choose a finishing method based on the size of the space behind the radiator, heat loss from the wall itself, the result you want to achieve from the cladding and the cost of materials and your own skills. Then such repair work will be carried out with the least amount of money and time.
Replace the window sill with a work area with a sink
Instead of a window sill, you can install a sink or equip a work surface.
Unusual design of the sink, which is installed instead of a window sill.
A lot can fit on these shelves.
Instead of a window sill, you can even install a hob and work area.
If you can move the communications, then instead of the window sill, install a countertop with a sink. Such a solution will be rational and convenient; not only will more space immediately appear, but the work area itself under the window will be well lit, and the interior will be transformed - it will become more fashionable and stylish.
If you decide on this kind of redevelopment, you need to take into account some nuances. For example, the width of the slopes, so as not to place the sink too close to the window, in order to avoid increased humidity and the appearance of mold. In no case should such innovation interfere with the opening and closing of the window.