Thanks to the correctly selected connection scheme for heating radiators, water is supplied more efficiently with minimal losses in their power. For this reason, your own connection diagram must be selected for each specific situation. For example, the bottom connection of heating radiators provides for hidden pipe routing, and therefore such a system will harmoniously combine with the interior of the room.
Bottom connection of heating radiators
About battery connection methods
Let's start with the fact that the connection diagram is:
- one-sided;
- cross;
- bottom.
Connection diagrams for heating radiators
According to the one-way option, the connection is made, as a rule, in city apartments where central heating is used. Here the pipes are connected only on one side of the battery. The advantage of the scheme is that the system can operate at maximum rated power, but how efficient the heat transfer is depends on the number of battery sections. In this case, water cannot reach areas remote from the connection point, which negatively affects the efficiency of the entire heating system. This effect is especially noticeable when using a battery consisting of 15 sections, therefore, when connecting multi-section radiators, it is better to give preference to a different circuit.
Adapter for bottom one-sided radiator connection
In recent years, bimetallic radiators have become increasingly popular; they can be connected in a diagonal (also called cross) pattern. The essence of this scheme is that the liner is connected from above, and the branch is connected from below, but on the other side. With this installation, the liquid is more evenly distributed throughout the battery, which means the loss of its power is minimized.
Diagonal connection of heating radiators
On a note! When using a diagonal scheme, it is necessary to take into account how the outlet/supply pipes are located. After all, if the inlet is made from below and the outlet from above, then the radiator can lose over 50% of its power.
Diagonal diagram for connecting heating radiators with a two-pipe and one-pipe system
Sometimes the diagrams described above are not used indoors for one reason or another. Then only the bottom connection , which creates a through passage of the coolant; It is obvious that in this case the liquid does not reach the upper sections of the radiator, which is why heat transfer can decrease by 15%. However, this scheme is often used in private houses with individual heating. And heat transfer can be replenished through distribution pipes.
Heating radiator design
Is it worth using a one-pipe heating system?
When laying pipes, a 2-pipe heating system is often used. Schematically, it can be represented in the form of 2 circuits, one is responsible for supplying hot water to the radiators, and the second is responsible for removing the cooled coolant and supplying it to the boiler. This approach allows you to organize the circulation of water of the same temperature in all batteries.
A significant disadvantage of this method of organizing heating is the financial cost of pipes (the price of installing such heating will be approximately 1.5-2 times more than single-pipe heating), and the labor intensity increases. In addition, the pipes will be more difficult to disguise.
The single-pipe scheme does not imply the presence of a separate riser for the removal of cooled coolant, that is, approximately half as many pipes will be required. Schematically, it can be represented as a closed loop, and the connection of radiators with a single-pipe heating system is made in series.
Comparison of one- and two-pipe heating systems
Such a system began to be widely used during the construction boom during the USSR, and then its significant shortcomings were discovered:
the main thing can be considered that the last batteries in the circuit receive a coolant with a temperature approximately 30-50% lower than those closest to the boiler, this leads to the fact that the rooms are heated extremely unevenly;
Note! This drawback can be easily solved by increasing the number of sections of the latest radiators. But when constructing a large number of objects, this will lead to an increase in calculations, which is not very convenient
- You will need a fairly powerful pump; it will not be possible to organize the movement of coolant by gravity;
- it is characterized by large heat losses;
- startup of the system takes longer than in the case of a two-pipe system;
- When doing work with your own hands, the risk of air locks occurring during operation is especially high. It’s just that quite often it is not possible to maintain the required slopes along the entire length of the pipes.
The listed list of disadvantages is typical for a conventional one-pipe heating system. Nowadays, most of the listed shortcomings are successfully eliminated by installing simple devices. For example, it is already possible to regulate the temperature in individual batteries, and installing balancing valves will make it possible to achieve almost identical operating conditions for all batteries in the circuit.
Considering the significant savings on materials, such a heating system design definitely deserves attention.
Key Points of Bottom Connection
So, we found out that this scheme allows you to hide pipes from prominent places and is used mainly in private homes. The pipes connected to the radiator go to the floor, which frees up some space, and the room itself looks more neat and noble. Today you can buy 2 types of batteries with this connection - these are panel and steel devices.
Bottom radiator connection
They can have either 1 or 3 heating panels. The more of them, the warmer the room will be, and therefore when choosing devices it is necessary to take into account the area that needs heating.
Important! Steel radiators, when compared with analogues, are easy to install and take up little space. Ideal for any room. Panel models have already installed thermostatic fittings, as well as a connection point.
Bottom connection node
What radiators are used
The advantages of steel panel radiators include light weight and attractive external characteristics.
For bottom connections, there are some requirements that the radiators must meet, since in this case the coolant is distributed over a continuous area and the usual sectional designs will not be suitable here.
Panel
Made from aluminum alloys. Special U-shaped fins increase the heating area and heat transfer. The front side is made in the form of a solid panel. The main advantages of such a battery include: light weight, attractive external characteristics, energy savings, low price, wide range of models, durability.
For social institutions: hospitals, schools, kindergartens, special options are produced with a smoother surface, which facilitate regular maintenance.
Made from profiled steel
Tubular radiator made of steel profile pipe.
Simple in design, rectangular panels can be of different sizes. The battery consists of several plates connected by welding, inside of which there are vertical oblong channels designed for the circulation of hot liquid. To increase heat transfer, U-shaped steel fins are used.
Such a battery has a number of advantages: long service life, more than 25 years, compatibility with most types of boilers, there are no strict restrictions on the choice of coolant, aesthetics, ease of installation.
Since radiators made of profiled steel are prone to rapid contamination, it is recommended to install dirt filters in parallel during installation.
When purchasing a design, it is important to take seriously the quality of the coating, which should well protect the selected specimen from corrosion and maintain its original characteristics over many years of operation under intense thermal influences, where the maximum temperature reaches 130°C.
Types of panel radiators
Such batteries are:
- hygienic;
- smooth;
- profile.
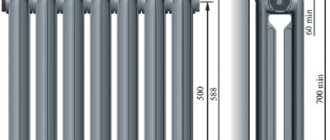
Dimensions of steel panel radiators of various types.
The first two types are intended for hospitals, schools and kindergartens. The most popular manufacturers of such models are Purmo and Kermi.
Steel panel radiators PURMO COMPACT
As for profile batteries, they are made of sheet steel and coated on the outside with a special powder coating. They are also coated with neutral anti-corrosion varnish, and therefore can last for many years. Note that such radiators can be of any color.
Bimetallic heating radiators
Tubular steel batteries are better than panel ones, because they can be turned over on either side (in this case, panel models are purchased with a specific connection). The coolant in tubular models is supplied directly to the outer section, which is very good if you need to replace old batteries with new ones.
Steel tubular radiator
What is a radiator connection unit?
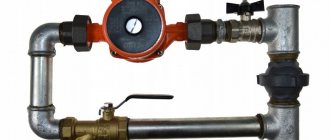
A radiator connection unit with a bottom connection is an N-shaped piece of plumbing fittings with two parallel fittings located at a distance from the seats of a steel panel radiator, and a rigid jumper between them. A typical part has, on one side, a fitting into a pressed-in union nut with a gasket (American connector) with an internal diameter of 3/4 inch, and on the other side, a 3/4 inch external thread is applied to the fitting.
Inside each of the inputs there is a shut-off ball valve or screw valve, which allows you to regulate or shut off the incoming coolant; when removing the battery during its repair or replacement, a shut-off function is used.
Advantages of this connection scheme
This type of connection allows for easy concealment of pipes, and the loss of efficiency will be insignificant. The radiator will heat up faster and stronger from below than from above, which is explained by the rapid flow of coolant through it.
Bottom connection
Sometimes efficiency may be reduced due to air accumulation or blockages. Warming up with the lower connection, as noted earlier, is uneven, but it is still no worse than the upper one.
Note! When installing batteries - regardless of the circuit used - you must comply with all installation requirements. First of all, this refers to the proportions between the width of the battery and the window.
Video - What are the benefits of batteries with bottom connections?
Features of the diagonal connection scheme
If you also wondered why a diagonal connection is the most effective, then you should consider this option in more detail.
If we take into account the process where hot air or water is involved, then the action will occur according to one physical law, which involves the rise of warm masses upward, while the cold ones sink downwards
To ensure uniform heat distribution throughout the volume of the radiator, the coolant should be distributed throughout the battery. As mentioned above, lateral connection in city apartments acts as the main circuit. After all, forced circulation under high pressure is used there. The diameter of the incoming and outgoing pipes is only 20 mm. Through them, water enters the battery under high pressure, which allows the device to be filled evenly and quickly.
If we are talking about private housing construction, where the circulation is natural, the filling of radiators occurs under the influence of the above-mentioned physical law. That is why hot streams penetrate through the upper pipe, pushing cold water through the lower outlet on the opposite side. The two pipes are located diagonally when viewing the device. This is where the name of the connection comes from. The coolant fills the battery gradually, releasing heat to the entire volume. It is necessary to take into account not only the law of heat transfer, but also the physical law. That is why this scheme is the most effective.
Nuances of installing radiators
The most important thing during installation is to do everything in the original packaging so as not to damage the external coating of the radiators. In addition, it is important not to confuse the supply and return. If the entrance and exit are located at different ends, then you cannot make a mistake - to do this, just study the markings. But if they are on one side, you need to act carefully and carefully! An error may result in an incorrect connection, which could result in a power reduction of up to 60% (the exact value will vary depending on the model selected).
Bottom connection unit with bypass
On a note! Each model with a bottom connection has a thermostatic insert that allows you to easily regulate the temperature of the device. This feature affected the cost - it is, on average, 10% higher than other batteries.
Calculator for calculating the number of heating radiator sections
Go to calculations
Not everyone will like this “web of pipes” created for the most efficient connection of the battery
Manufacturers and cost
The best companies producing heating radiators with bottom connections are considered to be German (such as Kermi) or Finnish (PURMO). But also good devices are produced in Austria, Italy and even in the CIS countries.
If we talk about cost, then on average a good radiator will cost about 4500-5000 rubles.
Bottom liner options
There are only two of these, let’s get acquainted with the features of each of them.
Table. Bottom pipe options.
| Name, photo | Short description |
| One-sided | In this case, both pipes are connected on one side. The hot coolant enters through the top plug, and the cooled coolant is discharged through the bottom. |
| Versatile | The entrance and exit, as you might guess from the name, are on different sides. This connection option is ideal for individual heating systems. The good thing about this option is that hot water can flow in any direction, plus the length of supply and return is shorter here. |
Choosing a location and method of installing a radiator
Options for connecting heating radiators depend on the general heating scheme in the house, the design features of heating devices and the method of laying pipes. The following methods of connecting heating radiators are common:
- Lateral (unilateral). The inlet and outlet pipes are connected on one side, with the supply located at the top. The standard method for multi-storey buildings, when the supply is made from a riser pipe. In terms of efficiency, this method is not inferior to the diagonal one.
- Lower. In this way, bimetallic radiators with a bottom connection or a steel radiator with a bottom connection are connected. The supply and return pipes are supplied from below on the left or right side of the device and are connected through the lower radiator connection unit with union nuts and shut-off valves. The union nut is screwed onto the lower radiator pipe. The advantage of this method is that the main pipes are hidden in the floor, and heating radiators with bottom connections fit harmoniously into the interior and can be installed in narrow niches.
The advantage of most steel radiators with a bottom connection is that they already have a built-in thermostatic valve for installing a thermostatic head, so you shouldn’t be surprised that they cost a little more than radiators of the same size with a side connection.
- Diagonal. The coolant enters through the upper inlet, and the return is connected from the opposite side to the lower outlet. The optimal type of connection ensures uniform heating of the entire battery area. In this way, correctly connect a heating battery whose length exceeds 1 meter. Heat loss does not exceed 2%.
- Saddle. The supply and return are connected to the lower holes located on opposite sides. It is used primarily in single-pipe systems when no other method is possible. Heat loss as a result of poor coolant circulation in the upper part of the device reaches 15%.
When choosing a location for installation, several factors are taken into account to ensure the correct operation of heating devices. Installation is carried out in places least protected from the penetration of cold air, under window openings. It is recommended to install a battery under each window. The minimum distance from the wall is 3-5 cm, from the floor and window sill - 10-15 cm. With smaller gaps, convection worsens and the battery power drops.
Typical mistakes when choosing an installation location:
- The place for installing control valves has not been taken into account.
- A small distance to the floor and window sill prevents full air circulation, as a result of which heat transfer is reduced and the room is not heated to the set temperature.
- Instead of several batteries located under each window and creating a thermal curtain, one long radiator is chosen.
- Installation of decorative grilles and panels that prevent the normal spread of heat.
Coolant circulation methods
Coolant circulation through pipelines occurs naturally or forcedly. The natural (gravity) method does not involve the use of additional equipment. The coolant moves due to changes in the characteristics of the liquid as a result of heating. The hot coolant entering the battery, cooling, acquires greater density and mass, after which it sinks down, and a hotter coolant takes its place. Cold water from the return flow flows by gravity into the boiler and displaces the already heated liquid. For normal operation, the pipeline is installed at a slope of at least 0.5 cm per linear meter.
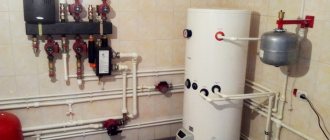
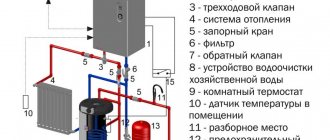
Scheme of coolant circulation in the system using pumping equipment
For forced supply of coolant, the installation of one or more circulation pumps is required. The pump is installed on the return pipe in front of the boiler. The heating operation in this case depends on electrical power, but has significant advantages:
- The use of small diameter pipes is allowed.
- The line can be installed in any position, vertically or horizontally.
- Requires less coolant volume.
Bottom connection methods
Next, we will consider exactly how radiators can be connected to the heating system.
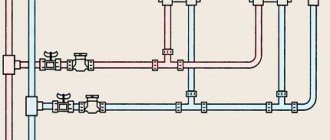
Bottom connection in a two-pipe system
Method No1. With side outlets
The connection is easy to make; the pipes in this case are located below - in the floor or under it. The radiator can be removed without stopping the entire heating process, but for this, shut-off valves are mounted on both sides. And an air vent is placed on top (on either side).
Double-sided bottom connection
Method No2. Using an adapter
If it is not possible to connect pipes to the radiator on both sides, then the problem can be solved by using an adapter. It is screwed into the lower hole, and a stainless steel tube is passed to the upper hole. The heating pipes are connected to the adapter itself from below.
Installation of the radiator bottom connection unit
On a note! You can learn more about this method from the video below.
Video - How to connect a sectional radiator from below
Method No3. With flow extender
The extension cord must be screwed into the lower hole without any bends to the upper one. The coolant circulates due to the fact that, passing through the middle of the device, it comes out at its end and rises, thereby squeezing out the cold liquid through the outlet located in the device.
Radiator guide or duct extension
Important! This connection option is not suitable for a gravity heating system.
Operating principle of a flow extender for a heating radiator
Single-pipe and two-pipe heating systems
Depending on the number of pipelines, systems are single-pipe, double-pipe and radial. In a one-pipe system, the coolant is supplied through one pipe, passes through the channels of the battery, gives off some of the heat, and flows back into the same pipe. The only advantage of such a system is ease of installation and a minimum amount of consumables. Thanks to these features, this installation scheme is used in the construction of multi-storey standard houses. Radiators are connected in series; accordingly, in devices remote from the boiler, the temperature of the coolant decreases. If the supply and return in the heating system are made by one pipe (lateral connection of the heating radiator from a vertical riser), it is impossible to regulate the temperature of a separate device, since narrowing or blocking the flow will affect the operation of all subsequent batteries. To ensure this possibility, it is necessary to install a jumper between the supply and return pipes.
In two-pipe systems, two pipes, supply and return, are separately connected to each battery. This increases pipe consumption, but the system works much more efficiently. It is recommended to connect a radiator to a two-pipe heating system diagonally, but other connection methods can be used depending on the location of the pipelines. The two-pipe system has several advantages:
- Natural and forced coolant circulation can be used.
- A heating connection diagram of any complexity can be used, taking into account the architectural features of the building.
- The temperature adjustment of each device is carried out separately and does not affect the operation of the system as a whole, which allows you to maintain different temperatures in individual rooms.
Collector wiring (radial system) involves supplying coolant to each battery (or room) directly from the boiler. The temperature of the devices is controlled using manifold control valves. This wiring method allows you to connect a heated towel rail or heated floor system to the heating system, regardless of the radiators.
Manifold for routing heating system pipes
Collector wiring allows you to balance and adjust the system with a high degree of accuracy, however, in addition to its advantages, it also has many disadvantages:
- Expensive. The pipe flow rate increases significantly and the installation of additional equipment (manifold, hydraulic separator) is required.
- The pipe is laid in the screed in solid sections; joints in the screed are not allowed.
- Natural circulation is not enough; a circulation pump must be installed on each circuit. The use of electrical equipment makes the system dependent on power supply.
- Restrictions when choosing the type of pipe. Usually a metal-plastic pipe or cross-linked polyethylene is used. Connecting a radiator to polypropylene pipes, which are affordable, is impossible in this case.
Using radiators with bottom connections
This method is not only the most effective, but also the most aesthetically acceptable. The advantages of this connection include:
- possibility of installing a flow direction adapter;
Flow direction adapter
- no need to purchase a suitable thermostat - it is already on the radiator;
- the fact that both pipes from the battery go into the wall or floor.
Piping in the wall
However, there are also disadvantages, including:
- the need to install an air vent on each radiator;
- the need for constant use of a circulation pump;
- less uniform heating, lower efficiency;
- impossibility of use for gravity heating systems.
You need to bleed the air from the battery
Advantages and disadvantages
The advantages of the bottom connection of a bimetallic radiator include:
- Aesthetic appearance.
With this connection scheme, the pipes are easier to hide. For example, this can be done by hiding them under the floor, in the wall, or under the baseboard. - Easy to install.
The pipes are connected directly, with this option there are few bends, turns, etc. Thus, the coolant flows without significant obstacles. - The price of the lower connection diagram is less than the others;
- The lower connection system is more stable, meaning it is difficult to unbalance.
Rice.
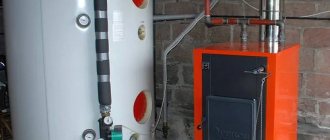
3 Panel models of bimetallic radiators Disadvantages of bottom connection:
- If, to achieve an aesthetic appearance, pipes are laid under the floor, it will be very difficult to eliminate the leak. The floor will need to be removed. In an apartment building, such a system is not connected, since there is a central heating system.
- The level of heat transfer from radiators with the lower connection scheme is somewhat less than with other connections.
As for the low heat transfer, this can be explained by the design of the channels in bimetallic radiators. Hot coolant is supplied to the battery and very quickly heats its lower part. The top of the battery warms up due to the convection process. Thus, the top of the battery may not be completely heated, and air will constantly collect there.
This also applies to the situation when the coolant consists of water and antifreeze (Fig. 4). Antifreeze is heavier than water and is always at the bottom, while water will rise up. Thus, with a lower connection scheme, the circulation of the coolant inside the device is disrupted. This leads to low heat transfer and ineffectiveness of the lower connection circuit.
Rice. 4 Coolant circulation with antifreeze
How to properly connect a bimetallic radiator? Of course, to do this you need to have certain knowledge and skills. Correct connection of a bimetallic heating device requires following certain rules. It should be noted that it is better to connect the lower pipe circuit at the beginning of the repair work. Since this liner is done purely for its aesthetic appearance, the pipes go either under the floor or in the wall.
All distances must be strictly observed, for example, from the floor to the radiator the correct distance should be at least 15 cm, between the wall and the device at least 2 cm.
Next, using a level, you need to accurately mark out the locations for the brackets. It is better to install the radiator on a stand and put a level on top, then you can be sure that all measurements are made correctly. Brackets, as a rule, come complete with a bimetallic heating device. The number of these fasteners must correspond to the size of the device.
Rice. 5 Correct ways to connect pipes to a bimetallic radiator
To connect the pipes correctly, it is important not to confuse the supply and return. To prevent this from happening, you need to carefully study all the inscriptions, since there is a corresponding marking on the radiator
If a bimetallic heating radiator is connected incorrectly, heat transfer is reduced significantly, namely by 60%. Of course, the model of the heating device also depends on this.
The lower tubes, which are L-shaped, must be strengthened, but only after checking the entire system. This is usually done using polyurethane foam.
Installation and connection of bimetallic radiators must be done in protective packaging
This is very important, because if the paint on the radiator is damaged, an irreversible process may occur. The paint will continue to swell due to damage.
If this happens, you need to purchase special enamel-based paint and treat the scratch. The packaging must be on the radiator before connection.
All component plugs and taps must be included with the radiator, but this needs to be clarified with a consultant in the store. Namely, this is the Mayevsky tap and plugs for another collector. The Mayevsky tap should be installed correctly with a torque wrench so as not to overtighten the connection and damage the tap. Under no circumstances should the connections be cleaned with anything, as a leak may appear when the system is started.
Rice. 6 Design of a bimetallic device with a bottom connection
Battery Location Requirements
Regardless of which connection method is chosen, the radiator should be located:
- 5 cm from the wall;
- 10 cm from the window sill (a distance of at least 5 cm can be allowed);
- 10 cm from the floor surface (a slight deviation is possible - maximum 2 cm).
How to install heating radiators correctly
On a note! When purchasing fasteners, consider the thickness of the foil thermal insulation (if provided). In this case, the length of the locking hooks should be slightly longer.
Radiator location standards are observed
Reinforcement elements and consumables
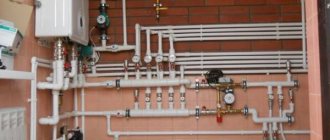
Installation of batteries, to which the pipelines are connected from below, is not difficult. However, the process is carried out using special fittings. Its type is selected for the installed radiators.
Bottom connection of the heating battery with polypropylene or other pipelines involves the use of a set of adapters. They are selected according to the material of the connected pipes. Typically solder sleeves and press fittings are used. If polypropylene pipes are connected, it is recommended to use “American” threads.
Completed lower piping of the heating device using a set of fittings and adapters Source remontnik.ru
On a note! Adjustment fittings are rarely installed under heating equipment. It is usually located on the manifold.
If a lateral pipe supply is made from below, a control and thermostatic valve is installed on the heater. Installation of fittings is carried out using threads.
On a note! When installing any room heating device, 2 shut-off valves are installed. They allow you to turn off and remove heating equipment without stopping the operation of the heating circuit of the house.
When installing the battery, radiator plugs and air vents are also used, which are often Mayevsky taps. To seal threaded connections, tow is usually used together with a special paste.
Manual air vent - Mayevsky tap Source eurobion.info
About special radiators designed for the lower connection scheme
As noted earlier, special batteries with bottom connections are sold today. Their design is such that optimal heat transfer is ensured. Radiators consist of a pair of steel plates connected to each other by welding, thereby forming technological channels for the movement of working fluid. The plates are varnished in two layers for high-quality protection against corrosion.
Bimetallic radiators Titan (Marek) 500/96 with bottom connection
To connect the radiator with your own hands, you need to prepare:
- L- or T-shaped tubes;
- building level;
- multiflex nodes;
- FUM tape;
- thermal insulation;
- pipe cutter;
- nuts in the required quantity.
It is advisable that the bottom connection of the batteries be made in the early stages of renovation of the apartment/house, because the pipes in this case are laid inside the floor (or wall). Keep this in mind when planning the installation of a concrete floor screed.
It is better to connect the radiator in the early stages of repair
Note! Each battery model with a bottom connection can have its own mounting kit or its own unit, thanks to which you can mount the device on the wall.
If for one reason or another the pipes cannot be laid into the floor, then in the future they can be covered with a plinth or plasterboard box.
Skirting for radiator pipes
We connect heating radiators correctly
Regardless of the type of radiators chosen and the connection diagram suitable for them, it is important to calculate and install everything correctly. Each specific case will have its own optimal system.
For expensive houses with a large area, it is advisable to contact specialists who can offer the optimal design. This is not an issue to skimp on.
Each specific case will have its own optimal system. For expensive houses with a large area, it is advisable to contact specialists who can offer the optimal design. This is not an issue on which you need to skimp.
In order to properly install and connect heating devices in complex design schemes, it is better to use the services of professionals
For small residential houses, you can independently choose a suitable scheme and install heating devices. It is imperative to take into account the features of your home, the rules for installing batteries and the feasibility of using one or another scheme.
When installing radiators, do not forget that the type of material for the battery itself and the pipes must be the same. Plastic pipes connected to cast iron heating devices will cause many problems, ruining the heating system.
When installing heating radiators yourself, you should not forget to install ball valves for bleeding air and a regulator at the inlet
Features of installing radiators with bottom connections
The installation process is determined by which scheme is chosen. So, the pipeline can be laid:
- in the wall;
- in the floor;
- between the radiator and the floor.
On a note! The efficiency of the heating system does not depend on the location of the pipes - they are hidden for aesthetic reasons.
The connection is made using special fittings.
First, radiators are installed, having previously calculated their number for each room, after which pipes are supplied to them.
If you follow the advice from this article, you will not encounter any difficulties.
Piping to the room heater
Currently, the best piping options are polypropylene and cross-linked polyethylene pipes. They are reliable and have an attractive appearance. Experts do not recommend using steel pipelines for wiring the heating system.
Pipes connected to the battery from below are often laid under the floor covering or even along the ceiling of the floor below. For this installation method, steel pipelines are not the best option. The optimal solution, proven in practice, is tying heating radiators with polypropylene. A good solution is also to use copper and PEX piping for heating distribution.
Polypropylene pipe for heating system Source vyborexperta.ru
The use of insulation on pipes also has its own characteristics:
- the absence of thermal insulation protection will provide additional heating of the room;
- the presence of thermal insulation will reduce heat loss - this is an important nuance if the pipelines are laid in the suspended ceiling of the floor below;
- the thermal insulation layer replaces the damping material when heating is installed in the screed - the insulation compensates for the thermal expansion of the polymer, which allows the plastic to expand in any direction without negative consequences.
Thermally insulated heating pipes laid in a screed Source odstroy.ru
Before installing pipelines, be sure to determine the exact location of the heating devices. Their horizontal displacement is unacceptable, unlike height. The reason for this is the lack of a swivel fitting above the floor covering.
Usually only small straight sections of piping are above the surface. They are connected to the heater taps. The exception is batteries that are tied from below using knots that provide lower side connection to the pipes. This option assumes that the pipeline outlets are located at a distance of approximately 120 mm from the fittings.
Master Class. We connect the radiator from the floor using L-shaped tubes
L-shaped tube
Step 1. Installation begins with the installation of the nipple.
Nipple installation
Step 2. Then the block of ball valves is installed.
Installation of ball valve block
Step 3. Place the threaded clamp onto the L-shaped tube.
Threaded clamp connection is put on
Step 4: Now the L-shaped tube is flared using a tool.
The L-shaped tube is flared using a tool
As a result, the rubber seal no longer slips off the tube into the Eurocone.
Now the seal does not slip off the tube
Step 5. The tubes are installed in the fixing angle.
Installation of tubes in the fixing angle
Step 6. Next, the tubes are inserted into the block of ball valves and baited.
Baiting tubes
Step 7. A hole is marked for attaching the fixing angle, after which the tubes are dismantled.
The future hole is marked. Removing the tubes.
Step 8. A hole is drilled in the floor according to the markings.
A hole is drilled in the floor
The kit with a fixing angle includes a dowel and a self-tapping screw. The dowel is driven into the hole made.
Dowel and screw The dowel is driven into the hole
Step 9. The L-shaped connecting tubes are installed back and fixed to the ceiling.
Fixing L-shaped tubes
Step 10. Take the pipe and connect it to the L-shaped connecting tubes. The thermal insulation on the pipe is moved back at least 2 lengths of the sliding sleeve. Then the sleeve is fixed.
Pipe for heating system
Thermal insulation is pushed back by 2 lengths of the sleeve Fixing the sleeve
Step 11: The connection is made. The end of the pipe is flared.
Note! In this example, a metal-polymer pipe is used, which is why the nozzle on the tool is green.
Green nozzle is used
Flaring the pipe The pipes are connected
Step 12. The pipes are attached to the ceiling using dowel hooks in increments of 50 cm. Thanks to this, the pipes will not float up when pouring the screed.
The pipes are attached to the floor with dowel hooks
What you need for efficient battery operation
An efficient heating system can save money on fuel costs. Therefore, when designing it, you should make informed decisions. After all, sometimes the advice of a neighbor in the country or a friend who recommends a system like his is not at all suitable.
It happens that there is no time to deal with these issues yourself. In this case, it is better to turn to professionals who have been working in this field for at least 5 years and have grateful reviews.
Correct connection is guaranteed to ensure comfortable living in the house for all family members. After all, when choosing a scheme, you need to take into account a number of features of your home
Having decided to independently connect heating radiators, you need to take into account that their efficiency is directly affected by the following indicators:
- size and thermal power of heating devices;
- their location in the room;
- connection method.
The choice of heating devices amazes the imagination of the inexperienced consumer. Among the offers are wall-mounted radiators made of various materials, floor and baseboard convectors. They all have different shapes, sizes, heat transfer levels, and connection types. These characteristics must be taken into account when installing heating devices into the system.
Among the models of heating devices on the market, it is better to choose based on the material and thermal power specified by the manufacturer
For each room, the number of radiators and their size will be different. It all depends on the area of the room, the level of insulation of the external walls of the building, the connection diagram, the thermal power indicated by the manufacturer in the product passport.
The location of the batteries is under the window, between windows located at a fairly long distance from each other, along a blank wall or in the corner of the room, in the hallway, pantry, bathroom, in the entrances of apartment buildings.
Depending on the location and method of installation of the heating device, there will be different heat losses. The worst option is a radiator completely covered with a screen
It is recommended to install a heat-reflecting screen between the wall and the heating device. You can make it yourself using one of the heat-reflecting materials - penofol, isospan or another foil analogue. Also, you should adhere to the following basic rules for installing a battery under a window:
- all radiators in one room are located on the same level;
- convector fins in a vertical position;
- the center of the heating equipment coincides with the center of the window or is 2 cm to the right (to the left);
- the length of the battery is at least 75% of the length of the window itself;
- the distance to the window sill is at least 5 cm, to the floor - no less than 6 cm. The optimal distance is 10-12 cm.
The level of heat transfer from devices and heat loss depends on the correct connection of radiators to the heating system in the house.
By following the basic standards for the placement of radiators, you can maximally prevent the penetration of cold into the room through the window
It happens that the owner of a home is guided by the advice of a friend, but the result is not at all as expected. Everything is done like his, but the batteries don’t want to heat up. This means that the selected connection diagram was not suitable specifically for this house, the area of the premises, the thermal power of the heating devices were not taken into account, or annoying mistakes were made during installation.
Master Class. We connect the radiator from the floor using T-shaped tubes
Also, T-shaped connecting tubes can be used to connect the battery from the floor. They are necessary if the line goes under the heating device. Let's look at this process step by step.
T-tube
Step 1. A threaded clamp connection is put on the tube.
Threaded clamp connection is put on
Step 2. After this, the tube is flared.
T-Tube Flaring
Step 3. Next, you can proceed directly to installing the tubes.
Installation of tubes
On a note! In the photo you see that the connecting tubes are installed in different directions.
The tubes are installed in different directions
Step 4. A connection is made using a sliding sleeve. The radiator is connected using T-tubes, and the line goes further to the next heating device.
The heating device is connected using T-tubes
Step 5. The exit of the pipes from the floor can be decorated using overlays in accordance with the finishing floor covering. Overlays can be made for different coatings.
Decorative overlay Example of using decorative overlays
If there are no high aesthetic requirements for the interior of the room, then you can use a budget connection option using a connecting set. This set is used for cross-linked polyethylene pipes without an aluminum layer.
Connection set
Inside this set there are guides and rings for fixing the pipe. This set is necessary to prevent threaded connections from loosening and to compensate for thermal expansion.
Guides
Ring for fixing the pipe
First, the ring is put on the pipe. Then the clamp is removed from the guide, the pipe is inserted into it and secured with a ring. The latch is inserted.
The ring is put on the pipe The pipe is fixed using the ring A clamp is inserted
The pipe is cut to the required length, after which a connection is put on it and installation is carried out to the heating device.
Cutting the pipe Putting on the threaded clamping connection Installation to the heating radiator
Decorative overlays are installed, pre-cut to size.
Mark the cut location Installation of decorative overlays
Using this element, the two parts are connected to each other.
This element is necessary to connect two parts
Connection of two parts
The connection kit is attached to the ceiling. That's it, the installation can be considered complete.
The kit is attached to the ceiling
Installation work completed
Polypropylene pipe piping
Before connecting aluminum radiators with polypropylene pipes, you should draw up a wiring diagram
When compiling it, it is important to avoid unnecessary nodes and “elbows” in the pipes, which will make the work more reliable
Piping can be carried out in both single-pipe and two-pipe heating systems, but taking into account the following nuances:
- In the first option, the installation of a bypass is required.
- With a two-pipe system, additional connecting elements are needed.
Polypropylene pipes can be connected in two ways:
- The most reliable is soldering. since the ends of the pipes and the tee are fastened so firmly that they become a single system that is not afraid of either high temperatures or increased pressure. Soldering is performed with a special tool.
- If you use fittings. for which no special devices are needed for fastening, you should be prepared that they will have to be tightened and checked regularly. This is due to the fact that when heated, the pipes expand, gradually weakening their “grip”. As soon as the fastenings become loose, leakage will follow.
In order for everything to be done correctly, you must follow the sequence of actions:
- Check that the cuts of the part of the harness that fits directly to the battery are even. If necessary, cut the pipe again.
- The next stage is soldering the parts of the trim that fit the fitting located at the top of the radiator. If you have a special soldering iron, even a beginner can carry out this procedure. It is enough to insert one part of the tee into the pipe, heat the joint with a soldering iron and hold them until the seam cools down. As a rule, this takes no more than 3 minutes. The same process is carried out on the second side of the tee.
- Assembling the lower part of the harness. which is connected to the lower fitting, is carried out in a similar way, only a larger number of adapters will be required.
- The locking device is connected to both parts of the harness. Why is the pipe unscrewed?
After the shut-off valves are connected, tighten all the nuts, having first screwed tow soaked with sealant onto the threads of the fitting.
If you decide to install aluminum radiators, it is important to know the following:
As practice shows, converting aluminum radiators for bottom connections is in great demand, especially in houses with autonomous heating. They look more aesthetically pleasing, heat the room evenly and quickly, but require some knowledge during installation, so it is recommended to trust their installation to professionals.
The importance of a competent approach to choosing a connection diagram
First of all, always pay attention to the radiator installation diagram. As a rule, it affects the functionality of the heating device and its efficiency. In addition, if the installation is performed incorrectly, thermoregulation will be disrupted and the pressure in the battery will increase, which will inevitably lead to operational problems. If you do the installation yourself, without the appropriate skills, you will encounter many problems and, most likely, ruin the interior of the room.
Radiator bottom connection unit
By giving preference to the lower connection, prepare for a slight decrease in the efficiency of the entire heating system. Although this is a small thing when compared with convenience and hiding the pipes. If you connect radiators correctly, they will save heating costs in the future and will serve you for many years!
Single-pipe scheme (apartment version)
This connection scheme is very common in apartment buildings (from 9 floors and above).
One pipe (riser) descends from the technical floor, passes through all floors and enters the basement, where it enters the return pipe. In such a connection system, there will be heat in the upper apartments, since, having passed through all the floors and given off the heat to the bottom, the water in the pipe will cool down.
And if there is no technical floor (5-story buildings and below), then such a system is “ringed”. One pipe (riser) rises from the basement, passes through all floors, goes through the apartment on the top floor to the next room and descends, also through all floors, to the basement. In this case, it is not known who is lucky. On the ground floor, in one room, it may be warm where the pipe rises, but in the next room it is cold, where the same pipe descends, giving off heat to all apartments.
Types of piping, or how to properly connect a heating battery
Providing heat to a house or apartment is task number one during the cold season. Therefore, every average person strives first to create an efficiently operating system that would be economically justified. And since most heating systems are of the radiator type, the question of how to properly connect heating batteries is one of the most pressing.
For many, this means nothing, especially for those who are faced with the problem of piping the heating system for the first time. But anyone who has already dealt with the creation of such schemes understands perfectly what we are talking about.
There are not so many classifications of types of piping and routing of a pipe system, especially when it comes to radiator piping. Therefore, it will not be very difficult to understand this issue. Most often, it is the pipe layout that influences the nature of the connection of battery radiators. Therefore, it is necessary to consider the classification of various heating systems and determine which of them is best suited for a particular connection.
Pipes for heating and water supply systems made of cross-linked polyethylene
The new material exhibits the properties of metals and polymers. Cross-linked polyethylene is a thermoplastic polymer with a three-dimensional structure.
The cross-linking technology creates an intermolecular network similar to a crystal lattice of substances in the solid state.
Thanks to this, flexibility is maintained, the melting point increases, resistance to thermal deformation, scratches and cracks. The material is designated PEX, where X means cross-linking.
Application in residential buildings
Cross-linked polyethylene is used for laying pipelines for external and internal engineering systems of residential buildings: heating, sewerage, hot and cold water supply.
Advantageous areas of application:
- Warm floor.
- Heating systems operating with coolants at low temperatures.
- Indoor water supply.
Photo 1. Installation of warm water floors with red cross-linked polyethylene pipes indoors.
- Heating with horizontal wiring.
- Gutters.
Important! Molecular modified polyethylene is environmentally friendly and safe: it does not emit toxic substances , therefore it is used for residential premises. When burned, it breaks down into compounds that are harmless to humans: carbon dioxide and water.
Technical properties
- Combustion temperature – 400° C.
- Melting – starts at 200°C.
- Average density – 940 kg/m3.
- Tension without breaking – in the range 350–800%.
- Maintains performance at temperatures down to –50° C.
- Thermal conductivity – 0.38 W/mK.
- Flexibility.
When used under standard conditions (coolant temperature within 75° C ), cross-linked polyethylene will last about 50 years. With constant use under extreme loads: high pressure, 95-degree coolant, the service life will be reduced to 15 years.
Standard sizes and diameter
PEX pipes are available in diameters of 10–280 mm and wall thicknesses of 1.7–29.0 mm . Supplied in coils in lengths of 6, 8, 10, 12 meters.
According to the degree of pressure resistance, cross-linked polyethylene pipes are divided into the following types:
- light: 0.25 MPa (2.5 Atm);
- medium light: 0.4 MPa (4 Atm);
- average: 0.6 MPa (6 Atm);
- heavy: 1 MPa (10 Atm).
The pressure indicated above is conditional, the data is valid when pumping water at 20° C.
Advantages and disadvantages
Polyethylene, cross-linked at the molecular level, retains the positive qualities of standard PE and acquires new advantages:
The disadvantages of cross-linked PE pipes include sensitivity to UV radiation and slow destruction under the influence of free oxygen penetrating into the structure from the air.
Attention! To prevent unwanted contact of PEX pipes with air, anti-diffusion protection . This coating should be handled with care so as not to scratch it during installation or transportation. Products are protected from ultraviolet radiation by special additives , which are included in the composition at the production stage.
The final stage is checking the tightness
After assembling the water supply system, heated floor, or heating circuit, be sure to carry out hydraulic testing (pressure testing). Fill the system with water, removing air, set the pressure to 1.5 times the working pressure, not lower than 6 atm . Maintain this value for 30 minutes.
Then quickly lower the pressure to half the worker's normal pressure. If after this the value increases, the cross-linked polyethylene communication is sealed. Leave the system with a pressure of 50% of the working pressure for 1.5 hours , if the value decreases during this time, then there is a leak.
Source